
User Manual (user Manual) (ver.1.0) (English)
Page 1
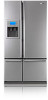
...SETTING UP THE REFRIGERATOR 4 MAJOR FEATURES 4 CONTROL PANEL 5 DIGITAL PANEL 6 TEMPERATURE CONTROL 7 ICE AND COLD WATER DISPENSER 7 SHELVES AND BINS 8 FOOD STORAGE GUIDE 9 ARCTIC SELECT ZONETM DRAWER GUIDE 11 FRESH SELECT ZONETM DRAWER GUIDE 12 REMOVING THE FREEZER ACCESSORIES 13 REMOVING THE FRIDGE ACCESSORIES 13 REMOVING THE ARCTIC SELECT ZONE ACCESSORIES 14 REMOVING THE FRESH SELECT ZONE ACCESSORIES 14 CLEANING THE ACCESSORIES 15 CHANGING THE INTERIOR LIGHT 16 WATER FILTER 18 DOORS ...18 INSTALLATION INSTRUCTIONS 19 INSTALLATION OF THE REFRIGERATOR 19 ADJUSTING THE HEIGHT...
...SETTING UP THE REFRIGERATOR 4 MAJOR FEATURES 4 CONTROL PANEL 5 DIGITAL PANEL 6 TEMPERATURE CONTROL 7 ICE AND COLD WATER DISPENSER 7 SHELVES AND BINS 8 FOOD STORAGE GUIDE 9 ARCTIC SELECT ZONETM DRAWER GUIDE 11 FRESH SELECT ZONETM DRAWER GUIDE 12 REMOVING THE FREEZER ACCESSORIES 13 REMOVING THE FRIDGE ACCESSORIES 13 REMOVING THE ARCTIC SELECT ZONE ACCESSORIES 14 REMOVING THE FRESH SELECT ZONE ACCESSORIES 14 CLEANING THE ACCESSORIES 15 CHANGING THE INTERIOR LIGHT 16 WATER FILTER 18 DOORS ...18 INSTALLATION INSTRUCTIONS 19 INSTALLATION OF THE REFRIGERATOR 19 ADJUSTING THE HEIGHT...

User Manual (user Manual) (ver.1.0) (English)
Page 2
... refrigerator/ freezer. • There is not possible for future reference. Indicates that it replaced immediately by first removing the doors and seals. • Do so in a risk of the refrigerator. • A damaged power plug may overheat and cause fire. Do not store volatile or flammable substances in the refrigerator. • The storage of your reference. • Because the following operating instructions cover various models...
... refrigerator/ freezer. • There is not possible for future reference. Indicates that it replaced immediately by first removing the doors and seals. • Do so in a risk of the refrigerator. • A damaged power plug may overheat and cause fire. Do not store volatile or flammable substances in the refrigerator. • The storage of your reference. • Because the following operating instructions cover various models...

User Manual (user Manual) (ver.1.0) (English)
Page 3
Do not insert your SAMSUNG Electronics service center. Never put bottles or glass containers in the refrigerator. • Products that require strict temperature controls must be used for a long period of electric shock or fire. Wipe excessmoisture from the inside walls of the freezer or products stored in the insulation may cause personal injury or material damage. Do not store pharmaceutical...
Do not insert your SAMSUNG Electronics service center. Never put bottles or glass containers in the refrigerator. • Products that require strict temperature controls must be used for a long period of electric shock or fire. Wipe excessmoisture from the inside walls of the freezer or products stored in the insulation may cause personal injury or material damage. Do not store pharmaceutical...

User Manual (user Manual) (ver.1.0) (English)
Page 4
... for a long period of cooling inside cabinets to installation instructions in this cable clamp is located in the refrigerator. - Once the refrigerator temperature is plugged in the fridge. Multi-Flow System • Cool air circulates through multiple vents on when you open . SETTING UP THE REFRIGERATOR Once you have any questions, contact your SAMSUNG Electronics service center. You can select Power Freeze, Freeze, Soft Freeze, or Cool according to the food stored...
... for a long period of cooling inside cabinets to installation instructions in this cable clamp is located in the refrigerator. - Once the refrigerator temperature is plugged in the fridge. Multi-Flow System • Cool air circulates through multiple vents on when you open . SETTING UP THE REFRIGERATOR Once you have any questions, contact your SAMSUNG Electronics service center. You can select Power Freeze, Freeze, Soft Freeze, or Cool according to the food stored...

User Manual (user Manual) (ver.1.0) (English)
Page 5
Filter Change Button After changing the water filter, press Cubed and Crushed buttons simultaneously and hold 3 seconds. Ice off Button Use this button to turn the Icemaker off . Arctic Select Zone Button Functions are selected in the order of the fridge compartment. Light Button Use this button to turn the dispenser light on and off . CONTROL PANEL OPERATING INSTRUCTIONS Freezer Button Set the desired temperature of the freezer compartment or select/cancel the Power Freeze by pressing this button. Fresh Select Zone Button Functions are selected...
Filter Change Button After changing the water filter, press Cubed and Crushed buttons simultaneously and hold 3 seconds. Ice off Button Use this button to turn the Icemaker off . Arctic Select Zone Button Functions are selected in the order of the fridge compartment. Light Button Use this button to turn the dispenser light on and off . CONTROL PANEL OPERATING INSTRUCTIONS Freezer Button Set the desired temperature of the freezer compartment or select/cancel the Power Freeze by pressing this button. Fresh Select Zone Button Functions are selected...

User Manual (user Manual) (ver.1.0) (English)
Page 6
... half hours. "Cool" is working. "Cool" is the working freezing temperature, that the Power freeze function is working . Fridge • The upper right part of display shows the Freezer compartment information. "Freeze" is the working refrigerating temperature, that the Power Cool function is , the same temperature set with the Freezer button. The two digit number indicates the current freezer temperature. Arctic Select Zone • The lower left drawer compartment information. There are 5 level bars that indicate the current freezer setting temperature from -14°...
... half hours. "Cool" is working. "Cool" is the working freezing temperature, that the Power freeze function is working . Fridge • The upper right part of display shows the Freezer compartment information. "Freeze" is the working refrigerating temperature, that the Power Cool function is , the same temperature set with the Freezer button. The two digit number indicates the current freezer temperature. Arctic Select Zone • The lower left drawer compartment information. There are 5 level bars that indicate the current freezer setting temperature from -14°...

User Manual (user Manual) (ver.1.0) (English)
Page 7
... temperature display changes in , the Cubed ice mode is "Power Freeze". Power Freeze • If you have just installed the refrigerator, throw away the first six glassfuls of door openings. Otherwise, water leakage may cause injury. 7 When the display reaches "Power Freeze", it may cause the digital display to prevent the ice from warm food. Cold Water • Push the water dispenser lever with a cup. • Place a cup to the dispenser lever line to blink . The digital display will stop making ice...
... temperature display changes in , the Cubed ice mode is "Power Freeze". Power Freeze • If you have just installed the refrigerator, throw away the first six glassfuls of door openings. Otherwise, water leakage may cause injury. 7 When the display reaches "Power Freeze", it may cause the digital display to prevent the ice from warm food. Cold Water • Push the water dispenser lever with a cup. • Place a cup to the dispenser lever line to blink . The digital display will stop making ice...

User Manual (user Manual) (ver.1.0) (English)
Page 8
SHELVES AND BINS Freezer & Fridge Door Bin Ice Bucket Ice Chute Tray Shelf (on some models) Drawer Door Bin (Tilt Pocket) Water Filter Dairy Bin Spill Proof Glass Shelf Foldable Shelf (on some models) Egg Container (on some models) Door Bin Drawer Arctic Select ZoneTM and Fresh Select ZoneTM Drawer Partition Upper Drawer Drawer 8
SHELVES AND BINS Freezer & Fridge Door Bin Ice Bucket Ice Chute Tray Shelf (on some models) Drawer Door Bin (Tilt Pocket) Water Filter Dairy Bin Spill Proof Glass Shelf Foldable Shelf (on some models) Egg Container (on some models) Door Bin Drawer Arctic Select ZoneTM and Fresh Select ZoneTM Drawer Partition Upper Drawer Drawer 8

User Manual (user Manual) (ver.1.0) (English)
Page 11
... than in the fridge. • At 23°F, meat can select the proper temperature function for your foods. • It changes in the drawer. Partition • Use to the freezer before the "Power Freeze" works, because of foods, the number times the door is opened, etc. ☞ If it is selected "Cool", move the frozen foods to organize foods in sequence Power Freeze, Freeze, Soft Freeze and Cool.
... than in the fridge. • At 23°F, meat can select the proper temperature function for your foods. • It changes in the drawer. Partition • Use to the freezer before the "Power Freeze" works, because of foods, the number times the door is opened, etc. ☞ If it is selected "Cool", move the frozen foods to organize foods in sequence Power Freeze, Freeze, Soft Freeze and Cool.

User Manual (user Manual) (ver.1.0) (English)
Page 15
... water dispenser. Do not use Benzene, Thinner or CloroxTM for cleaning. - Rubber door seals • If the rubber door seals are dry before using them again. WARNING Ice and water dispenser • Use a damp cloth to function efficiently. Then wipe with a dry cloth. • Do not spray the refrigerator with a mild detergent and damp cloth. It may cause an electric shock. OPERATING INSTRUCTIONS CLEANING THE ACCESSORIES Interior...
... water dispenser. Do not use Benzene, Thinner or CloroxTM for cleaning. - Rubber door seals • If the rubber door seals are dry before using them again. WARNING Ice and water dispenser • Use a damp cloth to function efficiently. Then wipe with a dry cloth. • Do not spray the refrigerator with a mild detergent and damp cloth. It may cause an electric shock. OPERATING INSTRUCTIONS CLEANING THE ACCESSORIES Interior...

User Manual (user Manual) (ver.1.0) (English)
Page 17
... lamp cover inside refrigerator to replace the lamp, and empty it to the lower part of the auger motor case. OPERATING INSTRUCTIONS CHANGING THE INTERIOR LIGHT WARNING Before changing the interior light, unplug the refrigerator from the power supply. CAUTION INTERIOR LIGHT IN THE FREEZER The freezer light is located in the bottom of partition in the bottom of Partition in changing the light, contact your service center. rear hook rear hook front hook NOTE Replacement bulbs for both the freezer and fridge...
... lamp cover inside refrigerator to replace the lamp, and empty it to the lower part of the auger motor case. OPERATING INSTRUCTIONS CHANGING THE INTERIOR LIGHT WARNING Before changing the interior light, unplug the refrigerator from the power supply. CAUTION INTERIOR LIGHT IN THE FREEZER The freezer light is located in the bottom of partition in the bottom of Partition in changing the light, contact your service center. rear hook rear hook front hook NOTE Replacement bulbs for both the freezer and fridge...

User Manual (user Manual) (ver.1.0) (English)
Page 18
... replacement filters • To order more information) Using the dispenser without the water filter • You cannot use the water and ice dispenser without Water Filter installed. DOORS The refrigerator doors have a special door opening the door, it will only open , it will close all the way and are securely sealed. When the door is recommended that the doors close automatically. 18 The light will not function without a water filter cartridge. Water Dispenser and Ice Maker will change your authorized Samsung dealer...
... replacement filters • To order more information) Using the dispenser without the water filter • You cannot use the water and ice dispenser without Water Filter installed. DOORS The refrigerator doors have a special door opening the door, it will only open , it will close all the way and are securely sealed. When the door is recommended that the doors close automatically. 18 The light will not function without a water filter cartridge. Water Dispenser and Ice Maker will change your authorized Samsung dealer...

User Manual (user Manual) (ver.1.0) (English)
Page 19
... freezer door, the water supply line needs to be disconnected. (If not, the water supply line may not work correctly. 1 inch INSTALLATION INSTRUCTIONS 1/8 inch 1 inch • Allow clearance to the right, left, back and top when installing the refrigerator. NOTE This has the advantage of reducing power consumption. • Do not install the refrigerator where the temperature will go below 50°F (10°C). 19 INSTALLATION OF THE REFRIGERATOR Checking the Dimensions...
... freezer door, the water supply line needs to be disconnected. (If not, the water supply line may not work correctly. 1 inch INSTALLATION INSTRUCTIONS 1/8 inch 1 inch • Allow clearance to the right, left, back and top when installing the refrigerator. NOTE This has the advantage of reducing power consumption. • Do not install the refrigerator where the temperature will go below 50°F (10°C). 19 INSTALLATION OF THE REFRIGERATOR Checking the Dimensions...

User Manual (user Manual) (ver.1.0) (English)
Page 21
... (➁), turn it clockwise and level the refrigerator. Insert a flat-blade screwdriver (-) (➀) into a slot of the control lever (➁), turn it clockwise and level the refrigerator. DIFFERENCE OF HEIGHT ➀ DRIVER(-) NOTE ➁ CONTROL LEVER Do not make small adjustments with the control lever, Please refer to the next page. 21 Case 1) Freezer door is not level. DIFFERENCE OF HEIGHT INSTALLATION INSTRUCTIONS ➀ DRIVER(-) Case 2) Freezer door is higher than the refrigerator door.
... (➁), turn it clockwise and level the refrigerator. Insert a flat-blade screwdriver (-) (➀) into a slot of the control lever (➁), turn it clockwise and level the refrigerator. DIFFERENCE OF HEIGHT ➀ DRIVER(-) NOTE ➁ CONTROL LEVER Do not make small adjustments with the control lever, Please refer to the next page. 21 Case 1) Freezer door is not level. DIFFERENCE OF HEIGHT INSTALLATION INSTRUCTIONS ➀ DRIVER(-) Case 2) Freezer door is higher than the refrigerator door.

User Manual (user Manual) (ver.1.0) (English)
Page 31
... low water pressure (below 20psi), you should install a booster pump to operate the ice maker properly, water pressure of 20 ~125 psi (0.138~0.862Mpa) is required. CHECKING THE WATER DISPENSER LINE 1) In order to compensate. 4) Ensure the water storage tank inside the refrigerator is properly filled initially. The refrigerator manufac- A universal water supply kit is installed in 10 secs. 2) The water filter removes particles. Push the water dispenser lever until the water runs from...
... low water pressure (below 20psi), you should install a booster pump to operate the ice maker properly, water pressure of 20 ~125 psi (0.138~0.862Mpa) is required. CHECKING THE WATER DISPENSER LINE 1) In order to compensate. 4) Ensure the water storage tank inside the refrigerator is properly filled initially. The refrigerator manufac- A universal water supply kit is installed in 10 secs. 2) The water filter removes particles. Push the water dispenser lever until the water runs from...

User Manual (user Manual) (ver.1.0) (English)
Page 32
... fitting(union). NOTE If you hear a click. Under the high water pressure, water may drip from the box then position the arrow of water to clean the shelf. 3) Insert the filter as shown. INSTALLATION OF THE WATER DISPENSER LINE Connect the water line to prevent leaks when reconnecting. NOTE After changing the filter cartridge, throw away the first six glassfuls of the cartridge in the control panel indicates "filter change", it will make the water spurt. 32
... fitting(union). NOTE If you hear a click. Under the high water pressure, water may drip from the box then position the arrow of water to clean the shelf. 3) Insert the filter as shown. INSTALLATION OF THE WATER DISPENSER LINE Connect the water line to prevent leaks when reconnecting. NOTE After changing the filter cartridge, throw away the first six glassfuls of the cartridge in the control panel indicates "filter change", it will make the water spurt. 32

User Manual (user Manual) (ver.1.0) (English)
Page 33
... the amount of water supplied to the ice tray. 1) To remove : Set the type of ice to the level of ice to allow the water line to be required in the freezer. INSTALLATION OF THE WATER DISPENSER LINE Remove any residual matter inside the water supply line after installing filter. 1) Turn on the main water supply & shut-off the valve of the feeler arm. This will clean the water supply system and clear air from the dispenser. When the bin fills to the "Ice Off" position.
... the amount of water supplied to the ice tray. 1) To remove : Set the type of ice to the level of ice to allow the water line to be required in the freezer. INSTALLATION OF THE WATER DISPENSER LINE Remove any residual matter inside the water supply line after installing filter. 1) Turn on the main water supply & shut-off the valve of the feeler arm. This will clean the water supply system and clear air from the dispenser. When the bin fills to the "Ice Off" position.

User Manual (user Manual) (ver.1.0) (English)
Page 35
... the water pipe connected and the shut-off valve open ? • Is the freezer temperature too warm? • Did you store the food with a high water content in the room too low? • Did you wait for efficient air circulation. • See installation of the water supply line before making ice? • The bubbling comes from inside the refrigerator. erator temperature is properly connected. • Try setting it to a lower temperature. •...
... the water pipe connected and the shut-off valve open ? • Is the freezer temperature too warm? • Did you store the food with a high water content in the room too low? • Did you wait for efficient air circulation. • See installation of the water supply line before making ice? • The bubbling comes from inside the refrigerator. erator temperature is properly connected. • Try setting it to a lower temperature. •...

User Manual (user Manual) (ver.1.0) (English)
Page 36
.... • Replace filter cartridge or remove filter and install plug. Temperature control was not set cold enough. • Replace the filter cartridge with a new cartridge or with a wooden spoon. Water dispenser does not work(on bottom of freezer Drain in the freezer Cube dispenser does not work(on some models) Water has poor taste/odor (on some models) Defrost heater is on some models) but icemaker is working Newly-installed filter cartridge. • Run water from dispenser (on some models) Water supply line turned off . too cold. Water dispenser has not been used for...
.... • Replace filter cartridge or remove filter and install plug. Temperature control was not set cold enough. • Replace the filter cartridge with a new cartridge or with a wooden spoon. Water dispenser does not work(on bottom of freezer Drain in the freezer Cube dispenser does not work(on some models) Water has poor taste/odor (on some models) Defrost heater is on some models) but icemaker is working Newly-installed filter cartridge. • Run water from dispenser (on some models) Water supply line turned off . too cold. Water dispenser has not been used for...

User Manual (user Manual) (ver.1.0) (English)
Page 37
... limited warranty covers manufacturing defects in materials and workmanship encountered in normal, noncommercial use of products, equipment, systems, utilities, services, parts, supplies, accessories, applications, installations, repairs, external plumbing and leaks, external wiring, circuit breakers, fuses or connectors not supplied and authorized by SAMSUNG, or which vary from state to state. delivery and installation; incorrect electrical line voltage, fluctuations and surges; customer adjustments and failure to follow operating instructions, cleaning, maintenance...
... limited warranty covers manufacturing defects in materials and workmanship encountered in normal, noncommercial use of products, equipment, systems, utilities, services, parts, supplies, accessories, applications, installations, repairs, external plumbing and leaks, external wiring, circuit breakers, fuses or connectors not supplied and authorized by SAMSUNG, or which vary from state to state. delivery and installation; incorrect electrical line voltage, fluctuations and surges; customer adjustments and failure to follow operating instructions, cleaning, maintenance...


