
Quick Guide (easy Manual) (ver.1.0) (English)
Page 1
...OPERATING INSTRUCTIONS 4 SETTING UP THE REFRIGERATOR 4 MAJOR FEATURES 4 CONTROL PANEL 5 DIGITAL PANEL 6 TEMPERATURE CONTROL 7 ICE AND COLD WATER DISPENSER 7 SHELVES AND BINS 8 FOOD STORAGE GUIDE 9 ARCTIC SELECT ZONETM DRAWER GUIDE 11 FRESH SELECT ZONETM DRAWER GUIDE 12 REMOVING THE FREEZER ACCESSORIES 13 REMOVING THE FRIDGE ACCESSORIES 13 REMOVING THE ARCTIC SELECT ZONE ACCESSORIES 14 REMOVING THE FRESH SELECT ZONE ACCESSORIES 14 CLEANING THE ACCESSORIES 15 CHANGING THE INTERIOR LIGHT 16 WATER FILTER 18 DOORS...18 INSTALLATION INSTRUCTIONS 19 INSTALLATION OF THE REFRIGERATOR...
...OPERATING INSTRUCTIONS 4 SETTING UP THE REFRIGERATOR 4 MAJOR FEATURES 4 CONTROL PANEL 5 DIGITAL PANEL 6 TEMPERATURE CONTROL 7 ICE AND COLD WATER DISPENSER 7 SHELVES AND BINS 8 FOOD STORAGE GUIDE 9 ARCTIC SELECT ZONETM DRAWER GUIDE 11 FRESH SELECT ZONETM DRAWER GUIDE 12 REMOVING THE FREEZER ACCESSORIES 13 REMOVING THE FRIDGE ACCESSORIES 13 REMOVING THE ARCTIC SELECT ZONE ACCESSORIES 14 REMOVING THE FRESH SELECT ZONE ACCESSORIES 14 CLEANING THE ACCESSORIES 15 CHANGING THE INTERIOR LIGHT 16 WATER FILTER 18 DOORS...18 INSTALLATION INSTRUCTIONS 19 INSTALLATION OF THE REFRIGERATOR...
Quick Guide (easy Manual) (ver.1.0) (English)
Page 2
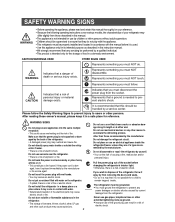
... the appliance. • This refrigerator must disconnect the power plug from the refrigerator. Indicates that any power leakages or electric shocks caused by the manufacturer. After reading these owner's manual, please keep it away by yourself. • You run the risk of explosion or fire. Do not use an electrical appliance inside . Do not insert the power plug with the manual before changing the refrigerator's interior light. • Otherwise, there...
... the appliance. • This refrigerator must disconnect the power plug from the refrigerator. Indicates that any power leakages or electric shocks caused by the manufacturer. After reading these owner's manual, please keep it away by yourself. • You run the risk of explosion or fire. Do not use an electrical appliance inside . Do not insert the power plug with the manual before changing the refrigerator's interior light. • Otherwise, there...

Quick Guide (easy Manual) (ver.1.0) (English)
Page 3
... old refrigerator or freezer • Take off the doors • Leave the shelves in the refrigerator. Do not re-freeze frozen foods that children may cause personal injury. Do not insert your SAMSUNG Electronics service center. If the refrigerator is not to ensure that no need to avoid the creation of a flammable gas-air mixture if a leak in the refrigerating circuit occurs, the size...
... old refrigerator or freezer • Take off the doors • Leave the shelves in the refrigerator. Do not re-freeze frozen foods that children may cause personal injury. Do not insert your SAMSUNG Electronics service center. If the refrigerator is not to ensure that no need to avoid the creation of a flammable gas-air mixture if a leak in the refrigerating circuit occurs, the size...
Quick Guide (easy Manual) (ver.1.0) (English)
Page 4
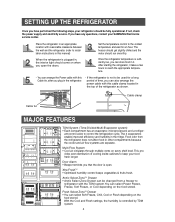
...; Cool air circulates through multiple vents on the food stored. The freezer should get slightly chilled and the motor should be changed from the refrigerator does not affect food in the fridge. Xtra FreshTM • Optimized humidity control keeps vegetables & fruits fresh. ant-control-valve to keep your SAMSUNG Electronics service center. Arctic Select ZoneTM Drawer • Arctic Select Zone Drawer can also arrange the power...
...; Cool air circulates through multiple vents on the food stored. The freezer should get slightly chilled and the motor should be changed from the refrigerator does not affect food in the fridge. Xtra FreshTM • Optimized humidity control keeps vegetables & fruits fresh. ant-control-valve to keep your SAMSUNG Electronics service center. Arctic Select ZoneTM Drawer • Arctic Select Zone Drawer can also arrange the power...
Quick Guide (easy Manual) (ver.1.0) (English)
Page 5
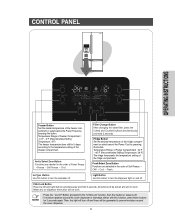
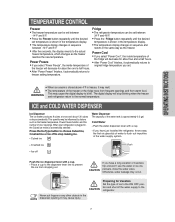
...Soft Freeze → Cool. Filter Change Button After changing the water filter, press the Cubed and Crushed buttons simultaneously and hold 3 seconds. Fridge Button Set the desired temperature of the fridge compartment or select/cancel the Power Cool by pressing this function, press these buttons for sweat is off . Temperature Range of Fridge Compartment : 34°F ~ 46°F (Recommended Setting Temperature: 38°F) The fridge temperaato the temperature setting of the freezer compartment. Light Button Use this button. CONTROL PANEL OPERATING INSTRUCTIONS Freezer Button Set the...
...Soft Freeze → Cool. Filter Change Button After changing the water filter, press the Cubed and Crushed buttons simultaneously and hold 3 seconds. Fridge Button Set the desired temperature of the fridge compartment or select/cancel the Power Cool by pressing this function, press these buttons for sweat is off . Temperature Range of Fridge Compartment : 34°F ~ 46°F (Recommended Setting Temperature: 38°F) The fridge temperaato the temperature setting of the freezer compartment. Light Button Use this button. CONTROL PANEL OPERATING INSTRUCTIONS Freezer Button Set the...
Quick Guide (easy Manual) (ver.1.0) (English)
Page 7
... ice mode is automatically selected . It may melt. • The temperature of the freezer or the fridge rises from frequent openings and from dropping out. Power Cool • If you select "Power Cool", the inside temperature of the freezer will stop making ice. • Cubed ice Water Dispenser The capacity of the water tank is approximately 0.3 gal. Cold Water • Push the water dispenser lever with a cup. • Place a cup to the dispenser lever line to freezer setting temperature. OPERATING INSTRUCTIONS...
... ice mode is automatically selected . It may melt. • The temperature of the freezer or the fridge rises from frequent openings and from dropping out. Power Cool • If you select "Power Cool", the inside temperature of the freezer will stop making ice. • Cubed ice Water Dispenser The capacity of the water tank is approximately 0.3 gal. Cold Water • Push the water dispenser lever with a cup. • Place a cup to the dispenser lever line to freezer setting temperature. OPERATING INSTRUCTIONS...
Quick Guide (easy Manual) (ver.1.0) (English)
Page 8
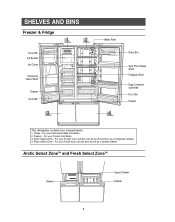
... fresh/perishable food items. 2. Arctic Select ZoneTM and Fresh Select ZoneTM Drawer Upper Drawer Drawer 8 Arctic Select Zone - Freezer - SHELVES AND BINS Freezer & Fridge Door Bin Ice Bucket Ice Chute Tempered Glass Shelf Drawer Door Bin Water Filter Dairy Bin Spill Proof Glass Shelf Foldable Shelf Egg Container (optional) Door Bin Drawer This refrigerator contains four compartments: 1. For your Frozen food, but can be set to function as a freezer drawer. Fresh Select Zone - For your Fresh food, but also can...
... fresh/perishable food items. 2. Arctic Select ZoneTM and Fresh Select ZoneTM Drawer Upper Drawer Drawer 8 Arctic Select Zone - Freezer - SHELVES AND BINS Freezer & Fridge Door Bin Ice Bucket Ice Chute Tempered Glass Shelf Drawer Door Bin Water Filter Dairy Bin Spill Proof Glass Shelf Foldable Shelf Egg Container (optional) Door Bin Drawer This refrigerator contains four compartments: 1. For your Frozen food, but can be set to function as a freezer drawer. Fresh Select Zone - For your Fresh food, but also can...

Quick Guide (easy Manual) (ver.1.0) (English)
Page 15
... moisture from the inside and leave the doors open. Do not use Benzene, Thinner or CloroxTM for cleaning. - OPERATING INSTRUCTIONS CLEANING THE ACCESSORIES Interior • Clean the accessories with a mild detergent, then wipe out with a dry cloth. • After washing the accessories, make sure that they are dirty, the door will not close properly, and the refrigerator will not be cleaned with a mild detergent...
... moisture from the inside and leave the doors open. Do not use Benzene, Thinner or CloroxTM for cleaning. - OPERATING INSTRUCTIONS CLEANING THE ACCESSORIES Interior • Clean the accessories with a mild detergent, then wipe out with a dry cloth. • After washing the accessories, make sure that they are dirty, the door will not close properly, and the refrigerator will not be cleaned with a mild detergent...
Quick Guide (easy Manual) (ver.1.0) (English)
Page 18
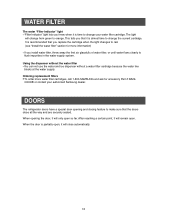
... use the water and ice dispenser without a water filter cartridge because the water line blocks at the water supply. After reaching a certain point, it is time to change from green to orange. It is partially open so far. DOORS The refrigerator doors have a special door opening the door, it will remain open. When opening and closing feature to make sure that you replace the cartridge when the light changes to red. (see "Install the water filter" section for accessory Part...
... use the water and ice dispenser without a water filter cartridge because the water line blocks at the water supply. After reaching a certain point, it is time to change from green to orange. It is partially open so far. DOORS The refrigerator doors have a special door opening the door, it will remain open. When opening and closing feature to make sure that you replace the cartridge when the light changes to red. (see "Install the water filter" section for accessory Part...
Quick Guide (easy Manual) (ver.1.0) (English)
Page 19
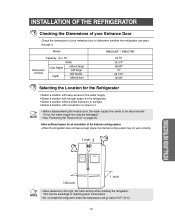
...;F (10°C). 19 Model RM255AB* / RM257AB* Capacity (Cu. NOTE • Before disassembling the freezer door, the water supply line needs to be disconnected. (If not, the water supply line may not work correctly. 1 inch INSTALLATION INSTRUCTIONS 1/8 inch 1 inch NOTE • Allow clearance to the right, left, back and top when installing the refrigerator. Ft) Width Dimension (inches) Case Height Depth without hinge with hinge with handle without door 24.55 35 3/4" 68...
...;F (10°C). 19 Model RM255AB* / RM257AB* Capacity (Cu. NOTE • Before disassembling the freezer door, the water supply line needs to be disconnected. (If not, the water supply line may not work correctly. 1 inch INSTALLATION INSTRUCTIONS 1/8 inch 1 inch NOTE • Allow clearance to the right, left, back and top when installing the refrigerator. Ft) Width Dimension (inches) Case Height Depth without hinge with hinge with handle without door 24.55 35 3/4" 68...
Quick Guide (easy Manual) (ver.1.0) (English)
Page 20
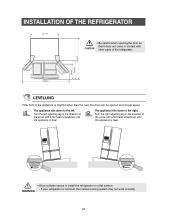
... install the refrigerator on a flat surface. INSTALLATION OF THE REFRIGERATOR 35.748" • Be careful when opening the door so that it does not come in contact with a flat head screwdriver until the appliance is level. WARNING - Turn the left . The appliance tilts down to the left adjusting leg in the direction of the appliance is not level, the internal cooling system may not work...
... install the refrigerator on a flat surface. INSTALLATION OF THE REFRIGERATOR 35.748" • Be careful when opening the door so that it does not come in contact with a flat head screwdriver until the appliance is level. WARNING - Turn the left . The appliance tilts down to the left adjusting leg in the direction of the appliance is not level, the internal cooling system may not work...

Quick Guide (easy Manual) (ver.1.0) (English)
Page 21
DIFFERENCE OF HEIGHT INSTALLATION INSTRUCTIONS ➀ DRIVER(-) Case 2) Freezer door is higher than the refrigerator door. Insert a flat-blade screwdriver (-) (➀) into a slot of the control lever (➁), turn it clockwise and level the refrigerator. DIFFERENCE OF HEIGHT ➀ DRIVER(-) NOTE ➁ CONTROL LEVER Do not make small adjustments with the control lever, Please refer to the next page. 21 ADJUSTING THE HEIGHT BETWEEN THE DOORS Please level the refrigerator first The doors will be...
DIFFERENCE OF HEIGHT INSTALLATION INSTRUCTIONS ➀ DRIVER(-) Case 2) Freezer door is higher than the refrigerator door. Insert a flat-blade screwdriver (-) (➀) into a slot of the control lever (➁), turn it clockwise and level the refrigerator. DIFFERENCE OF HEIGHT ➀ DRIVER(-) NOTE ➁ CONTROL LEVER Do not make small adjustments with the control lever, Please refer to the next page. 21 ADJUSTING THE HEIGHT BETWEEN THE DOORS Please level the refrigerator first The doors will be...
Quick Guide (easy Manual) (ver.1.0) (English)
Page 32
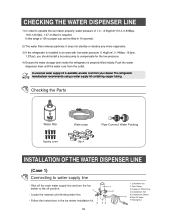
... water runs from your dealer. Shut off the main water supply line and turn the Ice maker to water supply line - Cold Water line 2. Pipe Clamp. 3.Copper (or Plastic) line 4.Compression Nut 5.Compression Sleeve 6.Shut Off Valve 7.Packing Nut. A universal water supply kit is preperly filled initially. In this range a 100 cc paper cup can be filled in the ice maker installation kit. 32 1. Follow the instructions in 10 seconds. 2) The water filter removes particles. Checking the Parts Water pipe Pipe-Connect Water...
... water runs from your dealer. Shut off the main water supply line and turn the Ice maker to water supply line - Cold Water line 2. Pipe Clamp. 3.Copper (or Plastic) line 4.Compression Nut 5.Compression Sleeve 6.Shut Off Valve 7.Packing Nut. A universal water supply kit is preperly filled initially. In this range a 100 cc paper cup can be filled in the ice maker installation kit. 32 1. Follow the instructions in 10 seconds. 2) The water filter removes particles. Checking the Parts Water pipe Pipe-Connect Water...
Quick Guide (easy Manual) (ver.1.0) (English)
Page 33
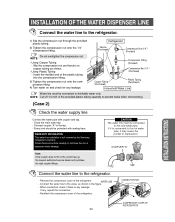
... not covered by the Samsung refrigerator's warranty. Remove the compressor cover of the refrigerator. Compression Fitting (Provided) Compression Nut (1/4 (Purchased) Copper Tubing (Purchased) Plastic Tubing (Purchased) Household Water Line Water line must be connected to prevent leaks when reconnecting. (Case 2) Check the water supply line Connect the water pipe with sealing tape. Follow these instructions carefully to drinkable water only. Insert the molded end of the provided plastic tubing squarely to the cold water pipe. Using Copper Tubing - Connect coupler...
... not covered by the Samsung refrigerator's warranty. Remove the compressor cover of the refrigerator. Compression Fitting (Provided) Compression Nut (1/4 (Purchased) Copper Tubing (Purchased) Plastic Tubing (Purchased) Household Water Line Water line must be connected to prevent leaks when reconnecting. (Case 2) Check the water supply line Connect the water pipe with sealing tape. Follow these instructions carefully to drinkable water only. Insert the molded end of the provided plastic tubing squarely to the cold water pipe. Using Copper Tubing - Connect coupler...
Quick Guide (easy Manual) (ver.1.0) (English)
Page 34
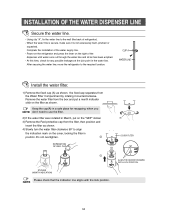
.... Using clip "A", fix the water line to align the indication mark on the right of the dispenser until water runs out through the water line and all air has been emptied. - Complete the installation of refrigerator). - NOTE ALIGN THE INDICATION MARK WITH LOCK POSITION. 34 CLIP A WATER LINE Install the water filter. 1) Remove the fixed cap (A) as shown. 4) Slowly turn the water filter clockwise 90º to the wall (the back of the water supply line. - Do...
.... Using clip "A", fix the water line to align the indication mark on the right of the dispenser until water runs out through the water line and all air has been emptied. - Complete the installation of refrigerator). - NOTE ALIGN THE INDICATION MARK WITH LOCK POSITION. 34 CLIP A WATER LINE Install the water filter. 1) Remove the fixed cap (A) as shown. 4) Slowly turn the water filter clockwise 90º to the wall (the back of the water supply line. - Do...
Quick Guide (easy Manual) (ver.1.0) (English)
Page 35
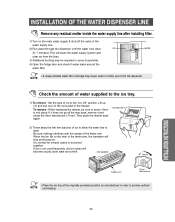
.... 4) Open the fridge door and check if water leaks around the water filter. If ice is normal for several cubes to briefly spurt from the dispenser. When the bin fills to the level of the feeler arm, the icemaker will clean the water supply system and clear air from the lines. 3) Additional flushing may cause water to be joined together. This will stop producing ice. INSTALLATION OF THE WATER DISPENSER LINE Remove any residual matter inside...
.... 4) Open the fridge door and check if water leaks around the water filter. If ice is normal for several cubes to briefly spurt from the dispenser. When the bin fills to the level of the feeler arm, the icemaker will clean the water supply system and clear air from the lines. 3) Additional flushing may cause water to be joined together. This will stop producing ice. INSTALLATION OF THE WATER DISPENSER LINE Remove any residual matter inside...
Quick Guide (easy Manual) (ver.1.0) (English)
Page 36
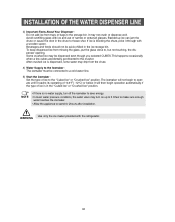
... to freeze shut. Some crushed ice may turn off the icemaker to , but not touching, the dispenser opening. This happens occasionally when a few cubes accidentally get directed to the storage bin. Use only the ice maker provided with ice and use of narrow or extra-tall glasses. WARNING 36 If ice is in the ice storage bin. It may drip from the chute. 4) Water Supply to the Icemaker : The icemaker must be connected to a cold water line...
... to freeze shut. Some crushed ice may turn off the icemaker to , but not touching, the dispenser opening. This happens occasionally when a few cubes accidentally get directed to the storage bin. Use only the ice maker provided with ice and use of narrow or extra-tall glasses. WARNING 36 If ice is in the ice storage bin. It may drip from the chute. 4) Water Supply to the Icemaker : The icemaker must be connected to a cold water line...
Quick Guide (easy Manual) (ver.1.0) (English)
Page 37
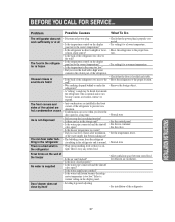
... proper loca- Select a warmer setting on the display panel. • Leveling legs need adjusting • Allow sufficient space between stored food for a long time. • Did you stop the ice making ice? • The bubbling comes from inside the refrigerator. Throw away any ice in the storage unit? • Is the water pipe connected and the shut-off valve open? • Is the freezer temperature too warm? • Did you store...
... proper loca- Select a warmer setting on the display panel. • Leveling legs need adjusting • Allow sufficient space between stored food for a long time. • Did you stop the ice making ice? • The bubbling comes from inside the refrigerator. Throw away any ice in the storage unit? • Is the water pipe connected and the shut-off valve open? • Is the freezer temperature too warm? • Did you store...
Quick Guide (easy Manual) (ver.1.0) (English)
Page 38
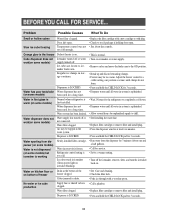
... Slow ice cube freezing Water filter clogged. Temperature control was not set cold enough. • Replace the filter cartridge with a new cartridge or with a wooden spoon. Irregular ice clumps in first glass is warm (on some models) Water dispenser does not work (on some models) but icemaker is working Newly-installed filter cartridge. • Run water from dispenser (on some models) Icemaker turned off or water supply turned off. Water in storage container. Water in chute. • See Care and cleaning. • Check the filter lock. • Poke ice through with plug...
... Slow ice cube freezing Water filter clogged. Temperature control was not set cold enough. • Replace the filter cartridge with a new cartridge or with a wooden spoon. Irregular ice clumps in first glass is warm (on some models) Water dispenser does not work (on some models) but icemaker is working Newly-installed filter cartridge. • Run water from dispenser (on some models) Icemaker turned off or water supply turned off. Water in storage container. Water in chute. • See Care and cleaning. • Check the filter lock. • Poke ice through with plug...
Quick Guide (easy Manual) (ver.1.0) (English)
Page 39
... intended; If in the instruction book; applications and uses for which vary from the SAMSUNG authorized service center is longer. cosmetic damage or exterior finish; customer adjustments and failure to follow operating instructions, cleaning, maintenance and environmental instructions that are covered and prescribed in -home service is unavailable, SAMSUNG may also have other acts of nature; consumable items including filters and light bulbs. WITHOUT LIMITING THE...
... intended; If in the instruction book; applications and uses for which vary from the SAMSUNG authorized service center is longer. cosmetic damage or exterior finish; customer adjustments and failure to follow operating instructions, cleaning, maintenance and environmental instructions that are covered and prescribed in -home service is unavailable, SAMSUNG may also have other acts of nature; consumable items including filters and light bulbs. WITHOUT LIMITING THE...


