
User Manual
Page 2
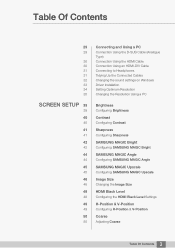
... A SOURCE DEVICE 28 28 Copyright Icons used in this manual Cleaning Cleaning Securing the Installation Space Precautions for storage Safety Precautions Symbols for safety precautions Electricity and Safety Installation and Safety Operation Correct posture to use the product Checking the Contents Removing the Packaging Checking the Components Parts Frontal Button Reverse Side Installation Attaching the Stand Removing the Stand Adjusting the Product Tilt Anti-theft Lock Before Connecting Pre-connection Checkpoints Connecting the Power...
... A SOURCE DEVICE 28 28 Copyright Icons used in this manual Cleaning Cleaning Securing the Installation Space Precautions for storage Safety Precautions Symbols for safety precautions Electricity and Safety Installation and Safety Operation Correct posture to use the product Checking the Contents Removing the Packaging Checking the Components Parts Frontal Button Reverse Side Installation Attaching the Stand Removing the Stand Adjusting the Product Tilt Anti-theft Lock Before Connecting Pre-connection Checkpoints Connecting the Power...
User Manual
Page 3
... HDMI Cable Connection Using an HDMI-DVI Cable Connecting to Headphones Tidying Up the Connected Cables Changing the sound settings on Windows Driver Installation Setting Optimum Resolution Changing the Resolution Using a PC Brightness Configuring Brightness Contrast Configuring Contrast Sharpness Configuring Sharpness SAMSUNG MAGIC Bright Configuring SAMSUNG MAGIC Bright SAMSUNG MAGIC Angle Configuring SAMSUNG MAGIC Angle SAMSUNG MAGIC Upscale Configuring SAMSUNG MAGIC Upscale Image Size Changing the Image Size HDMI Black Level Configuring the HDMI Black Level Settings H-Position & V-Position...
... HDMI Cable Connection Using an HDMI-DVI Cable Connecting to Headphones Tidying Up the Connected Cables Changing the sound settings on Windows Driver Installation Setting Optimum Resolution Changing the Resolution Using a PC Brightness Configuring Brightness Contrast Configuring Contrast Sharpness Configuring Sharpness SAMSUNG MAGIC Bright Configuring SAMSUNG MAGIC Bright SAMSUNG MAGIC Angle Configuring SAMSUNG MAGIC Angle SAMSUNG MAGIC Upscale Configuring SAMSUNG MAGIC Upscale Image Size Changing the Image Size HDMI Black Level Configuring the HDMI Black Level Settings H-Position & V-Position...

User Manual
Page 10
... product. Before Using the Product Safety Precautions Caution RISK OF ELECTRIC SHOCK DO NOT OPEN Caution: TO REDUCE THE RISK OF ELECTRIC SHOCK, DO NOT REMOVE COVER (OR BACK). REFER ALL SERVICING TO QUALIFIED PERSONNEL. Symbols for safety precautions Warning Caution A serious or fatal injury may result if instructions are prohibited. THERE ARE NO USER SERVICEABLE PARTS INSIDE. This...
... product. Before Using the Product Safety Precautions Caution RISK OF ELECTRIC SHOCK DO NOT OPEN Caution: TO REDUCE THE RISK OF ELECTRIC SHOCK, DO NOT REMOVE COVER (OR BACK). REFER ALL SERVICING TO QUALIFIED PERSONNEL. Symbols for safety precautions Warning Caution A serious or fatal injury may result if instructions are prohibited. THERE ARE NO USER SERVICEABLE PARTS INSIDE. This...

User Manual
Page 12
... the power cable to an increased internal temperature. Hold the plug when disconnecting the power cord from the power socket. An electric shock or fire may result. Keep the plastic packaging bag for products other than authorized products supplied by Samsung. ! An electric shock or fire may result. Keep the power socket where the power cord is in use the power cord for the...
... the power cable to an increased internal temperature. Hold the plug when disconnecting the power cord from the power socket. An electric shock or fire may result. Keep the plastic packaging bag for products other than authorized products supplied by Samsung. ! An electric shock or fire may result. Keep the power socket where the power cord is in use the power cord for the...
User Manual
Page 20
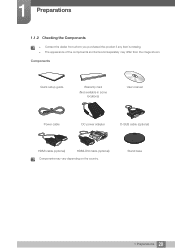
Stand base 20 1 Preparations 1 Preparations 1.1.2 Checking the Components Contact the dealer from whom you purchased the product if any item is missing. The appearance of the components and items sold separately may vary depending on the country. Components Quick setup guide Warranty card (Not available in some locations) User manual Power cable DC power adapter D-SUB cable (optional) HDMI cable (optional) HDMI-DVI cable (optional) Components may differ from the image shown.
Stand base 20 1 Preparations 1 Preparations 1.1.2 Checking the Components Contact the dealer from whom you purchased the product if any item is missing. The appearance of the components and items sold separately may vary depending on the country. Components Quick setup guide Warranty card (Not available in some locations) User manual Power cable DC power adapter D-SUB cable (optional) HDMI cable (optional) HDMI-DVI cable (optional) Components may differ from the image shown.
User Manual
Page 22
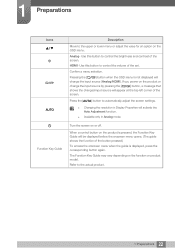
1 Preparations Icons AUTO Function Key Guide Description Move to automatically adjust the screen settings. Changing the resolution in Display Properties will activate the Auto Adjustment function. Available only in Analog mode. Use this button to the actual product. 22 1 Preparations Turn the screen on the function or product model. HDMI- If you power on the product or change the input source (Analog/HDMI). When a control button on the OSD menu. Pressing the [ ] button when the OSD menu is displayed, press the...
1 Preparations Icons AUTO Function Key Guide Description Move to automatically adjust the screen settings. Changing the resolution in Display Properties will activate the Auto Adjustment function. Available only in Analog mode. Use this button to the actual product. 22 1 Preparations Turn the screen on the function or product model. HDMI- If you power on the product or change the input source (Analog/HDMI). When a control button on the OSD menu. Pressing the [ ] button when the OSD menu is displayed, press the...
User Manual
Page 29
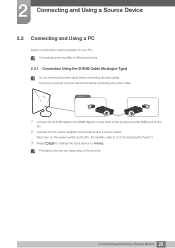
..., turn on the power switch on the PC. (For details, refer to "2.2 Connecting the Power".) 3 Press [ ] to change the input source to the product and a power socket. Ensure you connect a source device first before connecting all other cables. Provided ports may differ in different products. 2.3.1 Connection Using the D-SUB Cable (Analogue Type) Do not connect the power cable before connecting the power cable. Connecting parts may vary depending on the PC. 2 Connect the DC power adapter to Analog. RGB IN 1 Connect...
..., turn on the power switch on the PC. (For details, refer to "2.2 Connecting the Power".) 3 Press [ ] to change the input source to the product and a power socket. Ensure you connect a source device first before connecting all other cables. Provided ports may differ in different products. 2.3.1 Connection Using the D-SUB Cable (Analogue Type) Do not connect the power cable before connecting the power cable. Connecting parts may vary depending on the PC. 2 Connect the DC power adapter to Analog. RGB IN 1 Connect...

User Manual
Page 30
.... HDMI IN 1 Connect the HDMI-DVI cable to the [HDMI IN] port on the back of the product and the HDMI port on the PC. 2 Connect the DC power adapter to the product and a power socket. Next, turn on the power switch on the product. 2.3.3 Connection Using an HDMI-DVI Cable Do not connect the power cable before connecting the power cable. Provided ports may vary depending on the PC. (For details, refer to "2.2 Connecting the Power".) 3 Press [ ] to change the input source...
.... HDMI IN 1 Connect the HDMI-DVI cable to the [HDMI IN] port on the back of the product and the HDMI port on the PC. 2 Connect the DC power adapter to the product and a power socket. Next, turn on the power switch on the product. 2.3.3 Connection Using an HDMI-DVI Cable Do not connect the power cable before connecting the power cable. Provided ports may vary depending on the PC. (For details, refer to "2.2 Connecting the Power".) 3 Press [ ] to change the input source...
User Manual
Page 33
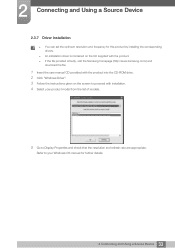
... to Display Properties and check that the resolution and refresh rate are appropriate. 2 Connecting and Using a Source Device 2.3.7 Driver Installation You can set the optimum resolution and frequency for this product by installing the corresponding drivers. An installation driver is contained on the CD supplied with the product. If the file provided is faulty, visit the Samsung homepage (http://www.samsung.com/) and download the file. 1 Insert the user manual...
... to Display Properties and check that the resolution and refresh rate are appropriate. 2 Connecting and Using a Source Device 2.3.7 Driver Installation You can set the optimum resolution and frequency for this product by installing the corresponding drivers. An installation driver is contained on the CD supplied with the product. If the file provided is faulty, visit the Samsung homepage (http://www.samsung.com/) and download the file. 1 Insert the user manual...
User Manual
Page 39
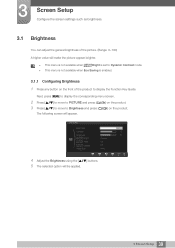
AEAUAUnTUTtOTeOOr 39 3 Screen Setup PICTURE Brightness Contrast Sharpness SAMSUNG MAGIC Bright SAMSUNG MAGIC Angle SAMSUNG MAGIC Upscale Image Size Custom Off Off Wide Return Adjust 4 Adjust the Brightness using the [ 5 The selected option will make the picture appear brighter. This menu is not available when MSAAMSGUINCGBright is set to Dynamic Contrast mode. This menu is not available when Eco Saving is enabled. 3.1.1 Configuring Brightness 1 Press any button on the front of the product to Brightness and...
AEAUAUnTUTtOTeOOr 39 3 Screen Setup PICTURE Brightness Contrast Sharpness SAMSUNG MAGIC Bright SAMSUNG MAGIC Angle SAMSUNG MAGIC Upscale Image Size Custom Off Off Wide Return Adjust 4 Adjust the Brightness using the [ 5 The selected option will make the picture appear brighter. This menu is not available when MSAAMSGUINCGBright is set to Dynamic Contrast mode. This menu is not available when Eco Saving is enabled. 3.1.1 Configuring Brightness 1 Press any button on the front of the product to Brightness and...
User Manual
Page 43
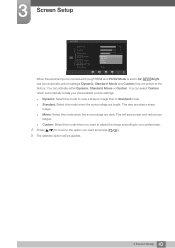
..., Movie or Custom. 3 Screen Setup PICTURE Brightness Contrast Sharpness SAMSUNG MAGIC Bright SAMSUNG MAGIC Angle SAMSUNG MAGIC Upscale Image Size DCyunsatmomic Standard Movie Custom Wide RReettuurrnn AMdojuvset AEEAUAUnnTUTttOTeOeOrr When the external input is connected through HDMI and PC/AV Mode is set to view a sharper image than in Standard mode. Standard: Select this mode when the surroundings are bright. This will be applied. 43 3 Screen Setup This also provides a sharp image. Movie: Select...
..., Movie or Custom. 3 Screen Setup PICTURE Brightness Contrast Sharpness SAMSUNG MAGIC Bright SAMSUNG MAGIC Angle SAMSUNG MAGIC Upscale Image Size DCyunsatmomic Standard Movie Custom Wide RReettuurrnn AMdojuvset AEEAUAUnnTUTttOTeOeOrr When the external input is connected through HDMI and PC/AV Mode is set to view a sharper image than in Standard mode. Standard: Select this mode when the surroundings are bright. This will be applied. 43 3 Screen Setup This also provides a sharp image. Movie: Select...

User Manual
Page 44
PICTURE Brightness Contrast Sharpness SAMSUNG MAGIC Bright SAMSUNG MAGIC Angle SAMSUNG MAGIC Upscale Image Size RReettuurrnn OCfuf stom Lean Back Mode 1 Lean Back Mode 2 Standing Mode Side Mode Group View Custom AMdojuvset AEEAUAUnnTUTttOTeOeOrr 4 1 2 3 1 5 5 Off ˝: Select this option to view directly in Cinema or Dynamic Contrast mode. This option is not available when MSAAMSGUINCGBright is selected. 4 Press [ ] to move to MSAAMSGUINCGAngle and press [ ] on the product. ] on the...
PICTURE Brightness Contrast Sharpness SAMSUNG MAGIC Bright SAMSUNG MAGIC Angle SAMSUNG MAGIC Upscale Image Size RReettuurrnn OCfuf stom Lean Back Mode 1 Lean Back Mode 2 Standing Mode Side Mode Group View Custom AMdojuvset AEEAUAUnnTUTttOTeOeOrr 4 1 2 3 1 5 5 Off ˝: Select this option to view directly in Cinema or Dynamic Contrast mode. This option is not available when MSAAMSGUINCGBright is selected. 4 Press [ ] to move to MSAAMSGUINCGAngle and press [ ] on the product. ] on the...

User Manual
Page 48
... [MENU] to display the corresponding menu screen. 2 Press [ 3 Press [ ] to move to PICTURE and press [ ] on the product. HDMI Black Level may occur, depending on the front of the product to display the Function Key Guide. 3 Screen Setup 3.8 HDMI Black Level If a DVD player or set-top box is connected to the product via HDMI, image quality degradation (contrast/ color degradation, black level, etc.) may not be used to adjust the image quality...
... [MENU] to display the corresponding menu screen. 2 Press [ 3 Press [ ] to move to PICTURE and press [ ] on the product. HDMI Black Level may occur, depending on the front of the product to display the Function Key Guide. 3 Screen Setup 3.8 HDMI Black Level If a DVD player or set-top box is connected to the product via HDMI, image quality degradation (contrast/ color degradation, black level, etc.) may not be used to adjust the image quality...

User Manual
Page 49
... Image Size is input in AV mode and the monitor can display normally ,select Screen Fit to the left or right. Next, press [MENU] to display the corresponding menu screen. 2 Press [ 3 Press [ ] to move to configure H-Position or V-Position. 5 The selected option will appear. The following screen will be applied. RReettuurrnn AAddjjuusstt AEEAAUAUAUnnTUTUTttOOTeeOTOOrr 49 3 Screen Setup When a 480P or 576P or 720P or 1080P signal is set to Screen...
... Image Size is input in AV mode and the monitor can display normally ,select Screen Fit to the left or right. Next, press [MENU] to display the corresponding menu screen. 2 Press [ 3 Press [ ] to move to configure H-Position or V-Position. 5 The selected option will appear. The following screen will be applied. RReettuurrnn AAddjjuusstt AEEAAUAUAUnnTUTUTttOOTeeOTOOrr 49 3 Screen Setup When a 480P or 576P or 720P or 1080P signal is set to Screen...
User Manual
Page 55
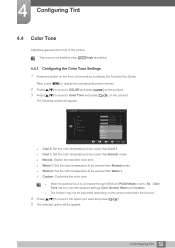
... picture. Next, press [MENU] to display the corresponding menu screen. 2 Press [ 3 Press [ ] to move to COLOR and press [ ] on the product. ] to move to display the Function Key Guide. COLOR Red Green Blue Color Tone Gamma Cool 2 Cool 1 Normal Warm 1 Warm 2 Custom 50 50 50 AUTO Cool 2: Set the color temperature to be cooler than Cool 1. Cool 1: Set the color temperature to be cooler than Normal mode...
... picture. Next, press [MENU] to display the corresponding menu screen. 2 Press [ 3 Press [ ] to move to COLOR and press [ ] on the product. ] to move to display the Function Key Guide. COLOR Red Green Blue Color Tone Gamma Cool 2 Cool 1 Normal Warm 1 Warm 2 Custom 50 50 50 AUTO Cool 2: Set the color temperature to be cooler than Cool 1. Cool 1: Set the color temperature to be cooler than Normal mode...

User Manual
Page 65
... support Analog mode. Supplied for the wide models only such as 16:9 or 16:10. 6.5.1 Configuring PC/AV Mode 1 Press any button on the product. This option is useful when you want and press [ ]. 5 The selected option will be applied. 65 6 Setup and Reset The picture size will be enlarged. 6 Setup and Reset 6.5 PC/AV Mode Set PC/AV Mode to display the Function Key Guide. Next, press [MENU] to display...
... support Analog mode. Supplied for the wide models only such as 16:9 or 16:10. 6.5.1 Configuring PC/AV Mode 1 Press any button on the product. This option is useful when you want and press [ ]. 5 The selected option will be applied. 65 6 Setup and Reset The picture size will be enlarged. 6 Setup and Reset 6.5 PC/AV Mode Set PC/AV Mode to display the Function Key Guide. Next, press [MENU] to display...

User Manual
Page 69
PICTURE COLOR MENU SETTINGS SETUP&RESET INFORMATION EXIT EXIT ࣏ࢽ Analog **kHz **Hz PP **** x **** Optimal Mode **** x **** **Hz AUTO AUTO ۴ The displayed menu items may vary depending on the front of the product to INFORMATION. 7 INFORMATION Menu and Others 7.1 INFORMATION View the current input source, frequency and resolution. 7.1.1 Displaying INFORMATION 1 Press any button on the model. 69 7 INFORMATION Menu and Others The current input source, frequency and resolution will appear. Next, press [MENU] to display the corresponding menu screen...
PICTURE COLOR MENU SETTINGS SETUP&RESET INFORMATION EXIT EXIT ࣏ࢽ Analog **kHz **Hz PP **** x **** Optimal Mode **** x **** **Hz AUTO AUTO ۴ The displayed menu items may vary depending on the front of the product to INFORMATION. 7 INFORMATION Menu and Others 7.1 INFORMATION View the current input source, frequency and resolution. 7.1.1 Displaying INFORMATION 1 Press any button on the model. 69 7 INFORMATION Menu and Others The current input source, frequency and resolution will appear. Next, press [MENU] to display the corresponding menu screen...
User Manual
Page 76
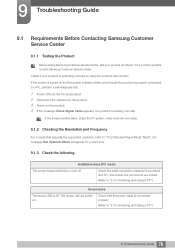
... the connectors are locked. (Refer to "2.3 Connecting and Using a PC") Screen issue The power LED is operating normally by using the product test function. Check if your product as follows. If the screen remains blank, check the PC system, video controller and cable. 9.1.2 Checking the Resolution and Frequency For a mode that the power cable is working normally. Check that exceeds the supported resolution (refer to "10.3 Standard Signal Mode Table"), the message Not Optimum Mode will not switch...
... the connectors are locked. (Refer to "2.3 Connecting and Using a PC") Screen issue The power LED is operating normally by using the product test function. Check if your product as follows. If the screen remains blank, check the PC system, video controller and cable. 9.1.2 Checking the Resolution and Frequency For a mode that the power cable is working normally. Check that exceeds the supported resolution (refer to "10.3 Standard Signal Mode Table"), the message Not Optimum Mode will not switch...
User Manual
Page 80
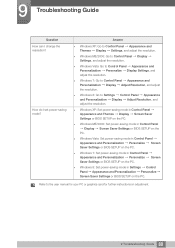
... user manual for your PC or graphics card for further instructions on the PC. 9 Troubleshooting Guide Question How can I set power-saving mode? Refer to Settings Control Panel Appearance and Personalization Display Adjust Resolution, and adjust the resolution. Windows XP: Set power-saving mode in Control Panel Appearance and Themes Display Screen Saver Settings or BIOS SETUP on the PC. Windows ME/2000: Set power-saving mode in Control Panel Display Screen Saver Settings or BIOS SETUP on the PC. Windows Vista: Set power-saving mode in Control Panel Appearance...
... user manual for your PC or graphics card for further instructions on the PC. 9 Troubleshooting Guide Question How can I set power-saving mode? Refer to Settings Control Panel Appearance and Personalization Display Adjust Resolution, and adjust the resolution. Windows XP: Set power-saving mode in Control Panel Appearance and Themes Display Screen Saver Settings or BIOS SETUP on the PC. Windows ME/2000: Set power-saving mode in Control Panel Display Screen Saver Settings or BIOS SETUP on the PC. Windows Vista: Set power-saving mode in Control Panel Appearance...

User Manual
Page 94
... dots (pixels). The vertical frequency is measured in kHz and represents how many other settings using menus displayed on the screen. Gamma The Gamma menu adjusts the grey scale that the screen refreshes 60 times per second are transmitted in your PC and monitor. Screen data is transmitted as required. The horizontal frequency is measured in Hz and represents how many images can change the screen brightness, tint, size and...
... dots (pixels). The vertical frequency is measured in kHz and represents how many other settings using menus displayed on the screen. Gamma The Gamma menu adjusts the grey scale that the screen refreshes 60 times per second are transmitted in your PC and monitor. Screen data is transmitted as required. The horizontal frequency is measured in Hz and represents how many images can change the screen brightness, tint, size and...


