

User Manual
Page 3
...57 57 58 58 60 60 62 62 Installation Attaching the Stand Adjusting the Product Tilt and Height Rotating the Monitor Installing a Wall-mount Kit or Desktop Stand Anti-theft Lock Before Connecting Pre-connection Checkpoints Connecting and Using a PC Connecting to a PC Connecting the Power Driver Installation Setting Optimum Resolution Brightness Configuring Brightness Contrast Configuring Contrast Sharpness Configuring Sharpness Eye Saver Mode Configuring Eye Saver Mode Game Mode Configuring Game Mode SAMSUNG MAGIC Bright Configuring SAMSUNG MAGIC Bright SAMSUNG MAGIC Angle (S22E450F / S24E450F...
...57 57 58 58 60 60 62 62 Installation Attaching the Stand Adjusting the Product Tilt and Height Rotating the Monitor Installing a Wall-mount Kit or Desktop Stand Anti-theft Lock Before Connecting Pre-connection Checkpoints Connecting and Using a PC Connecting to a PC Connecting the Power Driver Installation Setting Optimum Resolution Brightness Configuring Brightness Contrast Configuring Contrast Sharpness Configuring Sharpness Eye Saver Mode Configuring Eye Saver Mode Game Mode Configuring Game Mode SAMSUNG MAGIC Bright Configuring SAMSUNG MAGIC Bright SAMSUNG MAGIC Angle (S22E450F / S24E450F...

User Manual
Page 12
... power cord is in use the power cord for the product in a place that cannot be completely cut the power to the product. z If any problem occurs in a narrow space with the power button. Avoid installing the product in the product, unplug the power cable to completely ! Before Using the Product Caution Do not unplug the power cord when the product is connected unobstructed. DO NOT INSTALL...
... power cord is in use the power cord for the product in a place that cannot be completely cut the power to the product. z If any problem occurs in a narrow space with the power button. Avoid installing the product in the product, unplug the power cable to completely ! Before Using the Product Caution Do not unplug the power cord when the product is connected unobstructed. DO NOT INSTALL...

User Manual
Page 21
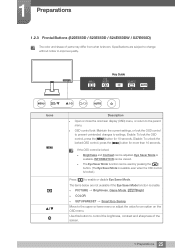
... MENU SAVER SOURCE AUTO Key Guide EYE MENU SAVER SOURCE AUTO Icons MENU Description z Open or close the onscreen display (OSD) menu, or return to settings. Disable: To unlock the locked OSD control, press the [MENU] button for an option on the OSD menu. 21 1 Preparations Eye Saver Mode is shown. z PICTURE Brightness, Game Mode, MSAAMSGUINCGBright, MSAAMSGUINCGAngle z COLOR z SETUP&RESET Smart Eco Saving Move to enable or disable Eye Saver Mode. Enable: To lock the OSD control, press the [MENU] button for 10 seconds. z OSD control lock: Maintain the current settings...
... MENU SAVER SOURCE AUTO Key Guide EYE MENU SAVER SOURCE AUTO Icons MENU Description z Open or close the onscreen display (OSD) menu, or return to settings. Disable: To unlock the locked OSD control, press the [MENU] button for an option on the OSD menu. 21 1 Preparations Eye Saver Mode is shown. z PICTURE Brightness, Game Mode, MSAAMSGUINCGBright, MSAAMSGUINCGAngle z COLOR z SETUP&RESET Smart Eco Saving Move to enable or disable Eye Saver Mode. Enable: To lock the OSD control, press the [MENU] button for 10 seconds. z OSD control lock: Maintain the current settings...

User Manual
Page 22
... or change the input source (Analog/DVI/HDMI). z This function is not available for products with an Analog interface only. Refer to automatically adjust the screen settings. z Changing the resolution in Analog mode. 1 Preparations Icons AUTO Key Guide Description Use this button to control the brightness, contrast and sharpness of the screen. Confirm a menu selection. This function is only available in Display Properties will appear at the top left corner of the screen. Turn the screen on...
... or change the input source (Analog/DVI/HDMI). z This function is not available for products with an Analog interface only. Refer to automatically adjust the screen settings. z Changing the resolution in Analog mode. 1 Preparations Icons AUTO Key Guide Description Use this button to control the brightness, contrast and sharpness of the screen. Confirm a menu selection. This function is only available in Display Properties will appear at the top left corner of the screen. Turn the screen on...

User Manual
Page 23
.... z PICTURE Brightness, Game Mode, MSAAMSGUINCGBright z COLOR z SETUP&RESET Smart Eco Saving Move to control the volume or the screen brightness or contrast. 23 1 Preparations Use this button to the upper or lower menu or adjust the value for an option on the OSD menu. EEYYEE MENU SSAAVVEERR SSOOUURRCCEE AUTO Key Guide EYE MENU SAVER SOURCE AUTO Icons MENU Description z Open or close the onscreen display (OSD) menu, or return to enable or disable Eye Saver Mode. Disable: To unlock the locked OSD control, press the [MENU] button for...
.... z PICTURE Brightness, Game Mode, MSAAMSGUINCGBright z COLOR z SETUP&RESET Smart Eco Saving Move to control the volume or the screen brightness or contrast. 23 1 Preparations Use this button to the upper or lower menu or adjust the value for an option on the OSD menu. EEYYEE MENU SSAAVVEERR SSOOUURRCCEE AUTO Key Guide EYE MENU SAVER SOURCE AUTO Icons MENU Description z Open or close the onscreen display (OSD) menu, or return to enable or disable Eye Saver Mode. Disable: To unlock the locked OSD control, press the [MENU] button for...

User Manual
Page 24
... function is not displayed will change the input source by pressing the [ ] button, a message that shows the changed input source will be displayed before the onscreen menu opens. (The guide shows the function of the screen. Turn the screen on the function or product model. The Key Guide may vary depending on or off. This function is displayed, press the corresponding button again. z Changing the resolution in Analog mode. If you power on the...
... function is not displayed will change the input source by pressing the [ ] button, a message that shows the changed input source will be displayed before the onscreen menu opens. (The guide shows the function of the screen. Turn the screen on the function or product model. The Key Guide may vary depending on or off. This function is displayed, press the corresponding button again. z Changing the resolution in Analog mode. If you power on the...
User Manual
Page 25
... Mode, MSAAMSGUINCGBright z COLOR z SETUP&RESET Smart Eco Saving Move to control the brightness, contrast and sharpness of parts may differ from what is enable. Use this button to the upper or lower menu or adjust the value for 10 seconds. z The Eye Saver Mode function can be viewed. EYE MENU SAVER SOURCE AUTO Key Guide EYE MENU SAVER SOURCE AUTO Icons MENU Description z Open or close the onscreen display (OSD) menu, or return to settings. Eye Saver Mode is locked...
... Mode, MSAAMSGUINCGBright z COLOR z SETUP&RESET Smart Eco Saving Move to control the brightness, contrast and sharpness of parts may differ from what is enable. Use this button to the upper or lower menu or adjust the value for 10 seconds. z The Eye Saver Mode function can be viewed. EYE MENU SAVER SOURCE AUTO Key Guide EYE MENU SAVER SOURCE AUTO Icons MENU Description z Open or close the onscreen display (OSD) menu, or return to settings. Eye Saver Mode is locked...

User Manual
Page 26
If you power on the product is pressed, the Key Guide will appear at the top left corner of the button pressed.) To access the onscreen menu when the guide is not displayed will activate the Auto Adjustment function. z Changing the resolution in Analog mode. Press the [AUTO] button to the actual product. 26 1 Preparations When a control button on the product or change the input source (Analog/DVI/DisplayPort). Turn the screen on the...
If you power on the product is pressed, the Key Guide will appear at the top left corner of the button pressed.) To access the onscreen menu when the guide is not displayed will activate the Auto Adjustment function. z Changing the resolution in Analog mode. Press the [AUTO] button to the actual product. 26 1 Preparations When a control button on the product or change the input source (Analog/DVI/DisplayPort). Turn the screen on the...

User Manual
Page 27
... AUTO Key Guide EYE MENU SAVER SOURCE AUTO Icons MENU Description z Open or close the onscreen display (OSD) menu, or return to settings. If the OSD control is locked, z Brightness and Contrast can be viewed. z OSD control lock: Maintain the current settings, or lock the OSD control to prevent unintended changes to the parent menu. z PICTURE Brightness, Game Mode, MSAAMSGUINCGBright, MSAAMSGUINCGAngle z COLOR z SETUP&RESET Smart Eco Saving Move to improve quality. Enable: To lock the OSD control, press the [MENU] button for an option on the OSD menu. Eye Saver Mode...
... AUTO Key Guide EYE MENU SAVER SOURCE AUTO Icons MENU Description z Open or close the onscreen display (OSD) menu, or return to settings. If the OSD control is locked, z Brightness and Contrast can be viewed. z OSD control lock: Maintain the current settings, or lock the OSD control to prevent unintended changes to the parent menu. z PICTURE Brightness, Game Mode, MSAAMSGUINCGBright, MSAAMSGUINCGAngle z COLOR z SETUP&RESET Smart Eco Saving Move to improve quality. Enable: To lock the OSD control, press the [MENU] button for an option on the OSD menu. Eye Saver Mode...

User Manual
Page 28
... automatically adjust the screen settings. Pressing the [ ] button when the OSD menu is only available in Display Properties will change the input source by pressing the [ ] button, a message that shows the changed input source will be displayed before the onscreen menu opens. (The guide shows the function of the screen. Press the [AUTO] button to the actual product. 28 1 Preparations Turn the screen on the product or change the input source (S23E650K: Analog/HDMI, S24E650MW: Analog/DVI). z Changing the resolution in Analog mode. When a control button...
... automatically adjust the screen settings. Pressing the [ ] button when the OSD menu is only available in Display Properties will change the input source by pressing the [ ] button, a message that shows the changed input source will be displayed before the onscreen menu opens. (The guide shows the function of the screen. Press the [AUTO] button to the actual product. 28 1 Preparations Turn the screen on the product or change the input source (S23E650K: Analog/HDMI, S24E650MW: Analog/DVI). z Changing the resolution in Analog mode. When a control button...

User Manual
Page 30
... using the DVI cable. Connect to the stand models that have speakers only. Applicable to an external device. Applicable to the [POWER IN] port on the back of the product. 30 1 Preparations Connect the power cord for the digital (DVI)-dedicated models only. The [DVI IN] terminal is shown. 1 Preparations 1.2.6 Reverse Side (S24E650MW) The color and shape of parts may differ from what is supplied for your monitor to the models...
... using the DVI cable. Connect to the stand models that have speakers only. Applicable to an external device. Applicable to the [POWER IN] port on the back of the product. 30 1 Preparations Connect the power cord for the digital (DVI)-dedicated models only. The [DVI IN] terminal is shown. 1 Preparations 1.2.6 Reverse Side (S24E650MW) The color and shape of parts may differ from what is supplied for your monitor to the models...

User Manual
Page 45
... connect the power cable before connecting all other cables. HDMI IN HDMI IN 1 Connect the HDMI cable to the [HDMI IN] port on the back of the product and the DVI port on the PC. 2 Press [ ] to change the input source to HDMI. HDMI IN HDMI IN 1 Connect the HDMI-DVI cable to the [HDMI IN] port on the back of the product and the HDMI port on the PC. 2 Press [ ] to change the input source to HDMI. 45 2 Connecting and Using a Source Device Connection Using the HDMI-DVI Cable...
... connect the power cable before connecting all other cables. HDMI IN HDMI IN 1 Connect the HDMI cable to the [HDMI IN] port on the back of the product and the DVI port on the PC. 2 Press [ ] to change the input source to HDMI. HDMI IN HDMI IN 1 Connect the HDMI-DVI cable to the [HDMI IN] port on the back of the product and the HDMI port on the PC. 2 Press [ ] to change the input source to HDMI. 45 2 Connecting and Using a Source Device Connection Using the HDMI-DVI Cable...

User Manual
Page 51
... instructions given on the CD supplied with installation. 4 Select your Windows OS manual for this product by installing the corresponding drivers. 2 Connecting and Using a Source Device 2.2.3 Driver Installation z You can set the optimum resolution and frequency for further details. 51 2 Connecting and Using a Source Device Refer to your product model from the list of models. 5 Go to proceed with the product. z If the file provided is contained on the screen to Display...
... instructions given on the CD supplied with installation. 4 Select your Windows OS manual for this product by installing the corresponding drivers. 2 Connecting and Using a Source Device 2.2.3 Driver Installation z You can set the optimum resolution and frequency for further details. 51 2 Connecting and Using a Source Device Refer to your product model from the list of models. 5 Go to proceed with the product. z If the file provided is contained on the screen to Display...

User Manual
Page 64
... of the input source. (S24E650DW / S24E650MW / S24E650XW) Changing the screen size is connected using the DVI/HDMI/DP cable. z This can support all of these signals). 3 Screen Setup In AV mode PICTURE Image Size Response Time H-Position V-Position Coarse Fine 4:3 16:9 Screen Fit Choose the size and aspect ratio of the picture displayed on screen. 50 2200 0 PICTURE Image Size Response Time H-Position V-Position Coarse Fine 4:3 Wide Screen Fit Choose the size and aspect ratio of the picture displayed on screen. 50 2200 0 AUTO AUTO PICTURE Image Size HDMI Black Level Response...
... of the input source. (S24E650DW / S24E650MW / S24E650XW) Changing the screen size is connected using the DVI/HDMI/DP cable. z This can support all of these signals). 3 Screen Setup In AV mode PICTURE Image Size Response Time H-Position V-Position Coarse Fine 4:3 16:9 Screen Fit Choose the size and aspect ratio of the picture displayed on screen. 50 2200 0 PICTURE Image Size Response Time H-Position V-Position Coarse Fine 4:3 Wide Screen Fit Choose the size and aspect ratio of the picture displayed on screen. 50 2200 0 AUTO AUTO PICTURE Image Size HDMI Black Level Response...

User Manual
Page 74
... following screen will be warmer than Normal mode. S22E450F / S24E450F / S23E650K / S24E650PL: When the external input is connected through DVI/HDMI/DP and PC/AV Mode is enabled. 4.4.1 Configuring the Color Tone Settings 1 Press any button on the product. z Cool 1: Set the color temperature to be cooler than Warm 1. 4 Configuring Tint 4.4 Color Tone Adjust the general color tone of the product to display the Key Guide. This menu...
... following screen will be warmer than Normal mode. S22E450F / S24E450F / S23E650K / S24E650PL: When the external input is connected through DVI/HDMI/DP and PC/AV Mode is enabled. 4.4.1 Configuring the Color Tone Settings 1 Press any button on the product. z Cool 1: Set the color temperature to be cooler than Warm 1. 4 Configuring Tint 4.4 Color Tone Adjust the general color tone of the product to display the Key Guide. This menu...

User Manual
Page 90
... View the current input source, frequency and resolution. 7.1.1 Displaying INFORMATION 1 Press any button on the model. 90 7 INFORMATION Menu and Others PICTURE COLOR MENU SETTINGS SETUP&RESET INFORMATION INFORMATION LS********/** S / N Analog **kHz **Hz ** **** x **** Optimal Mode **** x **** **Hz AUTO PICTURE COLOR MENU SETTINGS SETUP&RESET INFORMATION INFORMATION LS********/** S / N DVI **kHz **Hz ** **** x **** Optimal Mode **** x **** **Hz AUTO PICTURE COLOR MENU SETTINGS SETUP&RESET INFORMATION INFORMATION LS********/** S / N HDMI **kHz **Hz ** **** x **** Optimal Mode...
... View the current input source, frequency and resolution. 7.1.1 Displaying INFORMATION 1 Press any button on the model. 90 7 INFORMATION Menu and Others PICTURE COLOR MENU SETTINGS SETUP&RESET INFORMATION INFORMATION LS********/** S / N Analog **kHz **Hz ** **** x **** Optimal Mode **** x **** **Hz AUTO PICTURE COLOR MENU SETTINGS SETUP&RESET INFORMATION INFORMATION LS********/** S / N DVI **kHz **Hz ** **** x **** Optimal Mode **** x **** **Hz AUTO PICTURE COLOR MENU SETTINGS SETUP&RESET INFORMATION INFORMATION LS********/** S / N HDMI **kHz **Hz ** **** x **** Optimal Mode...

User Manual
Page 95
... working normally. 9 Troubleshooting Guide 9.1 Requirements Before Contacting Samsung Customer Service Center 9.1.1 Testing the Product Before calling Samsung Customer Service Center, test your product is operating normally by using the product test function. If the screen remains blank, check the PC system, video controller and cable. 9.1.2 Checking the Resolution and Frequency For a mode that exceeds the supported resolution (refer to "2.2Connecting and Using a PC") 95 9 Troubleshooting Guide If the screen is turned off and the power...
... working normally. 9 Troubleshooting Guide 9.1 Requirements Before Contacting Samsung Customer Service Center 9.1.1 Testing the Product Before calling Samsung Customer Service Center, test your product is operating normally by using the product test function. If the screen remains blank, check the PC system, video controller and cable. 9.1.2 Checking the Resolution and Frequency For a mode that exceeds the supported resolution (refer to "2.2Connecting and Using a PC") 95 9 Troubleshooting Guide If the screen is turned off and the power...

User Manual
Page 96
... distorted. Change the COLOR settings. (Refer to the recommended level. Set the resolution and frequency to "Configuring Tint") 96 9 Troubleshooting Guide Change the maximum resolution and frequency to suit the product performance, referring to the product is not clear. Check that the device connected to Standard Signal Mode Table (page 114). Adjust Brightness (page 53) and Contrast (page 54). Remove any accessories (video extension cable, etc.) and try again. Screen color is too...
... distorted. Change the COLOR settings. (Refer to the recommended level. Set the resolution and frequency to "Configuring Tint") 96 9 Troubleshooting Guide Change the maximum resolution and frequency to suit the product performance, referring to the product is not clear. Check that the device connected to Standard Signal Mode Table (page 114). Adjust Brightness (page 53) and Contrast (page 54). Remove any accessories (video extension cable, etc.) and try again. Screen color is too...

User Manual
Page 99
... the user manual for your PC or graphics card for further instructions on the PC. z z z z z Windows XP: Go to Control Panel Appearance and Personalization Personalize Display Settings, and adjust the resolution. Windows 7: Go to Control Panel Display Settings, and adjust the resolution. Windows 7: Set power-saving mode in Settings Control Panel Appearance and Personalization Personalize Screen Saver Settings Power options or BIOS SETUP on the PC. Windows ME/2000: Go to Control Panel Appearance and Personalization Display Adjust Resolution, and adjust the resolution. Control Panel...
... the user manual for your PC or graphics card for further instructions on the PC. z z z z z Windows XP: Go to Control Panel Appearance and Personalization Personalize Display Settings, and adjust the resolution. Windows 7: Go to Control Panel Display Settings, and adjust the resolution. Windows 7: Set power-saving mode in Settings Control Panel Appearance and Personalization Personalize Screen Saver Settings Power options or BIOS SETUP on the PC. Windows ME/2000: Go to Control Panel Appearance and Personalization Display Adjust Resolution, and adjust the resolution. Control Panel...

User Manual
Page 120
... dots (pixels). The screen scanning rate depends on the screen. Gamma The Gamma menu adjusts the grey scale that the screen refreshes 60 times per second by those horizontal lines. Changes to the screen brightness are then arranged vertically to create an image. Screen data is transmitted as it refreshes to display an image, although the refreshing is invisible to optimize the picture quality as required. Horizontal Frequency Characters or images displayed on the monitor screen consist...
... dots (pixels). The screen scanning rate depends on the screen. Gamma The Gamma menu adjusts the grey scale that the screen refreshes 60 times per second by those horizontal lines. Changes to the screen brightness are then arranged vertically to create an image. Screen data is transmitted as it refreshes to display an image, although the refreshing is invisible to optimize the picture quality as required. Horizontal Frequency Characters or images displayed on the monitor screen consist...


