
User Manual
Page 3
...55 56 56 57 57 58 58 60 60 62 62 Installation Attaching the Stand Adjusting the Product Tilt and Height Rotating the Monitor Installing a Wall-mount Kit or Desktop Stand Anti-theft Lock Before Connecting Pre-connection Checkpoints Connecting and Using a PC Connecting ...Configuring Contrast Sharpness Configuring Sharpness Eye Saver Mode Configuring Eye Saver Mode Game Mode Configuring Game Mode SAMSUNG MAGIC Bright Configuring SAMSUNG MAGIC Bright SAMSUNG MAGIC Angle (S22E450F / S24E450F) Configuring SAMSUNG MAGIC Angle SAMSUNG MAGIC Upscale Configuring SAMSUNG MAGIC Upscale 3 Table Of Contents
...55 56 56 57 57 58 58 60 60 62 62 Installation Attaching the Stand Adjusting the Product Tilt and Height Rotating the Monitor Installing a Wall-mount Kit or Desktop Stand Anti-theft Lock Before Connecting Pre-connection Checkpoints Connecting and Using a PC Connecting ...Configuring Contrast Sharpness Configuring Sharpness Eye Saver Mode Configuring Eye Saver Mode Game Mode Configuring Game Mode SAMSUNG MAGIC Bright Configuring SAMSUNG MAGIC Bright SAMSUNG MAGIC Angle (S22E450F / S24E450F) Configuring SAMSUNG MAGIC Angle SAMSUNG MAGIC Upscale Configuring SAMSUNG MAGIC Upscale 3 Table Of Contents
User Manual
Page 8
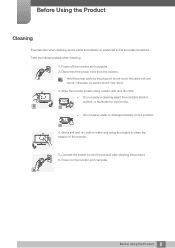
...the product. 4. Hold the power cable by the plug and do not touch the cable with wet hands. Disconnect the power cord from the monitor. Wet a soft and dry cloth in water and wring thoroughly to clean the exterior of advanced LCDs are easily scratched. Take the following ...steps when cleaning. 1. Otherwise, an electric shock may result. 3. Wipe the monitor screen using a clean, soft and dry cloth. Do not apply a cleaning agent that contains alcohol, solvent, or surfactant to the product after ...
...the product. 4. Hold the power cable by the plug and do not touch the cable with wet hands. Disconnect the power cord from the monitor. Wet a soft and dry cloth in water and wring thoroughly to clean the exterior of advanced LCDs are easily scratched. Take the following ...steps when cleaning. 1. Otherwise, an electric shock may result. 3. Wipe the monitor screen using a clean, soft and dry cloth. Do not apply a cleaning agent that contains alcohol, solvent, or surfactant to the product after ...
User Manual
Page 9
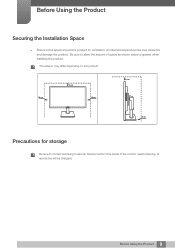
Be sure to contact Samsung Customer Service Center if the inside of space as shown below or greater when installing the product. The exterior may cause fire and damage the product. An internal temperature rise may differ depending on the product. 10 cm 10 cm 10 cm 10 cm 10 cm Precautions for ventilation. Before Using the Product Securing the Installation Space Ensure some space around the product for storage Be sure to allow the amount of the monitor needs cleaning. (A service fee will be charged.) 9 Before Using the Product
Be sure to contact Samsung Customer Service Center if the inside of space as shown below or greater when installing the product. The exterior may cause fire and damage the product. An internal temperature rise may differ depending on the product. 10 cm 10 cm 10 cm 10 cm 10 cm Precautions for ventilation. Before Using the Product Securing the Installation Space Ensure some space around the product for storage Be sure to allow the amount of the monitor needs cleaning. (A service fee will be charged.) 9 Before Using the Product

User Manual
Page 17
... on for an extended period of children. ! z Eye fatigue will become stuck and injured. ! z Having the sound too loud may result. Do not hold the monitor upside-down or move it to fall and break or cause a personal injury. z An electric shock or fire may damage your eyesight. ! Rest your eyes...
... on for an extended period of children. ! z Eye fatigue will become stuck and injured. ! z Having the sound too loud may result. Do not hold the monitor upside-down or move it to fall and break or cause a personal injury. z An electric shock or fire may damage your eyesight. ! Rest your eyes...
User Manual
Page 29
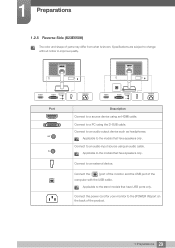
... Description Connect to the stand models that have speakers only. Connect to a PC using the D-SUB cable. Connect the [ ] port of the monitor and the USB port of parts may differ from what is shown. Applicable to a source device using an audio cable. Connect to the models that... have speakers only. Connect to an audio output device such as headphones. Connect the power cord for your monitor to improve quality. Specifications are subject to change without notice to the [POWER IN] port on the back of the product. 29 1 Preparations...
... Description Connect to the stand models that have speakers only. Connect to a PC using the D-SUB cable. Connect the [ ] port of the monitor and the USB port of parts may differ from what is shown. Applicable to a source device using an audio cable. Connect to the models that... have speakers only. Connect to an audio output device such as headphones. Connect the power cord for your monitor to improve quality. Specifications are subject to change without notice to the [POWER IN] port on the back of the product. 29 1 Preparations...

User Manual
Page 30
... the D-SUB cable. Connect to improve quality. 1 Preparations 1.2.6 Reverse Side (S24E650MW) The color and shape of parts may differ from what is supplied for your monitor to the [POWER IN] port on the back of the computer with the USB cable. Applicable to the stand models that have speakers only. Specifications... subject to change without notice to an audio-input source using an audio cable. The [DVI IN] terminal is shown. Connect the [ ] port of the monitor and the USB port of the product. 30 1 Preparations Applicable to the models that have USB ports only.
... the D-SUB cable. Connect to improve quality. 1 Preparations 1.2.6 Reverse Side (S24E650MW) The color and shape of parts may differ from what is supplied for your monitor to the [POWER IN] port on the back of the computer with the USB cable. Applicable to the stand models that have speakers only. Specifications... subject to change without notice to an audio-input source using an audio cable. The [DVI IN] terminal is shown. Connect the [ ] port of the monitor and the USB port of the product. 30 1 Preparations Applicable to the models that have USB ports only.
User Manual
Page 31
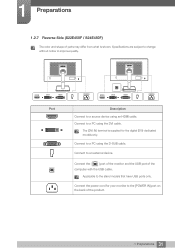
Connect to the [POWER IN] port on the back of the product. 31 1 Preparations Connect the [ ] port of the monitor and the USB port of parts may differ from what is supplied for your monitor to a PC using the DVI cable. Connect the power cord for the digital (DVI)-dedicated models only. 1 Preparations...
Connect to the [POWER IN] port on the back of the product. 31 1 Preparations Connect the [ ] port of the monitor and the USB port of parts may differ from what is supplied for your monitor to a PC using the DVI cable. Connect the power cord for the digital (DVI)-dedicated models only. 1 Preparations...
User Manual
Page 32
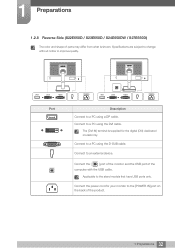
... (DVI)-dedicated models only. 1 Preparations 1.2.8 Reverse Side (S22E650D / S23E650D / S24E650DW / S27E650D) The color and shape of parts may differ from what is supplied for your monitor to a PC using the DVI cable. Connect to the [POWER IN] port on the back of the computer with the USB cable. Connect to a PC... using the D-SUB cable. Connect the [ ] port of the monitor and the USB port of the product. 32 1 Preparations DP IN DVI IN RGB IN POWER IN DP IN DVI IN RGB IN POWER IN...
... (DVI)-dedicated models only. 1 Preparations 1.2.8 Reverse Side (S22E650D / S23E650D / S24E650DW / S27E650D) The color and shape of parts may differ from what is supplied for your monitor to a PC using the DVI cable. Connect to the [POWER IN] port on the back of the computer with the USB cable. Connect to a PC... using the D-SUB cable. Connect the [ ] port of the monitor and the USB port of the product. 32 1 Preparations DP IN DVI IN RGB IN POWER IN DP IN DVI IN RGB IN POWER IN...
User Manual
Page 33
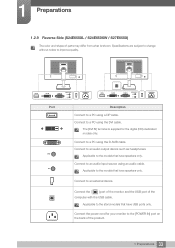
... change without notice to an external device. Connect to a PC using a DP cable. Connect the [ ] port of the monitor and the USB port of parts may differ from what is supplied for your monitor to the models that have USB ports only. Connect the power cord for the digital (DVI)-dedicated models...
... change without notice to an external device. Connect to a PC using a DP cable. Connect the [ ] port of the monitor and the USB port of parts may differ from what is supplied for your monitor to the models that have USB ports only. Connect the power cord for the digital (DVI)-dedicated models...
User Manual
Page 34
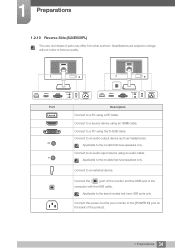
...] port on the back of the computer with the USB cable. Connect the power cord for your monitor to the stand models that have speakers only. Connect to an audio output device such as headphones. Connect...a DP cable. Connect to an audio-input source using an HDMI cable. Connect the [ ] port of the monitor and the USB port of the product. 34 1 Preparations Specifications are subject to change without notice to the models ...an audio cable. Applicable to improve quality. 1 Preparations 1.2.10 Reverse Side (S24E650PL) The color and shape of parts may differ from what is shown.
...] port on the back of the computer with the USB cable. Connect the power cord for your monitor to the stand models that have speakers only. Connect to an audio output device such as headphones. Connect...a DP cable. Connect to an audio-input source using an HDMI cable. Connect the [ ] port of the monitor and the USB port of the product. 34 1 Preparations Specifications are subject to change without notice to the models ...an audio cable. Applicable to improve quality. 1 Preparations 1.2.10 Reverse Side (S24E650PL) The color and shape of parts may differ from what is shown.
User Manual
Page 37
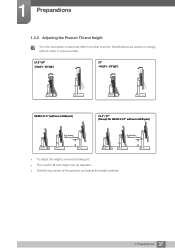
1 Preparations 1.3.2 Adjusting the Product Tilt and Height The color and shape of the product and adjust the height carefully. 37 1 Preparations Specifications are subject to change without notice to improve quality. 21.5"-24" 27" 4 SE450 21.5" (without a USB port) 0 (± 5 mm) 100 mm (± 5 mm) 21.5"- 27" (Except for SE450 21.5" without a USB port) 0 (± 5 mm) 130 mm (± 5 mm) To adjust the height, remove the fixing pin. The monitor tilt and height can be adjusted. Hold the top center of parts may differ from what is shown.
1 Preparations 1.3.2 Adjusting the Product Tilt and Height The color and shape of the product and adjust the height carefully. 37 1 Preparations Specifications are subject to change without notice to improve quality. 21.5"-24" 27" 4 SE450 21.5" (without a USB port) 0 (± 5 mm) 100 mm (± 5 mm) 21.5"- 27" (Except for SE450 21.5" without a USB port) 0 (± 5 mm) 130 mm (± 5 mm) To adjust the height, remove the fixing pin. The monitor tilt and height can be adjusted. Hold the top center of parts may differ from what is shown.
User Manual
Page 38
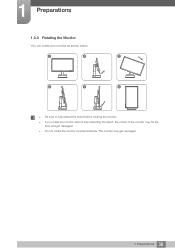
1 Preparations 1.3.3 Rotating the Monitor You can rotate your monitor as shown below. 1 2 3 4 5 6 Be sure to fully extend the stand before rotating the monitor. If you rotate the monitor without fully extending the stand, the corner of the monitor may get damaged. Do not rotate the monitor counterclockwise. The monitor may hit the floor and get damaged. 38 1 Preparations
1 Preparations 1.3.3 Rotating the Monitor You can rotate your monitor as shown below. 1 2 3 4 5 6 Be sure to fully extend the stand before rotating the monitor. If you rotate the monitor without fully extending the stand, the corner of the monitor may get damaged. Do not rotate the monitor counterclockwise. The monitor may hit the floor and get damaged. 38 1 Preparations
User Manual
Page 40
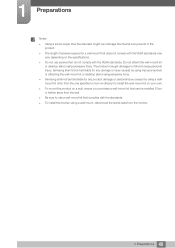
...; Using a screw longer than the one specified or from an attempt to use screws that do not comply with the standards. To install the monitor using a wall mount, disconnect the stand base from the wall. Be sure to install the wall-mount kit on your own. To ...damage the internal components of the product. The length of screws required for any product damage or personal injury caused by using excessive force. Samsung shall not be held liable for any damage or injury caused by using improper screws or attaching the wall-mount kit or desktop stand using...
...; Using a screw longer than the one specified or from an attempt to use screws that do not comply with the standards. To install the monitor using a wall mount, disconnect the stand base from the wall. Be sure to install the wall-mount kit on your own. To ...damage the internal components of the product. The length of screws required for any product damage or personal injury caused by using excessive force. Samsung shall not be held liable for any damage or injury caused by using improper screws or attaching the wall-mount kit or desktop stand using...
User Manual
Page 48
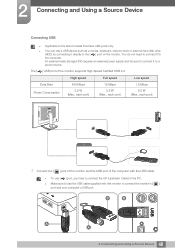
...the computer with the USB cable. To use [ ] port, you have USB ports only. You can use the USB cable supplied with this monitor to the computer. Data Rate Power Consumption High speed 480 Mbps 2.5 W (Max., each port) Full speed 12 Mbps 2.5 W (Max., each port) Low speed ... connecting it directly to a power source. An external mass-storage HDD requires an external power supply and be sure to connect it to connect the monitor's [ ] port and your computer's USB port. B B USB A A 48 2 Connecting and Using a Source Device You do not need to connect it to the...
...the computer with the USB cable. To use [ ] port, you have USB ports only. You can use the USB cable supplied with this monitor to the computer. Data Rate Power Consumption High speed 480 Mbps 2.5 W (Max., each port) Full speed 12 Mbps 2.5 W (Max., each port) Low speed ... connecting it directly to a power source. An external mass-storage HDD requires an external power supply and be sure to connect it to connect the monitor's [ ] port and your computer's USB port. B B USB A A 48 2 Connecting and Using a Source Device You do not need to connect it to the...
User Manual
Page 49
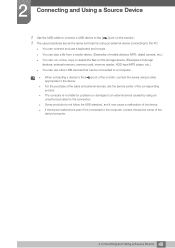
2 Connecting and Using a Source Device 2 Use the USB cable to connect a USB device to the [ ] port on the monitor. 3 The use procedures are as the same as those for using an external device connecting to the PC. You can connect and use a keyboard ... MP3 player, etc.) You can use other USB devices that can be connected to a computer. When connecting a device to the [ ] port of the monitor, connect the device using a cable appropriate to the device. For the purchase of the cable and external devices, ask the service center of the...
2 Connecting and Using a Source Device 2 Use the USB cable to connect a USB device to the [ ] port on the monitor. 3 The use procedures are as the same as those for using an external device connecting to the PC. You can connect and use a keyboard ... MP3 player, etc.) You can use other USB devices that can be connected to a computer. When connecting a device to the [ ] port of the monitor, connect the device using a cable appropriate to the device. For the purchase of the cable and external devices, ask the service center of the...
User Manual
Page 53
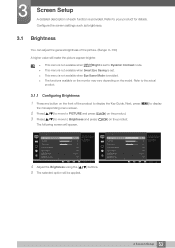
... available when Smart Eco Saving is set. This menu is not available when Eye Saver Mode is enabled. The functions available on the monitor may vary depending on the front of each function is provided. Refer to the actual product. 3.1.1 Configuring Brightness 1 Press any button on the model. Next...
... available when Smart Eco Saving is set. This menu is not available when Eye Saver Mode is enabled. The functions available on the monitor may vary depending on the front of each function is provided. Refer to the actual product. 3.1.1 Configuring Brightness 1 Press any button on the model. Next...
User Manual
Page 54
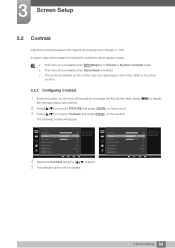
... MSAAMSGUINCGBright is in Cinema or Dynamic Contrast mode. This menu is not available when Game Mode is enabled. The functions available on the monitor may vary depending on the model. Values closer to 100 mean a bigger light/dark contrast. AUTO 54 3 Screen Setup Next, press [MENU] to display the...
... MSAAMSGUINCGBright is in Cinema or Dynamic Contrast mode. This menu is not available when Game Mode is enabled. The functions available on the monitor may vary depending on the model. Values closer to 100 mean a bigger light/dark contrast. AUTO 54 3 Screen Setup Next, press [MENU] to display the...
User Manual
Page 55
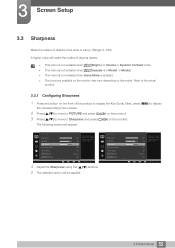
... available when MSAAMSGUINCGUpscale is in Mode1 or Mode2. This menu is not available when Game Mode is enabled. The functions available on the monitor may vary depending on the model. 3 Screen Setup 3.3 Sharpness Make the outline of objects more clear or blurry. (Range: 0~100) A higher value will be applied...
... available when MSAAMSGUINCGUpscale is in Mode1 or Mode2. This menu is not available when Game Mode is enabled. The functions available on the monitor may vary depending on the model. 3 Screen Setup 3.3 Sharpness Make the outline of objects more clear or blurry. (Range: 0~100) A higher value will be applied...
User Manual
Page 56
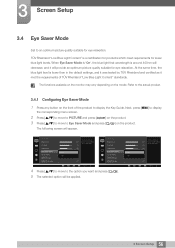
... will be applied. 100 75 60 Off Off Custom Off Set to an optimum picture quality suitable for eye relaxation. The functions available on the monitor may vary depending on the model. When Eye Saver Mode is 'On', the blue light that wavelength is lower than in the default settings, and...
... will be applied. 100 75 60 Off Off Custom Off Set to an optimum picture quality suitable for eye relaxation. The functions available on the monitor may vary depending on the model. When Eye Saver Mode is 'On', the blue light that wavelength is lower than in the default settings, and...

User Manual
Page 57
...display the Key Guide. Off On Always On 100 75 60 Off Custom Off Optimizes image settings for game mode. AUTO When the monitor turns off, enters power-saving mode or changes input sources, Game Mode turns Off even if it is enabled. The functions available on... the monitor may vary depending on the product. 3 Screen Setup 3.5 Game Mode Configure the product screen settings for playing games. The following screen will be applied...
...display the Key Guide. Off On Always On 100 75 60 Off Custom Off Optimizes image settings for game mode. AUTO When the monitor turns off, enters power-saving mode or changes input sources, Game Mode turns Off even if it is enabled. The functions available on... the monitor may vary depending on the product. 3 Screen Setup 3.5 Game Mode Configure the product screen settings for playing games. The following screen will be applied...


