User Manual
Page 2
... the Stand 19 Removing the Stand 20 Adjusting the Product Tilt 21 Anti-theft Lock 22 Installing the Wall Mount 23 Wall Mount Kit Specifications (VESA) 24 Connecting and Using a Source Device Before Connecting 25 Pre-connection Checkpoints 25 Connecting and Using a PC 25 Connection Using the HDMI Cable 25 Connection Using an HDMI-DVI Cable 26 Connection Using the DP Cable 26 Connecting to Headphones or Speakers 27 Connecting the Power 27 Driver Installation 28 Setting Optimum Resolution 28 Screen Setup SAMSUNG MAGIC Bright 29 Configuring SAMSUNG MAGIC Bright...
... the Stand 19 Removing the Stand 20 Adjusting the Product Tilt 21 Anti-theft Lock 22 Installing the Wall Mount 23 Wall Mount Kit Specifications (VESA) 24 Connecting and Using a Source Device Before Connecting 25 Pre-connection Checkpoints 25 Connecting and Using a PC 25 Connection Using the HDMI Cable 25 Connection Using an HDMI-DVI Cable 26 Connection Using the DP Cable 26 Connecting to Headphones or Speakers 27 Connecting the Power 27 Driver Installation 28 Setting Optimum Resolution 28 Screen Setup SAMSUNG MAGIC Bright 29 Configuring SAMSUNG MAGIC Bright...
User Manual
Page 3
... Information Menu and Others Information 57 Displaying Information 57 Configuring Brightness, Contrast and Sharpness from the Initial Screen 58 Configuring Volume in the Initial Screen 59 Installing the Software Easy Setting Box 60 Installing the Software 60 Removing the Software 60 Troubleshooting Guide Requirements Before Contacting Samsung Customer Service Center 61 Testing the Product 61 Checking the Resolution and Frequency 61 Check the following. 62 Q & A 65 Specifications General 67 PowerSaver 69 Standard Signal Mode Table...
... Information Menu and Others Information 57 Displaying Information 57 Configuring Brightness, Contrast and Sharpness from the Initial Screen 58 Configuring Volume in the Initial Screen 59 Installing the Software Easy Setting Box 60 Installing the Software 60 Removing the Software 60 Troubleshooting Guide Requirements Before Contacting Samsung Customer Service Center 61 Testing the Product 61 Checking the Resolution and Frequency 61 Check the following. 62 Q & A 65 Specifications General 67 PowerSaver 69 Standard Signal Mode Table...
User Manual
Page 5
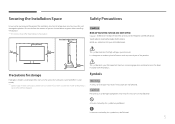
... ALL SERVICING TO QUALIFIED PERSONNEL. Instructions marked by this product. Be sure to make any internal part of space as shown below or greater when installing the product. ――The exterior may cause fire and damage the product. Securing the Installation Space Ensure some space around the product for storage High-glossy models can develop white stains...
... ALL SERVICING TO QUALIFIED PERSONNEL. Instructions marked by this product. Be sure to make any internal part of space as shown below or greater when installing the product. ――The exterior may cause fire and damage the product. Securing the Installation Space Ensure some space around the product for storage High-glossy models can develop white stains...
User Manual
Page 16
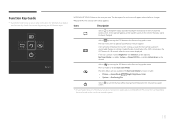
.... OSD control lock: Maintain the current settings, or lock the OSD control to prevent unintended changes to display the Function Key Guide. System Power LED On is available. Selects by pressing the JOG button again. Enable/Disable: To lock/unlock the OSD control, press the LEFT button for each item will be different. The items below are not available if the Eye Saver Mode function is locked, Brightness and Contrast can be viewed. Icons...
.... OSD control lock: Maintain the current settings, or lock the OSD control to prevent unintended changes to display the Function Key Guide. System Power LED On is available. Selects by pressing the JOG button again. Enable/Disable: To lock/unlock the OSD control, press the LEFT button for each item will be different. The items below are not available if the Eye Saver Mode function is locked, Brightness and Contrast can be viewed. Icons...
User Manual
Page 18
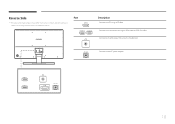
Port 2 Description Connects to improve quality. Specifications are subject to change without notice to a PC using an HDMI cable or HDMI-DVI cable. Connects to the DC power adapter. 18 Reverse Side ――The color and shape of parts may differ from what is shown. Connects to a source device using a DP cable. Connect to an audio output device such as headphones.
Port 2 Description Connects to improve quality. Specifications are subject to change without notice to a PC using an HDMI cable or HDMI-DVI cable. Connects to the DC power adapter. 18 Reverse Side ――The color and shape of parts may differ from what is shown. Connects to a source device using a DP cable. Connect to an audio output device such as headphones.
User Manual
Page 25
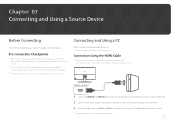
... cables. Ensure you connect a source device first before connecting all connections are completed. Connection Using the HDMI Cable ――Do not connect the power cable before connecting the power cable. 2 HDMI IN 1, HDMI IN 2 1 Connect the HDMI IN 1 or HDMI IN 2 port on the PC using an HDMI cable. 2 Connect the DC power adapter to device. ――Do not connect the power cable until all other devices. Next, turn on the power switch on the PC. 3 Change the input source to HDMI 1 or HDMI 2 controlling the JOG button...
... cables. Ensure you connect a source device first before connecting all connections are completed. Connection Using the HDMI Cable ――Do not connect the power cable before connecting the power cable. 2 HDMI IN 1, HDMI IN 2 1 Connect the HDMI IN 1 or HDMI IN 2 port on the PC using an HDMI cable. 2 Connect the DC power adapter to device. ――Do not connect the power cable until all other devices. Next, turn on the power switch on the PC. 3 Change the input source to HDMI 1 or HDMI 2 controlling the JOG button...
User Manual
Page 26
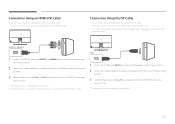
Using a cable longer than 1.5m can affect the picture quality. 2 2 HDMI IN 1, HDMI IN 2 DP IN 1 Connect the HDMI-DVI cable to the product and a power socket. Next, turn on the power switch on the PC. 3 Change the input source to HDMI 1 or HDMI 2 controlling the JOG button UP/DOWN, when input source is not set . ――Provided ports may vary depending on the PC. 2 Connect the DC power adapter to the HDMI IN 1 or HDMI IN 2 port on the...
Using a cable longer than 1.5m can affect the picture quality. 2 2 HDMI IN 1, HDMI IN 2 DP IN 1 Connect the HDMI-DVI cable to the product and a power socket. Next, turn on the power switch on the PC. 3 Change the input source to HDMI 1 or HDMI 2 controlling the JOG button UP/DOWN, when input source is not set . ――Provided ports may vary depending on the PC. 2 Connect the DC power adapter to the HDMI IN 1 or HDMI IN 2 port on the...

User Manual
Page 28
... as follows: English ****x**** **Hz Follow the above settings to set the optimum resolution and frequency for the first time after purchase. Select a language on the product and change the resolution on your PC. 28 Refer to your product model from the website. 2 Follow the instructions given on the screen to Display Properties and check that the resolution and refresh rate are appropriate. Setup Guide Language The optimal resolution for further details...
... as follows: English ****x**** **Hz Follow the above settings to set the optimum resolution and frequency for the first time after purchase. Select a language on the product and change the resolution on your PC. 28 Refer to your product model from the website. 2 Follow the instructions given on the screen to Display Properties and check that the resolution and refresh rate are appropriate. Setup Guide Language The optimal resolution for further details...

User Manual
Page 29
... brightness as brightness. Configuring SAMSUNG MAGIC Bright 1 When the Function Key Guide appears, select by moving the JOG button UP. Refer to an optimum picture quality suitable for the environment where the product will be used. In PC mode Picture SMAAMSGUINCG Bright Brightness Contrast Sharpness Color HDMI Black Level Eye Saver Mode Custom Standard Cinema Dynamic Contrast Set to your preferences. ――This menu is not available when Eco Saving...
... brightness as brightness. Configuring SAMSUNG MAGIC Bright 1 When the Function Key Guide appears, select by moving the JOG button UP. Refer to an optimum picture quality suitable for the environment where the product will be used. In PC mode Picture SMAAMSGUINCG Bright Brightness Contrast Sharpness Color HDMI Black Level Eye Saver Mode Custom Standard Cinema Dynamic Contrast Set to your preferences. ――This menu is not available when Eco Saving...
User Manual
Page 30
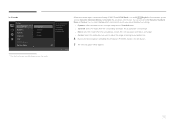
... Bright Brightness Contrast Sharpness Color HDMI Black Level Eye Saver Mode Dynamic Standard Movie Custom Set to AV, MSAAMSGUINCGBright has four automatic picture settings (Dynamic, Standard, Movie and Custom) that are preset at the factory. This also provides a sharp image. •• Movie: Select this mode when the surroundings are dark. The displayed image may differ depending on the model. 30 Off Return When the external input...
... Bright Brightness Contrast Sharpness Color HDMI Black Level Eye Saver Mode Dynamic Standard Movie Custom Set to AV, MSAAMSGUINCGBright has four automatic picture settings (Dynamic, Standard, Movie and Custom) that are preset at the factory. This also provides a sharp image. •• Movie: Select this mode when the surroundings are dark. The displayed image may differ depending on the model. 30 Off Return When the external input...
User Manual
Page 31
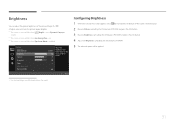
Picture SMAAMSGUINCG Bright Brightness Contrast Sharpness Color HDMI Black Level Eye Saver Mode Custom 100 75 60 Adjust the brightness level. Next, press the JOG button. 2 Move to Picture controlling the JOG button UP/DOWN and press the JOG button. 3 Move to Dynamic Contrast mode. ――This menu is not available when Eco Saving Plus is set . ――This menu is not available when Eye Saver Mode is set to Brightness controlling the JOG...
Picture SMAAMSGUINCG Bright Brightness Contrast Sharpness Color HDMI Black Level Eye Saver Mode Custom 100 75 60 Adjust the brightness level. Next, press the JOG button. 2 Move to Picture controlling the JOG button UP/DOWN and press the JOG button. 3 Move to Dynamic Contrast mode. ――This menu is not available when Eco Saving Plus is set . ――This menu is not available when Eye Saver Mode is set to Brightness controlling the JOG...
User Manual
Page 34
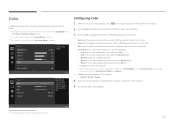
...; Red: Adjust the red saturation level. Next, press the JOG button. 2 Move to Picture controlling the JOG button UP/DOWN and press the JOG button. 3 Move to 100 mean greater intensity for the color. •• Green: Adjust the green saturation level. Custom: Customize the color tone. ――When the external input is connected through HDMI/DP and PC/AV Mode is set to Cinema or Dynamic Contrast mode...
...; Red: Adjust the red saturation level. Next, press the JOG button. 2 Move to Picture controlling the JOG button UP/DOWN and press the JOG button. 3 Move to 100 mean greater intensity for the color. •• Green: Adjust the green saturation level. Custom: Customize the color tone. ――When the external input is connected through HDMI/DP and PC/AV Mode is set to Cinema or Dynamic Contrast mode...
User Manual
Page 35
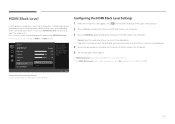
Picture SMAAMSGUINCG Bright Brightness Contrast Sharpness Color HDMI Black Level Eye Saver Mode Normal Low Custom 100 75 60 Optimize HDMI picture brightness and contrast by adjusting the black level of the video signal. 해제 Return Configuring the HDMI Black Level Settings 1 When the Function Key Guide appears, select by moving the JOG button UP. HDMI Black Level If a DVD player or set-top box is connected to the desired option controlling the JOG button UP/DOWN and...
Picture SMAAMSGUINCG Bright Brightness Contrast Sharpness Color HDMI Black Level Eye Saver Mode Normal Low Custom 100 75 60 Optimize HDMI picture brightness and contrast by adjusting the black level of the video signal. 해제 Return Configuring the HDMI Black Level Settings 1 When the Function Key Guide appears, select by moving the JOG button UP. HDMI Black Level If a DVD player or set-top box is connected to the desired option controlling the JOG button UP/DOWN and...
User Manual
Page 40
... HDMI cable. ――A digital output device is connected using the DP cable. ――The input signal is 480p, 576p, 720p, or 1080p and monitor can display normally (Not every model can support all of 16:9. •• Screen Fit: Display the picture with the original aspect ratio without cutting off. ――The function may differ depending on screen. -- In AV mode Picture Game Mode Response Time Picture Size Screen Adjustment...
... HDMI cable. ――A digital output device is connected using the DP cable. ――The input signal is 480p, 576p, 720p, or 1080p and monitor can display normally (Not every model can support all of 16:9. •• Screen Fit: Display the picture with the original aspect ratio without cutting off. ――The function may differ depending on screen. -- In AV mode Picture Game Mode Response Time Picture Size Screen Adjustment...
User Manual
Page 59
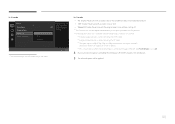
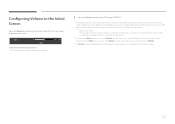
The displayed image may mute the sound or cause choppy audio when applying the headphones or speakers. To deactivate the Mute function, access the Volume control screen, then increase or decrease the Volume. ――The Mute function is disabled if you activate power-saving mode or turn the product off and then on the product may differ depending on the model. 1 Adjust the Volume controlling the JOG button LEFT...
The displayed image may mute the sound or cause choppy audio when applying the headphones or speakers. To deactivate the Mute function, access the Volume control screen, then increase or decrease the Volume. ――The Mute function is disabled if you activate power-saving mode or turn the product off and then on the product may differ depending on the model. 1 Adjust the Volume controlling the JOG button LEFT...
User Manual
Page 60
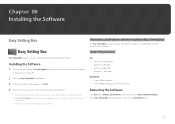
... the hard disk drive Removing the Software Click Start, select Settings/Control Panel, and then double-click Add or Remove Programs. Select Easy Setting Box from the Samsung Electronics website at http://www.samsung.com. 2 Select the Easy Setting Box setup Program. 3 When the Installation Wizard appears, click Next. 4 Follow the instructions given on the screen to use the monitor by the Graphics Card, Motherboard and the Networking...
... the hard disk drive Removing the Software Click Start, select Settings/Control Panel, and then double-click Add or Remove Programs. Select Easy Setting Box from the Samsung Electronics website at http://www.samsung.com. 2 Select the Easy Setting Box setup Program. 3 When the Installation Wizard appears, click Next. 4 Follow the instructions given on the screen to use the monitor by the Graphics Card, Motherboard and the Networking...

User Manual
Page 61
...;The displayed resolution may vary depending on the product. 4 If the message Check Signal Cable appears, the product is operating normally by using the product test function. If the problem persists, contact Samsung Customer Service Center. If the screen remains blank, check the PC system, video controller and cable. Chapter 09 Troubleshooting Guide Requirements Before Contacting Samsung Customer Service Center Before calling Samsung Customer Service Center, test your product is working...
...;The displayed resolution may vary depending on the product. 4 If the message Check Signal Cable appears, the product is operating normally by using the product test function. If the problem persists, contact Samsung Customer Service Center. If the screen remains blank, check the PC system, video controller and cable. Chapter 09 Troubleshooting Guide Requirements Before Contacting Samsung Customer Service Center Before calling Samsung Customer Service Center, test your product is working...
User Manual
Page 62
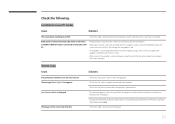
... screen have an option to adjust the screen size, update the graphics card driver to the latest version. (Please contact the graphics card or computer manufacturer for further details about how to the product. 62 Check the cable connection to adjust the screen settings.) Screen issue Issues The power LED is off . Installation issue (PC mode) Issues Solutions The screen keeps switching on all four sides of the screen when an HDMI or HDMI-DVI cable is connected...
... screen have an option to adjust the screen size, update the graphics card driver to the latest version. (Please contact the graphics card or computer manufacturer for further details about how to the product. 62 Check the cable connection to adjust the screen settings.) Screen issue Issues The power LED is off . Installation issue (PC mode) Issues Solutions The screen keeps switching on all four sides of the screen when an HDMI or HDMI-DVI cable is connected...

User Manual
Page 65
... to Control Panel Display Settings, and adjust the resolution. •• Windows Vista: Go to Control Panel Appearance and Personalization Personalize Display Settings, and adjust the resolution. •• Windows 7: Go to Control Panel Appearance and Personalization Display Adjust Resolution, and adjust the resolution. •• Windows 8(Windows 8.1): Go to the user manual for your PC or graphics card for further instructions on adjustment. How can I change the frequency? Refer to Settings Control Panel Appearance and Personalization Display Adjust Resolution, and adjust...
... to Control Panel Display Settings, and adjust the resolution. •• Windows Vista: Go to Control Panel Appearance and Personalization Personalize Display Settings, and adjust the resolution. •• Windows 7: Go to Control Panel Appearance and Personalization Display Adjust Resolution, and adjust the resolution. •• Windows 8(Windows 8.1): Go to the user manual for your PC or graphics card for further instructions on adjustment. How can I change the frequency? Refer to Settings Control Panel Appearance and Personalization Display Adjust Resolution, and adjust...
User Manual
Page 73
... 60Hz means that form a screen. Changing the grey scale through Gamma adjustment will change the screen brightness, tint, size and many other settings using menus displayed on the screen. A horizontal frequency of numerous dots (pixels). The monitor uses VESA DDC (international standard) to create an image. Terminology OSD (On Screen Display)____ On screen display (OSD) allows you to customize on-screen settings to optimize the picture quality as it refreshes to display an image, although the refreshing is invisible to the...
... 60Hz means that form a screen. Changing the grey scale through Gamma adjustment will change the screen brightness, tint, size and many other settings using menus displayed on the screen. A horizontal frequency of numerous dots (pixels). The monitor uses VESA DDC (international standard) to create an image. Terminology OSD (On Screen Display)____ On screen display (OSD) allows you to customize on-screen settings to optimize the picture quality as it refreshes to display an image, although the refreshing is invisible to the...


