

User Manual
Page 2
Starting Picture • Size • 16:9 • Zoom1 • Zoom2 • Wide Fit • 4:3 • Just Scan Sound • Multi-Track Options • Preferred Language • Multi-Track Sound Channel • Antenna • Air • Cable • Auto Program • Air • Cable • Auto • Clear Scrambled Channel • Channel List • All • Added • Favorite • Name • Fine Tune • Signal Strength Setup • Plug & Play
Starting Picture • Size • 16:9 • Zoom1 • Zoom2 • Wide Fit • 4:3 • Just Scan Sound • Multi-Track Options • Preferred Language • Multi-Track Sound Channel • Antenna • Air • Cable • Auto Program • Air • Cable • Auto • Clear Scrambled Channel • Channel List • All • Added • Favorite • Name • Fine Tune • Signal Strength Setup • Plug & Play

User Manual
Page 3
... Mode • Digital Caption Options • SW Upgrade Picture Size D.MENU →[Picture] → ENTER → ENTER→[Size] → , → ENTER You can switch the Size. 1. 16:9 Sets the picture to fit the entire screen. Wide Fit Enlarges the aspect ratio of the picture to 16:9 wide mode. 2. Zoom2 Magnifies the size of the picture on the screen. 3. • Language • V-Chip • V-Chip Lock...
... Mode • Digital Caption Options • SW Upgrade Picture Size D.MENU →[Picture] → ENTER → ENTER→[Size] → , → ENTER You can switch the Size. 1. 16:9 Sets the picture to fit the entire screen. Wide Fit Enlarges the aspect ratio of the picture to 16:9 wide mode. 2. Zoom2 Magnifies the size of the picture on the screen. 3. • Language • V-Chip • V-Chip Lock...
User Manual
Page 4
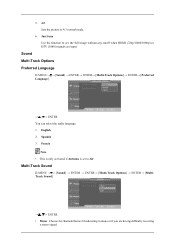
... the audio language. 1. French Note • This is only activated if Antenna is set to 4:3 normal mode. 6. English 2. Spanish 3. Multi-Track Sound D.MENU → → [Sound] → ENTER → ENTER→ [Multi-Track Options] → ENTER→ [MultiTrack Sound] → , → ENTER • Mono : Choose for channels that are broadcasting in mono or if you are input. Just Scan Use the function to...
... the audio language. 1. French Note • This is only activated if Antenna is set to 4:3 normal mode. 6. English 2. Spanish 3. Multi-Track Sound D.MENU → → [Sound] → ENTER → ENTER→ [Multi-Track Options] → ENTER→ [MultiTrack Sound] → , → ENTER • Mono : Choose for channels that are broadcasting in mono or if you are input. Just Scan Use the function to...
User Manual
Page 5
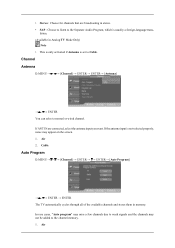
.... Air 2. Channel Antenna D.MENU Channel] → ENTER → ENTER→ [Antenna] → , → ENTER You can select a normal or wired channel. In rare cases, "Auto program" may miss a few channels due to Cable. If ANT IN are broadcasting in stereo. • SAP : Choose to listen to the Separate Audio Program, which is set to weak signals and the channels may appear on the screen. 1.
.... Air 2. Channel Antenna D.MENU Channel] → ENTER → ENTER→ [Antenna] → , → ENTER You can select a normal or wired channel. In rare cases, "Auto program" may miss a few channels due to Cable. If ANT IN are broadcasting in stereo. • SAP : Choose to listen to the Separate Audio Program, which is set to weak signals and the channels may appear on the screen. 1.
User Manual
Page 6
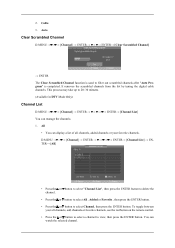
... scrambled channels after "Auto Program" is used to select Channel, then press the ENTER button. Cable 3. You can manage the channels. 1. All • You can display a list of all channels, added channels or your all channels, add channels or favorite channels, use the red button on the remote control. • Press the or button to select a channel to 20~30 minutes. (Available in DTV Mode Only) Channel List D.MENU Channel] → ENTER ENTER→ [Channel List...
... scrambled channels after "Auto Program" is used to select Channel, then press the ENTER button. Cable 3. You can manage the channels. 1. All • You can display a list of all channels, added channels or your all channels, add channels or favorite channels, use the red button on the remote control. • Press the or button to select a channel to 20~30 minutes. (Available in DTV Mode Only) Channel List D.MENU Channel] → ENTER ENTER→ [Channel List...

User Manual
Page 7
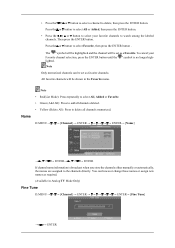
... use the Channel List function, first run Auto Program. D.MENU Channel] → ENTER ENTER→ [Channel List] → → ENTER→ [Added] • Press the , , or button to select a channel to delete the channel. Favorite • You can set as favorites. Added • All selected channels will be shown on Added menu. 3. Note All selected channels will be shown on "Added" menu. Note • A gray-colored channel indicates the channel...
... use the Channel List function, first run Auto Program. D.MENU Channel] → ENTER ENTER→ [Channel List] → → ENTER→ [Added] • Press the , , or button to select a channel to delete the channel. Favorite • You can set as favorites. Added • All selected channels will be shown on Added menu. 3. Note All selected channels will be shown on "Added" menu. Note • A gray-colored channel indicates the channel...
User Manual
Page 8
... required. (Available in the Favorite menu. All favorite channels will be set as favorite channels. Note Only memorized channels can however change these names or assign new names as a Favorite. Note • Red(List Mode): Press repeatedly to select All, Added or Favorite. • Green (Add All): Press to add all channels memorized. Name D.MENU Channel] → ENTER ENTER→ [Name...
... required. (Available in the Favorite menu. All favorite channels will be set as favorite channels. Note Only memorized channels can however change these names or assign new names as a Favorite. Note • Red(List Mode): Press repeatedly to select All, Added or Favorite. • Green (Add All): Press to add all channels memorized. Name D.MENU Channel] → ENTER ENTER→ [Name...
User Manual
Page 9
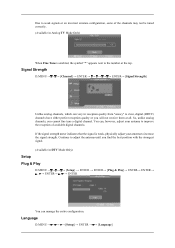
... find the best position with the strongest signal. (Available in DTV Mode Only) Setup Plug & Play D.MENU Setup] → ENTER → ENTER→ [Plug & Play]→ ENTER→ ENTER→ , → ENTER→ , → ENTER You can manage the entire configuration. Signal Strength D.MENU Channel] → ENTER ENTER→ [Signal Strength] Unlike analog channels, which can , however, adjust your antenna to improve the reception of the...
... find the best position with the strongest signal. (Available in DTV Mode Only) Setup Plug & Play D.MENU Setup] → ENTER → ENTER→ [Plug & Play]→ ENTER→ ENTER→ , → ENTER→ , → ENTER You can manage the entire configuration. Signal Strength D.MENU Channel] → ENTER ENTER→ [Signal Strength] Unlike analog channels, which can , however, adjust your antenna to improve the reception of the...
User Manual
Page 10
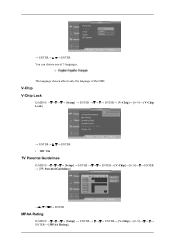
The language chosen affects only the language of 3 languages. V-Chip V-Chip Lock D.MENU Setup] → ENTER ENTER→ [V-Chip]→ [0~9]→ [V-Chip Lock] → ENTER→ , → ENTER • Off / On TV Parental Guidelines D.MENU Setup] → ENTER ENTER→ [V-Chip]→ [0~9]→ → ENTER → [TV Parental Guidelines] ENTER MPAA Rating D.MENU Setup] → ENTER ENTER→ [V-Chip]→ [0~9 ENTER→ [MPAA Rating] → ENTER→ , → ENTER You can choose one of the OSD.
The language chosen affects only the language of 3 languages. V-Chip V-Chip Lock D.MENU Setup] → ENTER ENTER→ [V-Chip]→ [0~9]→ [V-Chip Lock] → ENTER→ , → ENTER • Off / On TV Parental Guidelines D.MENU Setup] → ENTER ENTER→ [V-Chip]→ [0~9]→ → ENTER → [TV Parental Guidelines] ENTER MPAA Rating D.MENU Setup] → ENTER ENTER→ [V-Chip]→ [0~9 ENTER→ [MPAA Rating] → ENTER→ , → ENTER You can choose one of the OSD.
User Manual
Page 11
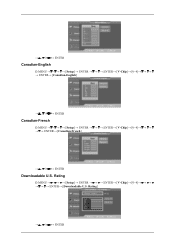
ENTER Canadian-English D.MENU Setup] → ENTER ENTER→ [V-Chip]→ [0~9 ENTER→ [Canadian-English] ENTER Canadian-French D.MENU Setup] → ENTER ENTER→ [V-Chip]→ [0~9 ENTER→ [Canadian-French] ENTER Downloadable U.S. Rating D.MENU Setup] → ENTER ENTER→ [V-Chip]→ [0~9 ENTER→ [Downloadable U.S. Rating] ENTER
ENTER Canadian-English D.MENU Setup] → ENTER ENTER→ [V-Chip]→ [0~9 ENTER→ [Canadian-English] ENTER Canadian-French D.MENU Setup] → ENTER ENTER→ [V-Chip]→ [0~9 ENTER→ [Canadian-French] ENTER Downloadable U.S. Rating D.MENU Setup] → ENTER ENTER→ [V-Chip]→ [0~9 ENTER→ [Downloadable U.S. Rating] ENTER
User Manual
Page 12
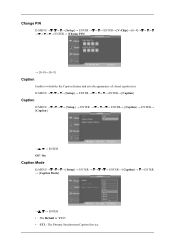
... Off / On Caption Mode D.MENU Setup] → ENTER ENTER→ [Caption] → → ENTER → [Caption Mode] → , → ENTER • The Default is "CC1". • CC1 : The Primary Synchronous Caption Service. Change PIN D.MENU Setup] → ENTER ENTER→ [V-Chip]→ [0~9 ENTER→ [Change PIN] → [0~9]→ [0~9] Caption Enables or disables the Caption feature and sets the appearance of closed caption text.
... Off / On Caption Mode D.MENU Setup] → ENTER ENTER→ [Caption] → → ENTER → [Caption Mode] → , → ENTER • The Default is "CC1". • CC1 : The Primary Synchronous Caption Service. Change PIN D.MENU Setup] → ENTER ENTER→ [V-Chip]→ [0~9 ENTER→ [Change PIN] → [0~9]→ [0~9] Caption Enables or disables the Caption feature and sets the appearance of closed caption text.

User Manual
Page 13
... to CC2. • Text1 : First Text Service. Digital Caption Options D.MENU Setup] → ENTER ENTER→ [Caption ENTER→ [Digital Caption Options] Note "Digital Caption Options" are not sufficient. This may not be in "Caption Mode". Alternate program-related caption data, typically second language captions. • CC4 : Special Non-Synchronous Use Captions. This channel carries data that must be available depending on the...
... to CC2. • Text1 : First Text Service. Digital Caption Options D.MENU Setup] → ENTER ENTER→ [Caption ENTER→ [Digital Caption Options] Note "Digital Caption Options" are not sufficient. This may not be in "Caption Mode". Alternate program-related caption data, typically second language captions. • CC4 : Special Non-Synchronous Use Captions. This channel carries data that must be available depending on the...

User Manual
Page 14
...; Foreground Color D.MENU Setup] → ENTER ENTER→ [Caption ENTER→ [Digital Caption Options ENTER→ [Foreground Color] → , → ENTER Default, White, Black, Red, Green, Blue, Yellow, Magenta, Cyan • Background Color D.MENU Setup] → ENTER ENTER→ [Caption ENTER→ [Digital Caption Options ENTER→ [Background Color] → , → ENTER Default, White, Black, Red, Green, Blue, Yellow, Magenta, Cyan • Foreground Opacity D.MENU Setup...
...; Foreground Color D.MENU Setup] → ENTER ENTER→ [Caption ENTER→ [Digital Caption Options ENTER→ [Foreground Color] → , → ENTER Default, White, Black, Red, Green, Blue, Yellow, Magenta, Cyan • Background Color D.MENU Setup] → ENTER ENTER→ [Caption ENTER→ [Digital Caption Options ENTER→ [Background Color] → , → ENTER Default, White, Black, Red, Green, Blue, Yellow, Magenta, Cyan • Foreground Opacity D.MENU Setup...

User Manual
Page 15
→ , → ENTER Default, Transparent, Translucent, Solid, Flashing • Background Opacity D.MENU Setup] → ENTER ENTER→ [Caption ENTER→ [Digital Caption Options ENTER→ [Background Opacity] → , → ENTER Default, Transparent, Translucent, Solid, Flashing • Return to Default D.MENU Setup] → ENTER ENTER→ [Caption ENTER→ [Digital Caption Options ENTER→ [Return to Default] SW Upgrade D.MENU Setup] → ENTER ENTER→ ENTER→ [SW Upgrade] → ENTER→ [USB] Use to upgrade the software.
→ , → ENTER Default, Transparent, Translucent, Solid, Flashing • Background Opacity D.MENU Setup] → ENTER ENTER→ [Caption ENTER→ [Digital Caption Options ENTER→ [Background Opacity] → , → ENTER Default, Transparent, Translucent, Solid, Flashing • Return to Default D.MENU Setup] → ENTER ENTER→ [Caption ENTER→ [Digital Caption Options ENTER→ [Return to Default] SW Upgrade D.MENU Setup] → ENTER ENTER→ ENTER→ [SW Upgrade] → ENTER→ [USB] Use to upgrade the software.


