
User Manual (user Manual) (English, Spanish)
Page 96
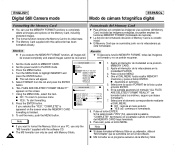
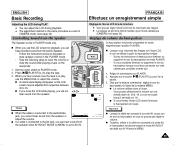
... MENU button. Note M.PLAY MODE 1. Pulse el botón MENÚ. MEMORY SET 6. DELETE FORMAT SERIES 7. I NO : regresa al menú anterior. I The sub menu will be erased completely and erased images cannot be used with Memory Sticks. 96 Nota I The MS formatter can use only the "MS formatter" supplied with this camcorder has been formatted already. Press the ENTER button. CAMERA A/V 2. PRINT MARK PROTECT FILE NO. I Si desea formatear el Memory Stick...
... MENU button. Note M.PLAY MODE 1. Pulse el botón MENÚ. MEMORY SET 6. DELETE FORMAT SERIES 7. I NO : regresa al menú anterior. I The sub menu will be erased completely and erased images cannot be used with Memory Sticks. 96 Nota I The MS formatter can use only the "MS formatter" supplied with this camcorder has been formatted already. Press the ENTER button. CAMERA A/V 2. PRINT MARK PROTECT FILE NO. I Si desea formatear el Memory Stick...

User Manual (user Manual) (English, French)
Page 12
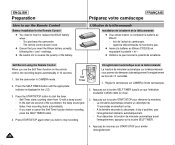
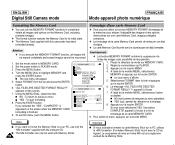
...;s avec votre caméscope numérique. Lithium Ion Battery pack 2. Lithium battery for Remote Control or Clock. (TYPE: CR2025) 7. AC cord 6. Lithium battery (CR2025) 9. Télécommande 8. AUDIO/VIDEO Cable 5. Instruction Book 7. Shoulder strap 3. Software CD 12. Couvre-objectif 11. AC Cord 4. Software CD 10. Câble AUDIO/VIDEO 5. Câble S-VIDEO Optional Accessory 13. Carte Memory Stick 12 Lens Cover 11. Shoulder strap 12. AC Power Adapter (AA-E8 TYPE) 3. Instruction Book 6. Bandouliè...
...;s avec votre caméscope numérique. Lithium Ion Battery pack 2. Lithium battery for Remote Control or Clock. (TYPE: CR2025) 7. AC cord 6. Lithium battery (CR2025) 9. Télécommande 8. AUDIO/VIDEO Cable 5. Instruction Book 7. Shoulder strap 3. Software CD 12. Couvre-objectif 11. AC Cord 4. Software CD 10. Câble AUDIO/VIDEO 5. Câble S-VIDEO Optional Accessory 13. Carte Memory Stick 12 Lens Cover 11. Shoulder strap 12. AC Power Adapter (AA-E8 TYPE) 3. Instruction Book 6. Bandouliè...
User Manual (user Manual) (English, French)
Page 20
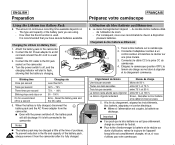
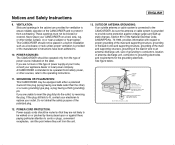
... du caméscope, - Press the START/STOP button to insert or replace the lithium battery when : - Pour désactiver la fonction de minuterie automatique avant l'enregistrement, appuyez sur la touche SELF TIMER. 4. Self Record using the Remote Control When you want to cancel the Self Timer function before recording, press the SELF TIMER button. 4. START/ STOP PHOTO DISPLAY SELF ZERO DATE/ TIMER MEMORY TIME PHOTO SEARCH A.DUB SLOW X2...
... du caméscope, - Press the START/STOP button to insert or replace the lithium battery when : - Pour désactiver la fonction de minuterie automatique avant l'enregistrement, appuyez sur la touche SELF TIMER. 4. Self Record using the Remote Control When you want to cancel the Self Timer function before recording, press the SELF TIMER button. 4. START/ STOP PHOTO DISPLAY SELF ZERO DATE/ TIMER MEMORY TIME PHOTO SEARCH A.DUB SLOW X2...
User Manual (user Manual) (English, French)
Page 24
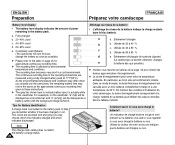
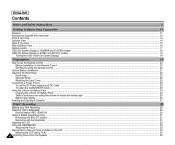
... cord to the camcorder. 2. Chargement du bloc batterie au lithium-ion Power Switch 1. Reset the battery pack and the DC cable 5. When the battery is used. I Pour éviter d'endommager la batterie et de réduire sa durée d'utilisation, retirez-la toujours de l'appareil lorsqu'elle est complètement chargée, et ce, si vous n'utilisez pas votre caméscope. Important...
... cord to the camcorder. 2. Chargement du bloc batterie au lithium-ion Power Switch 1. Reset the battery pack and the DC cable 5. When the battery is used. I Pour éviter d'endommager la batterie et de réduire sa durée d'utilisation, retirez-la toujours de l'appareil lorsqu'elle est complètement chargée, et ce, si vous n'utilisez pas votre caméscope. Important...
User Manual (user Manual) (English, French)
Page 26
...% used (flickers) (The camcorder will be the same as the approximate continuous recording time given in these instructions. ✤ The gray bar shown here to help you may not be displayed as possible) ✤ Please refer to the table on the battery pack to indicate battery leve,l is provided on page 25 for Battery Identification A charge mark is actually white in the operating instructions...
...% used (flickers) (The camcorder will be the same as the approximate continuous recording time given in these instructions. ✤ The gray bar shown here to help you may not be displayed as possible) ✤ Please refer to the table on the battery pack to indicate battery leve,l is provided on page 25 for Battery Identification A charge mark is actually white in the operating instructions...
User Manual (user Manual) (English, French)
Page 35
... the speaker when AV IN/OUT MODE on MENU is set to play , use the LCD screen for playback, you can adjust the LCD during playback. ✤ The adjustment method is the same procedure as used in play the tape. 3. Réglez le commutateur sur PLAYER. 2. I When you use the MENU DIAL to lower the volume or mute the sound while playing a tape on the LCD. I Le volume s'affiche alors à l'écran...
... the speaker when AV IN/OUT MODE on MENU is set to play , use the LCD screen for playback, you can adjust the LCD during playback. ✤ The adjustment method is the same procedure as used in play the tape. 3. Réglez le commutateur sur PLAYER. 2. I When you use the MENU DIAL to lower the volume or mute the sound while playing a tape on the LCD. I Le volume s'affiche alors à l'écran...
User Manual (user Manual) (English, French)
Page 96
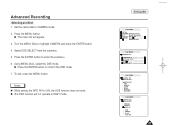
..., use the MEMORY FORMAT functions to PLAYER mode. 3. I NO (non): permet de retourner au menu précédent. FORMAT REALLY?" Using the MENU DIAL, select the item. To exit the menu, push the MENU button. DELETE FORMAT 1. MEMORY SET 7. À l'aide de la molette MENU, sélectionnez l'option M.PLAY SELECT PHOTO QUALITY MPEG4 SIZE PRINT MARK PROTECT FILE NO. I The sub menu will be erased completely and erased images cannot be used with Memory Sticks. 96 Important I YES...
..., use the MEMORY FORMAT functions to PLAYER mode. 3. I NO (non): permet de retourner au menu précédent. FORMAT REALLY?" Using the MENU DIAL, select the item. To exit the menu, push the MENU button. DELETE FORMAT 1. MEMORY SET 7. À l'aide de la molette MENU, sélectionnez l'option M.PLAY SELECT PHOTO QUALITY MPEG4 SIZE PRINT MARK PROTECT FILE NO. I The sub menu will be erased completely and erased images cannot be used with Memory Sticks. 96 Important I YES...
User Manual (user Manual) (ver.1.0) (English)
Page 3
... the plug. ENGLISH 13. OUTDOOR ANTENNA GROUNDING: If an outside antenna or cable system is connected to the CAMCORDER, be sure the antenna or cable system is grounded to provide some protection against them, paying particular attention to cords or plugs, convenient receptacles, and the point where they exit from battery power, or other sources, refer to the operating instructions. 11. This CAMCORDER...
... the plug. ENGLISH 13. OUTDOOR ANTENNA GROUNDING: If an outside antenna or cable system is connected to the CAMCORDER, be sure the antenna or cable system is grounded to provide some protection against them, paying particular attention to cords or plugs, convenient receptacles, and the point where they exit from battery power, or other sources, refer to the operating instructions. 11. This CAMCORDER...
User Manual (user Manual) (ver.1.0) (English)
Page 6
... Lens Cover...22 Connecting a Power Source ...23 To use the AC Power adapter and DC Cable ...23 To select the CAMCORDER mode...23 Using the Lithium Ion Battery Pack ...24 Charging the Lithium Ion Battery Pack ...24 Table of continuous recording time based on model and battery type ...25 Battery level display ...26 Inserting and Ejecting a Cassette ...27 BASIC Recording ...28 Making your First Recording ...28 Selecting OSD LANGUAGE ...29 Record Search (REC SEARCH) ...30 Hints for Stable Image Recording...
... Lens Cover...22 Connecting a Power Source ...23 To use the AC Power adapter and DC Cable ...23 To select the CAMCORDER mode...23 Using the Lithium Ion Battery Pack ...24 Charging the Lithium Ion Battery Pack ...24 Table of continuous recording time based on model and battery type ...25 Battery level display ...26 Inserting and Ejecting a Cassette ...27 BASIC Recording ...28 Making your First Recording ...28 Selecting OSD LANGUAGE ...29 Record Search (REC SEARCH) ...30 Hints for Stable Image Recording...

User Manual (user Manual) (ver.1.0) (English)
Page 7
... AE ...43 WHT. BALANCE (WHITE BALANCE) ...44 Zooming In and Out ...45 Tele MACRO ...45 Digital Zoom ...46 DIS (Digital Image Stabilizer) ...47 DSE (Digital Special Effects) SELECT ...48 Selecting an effect ...49 REC MODE ...50 AUDIO MODE ...51 WIND CUT ...52 DATE/TIME ...53 TV DISPLAY ...54 Using Quick Menu ...55 Setting the Quick menu ...56 SHUTTER SPEED & EXPOSURE ...57 SLOW SHUTTER(Low Shutter Speed) ...58 EASY Mode (for Beginners) ...59 AF/MF (Auto Focus/Manual Focus) ...60 Auto Focusing ...60 Manual Focusing ...60 BLC (Back...
... AE ...43 WHT. BALANCE (WHITE BALANCE) ...44 Zooming In and Out ...45 Tele MACRO ...45 Digital Zoom ...46 DIS (Digital Image Stabilizer) ...47 DSE (Digital Special Effects) SELECT ...48 Selecting an effect ...49 REC MODE ...50 AUDIO MODE ...51 WIND CUT ...52 DATE/TIME ...53 TV DISPLAY ...54 Using Quick Menu ...55 Setting the Quick menu ...56 SHUTTER SPEED & EXPOSURE ...57 SLOW SHUTTER(Low Shutter Speed) ...58 EASY Mode (for Beginners) ...59 AF/MF (Auto Focus/Manual Focus) ...60 Auto Focusing ...60 Manual Focusing ...60 BLC (Back...
User Manual (user Manual) (ver.1.0) (English)
Page 16
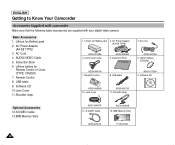
... 12 Instruction Book AD39-00001A 7. Remote Control 8. AC Cord 4. Software CD 10.Lens Cover 11.Shoulder strap 1. Lens Cover AD39-00073A 11. Software CD Optional Accessories 12.S-VIDEO Cable 13.8MB Memory Stick AD97-08447A 12. ENGLISH Getting to Know Your Camcorder Accessories Supplied with camcorder Make sure that the following basic accessories are supplied with your digital video camera. Lithium battery (CR2025) AD43-10130H 9. USB cable 9. Shoulder strap 3. AC Power Adapter (AA-E8 TYPE) 3. AUDIO/VIDEO Cable...
... 12 Instruction Book AD39-00001A 7. Remote Control 8. AC Cord 4. Software CD 10.Lens Cover 11.Shoulder strap 1. Lens Cover AD39-00073A 11. Software CD Optional Accessories 12.S-VIDEO Cable 13.8MB Memory Stick AD97-08447A 12. ENGLISH Getting to Know Your Camcorder Accessories Supplied with camcorder Make sure that the following basic accessories are supplied with your digital video camera. Lithium battery (CR2025) AD43-10130H 9. USB cable 9. Shoulder strap 3. AC Power Adapter (AA-E8 TYPE) 3. AUDIO/VIDEO Cable...
User Manual (user Manual) (ver.1.0) (English)
Page 53
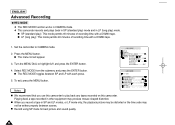
... highlight CAMERA and press the ENTER button. 4. Turn the MENU DIAL to ON, the DSE function does not work. Press the ENTER button to confirm the DSE mode. 7. Using MENU DIAL, select the DSE mode. I Press the ENTER button to enter the submenu. 6. I The menu list will not operate in EASY mode. ENGLISH CAM MODE INITIAL CAMERA A/V MEMORY VIEWER PROGRAM AE WHT. Set the camcorder to CAMERA mode. 2. Press the MENU button. BALANCE D.ZOOM DIS DSE SELECT CAM MODE CAMERA SET DSE...
... highlight CAMERA and press the ENTER button. 4. Turn the MENU DIAL to ON, the DSE function does not work. Press the ENTER button to confirm the DSE mode. 7. Using MENU DIAL, select the DSE mode. I Press the ENTER button to enter the submenu. 6. I The menu list will not operate in EASY mode. ENGLISH CAM MODE INITIAL CAMERA A/V MEMORY VIEWER PROGRAM AE WHT. Set the camcorder to CAMERA mode. 2. Press the MENU button. BALANCE D.ZOOM DIS DSE SELECT CAM MODE CAMERA SET DSE...
User Manual (user Manual) (ver.1.0) (English)
Page 54
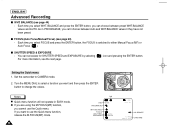
... record a tape in SP and LP modes, or LP mode only, the playback picture may be distorted or the time code may produce mosaic shaped distortion. Select REC MODE from the submenu and press the ENTER button. I The menu list will appear. 3. I Record using SP mode for best picture and sound quality. 50 To exit, press the MENU button. I When you use this camcorder to play back any tapes recorded on this camcorder. Notes CAM MODE A / V SET REC MODE PHOTO SEARCH PHOTO COPY AUDIO MODE AUDIO...
... record a tape in SP and LP modes, or LP mode only, the playback picture may be distorted or the time code may produce mosaic shaped distortion. Select REC MODE from the submenu and press the ENTER button. I The menu list will appear. 3. I Record using SP mode for best picture and sound quality. 50 To exit, press the MENU button. I When you use this camcorder to play back any tapes recorded on this camcorder. Notes CAM MODE A / V SET REC MODE PHOTO SEARCH PHOTO COPY AUDIO MODE AUDIO...
User Manual (user Manual) (ver.1.0) (English)
Page 60
... ENTER button, you can choose between Auto and WHT.BALANCE values it they have not been preset. Set the camcorder to either Manual Focus (MF) or Auto Focus ( ). Each time you want to change the values. I Quick menu function will not operate in PROGRAM AE, you can 't choose between preset WHT.BALANCE values and AUTO. Each time you want and then press the ENTER button to use the Quick menu. Notes I SHUTTER SPEED & EXPOSURE...
... ENTER button, you can choose between Auto and WHT.BALANCE values it they have not been preset. Set the camcorder to either Manual Focus (MF) or Auto Focus ( ). Each time you want to change the values. I Quick menu function will not operate in PROGRAM AE, you can 't choose between preset WHT.BALANCE values and AUTO. Each time you want and then press the ENTER button to use the Quick menu. Notes I SHUTTER SPEED & EXPOSURE...
User Manual (user Manual) (ver.1.0) (English)
Page 74
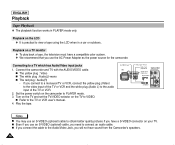
... the TV or VCR user's manual. 4. Play the tape. Turn on the TV and set the TV/VIDEO selector on the camcorder to VIDEO. Set the power switch on the TV to PLAYER mode. 3. I The red plug : Audio(R) - I The yellow plug : Video I The white plug : Audio(L)-mono I Even if you use an S-VIDEO (optional) cable, you use an S-VIDEO (optional) cable to connect an audio cable. Connecting to the audio input of the TV or VCR and the white plug (Audio L) to a TV which has Audio/Video input jacks 1. If you...
... the TV or VCR user's manual. 4. Play the tape. Turn on the TV and set the TV/VIDEO selector on the camcorder to VIDEO. Set the power switch on the TV to PLAYER mode. 3. I The red plug : Audio(R) - I The yellow plug : Video I The white plug : Audio(L)-mono I Even if you use an S-VIDEO (optional) cable, you use an S-VIDEO (optional) cable to connect an audio cable. Connecting to the audio input of the TV or VCR and the white plug (Audio L) to a TV which has Audio/Video input jacks 1. If you...

User Manual (user Manual) (ver.1.0) (English)
Page 85
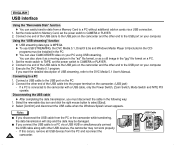
... to CAMERA. 2. I Editing Software Using the "PC camera" function ✤ You can use this camcorder as a PC CAMERA. ✤ When you connect to a Web site that can provide video chatting functions, you can be viewed using the POWER SWITCH, MODE SWITCH, ZOOM SWITCH and NITE PIX SWITCH to begin installation. - If the installation selection screen does not appear after inserting the CD, click "Run" on the Windows "Start" menu and execute SETUP.EXE file to avoid errors. 1. I DVC Driver: USB removable Disk Driver (Windows...
... to CAMERA. 2. I Editing Software Using the "PC camera" function ✤ You can use this camcorder as a PC CAMERA. ✤ When you connect to a Web site that can provide video chatting functions, you can be viewed using the POWER SWITCH, MODE SWITCH, ZOOM SWITCH and NITE PIX SWITCH to begin installation. - If the installation selection screen does not appear after inserting the CD, click "Run" on the Windows "Start" menu and execute SETUP.EXE file to avoid errors. 1. I DVC Driver: USB removable Disk Driver (Windows...
User Manual (user Manual) (ver.1.0) (English)
Page 86
... Power Switch, Zoom Switch, Mode Switch and NITE PIX operate. Connect a USB cable to select [Eject]. 2. Select the removable disc icon and click the right mouse button to the USB port on the PC. 2. If this occurs, remove all USB devices from the PC or the camcorder while transferring, the data transmission will stop and the data may not work properly. - ENGLISH USB interface Using the "Removable Disk" function ✤ You can also store it as a moving picture in the "asf" file format...
... Power Switch, Zoom Switch, Mode Switch and NITE PIX operate. Connect a USB cable to select [Eject]. 2. Select the removable disc icon and click the right mouse button to the USB port on the PC. 2. If this occurs, remove all USB devices from the PC or the camcorder while transferring, the data transmission will stop and the data may not work properly. - ENGLISH USB interface Using the "Removable Disk" function ✤ You can also store it as a moving picture in the "asf" file format...
User Manual (user Manual) (ver.1.0) (English)
Page 109
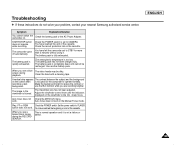
START/STOP button Check the POWER switch is completely dead, and cannot be dirty. When you see a broken block image during playback. Clean the head with a cleaning tape. The Viewfinder lens has not been adjusted. Troubleshooting ✤ If these instructions do not solve your problem, contact your nearest Samsung authorized service center. does not operate You have reached the beginning or end of the cassette. The camcorder goes off automatically. The battery pack...
START/STOP button Check the POWER switch is completely dead, and cannot be dirty. When you see a broken block image during playback. Clean the head with a cleaning tape. The Viewfinder lens has not been adjusted. Troubleshooting ✤ If these instructions do not solve your problem, contact your nearest Samsung authorized service center. does not operate You have reached the beginning or end of the cassette. The camcorder goes off automatically. The battery pack...
User Manual (user Manual) (ver.1.0) (English)
Page 110
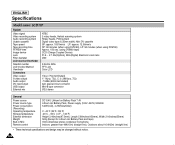
... Video signal Video recording system Audio recording system Usable cassette Tape speed Tape recording time FF/REW time Image device Lens Filter diameter LCD monitor/Viewfinder Size/dot number LCD monitor Method Viewfinder Connectors Video output S-video output Audio output DV input/output USB output External mic NTSC 2 rotary heads, Helical scanning system Rotary heads, PCM system Digital video tape (6.35mm width): Mini DV cassette SP: approx. 18.81mm/s LP: approx. 12.56mm/s SP: 60 minutes (when using DVM 60), LP: 90 minutes (when using DVM 60) Approx. 150 sec. (using DVM60 tape) CCD (Charge...
... Video signal Video recording system Audio recording system Usable cassette Tape speed Tape recording time FF/REW time Image device Lens Filter diameter LCD monitor/Viewfinder Size/dot number LCD monitor Method Viewfinder Connectors Video output S-video output Audio output DV input/output USB output External mic NTSC 2 rotary heads, Helical scanning system Rotary heads, PCM system Digital video tape (6.35mm width): Mini DV cassette SP: approx. 18.81mm/s LP: approx. 12.56mm/s SP: 60 minutes (when using DVM 60), LP: 90 minutes (when using DVM 60) Approx. 150 sec. (using DVM60 tape) CCD (Charge...
User Manual (user Manual) (ver.1.0) (English)
Page 111
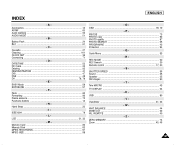
... - D DATE/TIME 53 DC Cable 23 Deleting ...95 DEMONSTRATION 41 DIS ...47 DSE ...48 DV ...78, 79 - L- LCD ...31, 32 - M - PPB DSE ...75 PHOTO copy 92 PHOTO quality 87 PHOTO SEARCH 65 PROGRAM AE 42 Protection 94 - V - Viewfinder 31, 33 - REMOTE 40 - E - Q Quick Menu 55 - T Tele MACRO 45 TV DISPLAY 54 - Cassette ...27 Cleaning 101 CLOCK SET 39 Connecting 71 - Fade ...62 Formatting 96 Frame advance 73 Functions buttons 14 - R REC MODE...
... - D DATE/TIME 53 DC Cable 23 Deleting ...95 DEMONSTRATION 41 DIS ...47 DSE ...48 DV ...78, 79 - L- LCD ...31, 32 - M - PPB DSE ...75 PHOTO copy 92 PHOTO quality 87 PHOTO SEARCH 65 PROGRAM AE 42 Protection 94 - V - Viewfinder 31, 33 - REMOTE 40 - E - Q Quick Menu 55 - T Tele MACRO 45 TV DISPLAY 54 - Cassette ...27 Cleaning 101 CLOCK SET 39 Connecting 71 - Fade ...62 Formatting 96 Frame advance 73 Functions buttons 14 - R REC MODE...


