
User Manual Ver.1.0 (English)
Page 2
... Machine overview 20 Control panel overview 24 Turning on the machine 28 Installing the driver locally 29 Reinstalling the driver 30 2. Menu Overview and Basic Setup Menu overview 32 Machine's basic settings 38 Media and tray 40 Basic printing 52 Basic copying 58 Basic scanning 62 Basic faxing 63 Using USB...
... Machine overview 20 Control panel overview 24 Turning on the machine 28 Installing the driver locally 29 Reinstalling the driver 30 2. Menu Overview and Basic Setup Menu overview 32 Machine's basic settings 38 Media and tray 40 Basic printing 52 Basic copying 58 Basic scanning 62 Basic faxing 63 Using USB...

User Manual Ver.1.0 (English)
Page 6
...• Print watermark: You can customize your documents with a USB interface and/or a network interface. • Using the WPS (Wi-Fi Protected Setup™) button - See "Introducing wireless set various wireless network settings using a USB cable or a network cable. • Using the Wi-Fi Direct... and the access point (a wireless router). • Using the USB cable or a network cable - You can conveniently print from the Samsung website, www.samsung.com > find your product > Support or Downloads. Key benefits • Smart Update allows you to check for Windows. • If...
...• Print watermark: You can customize your documents with a USB interface and/or a network interface. • Using the WPS (Wi-Fi Protected Setup™) button - See "Introducing wireless set various wireless network settings using a USB cable or a network cable. • Using the Wi-Fi Direct... and the access point (a wireless router). • Using the USB cable or a network cable - You can conveniently print from the Samsung website, www.samsung.com > find your product > Support or Downloads. Key benefits • Smart Update allows you to check for Windows. • If...

User Manual Ver.1.0 (English)
Page 29
... a USB cable no longer than 3 meters (118 inches). 4 Follow the instructions in the installation window. You can select the software applications in the installation window. X:\Setup.exe replacing "X" with the letter, which represents your machine is a machine directly attached to Install Window. 14 Windows 1 Insert the supplied software CD into your...
... a USB cable no longer than 3 meters (118 inches). 4 Follow the instructions in the installation window. You can select the software applications in the installation window. X:\Setup.exe replacing "X" with the letter, which represents your machine is a machine directly attached to Install Window. 14 Windows 1 Insert the supplied software CD into your...
User Manual Ver.1.0 (English)
Page 31
2. Menu Overview and Basic Setup This chapter provides information about the overall menu structure and the basic setup options. • Menu overview 32 • Machine's basic settings 38 • Media and tray 40 • Basic printing 52 • Basic copying 58 • Basic scanning 62 • Basic faxing 63 • Using USB memory device 67
2. Menu Overview and Basic Setup This chapter provides information about the overall menu structure and the basic setup options. • Menu overview 32 • Machine's basic settings 38 • Media and tray 40 • Basic printing 52 • Basic copying 58 • Basic scanning 62 • Basic faxing 63 • Using USB memory device 67
User Manual Ver.1.0 (English)
Page 32
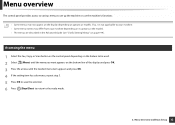
... selection. 6 Press (Stop/Clear) to return to be used. 2 Select (Menu) until the menu you want appears on options or models. Menu Overview and Basic Setup 32
... selection. 6 Press (Stop/Clear) to return to be used. 2 Select (Menu) until the menu you want appears on options or models. Menu Overview and Basic Setup 32
User Manual Ver.1.0 (English)
Page 33
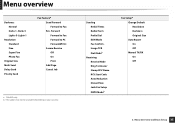
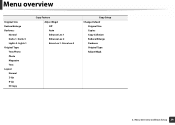
...Secure Receive Off On Print Add Page Cancel Job a. Sending Redial Times Redial Term Prefix Dial ECM Mode Fax Confirm. Menu Overview and Basic Setup 33 Menu overview Darkness Normal Dark+1- Image TCR Dial Modeb Receiving Receive Mode Ring To Answer Stamp RCV Name RCV Start Code Auto Reduction ...Discard Size Junk Fax Setup DRPD Modeb Fax Setupa Change Default Resolution Darkness Original Size Auto Report On Off Manual TX/RX On Off 2. C46xFW only. Dark+5 Light...
...Secure Receive Off On Print Add Page Cancel Job a. Sending Redial Times Redial Term Prefix Dial ECM Mode Fax Confirm. Menu Overview and Basic Setup 33 Menu overview Darkness Normal Dark+1- Image TCR Dial Modeb Receiving Receive Mode Ring To Answer Stamp RCV Name RCV Start Code Auto Reduction ...Discard Size Junk Fax Setup DRPD Modeb Fax Setupa Change Default Resolution Darkness Original Size Auto Report On Off Manual TX/RX On Off 2. C46xFW only. Dark+5 Light...
User Manual Ver.1.0 (English)
Page 34
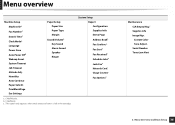
Dark+5 Light+5- Off Auto Enhance Lev.1 Enhance Lev.2 Erase Lev.1- Menu overview Original Size Reduce/Enlarge Darkness Normal Dark+1- Erase Lev.4 Copy Setup Change Default Original Size Copies Copy Collation Reduce/Enlarge Darkness Original Type Adjust Bkgd. 2. Light+1 Original Type Text/Photo Photo Magazine Text Layout Normal 2-Up 4-Up ID Copy Copy Feature Adjust Bkgd. Menu Overview and Basic Setup 34
Dark+5 Light+5- Off Auto Enhance Lev.1 Enhance Lev.2 Erase Lev.1- Menu overview Original Size Reduce/Enlarge Darkness Normal Dark+1- Erase Lev.4 Copy Setup Change Default Original Size Copies Copy Collation Reduce/Enlarge Darkness Original Type Adjust Bkgd. 2. Light+1 Original Type Text/Photo Photo Magazine Text Layout Normal 2-Up 4-Up ID Copy Copy Feature Adjust Bkgd. Menu Overview and Basic Setup 34
User Manual Ver.1.0 (English)
Page 35
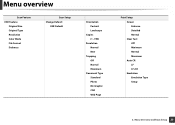
Menu Overview and Basic Setup 35 Menu overview Scan Feature USB Feature Original Size Original Type Resolution Color Mode File Format Darkness Scan Setup Change Default USB Default Orientation Portrait Landscape Copies [1 - 999] Resolution Normal Best Trapping Off Normal Maximum Document Type Standard Photo Biz Graphic CAD Web Page Print Setup Screen Enhance Detailed Normal Clear Text Off Minimum Normal Maximum Auto CR LF LF+CR Emulation Emulation Type Setup 2.
Menu Overview and Basic Setup 35 Menu overview Scan Feature USB Feature Original Size Original Type Resolution Color Mode File Format Darkness Scan Setup Change Default USB Default Orientation Portrait Landscape Copies [1 - 999] Resolution Normal Best Trapping Off Normal Maximum Document Type Standard Photo Biz Graphic CAD Web Page Print Setup Screen Enhance Detailed Normal Clear Text Off Minimum Normal Maximum Auto CR LF LF+CR Emulation Emulation Type Setup 2.
User Manual Ver.1.0 (English)
Page 36
... Timeout Job Timeout Altitude Adj. C46xFW only. C46xWonly c. Custom Color Tone Adjust. PrintBlankPage Eco Settings Paper Setup Paper Size Paper Type Margin Sound/Volumea Key Sound Alarm Sound Speaker Ringer a. Serial Number TonerLow Alert 2. System Setup Report Configuration Supplies Info. Demo Page Address Booka Fax Confirm.a Fax Senta Fax Receiveda Schedule Jobsa...
... Timeout Job Timeout Altitude Adj. C46xFW only. C46xWonly c. Custom Color Tone Adjust. PrintBlankPage Eco Settings Paper Setup Paper Size Paper Type Margin Sound/Volumea Key Sound Alarm Sound Speaker Ringer a. Serial Number TonerLow Alert 2. System Setup Report Configuration Supplies Info. Demo Page Address Booka Fax Confirm.a Fax Senta Fax Receiveda Schedule Jobsa...
User Manual Ver.1.0 (English)
Page 37
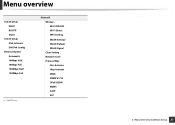
Menu overview TCP/IP (IPv4) DHCP BOOTP Static TCP/IP (IPv6) IPv6 Activate DHCPv6 Config Ethernet Speed Automatic 10Mbps Half 10Mbps Full 100Mbps Half 100Mbps Full a. Net. C46xFW only. Activate Http Activate WINS SNMP V1/V2 UPnP(SSDP) MDNS SetIP SLP 2. Network Wireless Wi-Fi ON/OFF Wi-Fi Direct WPS Setting WLAN Settinga WLAN Default WLAN Signal Clear Setting Network Conf. Menu Overview and Basic Setup 37 Protocol Mgr.
Menu overview TCP/IP (IPv4) DHCP BOOTP Static TCP/IP (IPv6) IPv6 Activate DHCPv6 Config Ethernet Speed Automatic 10Mbps Half 10Mbps Full 100Mbps Half 100Mbps Full a. Net. C46xFW only. Activate Http Activate WINS SNMP V1/V2 UPnP(SSDP) MDNS SetIP SLP 2. Network Wireless Wi-Fi ON/OFF Wi-Fi Direct WPS Setting WLAN Settinga WLAN Default WLAN Signal Clear Setting Network Conf. Menu Overview and Basic Setup 37 Protocol Mgr.
User Manual Ver.1.0 (English)
Page 38
...264. • It may want , then press OK. • Language: change it for the correct time being. For Windows and Mac users, you set from Samsung Easy Printer Manager > (Switch to advanced mode) > Device Settings, see "Keypad letters and numbers" on page 221). • Month = 01 to 12 •... the machine's settings by using the machine for a while, use this feature to save power. 2. Menu Overview and Basic Setup 38 If, however, they are used in Samsung Easy Printer Manager program. - To change the machine's default settings, follow these steps: It may be necessary to press OK...
...264. • It may want , then press OK. • Language: change it for the correct time being. For Windows and Mac users, you set from Samsung Easy Printer Manager > (Switch to advanced mode) > Device Settings, see "Keypad letters and numbers" on page 221). • Month = 01 to 12 •... the machine's settings by using the machine for a while, use this feature to save power. 2. Menu Overview and Basic Setup 38 If, however, they are used in Samsung Easy Printer Manager program. - To change the machine's default settings, follow these steps: It may be necessary to press OK...

User Manual Ver.1.0 (English)
Page 39
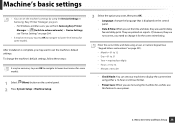
... "Setting the paper size and type" on page 46. • See "Setting up the fax address book" on the control panel. Menu Overview and Basic Setup 39 Machine's basic settings • When you press the Power/Wakeup button, start printing, or a fax is determined by the height of the machine above... quality is affected by atmospheric pressure, which atmospheric pressure is received, the product will wake up from the power saving mode. • Press (Menu) > System Setup > Machine Setup > Wakeup Event > On on page 222. 2.
... "Setting the paper size and type" on page 46. • See "Setting up the fax address book" on the control panel. Menu Overview and Basic Setup 39 Machine's basic settings • When you press the Power/Wakeup button, start printing, or a fax is determined by the height of the machine above... quality is affected by atmospheric pressure, which atmospheric pressure is received, the product will wake up from the power saving mode. • Press (Menu) > System Setup > Machine Setup > Wakeup Event > On on page 222. 2.

User Manual Ver.1.0 (English)
Page 40
... registration, image skew, or jamming of the paper. 2. The use the inkjet photo paper with this machine. Menu Overview and Basic Setup 40 Such repairs are not covered by Samsung's warranty or service agreements. • Make sure not to use of inflammable media or foreign materials left in the printer may lead...
... registration, image skew, or jamming of the paper. 2. The use the inkjet photo paper with this machine. Menu Overview and Basic Setup 40 Such repairs are not covered by Samsung's warranty or service agreements. • Make sure not to use of inflammable media or foreign materials left in the printer may lead...
User Manual Ver.1.0 (English)
Page 41
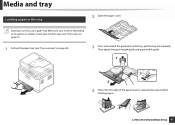
Menu Overview and Basic Setup 41 Then adjust the paper length guide and paper width guide. 1 32 2 4 Flex or fan the edge of the paper stack to separate the pages before loading papers. 2. Check your machine depending on page 40). 3 Press and unlatch the guide lock in the tray 2 Open the paper cover. Media and tray 3 Loading paper in the tray, pull the tray out manually. Illustrations on this user's guide may differ from your machine type (see "Front view" on page 21). 1 Pull out the paper tray (see "Tray overview" on its options or models.
Menu Overview and Basic Setup 41 Then adjust the paper length guide and paper width guide. 1 32 2 4 Flex or fan the edge of the paper stack to separate the pages before loading papers. 2. Check your machine depending on page 40). 3 Press and unlatch the guide lock in the tray 2 Open the paper cover. Media and tray 3 Loading paper in the tray, pull the tray out manually. Illustrations on this user's guide may differ from your machine type (see "Front view" on page 21). 1 Pull out the paper tray (see "Tray overview" on its options or models.

User Manual Ver.1.0 (English)
Page 42
...; If you want to print facing up. 1 For paper smaller than Legal-sized, press and unlatch the guide lock in manually. Menu Overview and Basic Setup 42 Then adjust the paper length guide and paper width guide. 1 2 • Do not push the paper width guide too far causing the media to...
...; If you want to print facing up. 1 For paper smaller than Legal-sized, press and unlatch the guide lock in manually. Menu Overview and Basic Setup 42 Then adjust the paper length guide and paper width guide. 1 2 • Do not push the paper width guide too far causing the media to...
User Manual Ver.1.0 (English)
Page 43
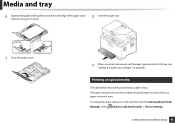
Menu Overview and Basic Setup 43 The paper setting in tray. Media and tray 6 Squeeze the paper width guide and slide it to the edge of the paper stack without a paper mismatch error. To change the paper setting set in the machine, from the Samsung Easy Printer Manager select (Switch to print without...
Menu Overview and Basic Setup 43 The paper setting in tray. Media and tray 6 Squeeze the paper width guide and slide it to the edge of the paper stack without a paper mismatch error. To change the paper setting set in the machine, from the Samsung Easy Printer Manager select (Switch to print without...
User Manual Ver.1.0 (English)
Page 44
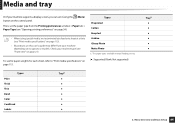
... media specifications" on page 21). To see "Front view" on page 115. Types Preprinted Cotton Recycled Archive Glossy Photo Matte Photo a. Menu Overview and Basic Setup 44 Check your machine depending on its options or models.
... media specifications" on page 21). To see "Front view" on page 115. Types Preprinted Cotton Recycled Archive Glossy Photo Matte Photo a. Menu Overview and Basic Setup 44 Check your machine depending on its options or models.

User Manual Ver.1.0 (English)
Page 45
... labels with wrinkles, bubbles, or other indications of separation. • Make sure that there is designed for use in any direction. - Menu Overview and Basic Setup 45 Adhesives: Should be stable at least 6.4 mm (0.25 inches) away from the backing sheet or are wrinkled, bubbled, or otherwise damaged. Condition: Do not...
... labels with wrinkles, bubbles, or other indications of separation. • Make sure that there is designed for use in any direction. - Menu Overview and Basic Setup 45 Adhesives: Should be stable at least 6.4 mm (0.25 inches) away from the backing sheet or are wrinkled, bubbled, or otherwise damaged. Condition: Do not...
User Manual Ver.1.0 (English)
Page 46
...It may be necessary to press OK to navigate to lower-level menus for some models. 1 Select (Menu) button on the control panel. 2 Press System Setup > Paper Setup > Paper Size or Paper Type. 3 Select the tray and the option you want. 4 Press OK to the machine's fusing temperature for 0.1 second (about ... print quality is dry. During the fusing process, wet ink can set the paper type from the Samsung Easy Printer Manager select (Switch to print without a paper mismatch error. Menu Overview and Basic Setup 46 Then, set it using the control panel buttons. • Must be facing up with an ...
...It may be necessary to press OK to navigate to lower-level menus for some models. 1 Select (Menu) button on the control panel. 2 Press System Setup > Paper Setup > Paper Size or Paper Type. 3 Select the tray and the option you want. 4 Press OK to the machine's fusing temperature for 0.1 second (about ... print quality is dry. During the fusing process, wet ink can set the paper type from the Samsung Easy Printer Manager select (Switch to print without a paper mismatch error. Menu Overview and Basic Setup 46 Then, set it using the control panel buttons. • Must be facing up with an ...
User Manual Ver.1.0 (English)
Page 47
... Printing Preferences (see "Opening printing preferences" on the output support, and the output support will help the printed pages to align. Menu Overview and Basic Setup 47 Media and tray 5 Press (Stop/Clear) to return to ready mode. • If you do not touch the surface, and do not allow children...
... Printing Preferences (see "Opening printing preferences" on the output support, and the output support will help the printed pages to align. Menu Overview and Basic Setup 47 Media and tray 5 Press (Stop/Clear) to return to ready mode. • If you do not touch the surface, and do not allow children...


