

Operating Instructions
Page 2
... the laser beam used in accordance with the instructions, may rise considerably inside the car. • After playing, store the disc in a particular installation. This symbol is no guarantee that to which can radiate radio frequency energy and, if not installed and used in a residential installation. Record the serial number in the U.S.A Owner's Record The model and serial numbers are located at the rear of the unit...
... the laser beam used in accordance with the instructions, may rise considerably inside the car. • After playing, store the disc in a particular installation. This symbol is no guarantee that to which can radiate radio frequency energy and, if not installed and used in a residential installation. Record the serial number in the U.S.A Owner's Record The model and serial numbers are located at the rear of the unit...
Operating Instructions
Page 5
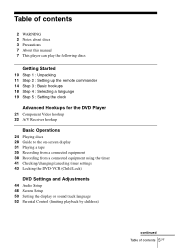
...2 : Setting up the remote commander 14 Step 3 : Basic hookups 18 Step 4 : Selecting a language 19 Step 5 : Setting the clock Advanced Hookups for the DVD Player 21 Component Video hookup 22 A/V Receiver hookup Basic Operations 24 Playing discs 28 Guide to the on-screen display 31 Playing a tape 35 Recording from a connected equipment 38 Recording from a connected equipment using the timer 41 Checking/changing/canceling timer settings 43 Locking the DVD-VCR (Child Lock) DVD Settings and Adjustments 44 Audio Setup 46 Screen Setup 50 Setting the display or sound track language 52 Parental Control...
...2 : Setting up the remote commander 14 Step 3 : Basic hookups 18 Step 4 : Selecting a language 19 Step 5 : Setting the clock Advanced Hookups for the DVD Player 21 Component Video hookup 22 A/V Receiver hookup Basic Operations 24 Playing discs 28 Guide to the on-screen display 31 Playing a tape 35 Recording from a connected equipment 38 Recording from a connected equipment using the timer 41 Checking/changing/canceling timer settings 43 Locking the DVD-VCR (Child Lock) DVD Settings and Adjustments 44 Audio Setup 46 Screen Setup 50 Setting the display or sound track language 52 Parental Control...
Operating Instructions
Page 6
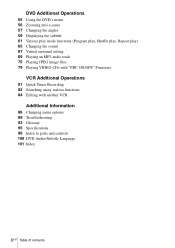
... 57 Changing the angles 59 Displaying the subtitle 61 Various play mode functions (Program play, Shuffle play, Repeat play) 65 Changing the sound 67 Virtual surround setting 69 Playing an MP3 audio track 75 Playing JPEG image files 79 Playing VIDEO CDs with "PBC ON/OFF" Functions VCR Additional Operations 81 Quick Timer Recording 82 Searching using various functions 84 Editing with another VCR Additional Information 86 Changing menu options 88 Troubleshooting 93 Glossary 95 Specifications 96 Index to parts and controls 100 DVD Audio/Subtitle Language 101 Index...
... 57 Changing the angles 59 Displaying the subtitle 61 Various play mode functions (Program play, Shuffle play, Repeat play) 65 Changing the sound 67 Virtual surround setting 69 Playing an MP3 audio track 75 Playing JPEG image files 79 Playing VIDEO CDs with "PBC ON/OFF" Functions VCR Additional Operations 81 Quick Timer Recording 82 Searching using various functions 84 Editing with another VCR Additional Information 86 Changing menu options 88 Troubleshooting 93 Glossary 95 Specifications 96 Index to parts and controls 100 DVD Audio/Subtitle Language 101 Index...
Operating Instructions
Page 8
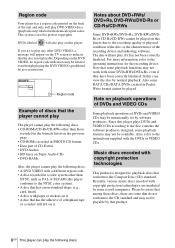
... the recording device and authoring software. If you try to play any other than NTSC, such as PAL or SECAM (this product. 8US This player can play the following discs X Region code Example of discs that the player cannot play The player cannot play the following discs: • A DVD VIDEO with copyright protection technologies This product is not playable. Please be aware that among those recorded in the formats listed...
... the recording device and authoring software. If you try to play any other than NTSC, such as PAL or SECAM (this product. 8US This player can play the following discs X Region code Example of discs that the player cannot play The player cannot play the following discs: • A DVD VIDEO with copyright protection technologies This product is not playable. Please be aware that among those recorded in the formats listed...
Operating Instructions
Page 18
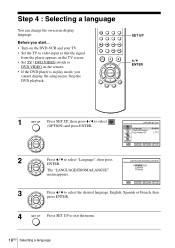
... French, then press ENTER. 4 Press SET UP to exit the menu. 18US Selecting a language Step 4 : Selecting a language You can change the on the remote. • If the DVD player is in play mode, you start... • Turn on the DVD-VCR and your TV. • Set the TV to video input so that the signal from the player appears on the TV screen. • Set TV / DVD·VIDEO switch to select "Language", then press ENTER. Stop the DVD playback.
... French, then press ENTER. 4 Press SET UP to exit the menu. 18US Selecting a language Step 4 : Selecting a language You can change the on the remote. • If the DVD player is in play mode, you start... • Turn on the DVD-VCR and your TV. • Set the TV to video input so that the signal from the player appears on the TV screen. • Set TV / DVD·VIDEO switch to select "Language", then press ENTER. Stop the DVD playback.
Operating Instructions
Page 19
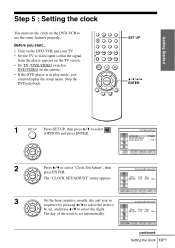
continued Setting the clock 19US The "CLOCK SET/ADJUST" menu appears. 3 Set the hour, minutes, month, day and year in play mode, you start... • Turn on the DVD-VCR and your TV. • Set the TV to video input so that the signal from the player appears on the TV screen. • Set TV / DVD·VIDEO switch to DVD·VIDEO on the DVD-VCR to use the timer features properly. SET UP V/v/B/b ENTER 1 Press SET UP, then press...
continued Setting the clock 19US The "CLOCK SET/ADJUST" menu appears. 3 Set the hour, minutes, month, day and year in play mode, you start... • Turn on the DVD-VCR and your TV. • Set the TV to video input so that the signal from the player appears on the TV screen. • Set TV / DVD·VIDEO switch to DVD·VIDEO on the DVD-VCR to use the timer features properly. SET UP V/v/B/b ENTER 1 Press SET UP, then press...
Operating Instructions
Page 21
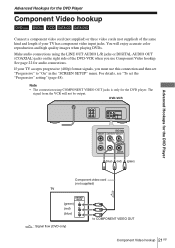
... playing DVDs. Note • The connection using the LINE OUT AUDIO L/R jacks or DIGITAL AUDIO OUT (COAXIAL) jacks on the right side of the same kind and length if your TV accepts progressive (480p) format signals, you use this connection and then set the "Progressive" setting" (page 48). See page 22 for the DVD player. For details, see "To set "Progressive" to COMPONENT VIDEO OUT Component Video hookup 21US DVD-VCR Advanced Hookups for the DVD Player (blue...
... playing DVDs. Note • The connection using the LINE OUT AUDIO L/R jacks or DIGITAL AUDIO OUT (COAXIAL) jacks on the right side of the same kind and length if your TV accepts progressive (480p) format signals, you use this connection and then set the "Progressive" setting" (page 48). See page 22 for the DVD player. For details, see "To set "Progressive" to COMPONENT VIDEO OUT Component Video hookup 21US DVD-VCR Advanced Hookups for the DVD Player (blue...
Operating Instructions
Page 23
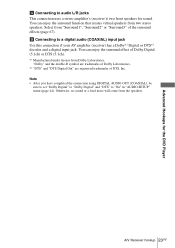
You can enjoy the surround function that creates virtual speakers from the speakers. Note • After you have completed the connection using DIGITAL AUDIO OUT (COAXIAL), be sure to set "Dolby Digital" to "Dolby Digital" and "DTS" to a digital audio (COAXIAL) input jack Use this connection if your AV amplifier (receiver) has a Dolby*1 Digital or DTS*2 decoder and a digital input jack. Select from Dolby Laboratories. B Connecting to "On" in "AUDIO SETUP" menu (page 44). Otherwise, no sound or a loud...
You can enjoy the surround function that creates virtual speakers from the speakers. Note • After you have completed the connection using DIGITAL AUDIO OUT (COAXIAL), be sure to set "Dolby Digital" to "Dolby Digital" and "DTS" to a digital audio (COAXIAL) input jack Use this connection if your AV amplifier (receiver) has a Dolby*1 Digital or DTS*2 decoder and a digital input jack. Select from Dolby Laboratories. B Connecting to "On" in "AUDIO SETUP" menu (page 44). Otherwise, no sound or a loud...
Operating Instructions
Page 25
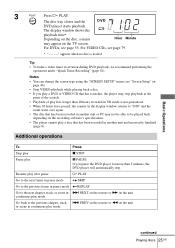
... mode is loaded. PREV on the remote or m on the unit or scene in > NEXT on the remote or M on the recording software's specifications. • The player cannot play a DVD or VIDEO CD that has been recorded in another unit and incorrectly finalized (page 8). The display window shows the playback time*. For VIDEO CDs, see page 55. Basic Operations 3 Press H PLAY. Notes • You can change the screen type using the "SCREEN SETUP" menu...
... mode is loaded. PREV on the remote or m on the unit or scene in > NEXT on the remote or M on the recording software's specifications. • The player cannot play a DVD or VIDEO CD that has been recorded in another unit and incorrectly finalized (page 8). The display window shows the playback time*. For VIDEO CDs, see page 55. Basic Operations 3 Press H PLAY. Notes • You can change the screen type using the "SCREEN SETUP" menu...

Operating Instructions
Page 27
... jacks of the DVD player are registered trademarks of the DVD player. • Set the sound to "Stereo" using the AUDIO button when you stopped the disc even if the DVD player enters standby mode by pressing ?/1. 1 While playing a disc, press x STOP to normal playback. Notes on playing DTS* sound tracks on playing DVDs with a DTS sound track • DTS audio signals are output only through the DIGITAL AUDIO OUT (COAXIAL) jack. • When you play DTS sound tracks without a DTS...
... jacks of the DVD player are registered trademarks of the DVD player. • Set the sound to "Stereo" using the AUDIO button when you stopped the disc even if the DVD player enters standby mode by pressing ?/1. 1 While playing a disc, press x STOP to normal playback. Notes on playing DTS* sound tracks on playing DVDs with a DTS sound track • DTS audio signals are output only through the DIGITAL AUDIO OUT (COAXIAL) jack. • When you play DTS sound tracks without a DTS...
Operating Instructions
Page 38
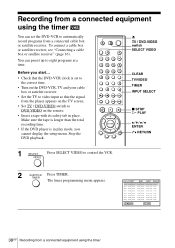
.../ DVD·VIDEO switch SELECT VIDEO CLEAR TV/VIDEO TIMER INPUT SELECT x STOP H PLAY V/v/B/b ENTER O RETURN 1 Press SELECT VIDEO to automatically record programs from a connected cable box or satellite receiver. Before you cannot display the setup menu. Make sure the tape is longer than the total recording time. • If the DVD player is set the DVD-VCR to control the VCR. 2 Press TIMER. Stop the DVD playback. To connect a cable box or satellite receiver, see "Connecting a cable box or satellite receiver" (page 16). You can set to the correct time. • Turn on the DVD-VCR...
.../ DVD·VIDEO switch SELECT VIDEO CLEAR TV/VIDEO TIMER INPUT SELECT x STOP H PLAY V/v/B/b ENTER O RETURN 1 Press SELECT VIDEO to automatically record programs from a connected cable box or satellite receiver. Before you cannot display the setup menu. Make sure the tape is longer than the total recording time. • If the DVD player is set the DVD-VCR to control the VCR. 2 Press TIMER. Stop the DVD playback. To connect a cable box or satellite receiver, see "Connecting a cable box or satellite receiver" (page 16). You can set to the correct time. • Turn on the DVD-VCR...
Operating Instructions
Page 40
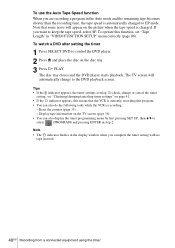
... DVD playback screen. Display tape information on the disc tray. 3 Press H PLAY. Note that the VCR is currently recording this function, set "Tape Length" in "VIDEO FUNCTION SETUP" menu correctly (page 86). To check, change to select (PROGRAM) and pressing ENTER in step 2. To use the Auto Tape Speed function When you are recording a program in the Auto mode and the remaining tape becomes shorter than the recording time, the tape speed is automatically changed . The disc tray closes and the DVD player...
... DVD playback screen. Display tape information on the disc tray. 3 Press H PLAY. Note that the VCR is currently recording this function, set "Tape Length" in "VIDEO FUNCTION SETUP" menu correctly (page 86). To check, change to select (PROGRAM) and pressing ENTER in step 2. To use the Auto Tape Speed function When you are recording a program in the Auto mode and the remaining tape becomes shorter than the recording time, the tape speed is automatically changed . The disc tray closes and the DVD player...
Operating Instructions
Page 41
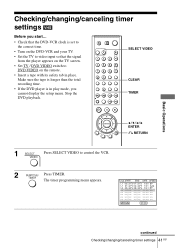
... total recording time. • If the DVD player is in play mode, you start... • Check that the DVD-VCR clock is set to the correct time. • Turn on the DVD-VCR and your TV. • Set the TV to video input so that the signal from the player appears on the TV screen. • Set TV / DVD·VIDEO switch to control the VCR. 2 Press TIMER. Stop the DVD playback. The timer programming menu appears. Checking/changing/canceling timer settings Before you cannot display the setup menu.
... total recording time. • If the DVD player is in play mode, you start... • Check that the DVD-VCR clock is set to the correct time. • Turn on the DVD-VCR and your TV. • Set the TV to video input so that the signal from the player appears on the TV screen. • Set TV / DVD·VIDEO switch to control the VCR. 2 Press TIMER. Stop the DVD playback. The timer programming menu appears. Checking/changing/canceling timer settings Before you cannot display the setup menu.

Operating Instructions
Page 44
Before you to set the sound according to the playback and connection conditions. DVD Settings and Adjustments Audio Setup "Audio Setup" allows you start... • Set TV / DVD·VIDEO switch to DVD·VIDEO on the remote. SET UP V/v/B/b ENTER 1 Press SET UP when the DVD player is in stop mode, then press V/v to select (DVD), then press ENTER. 2 Press V/v to select "Audio Setup," then press ENTER. 3 Press V/v to select the setup item from the displayed list: "Dolby Digital," "DTS" or "Audio DRC." 44US Audio Setup
Before you to set the sound according to the playback and connection conditions. DVD Settings and Adjustments Audio Setup "Audio Setup" allows you start... • Set TV / DVD·VIDEO switch to DVD·VIDEO on the remote. SET UP V/v/B/b ENTER 1 Press SET UP when the DVD player is in stop mode, then press V/v to select (DVD), then press ENTER. 2 Press V/v to select "Audio Setup," then press ENTER. 3 Press V/v to select the setup item from the displayed list: "Dolby Digital," "DTS" or "Audio DRC." 44US Audio Setup
Operating Instructions
Page 53
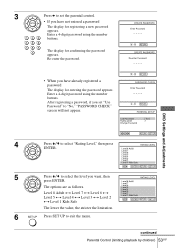
... registering a password, if you set the parental control. • If you have already registered a password The display for confirming the password appears. Re-enter the password. • When you have not entered a password The display for registering a new password appears. The options are as follows. Enter a 4-digit password using the number buttons. The display for entering the password appears. Enter a 4-digit password using the number buttons. 3 Press b to set "Use Password" to "No," "PASSWORD CHECK" screen will not...
... registering a password, if you set the parental control. • If you have already registered a password The display for confirming the password appears. Re-enter the password. • When you have not entered a password The display for registering a new password appears. The options are as follows. Enter a 4-digit password using the number buttons. The display for entering the password appears. Enter a 4-digit password using the number buttons. 3 Press b to set "Use Password" to "No," "PASSWORD CHECK" screen will not...
Operating Instructions
Page 61
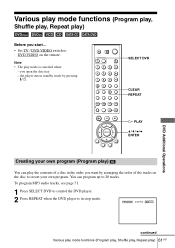
...: - the player enters standby mode by arranging the order of the tracks on the remote. SELECT DVD CLEAR REPEAT H PLAY V/v/B/b ENTER Creating your own program. You can program up to DVD·VIDEO on the disc to create your own program (Program play) You can play the contents of a disc in stop mode. Various play mode functions (Program play, Shuffle play, Repeat play) Before you open the disc tray - DVD Additional Operations continued Various play mode functions (Program play, Shuffle play, Repeat play) 61US you start... • Set TV / DVD·VIDEO switch to 20...
...: - the player enters standby mode by arranging the order of the tracks on the remote. SELECT DVD CLEAR REPEAT H PLAY V/v/B/b ENTER Creating your own program. You can program up to DVD·VIDEO on the disc to create your own program (Program play) You can play the contents of a disc in stop mode. Various play mode functions (Program play, Shuffle play, Repeat play) Before you open the disc tray - DVD Additional Operations continued Various play mode functions (Program play, Shuffle play, Repeat play) 61US you start... • Set TV / DVD·VIDEO switch to 20...
Operating Instructions
Page 86
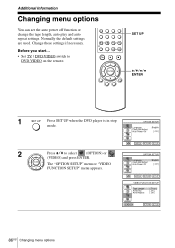
SET UP V/v/B/b ENTER 1 Press SET UP when the DVD player is in stop mode. 2 Press V/v to DVD·VIDEO on the remote. Additional Information Changing menu options You can set the auto power off function or change the tape length, auto play and auto repeat settings. Change these settings if necessary. The "OPTION SETUP" menu or "VIDEO FUNCTION SETUP" menu appears. 86US Changing menu options Normally the default settings are used. Before you start... • Set TV / DVD·VIDEO switch to select (OPTION) or (VIDEO) and press ENTER.
SET UP V/v/B/b ENTER 1 Press SET UP when the DVD player is in stop mode. 2 Press V/v to DVD·VIDEO on the remote. Additional Information Changing menu options You can set the auto power off function or change the tape length, auto play and auto repeat settings. Change these settings if necessary. The "OPTION SETUP" menu or "VIDEO FUNCTION SETUP" menu appears. 86US Changing menu options Normally the default settings are used. Before you start... • Set TV / DVD·VIDEO switch to select (OPTION) or (VIDEO) and press ENTER.
Operating Instructions
Page 89
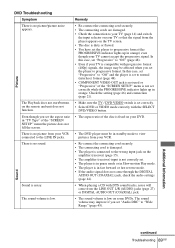
... the SELECT DVD/VIDEO button. • The aspect ratio of the "SCREEN SETUP" menu the picture does not fill the screen. Check the setting (page 46) and connection (page 21). • Make sure the TV / DVD·VIDEO switch is connected to the wrong input jack on your TV cannot accept the progressive signal. The sound volume may be affected when you set the player to view pictures from the player appears on the remote and unit does not function. Sound Picture DVD Troubleshooting...
... the SELECT DVD/VIDEO button. • The aspect ratio of the "SCREEN SETUP" menu the picture does not fill the screen. Check the setting (page 46) and connection (page 21). • Make sure the TV / DVD·VIDEO switch is connected to the wrong input jack on your TV cannot accept the progressive signal. The sound volume may be affected when you set the player to view pictures from the player appears on the remote and unit does not function. Sound Picture DVD Troubleshooting...
Operating Instructions
Page 90
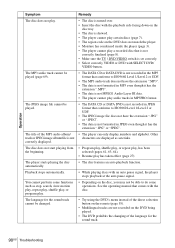
...;VIDEO switch is not formatted in JPEG even though it has the extension ".MP3". • The data is not characters are displayed as stop, search, slow-motion play, repeat play, shuffle play, or program play. • Depending on the DVD being played. • The DVD prohibits the changing of the language for the sound track cannot be changed. • Try using the DVD's menu instead of the MP3 audio album/ • The player...
...;VIDEO switch is not formatted in JPEG even though it has the extension ".MP3". • The data is not characters are displayed as stop, search, slow-motion play, repeat play, shuffle play, or program play. • Depending on the DVD being played. • The DVD prohibits the changing of the language for the sound track cannot be changed. • Try using the DVD's menu instead of the MP3 audio album/ • The player...
Operating Instructions
Page 91
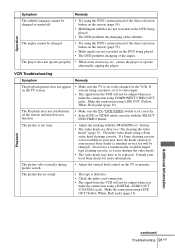
... the audio cord connection. • The signal from the VCR will be replaced. If you are using a monitor, set it may damage the video heads. • The video heads may have the heads cleaned at your nearest Sony dealer (a standard service fee will not be changed or turned off. • Try using the DVD's menu instead of the direct selection button on the remote (page 55). • Multilingual subtitles are not recorded...
... the audio cord connection. • The signal from the VCR will be replaced. If you are using a monitor, set it may damage the video heads. • The video heads may have the heads cleaned at your nearest Sony dealer (a standard service fee will not be changed or turned off. • Try using the DVD's menu instead of the direct selection button on the remote (page 55). • Multilingual subtitles are not recorded...

