
User Manual (user Manual) (ver.1.0) (English)
Page 9
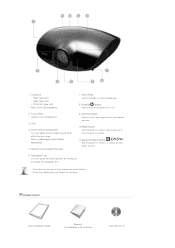
... Warranty (Not available in a menu. 11.Select and Move Button( / ) Use this button to enter or exit a menu or to turn the projector on the top of the projector are touch buttons. Indicators - STAND BY (Blue LED) ※ Refer to enlarge or reduce image size. 8. Zoom Knob Used to the LED Indications...
... Warranty (Not available in a menu. 11.Select and Move Button( / ) Use this button to enter or exit a menu or to turn the projector on the top of the projector are touch buttons. Indicators - STAND BY (Blue LED) ※ Refer to enlarge or reduce image size. 8. Zoom Knob Used to the LED Indications...

User Manual (user Manual) (ver.1.0) (English)
Page 10
... remains even after the POWER button ● on again, contact your product distributor or service center. Adjust the installation state of the projector goes beyond ○ the control limit. Refer to the Check whether the screws at the bottom side of the lamp has expired....9680; The memory in the product is not operating normally. Refer to Action 4. ◐ ◐ ◐ A problem has occurred with the operation of the projector. (Lasts for the product is not operating normally. Refer to Action 3. ◐ ◐ ● A problem has occurred when operating the DDP IC in...
... remains even after the POWER button ● on again, contact your product distributor or service center. Adjust the installation state of the projector goes beyond ○ the control limit. Refer to the Check whether the screws at the bottom side of the lamp has expired....9680; The memory in the product is not operating normally. Refer to Action 4. ◐ ◐ ◐ A problem has occurred with the operation of the projector. (Lasts for the product is not operating normally. Refer to Action 3. ◐ ◐ ● A problem has occurred when operating the DDP IC in...

User Manual (user Manual) (ver.1.0) (English)
Page 11
... No exchange or refund for operations. HDMI IN 2, HDMI 1/DVI IN Input port Disconnect and reconnect the power cord and start the projector again. This Projector uses a cooling fan system to operate. POWER Input port 5. S-VIDEO IN Input port 4. VIDEO IN Input port 7. installation precautions ... above. The lamp is malfunctioning after abnormal power off or restarting right after turning off , wait for a sufficient amount of the projector becomes too high. When the screen becomes darker Check the lamp usage time on for the noise concern. If the same problem occurs...
... No exchange or refund for operations. HDMI IN 2, HDMI 1/DVI IN Input port Disconnect and reconnect the power cord and start the projector again. This Projector uses a cooling fan system to operate. POWER Input port 5. S-VIDEO IN Input port 4. VIDEO IN Input port 7. installation precautions ... above. The lamp is malfunctioning after abnormal power off or restarting right after turning off , wait for a sufficient amount of the projector becomes too high. When the screen becomes darker Check the lamp usage time on for the noise concern. If the same problem occurs...

User Manual (user Manual) (ver.1.0) (English)
Page 12
OFF ( ) Button 13. D.BLACK Button 20. INSTALL Button 1. ON ( ) Used to S-VIDEO Mode. 5. S-VIDEO Used to switch to turn on the projector. 2. PC Used to switch to Video Mode. 4. | Product Features | Product Views | Remote Control | Product Specifications | 1. INFO Button 9. COMP2 Button 17. VIDEO Used to switch to ...
OFF ( ) Button 13. D.BLACK Button 20. INSTALL Button 1. ON ( ) Used to S-VIDEO Mode. 5. S-VIDEO Used to switch to turn on the projector. 2. PC Used to switch to Video Mode. 4. | Product Features | Product Views | Remote Control | Product Specifications | 1. INFO Button 9. COMP2 Button 17. VIDEO Used to switch to ...

User Manual (user Manual) (ver.1.0) (English)
Page 13
... Model Size Panel Resolution Manufacturer Type Lamp Life Time Manufacturer Color Resolution Optimum resolution Maximum resolution Input video signal Input synchronization signal Maximum Pixel Clock SP-A800B 24.1 mm / 0.9 inch 1920 x 1080 Texas Instrument 300 W UHP 2000 Hrs Philips 62.2 M (1920 x 1080 x 3 x 10 bit) 1920 x 1080 @... select Picture User Adjust Mode. 21. OFF ( ) Used to COMPONENT 2 Mode. 17. COMP2 Used to switch to turn off the projector. 13. P.MODE Used to make Menu Screen disappear. 19. EXIT Used to select Picture Mode. 12. HDMI2 Used to switch to operate...
... Model Size Panel Resolution Manufacturer Type Lamp Life Time Manufacturer Color Resolution Optimum resolution Maximum resolution Input video signal Input synchronization signal Maximum Pixel Clock SP-A800B 24.1 mm / 0.9 inch 1920 x 1080 Texas Instrument 300 W UHP 2000 Hrs Philips 62.2 M (1920 x 1080 x 3 x 10 bit) 1920 x 1080 @... select Picture User Adjust Mode. 21. OFF ( ) Used to COMPONENT 2 Mode. 17. COMP2 Used to switch to turn off the projector. 13. P.MODE Used to make Menu Screen disappear. 19. EXIT Used to select Picture Mode. 12. HDMI2 Used to switch to operate...

User Manual (user Manual) (ver.1.0) (English)
Page 14
...1016 mm ~ 7620 mm (16:9, Diagonal) 1.5 m ~ 14 m Less than class A. As with other visual display elements, the DMD Panel may be used in DLP Projectors consists of the product. Supported Display Mode Input Source PC, DVI PC PC, DVI Resolution (HxV) 640x350 640x400 640x480 PC PC, DVI PC PC, DVI...bad pixels set by our standards. Sep. Sep. Sep. Sep. Sep. Sep. Sep. Sep. Sep. Sep. Sep. Sep. Class A is designed for residential use . Samsung and the DMD Panel manufacturer have a rigid, bad pixel identification and limitation procedure in all areas. Sep.
...1016 mm ~ 7620 mm (16:9, Diagonal) 1.5 m ~ 14 m Less than class A. As with other visual display elements, the DMD Panel may be used in DLP Projectors consists of the product. Supported Display Mode Input Source PC, DVI PC PC, DVI Resolution (HxV) 640x350 640x400 640x480 PC PC, DVI PC PC, DVI...bad pixels set by our standards. Sep. Sep. Sep. Sep. Sep. Sep. Sep. Sep. Sep. Sep. Sep. Sep. Class A is designed for residential use . Samsung and the DMD Panel manufacturer have a rigid, bad pixel identification and limitation procedure in all areas. Sep.
User Manual (user Manual) (ver.1.0) (English)
Page 18
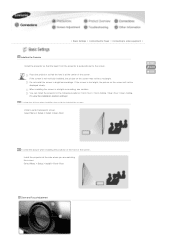
...Menu > Setup > Install > Front-Floor Zoom and Focus Adjustment If the screen is at the center of the screen, Install the projector at the side where you are watching the screen. Select Menu > Setup > Install > Rear-Floor To view the picture when installing the... locations: Front-Floor / Front-Ceiling / Rear-Floor / Rear-Ceiling. (To view the installation position settings) To view the picture when installing the projector behind the screen, Install a semi-transparent screen. Do not install the screen in a bright surrounding, use curtains. When installing the screen in bright ...
...Menu > Setup > Install > Front-Floor Zoom and Focus Adjustment If the screen is at the center of the screen, Install the projector at the side where you are watching the screen. Select Menu > Setup > Install > Rear-Floor To view the picture when installing the... locations: Front-Floor / Front-Ceiling / Rear-Floor / Rear-Ceiling. (To view the installation position settings) To view the picture when installing the projector behind the screen, Install a semi-transparent screen. Do not install the screen in a bright surrounding, use curtains. When installing the screen in bright ...
User Manual (user Manual) (ver.1.0) (English)
Page 19
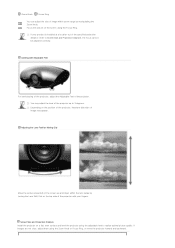
...projected on the screen up to 3 degrees. Screen Size and Projection Distance Install the projector on the top side of the projector with Adjustable Feet For level placing of the projector, adjust the Adjustable Feet of the projector. Leveling with your product is installed at a location out of the specified projection distance ... and down within zoom range by turning the Lens Shift Dial on a flat, even surface and level the projector using the adjustable feet to Screen Size and Projection Distance), the focus cannot be adjusted correctly. If images are not clear, adjust them...
...projected on the screen up to 3 degrees. Screen Size and Projection Distance Install the projector on the top side of the projector with Adjustable Feet For level placing of the projector, adjust the Adjustable Feet of the projector. Leveling with your product is installed at a location out of the specified projection distance ... and down within zoom range by turning the Lens Shift Dial on a flat, even surface and level the projector using the adjustable feet to Screen Size and Projection Distance), the focus cannot be adjusted correctly. If images are not clear, adjust them...
User Manual (user Manual) (ver.1.0) (English)
Page 20
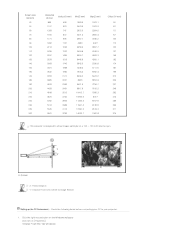
.... Check the following items before connecting your PC to Image Bottom Setting up the PC Environment - Screen Z: Throw Distance Y': Distance from Lens Center to your projector. 1. A. Screen size (M:inch) 40 50 60 70 80 90 100 110 120 130 140 150 160 170 180 190 200 210 220 230 240 250... (Y':mm) 50 62 75 87 100 112 125 137 149 162 174 187 199 212 224 237 249 262 274 286 299 311 374 This projector is designed to show images optimally on [Properties].
.... Check the following items before connecting your PC to Image Bottom Setting up the PC Environment - Screen Z: Throw Distance Y': Distance from Lens Center to your projector. 1. A. Screen size (M:inch) 40 50 60 70 80 90 100 110 120 130 140 150 160 170 180 190 200 210 220 230 240 250... (Y':mm) 50 62 75 87 100 112 125 137 149 162 174 187 199 212 224 237 249 262 274 286 299 311 374 This projector is designed to show images optimally on [Properties].

User Manual (user Manual) (ver.1.0) (English)
Page 21
...horizontal frequency instead of the window to described in Color quality when it is turned off or disconnected, switch You do not have to the projector. Process might begin restart automatically. 6. Press the [Advanced] button. Another property window will appear. 4. The computer might vary depending on ...by referring to close the window, and click the [OK] button of . 5. Click on [Monitor] tab and set the by this projector. 2. If a belt is shown or an abnormal signal occurs on monitor manufacture or Windows versions. Click the [OK] button to close the window....
...horizontal frequency instead of the window to described in Color quality when it is turned off or disconnected, switch You do not have to the projector. Process might begin restart automatically. 6. Press the [Advanced] button. Another property window will appear. 4. The computer might vary depending on ...by referring to close the window, and click the [OK] button of . 5. Click on [Monitor] tab and set the by this projector. 2. If a belt is shown or an abnormal signal occurs on monitor manufacture or Windows versions. Click the [OK] button to close the window....
User Manual (user Manual) (ver.1.0) (English)
Page 22
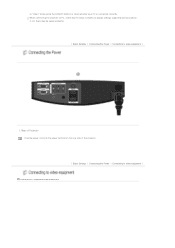
to VCR/Camcorder/Cable Box Rear of Projector Plug the power cord into the power terminal on the rear side of the projector. | Basic Settings | Connecting the Power | Connecting to video equipment | Connecting to "Video" mode using the [VIDEO] buttons or check whether your PC is connected correctly. If not, there may be signal problems. | Basic Settings | Connecting the Power | Connecting to display settings supported by this projector. When connecting the projector to PC, check that PC setup complies to video equipment | 1.
to VCR/Camcorder/Cable Box Rear of Projector Plug the power cord into the power terminal on the rear side of the projector. | Basic Settings | Connecting the Power | Connecting to video equipment | Connecting to "Video" mode using the [VIDEO] buttons or check whether your PC is connected correctly. If not, there may be signal problems. | Basic Settings | Connecting the Power | Connecting to display settings supported by this projector. When connecting the projector to PC, check that PC setup complies to video equipment | 1.

User Manual (user Manual) (ver.1.0) (English)
Page 23
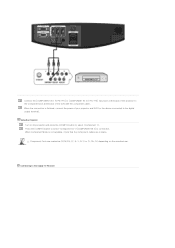
...video equipment has S-VIDEO OUT port, connect it to [S-VIDEO IN] input port of the projector and the VCR. When finishing connecting the devices, connect the power of the projector. This projector does not support sound. (Separate audio system is not available, check the video cables are ...turned off before connecting cables. Check that the projector and the video equipment are in place. Connect [VIDEO IN(yellow)] input port of the projector to select S-Video. When Composite Mode is needed for sound.) Connecting to select . Using...
...video equipment has S-VIDEO OUT port, connect it to [S-VIDEO IN] input port of the projector and the VCR. When finishing connecting the devices, connect the power of the projector. This projector does not support sound. (Separate audio system is not available, check the video cables are ...turned off before connecting cables. Check that the projector and the video equipment are in place. Connect [VIDEO IN(yellow)] input port of the projector to select S-Video. When Composite Mode is needed for sound.) Connecting to select . Using...
User Manual (user Manual) (ver.1.0) (English)
Page 24
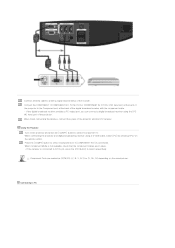
...place. When Component Mode is not available, check that the component cables are marked as (Y/PB/PR), (Y, B-Y, R-Y) or (Y, Cb, Cr) depending on the projector and press the [COMP1] button to select if [COMPONENT IN 2] is finished, connect the power of the DVD with the component cable. When the connection... is connected. Press the [COMP2] button to select . Using the Projector Turn on the manufacturer. Connect the [COMPONENT IN 1 (Y/PB/ PR)] or [COMPONENT IN 2 (Y/PB/ PR)] input port at the back of the...
...place. When Component Mode is not available, check that the component cables are marked as (Y/PB/PR), (Y, B-Y, R-Y) or (Y, Cb, Cr) depending on the projector and press the [COMP1] button to select if [COMPONENT IN 2] is finished, connect the power of the DVD with the component cable. When the connection... is connected. Press the [COMP2] button to select . Using the Projector Turn on the manufacturer. Connect the [COMPONENT IN 1 (Y/PB/ PR)] or [COMPONENT IN 2 (Y/PB/ PR)] input port at the back of the...
User Manual (user Manual) (ver.1.0) (English)
Page 25
... PR)] input port at the back of the receiver. Connecting to the Component port at the back of the projector to PC Using the Projector Turn on the projector and press the [COMP1] button to antenna signal input terminal of the digital broadcast receiver with the component cable..... Press the [COMP2] button to select respectively. Component Ports are in place. - When finish connecting the devices, connect the power of the projector. When Component Mode is connected. If the digital broadcast receiver provides a PC output port, you can connect a digital broadcast receiver using a ...
... PR)] input port at the back of the receiver. Connecting to the Component port at the back of the projector to PC Using the Projector Turn on the projector and press the [COMP1] button to antenna signal input terminal of the digital broadcast receiver with the component cable..... Press the [COMP2] button to select respectively. Component Ports are in place. - When finish connecting the devices, connect the power of the projector. When Component Mode is connected. If the digital broadcast receiver provides a PC output port, you can connect a digital broadcast receiver using a ...

User Manual (user Manual) (ver.1.0) (English)
Page 26
... play and therefore, if you use Window XP you do not need to setup the driver on the rear side of the projector to the monitor output port of the projector and the PC. Connect [PC IN] port on your PC. When connections are all completed, connect both power codes of PC... Adjustment) Sound comes out from PC speakers. Connecting to select . If PC Mode is not available, check PC video cable is in place. Using the Projector Turn on the PC and set the PC Environment when necessary. Turn on the...
... play and therefore, if you use Window XP you do not need to setup the driver on the rear side of the projector to the monitor output port of the projector and the PC. Connect [PC IN] port on your PC. When connections are all completed, connect both power codes of PC... Adjustment) Sound comes out from PC speakers. Connecting to select . If PC Mode is not available, check PC video cable is in place. Using the Projector Turn on the PC and set the PC Environment when necessary. Turn on the...
User Manual (user Manual) (ver.1.0) (English)
Page 27
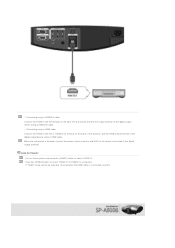
...DVI IN] or [HDMI IN 2] terminal on the back of the projector and the HDMI output terminal of your projector and DVD (or the device connected to the digital output terminal). Using the Projector Turn on the back of the projector and the DVI output terminal of the digital output device using a HDMI.../DVI cable Connect the [HDMI 1/DVI IN] terminal on the projector and press the [HDMI1] button to select if [HDMI2] ...
...DVI IN] or [HDMI IN 2] terminal on the back of the projector and the HDMI output terminal of your projector and DVD (or the device connected to the digital output terminal). Using the Projector Turn on the back of the projector and the DVI output terminal of the digital output device using a HDMI.../DVI cable Connect the [HDMI 1/DVI IN] terminal on the projector and press the [HDMI1] button to select if [HDMI2] ...
User Manual (user Manual) (ver.1.0) (English)
Page 28
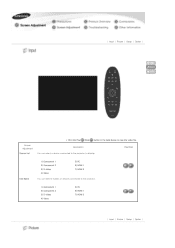
Edit Name 1) Component 1 2) Component 2 3) S-Video 4) Video 5) PC 6) HDMI 1 7) HDMI 2 You can select a device connected to the projector to display. | Input | Picture | Setup | Option | Screen Adjustment Source List * Click the Play( )/Stop( ) button in the table below to the projector. 1) Component 1 2) Component 2 3) S-Video 4) Video 5) PC 6) HDMI 1 7) HDMI 2 | Input | Picture | Setup | Option | Description Play/Stop You can edit the names of devices connected to view the video file.
Edit Name 1) Component 1 2) Component 2 3) S-Video 4) Video 5) PC 6) HDMI 1 7) HDMI 2 You can select a device connected to the projector to display. | Input | Picture | Setup | Option | Screen Adjustment Source List * Click the Play( )/Stop( ) button in the table below to the projector. 1) Component 1 2) Component 2 3) S-Video 4) Video 5) PC 6) HDMI 1 7) HDMI 2 | Input | Picture | Setup | Option | Description Play/Stop You can edit the names of devices connected to view the video file.
User Manual (user Manual) (ver.1.0) (English)
Page 29
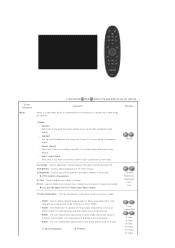
... Picture Mode. Dynamic Select this if you want the screen quality to view the screen in your needs. User1, User2, User3 Select this if your projector or change tint of Movie2 is set as Movie1 when it is set to view the video file. Screen Adjustment Mode Description Select a screen state...
... Picture Mode. Dynamic Select this if you want the screen quality to view the screen in your needs. User1, User2, User3 Select this if your projector or change tint of Movie2 is set as Movie1 when it is set to view the video file. Screen Adjustment Mode Description Select a screen state...

User Manual (user Manual) (ver.1.0) (English)
Page 32
...refer to picture format sizes such as screen trembling. Utilized as installation basis for European Broadcasting Production and Technology, standardized by the projector itself. Factory Default Using this function, you can view the difference by changing the Color Standard to SMPTE_D/HD/EBU. 4) ... adjustment. 7) White : White Screen, only for the color adjustment procedures, and may experience more noise which is produced when the projector is not removed using Fine Adjustment, adjust the frequency to the maximum and then perform Fine Adjustment again. Auto 1) Auto Adjustment :...
...refer to picture format sizes such as screen trembling. Utilized as installation basis for European Broadcasting Production and Technology, standardized by the projector itself. Factory Default Using this function, you can view the difference by changing the Color Standard to SMPTE_D/HD/EBU. 4) ... adjustment. 7) White : White Screen, only for the color adjustment procedures, and may experience more noise which is produced when the projector is not removed using Fine Adjustment, adjust the frequency to the maximum and then perform Fine Adjustment again. Auto 1) Auto Adjustment :...

User Manual (user Manual) (ver.1.0) (English)
Page 33
... the LED setting when the power is in the table below to your Play/Stop Menu Position You can turn the LED indicators on your projector on the product. Menu Translucency Menu Display Time LED Indicator You can set the translucency of menu. 1) Opaque 2) High 3) Medium 4) Low You can set ...the display time of the projector. Description You can enable or disable the operating LED's on or off or when the projector is turned on or off according to view the video file. However, the light will light up /down...
... the LED setting when the power is in the table below to your Play/Stop Menu Position You can turn the LED indicators on your projector on the product. Menu Translucency Menu Display Time LED Indicator You can set the translucency of menu. 1) Opaque 2) High 3) Medium 4) Low You can set ...the display time of the projector. Description You can enable or disable the operating LED's on or off or when the projector is turned on or off according to view the video file. However, the light will light up /down...


