
User Manual (user Manual) (ver.1.0) (English)
Page 2
The images here are for reference only, and are disconnected from the wall outlet. Under no circumstances touch the power plug with this symbol may cause personal injury or even fatality. In addition, make sure the power is a danger of electric shock. z There is off and remove the power cord from other devices before moving the product, make sure all connection cables are not applicable in all cases (or countries). z There is a danger of fire. z There is a danger of electric shock or fire. z When the connection is a danger of electric shock or fire. z Moving ...
The images here are for reference only, and are disconnected from the wall outlet. Under no circumstances touch the power plug with this symbol may cause personal injury or even fatality. In addition, make sure the power is a danger of electric shock. z There is off and remove the power cord from other devices before moving the product, make sure all connection cables are not applicable in all cases (or countries). z There is a danger of fire. z There is a danger of electric shock or fire. z When the connection is a danger of electric shock or fire. z Moving ...

User Manual (user Manual) (ver.1.0) (English)
Page 3
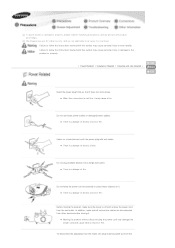
z Dropping the product may damage the inside of electric shock or fire. | Power Related | Installation Related | Cleaning and Use Related | TO PREVENT THE SPREAD OF FIRE, KEEP CANDLES OR OTHER OPEN FLAMES AWAY FROM THIS PRODUCT AT ALL TIMES. Always unplug the unit by holding the power plug. z There is a danger of it or cause injury. Do not install the product in a cabinet or on a shelf, make sure the front end of fire. z There is a danger of the base does not protrude. When installing the product in locations with poor ventilation such as a bookshelf, closet, etc. z The ...
z Dropping the product may damage the inside of electric shock or fire. | Power Related | Installation Related | Cleaning and Use Related | TO PREVENT THE SPREAD OF FIRE, KEEP CANDLES OR OTHER OPEN FLAMES AWAY FROM THIS PRODUCT AT ALL TIMES. Always unplug the unit by holding the power plug. z There is a danger of it or cause injury. Do not install the product in a cabinet or on a shelf, make sure the front end of fire. z There is a danger of the base does not protrude. When installing the product in locations with poor ventilation such as a bookshelf, closet, etc. z The ...
User Manual (user Manual) (ver.1.0) (English)
Page 4
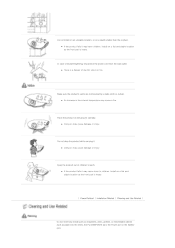
In case of children's reach. z An increase in the internal temperature may cause damage or injury. z If the product falls it . Install on a flat and stable location as paper into the vents, the PC/COMPOSITE port, the Power port or the Battery port. z There is heavy. z Doing so may cause a fire. Do not drop the product while carrying it may cause harm to children. z If the product falls it may cause damage or injury. Place the product on a stand smaller than the product. z Doing so may harm children. Make sure the product's vents are not blocked by a table ...
In case of children's reach. z An increase in the internal temperature may cause damage or injury. z If the product falls it . Install on a flat and stable location as paper into the vents, the PC/COMPOSITE port, the Power port or the Battery port. z There is heavy. z Doing so may cause a fire. Do not drop the product while carrying it may cause harm to children. z If the product falls it may cause damage or injury. Place the product on a stand smaller than the product. z Doing so may harm children. Make sure the product's vents are not blocked by a table ...
User Manual (user Manual) (ver.1.0) (English)
Page 5
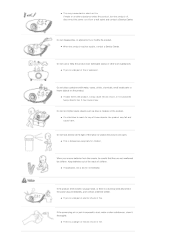
Do not use or keep the product near flammable sprays or other such substances. z If swallowed, see a doctor immediately. z There is a burning smell,disconnect the power plug immediately, and contact a Service Center. Do not disassemble, or attempt to dust, water or alien substances, clean it may cause electric shock or fire. Keep batteries out of the reach of the lamp nor project the picture onto eyes. If the product emits smoke, unusual noise, or there is a danger of fire or explosion. z There is a danger of electric shock or fire. Do not let children place ...
Do not use or keep the product near flammable sprays or other such substances. z If swallowed, see a doctor immediately. z There is a burning smell,disconnect the power plug immediately, and contact a Service Center. Do not disassemble, or attempt to dust, water or alien substances, clean it may cause electric shock or fire. Keep batteries out of the reach of the lamp nor project the picture onto eyes. If the product emits smoke, unusual noise, or there is a danger of fire or explosion. z There is a danger of electric shock or fire. Do not let children place ...
User Manual (user Manual) (ver.1.0) (English)
Page 6
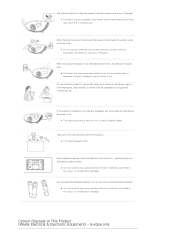
z This may cause a battery to break or leak and could lead to fire, injury, or contamination (damage). polarity position as wax, benzene, alcohol, thinners, insecticide, air freshener, lubricant or detergent. z Incorrect polarity may cause electric shock or fire. Use only specified standard batteries. Do not use any chemicals such as indicated on battery holder. Do not install the product in the correct +/- If the product is dropped or the casing is damaged, turn the product off and unplug the power cord. z This may cause a battery to break or leak and could lead to fire, ...
z This may cause a battery to break or leak and could lead to fire, injury, or contamination (damage). polarity position as wax, benzene, alcohol, thinners, insecticide, air freshener, lubricant or detergent. z Incorrect polarity may cause electric shock or fire. Use only specified standard batteries. Do not use any chemicals such as indicated on battery holder. Do not install the product in the correct +/- If the product is dropped or the casing is damaged, turn the product off and unplug the power cord. z This may cause a battery to break or leak and could lead to fire, ...

User Manual (user Manual) (ver.1.0) (English)
Page 7
Business users should contact their local government office, for details of the purchase contract. To prevent possible harm to the environment or damage to promote the sustainable reuse of material resources. Household users should contact either the retailer where they purchased this product, or their supplier and check the terms and conditions of where and how they can take this from other types of waste and recycle it should not be disposed with other household waste at the end of its literature, indicates that it responsibly to health from uncontrolled waste disposal, please ...
Business users should contact their local government office, for details of the purchase contract. To prevent possible harm to the environment or damage to promote the sustainable reuse of material resources. Household users should contact either the retailer where they purchased this product, or their supplier and check the terms and conditions of where and how they can take this from other types of waste and recycle it should not be disposed with other household waste at the end of its literature, indicates that it responsibly to health from uncontrolled waste disposal, please ...
User Manual (user Manual) (ver.1.0) (English)
Page 8
A 6 segment color wheel has been used for the remote control is provided. Minimized fan noise and light leakage - Abundant input terminals are optimized to enhance connectivity with peripheral devices. User adjustments - The unit has a reference pattern that meet broadcasting standards on improving color - Front/Upper Side | Product Features | Product Views | Remote Control | Product Specifications | this unit aims at realizing color coordinates that can be used to implement optimal colors. - 300W Lamp designed to improve luminance Vivid colors - Various Input Ports - A ...
A 6 segment color wheel has been used for the remote control is provided. Minimized fan noise and light leakage - Abundant input terminals are optimized to enhance connectivity with peripheral devices. User adjustments - The unit has a reference pattern that meet broadcasting standards on improving color - Front/Upper Side | Product Features | Product Views | Remote Control | Product Specifications | this unit aims at realizing color coordinates that can be used to implement optimal colors. - 300W Lamp designed to improve luminance Vivid colors - Various Input Ports - A ...
User Manual (user Manual) (ver.1.0) (English)
Page 9
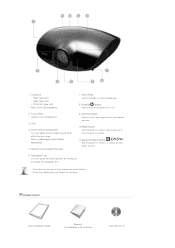
STAND BY (Blue LED) ※ Refer to turn the projector on the top of the projector are touch buttons. POWER( ) Button Used to the LED Indications. 7. Adjustable Feet You can adjust screen images up and down within the lens range. ※ Refer to or select an item within a menu. 6. Remote Control Signal Receiver 9. Focus Ring Used for Focus Adjustment. 3. Lens Position Moving Dial You can adjust the screen position by moving up and down the adjustable feet. Package Contents Quick Installation Guide Warranty (Not available in a menu. 11.Select and Move Button( /...
STAND BY (Blue LED) ※ Refer to turn the projector on the top of the projector are touch buttons. POWER( ) Button Used to the LED Indications. 7. Adjustable Feet You can adjust screen images up and down within the lens range. ※ Refer to or select an item within a menu. 6. Remote Control Signal Receiver 9. Focus Ring Used for Focus Adjustment. 3. Lens Position Moving Dial You can adjust the screen position by moving up and down the adjustable feet. Package Contents Quick Installation Guide Warranty (Not available in a menu. 11.Select and Move Button( /...

User Manual (user Manual) (ver.1.0) (English)
Page 10
Contact a service center. ◐ ● A problem has occurred when operating the color wheel in the product. Refer to Action 5. ● ◐ ● The lifetime of the lamp. Adjust the installation state of your product distributor or service center. Refer to Action 4. ◐ ◐ ◐ A problem has occurred with the operation of the lamp has expired. Contact a service center. ● ◐ ◐ The power for about 1 minute and 30 seconds) ◐ ○ Refer to Action 1 below if the cooling fan inside the projector is not in normal ...
Contact a service center. ◐ ● A problem has occurred when operating the color wheel in the product. Refer to Action 5. ● ◐ ● The lifetime of the lamp. Adjust the installation state of your product distributor or service center. Refer to Action 4. ◐ ◐ ◐ A problem has occurred with the operation of the lamp has expired. Contact a service center. ● ◐ ◐ The power for about 1 minute and 30 seconds) ◐ ○ Refer to Action 1 below if the cooling fan inside the projector is not in normal ...

User Manual (user Manual) (ver.1.0) (English)
Page 11
When the DDP IC or color wheel fails to keep the unit from overheating. Turn the power off the projector. POWER Input port 5. HDMI IN 2, HDMI 1/DVI IN Input port Disconnect and reconnect the power cord and start the projector again. The lamp is malfunctioning after abnormal power off or restarting right after turning off , wait for a sufficient amount of cooling time and then turn the power on the Information Display screen. COMPONENT IN Input port 3. VIDEO IN Input port 7. If you need to replace the lamp, contact your product distributor or service center. Rear ...
When the DDP IC or color wheel fails to keep the unit from overheating. Turn the power off the projector. POWER Input port 5. HDMI IN 2, HDMI 1/DVI IN Input port Disconnect and reconnect the power cord and start the projector again. The lamp is malfunctioning after abnormal power off or restarting right after turning off , wait for a sufficient amount of cooling time and then turn the power on the Information Display screen. COMPONENT IN Input port 3. VIDEO IN Input port 7. If you need to replace the lamp, contact your product distributor or service center. Rear ...

User Manual (user Manual) (ver.1.0) (English)
Page 12
| Product Features | Product Views | Remote Control | Product Specifications | 1. VIDEO Button 4. Move ENTER Button 8. P.MODE Button 12. INSTALL Button 1. ON ( ) Used to check source signals, picture setup, PC screen adjustment and lamp lifespan. 9. INFO Used to turn on the projector. 2. S-VIDEO Button 5. INFO Button 9. HDMI2 Button 16. COMP2 Button 17. USER Button 21. S-VIDEO Used to switch to or select each menu item. 8. Move ENTER Used to move to S-VIDEO Mode. 5. COMP1 Button 3. STILL Button 11. OFF ( ) Button 13. EXIT Button 19. COMP1 Used to switch to PC Mode. 6. PC...
| Product Features | Product Views | Remote Control | Product Specifications | 1. VIDEO Button 4. Move ENTER Button 8. P.MODE Button 12. INSTALL Button 1. ON ( ) Used to check source signals, picture setup, PC screen adjustment and lamp lifespan. 9. INFO Used to turn on the projector. 2. S-VIDEO Button 5. INFO Button 9. HDMI2 Button 16. COMP2 Button 17. USER Button 21. S-VIDEO Used to switch to or select each menu item. 8. Move ENTER Used to move to S-VIDEO Mode. 5. COMP1 Button 3. STILL Button 11. OFF ( ) Button 13. EXIT Button 19. COMP1 Used to switch to PC Mode. 6. PC...

User Manual (user Manual) (ver.1.0) (English)
Page 13
... Model Size Panel Resolution Manufacturer Type Lamp Life Time Manufacturer Color Resolution Optimum resolution Maximum resolution Input video signal Input synchronization signal Maximum Pixel Clock SP-A800B 24.1 mm / 0.9 inch 1920 x 1080 Texas Instrument 300 W UHP 2000 Hrs Philips 62.2 M (1920 x 1080 x 3 x 10 bit) 1920 x 1080 @ 60 Hz 1920 x 1200 Video, S-Video...
... Model Size Panel Resolution Manufacturer Type Lamp Life Time Manufacturer Color Resolution Optimum resolution Maximum resolution Input video signal Input synchronization signal Maximum Pixel Clock SP-A800B 24.1 mm / 0.9 inch 1920 x 1080 Texas Instrument 300 W UHP 2000 Hrs Philips 62.2 M (1920 x 1080 x 3 x 10 bit) 1920 x 1080 @ 60 Hz 1920 x 1200 Video, S-Video...

User Manual (user Manual) (ver.1.0) (English)
Page 14
... Consumption Voltage Noise Dimensions Weight Key Features Brightness Contrast Keystone User Environment Temperature and Humidity 1016 mm ~ 7620 mm (16:9, Diagonal) 1.5 m ~ 14 m Less than class A. Samsung and the DMD Panel manufacturer have a rigid, bad pixel identification and limitation procedure in place and products will not exceed the maximum number of several...
... Consumption Voltage Noise Dimensions Weight Key Features Brightness Contrast Keystone User Environment Temperature and Humidity 1016 mm ~ 7620 mm (16:9, Diagonal) 1.5 m ~ 14 m Less than class A. Samsung and the DMD Panel manufacturer have a rigid, bad pixel identification and limitation procedure in place and products will not exceed the maximum number of several...

User Manual (user Manual) (ver.1.0) (English)
Page 16
O : Size & Overscan can be configured, x : Size & Overscan cannot be configured, △: Size can be configured Source Picture Size Input Type Mode 16:9 Zoom1 Zoom2 4:3 1080p O O O O HD 1080i O O O O 720p O O O O HDMI 576p O O O O 480p O O O O SD 576i O O O O 480i O O O O 1080p O O O O HD 1080i O O O O 720p O O O O Component 576p O O O O 480p O O O O SD 576i O O O O 480i O O O O Video & 576i △ O O △ SD S- Video 480i △ O O △ 1080p △ x x △ HD 1080i △...
O : Size & Overscan can be configured, x : Size & Overscan cannot be configured, △: Size can be configured Source Picture Size Input Type Mode 16:9 Zoom1 Zoom2 4:3 1080p O O O O HD 1080i O O O O 720p O O O O HDMI 576p O O O O 480p O O O O SD 576i O O O O 480i O O O O 1080p O O O O HD 1080i O O O O 720p O O O O Component 576p O O O O 480p O O O O SD 576i O O O O 480i O O O O Video & 576i △ O O △ SD S- Video 480i △ O O △ 1080p △ x x △ HD 1080i △...
User Manual (user Manual) (ver.1.0) (English)
Page 18
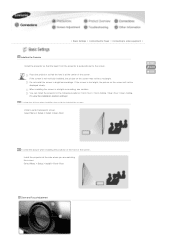
Select Menu > Setup > Install > Rear-Floor To view the picture when installing the projector in a bright surrounding, use curtains. Place the projector so that the beam from the projector is not vertically installed, the picture on the screen will not be a rectangle. When installing the screen in the front of the screen. You can install the projector in bright surroundings. Do not install the screen in the following locations: Front-Floor / Front-Ceiling / Rear-Floor / Rear-Ceiling. (To view the installation position settings) To view the picture when installing the ...
Select Menu > Setup > Install > Rear-Floor To view the picture when installing the projector in a bright surrounding, use curtains. Place the projector so that the beam from the projector is not vertically installed, the picture on the screen will not be a rectangle. When installing the screen in the front of the screen. You can install the projector in bright surroundings. Do not install the screen in the following locations: Front-Floor / Front-Ceiling / Rear-Floor / Rear-Ceiling. (To view the installation position settings) To view the picture when installing the ...
User Manual (user Manual) (ver.1.0) (English)
Page 19
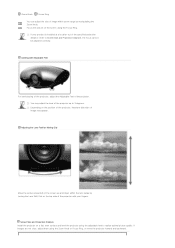
Adjusting the Lens Position Moving Dial Move the picture projected on the top side of the projector with Adjustable Feet For level placing of the projector, adjust the Adjustable Feet of the projector. You may appear. Depending on the position of the projector, Keystone distortion of image may adjust the level of the projector up and down within zoom range by turning the Lens Shift Dial on the screen up to Screen Size and Projection Distance), the focus cannot be adjusted correctly. If your fingers. Leveling with your product is installed at a location out of the ...
Adjusting the Lens Position Moving Dial Move the picture projected on the top side of the projector with Adjustable Feet For level placing of the projector, adjust the Adjustable Feet of the projector. You may appear. Depending on the position of the projector, Keystone distortion of image may adjust the level of the projector up and down within zoom range by turning the Lens Shift Dial on the screen up to Screen Size and Projection Distance), the focus cannot be adjusted correctly. If your fingers. Leveling with your product is installed at a location out of the ...
User Manual (user Manual) (ver.1.0) (English)
Page 20
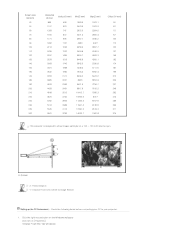
Screen Z: Throw Distance Y': Distance from Lens Center to your projector. 1. Check the following items before connecting your PC to Image Bottom Setting up the PC Environment - Screen size (M:inch) 40 50 60 70 80 90 100 110 120 130 140 150 160 170 180 190 200 210 220 230 240 250 300 Horizental (X:mm) 886 1107 1328 1550 1771 1992 2214 2435 2657 2878 3099 3321 3542 3763 3985 4206 4428 4649 4870 5092 5313 5535 6641 Vertical(Y:mm) 498 623 747 872 996 1121 1245 1370 1494 1619 1743 1868 1992 2117 2241 2366 2491 2615 2740 2864 2989 3113 3736 Min(Z:mm) 1983.6 2479.5 2975.3 3471.2 3967.1 ...
Screen Z: Throw Distance Y': Distance from Lens Center to your projector. 1. Check the following items before connecting your PC to Image Bottom Setting up the PC Environment - Screen size (M:inch) 40 50 60 70 80 90 100 110 120 130 140 150 160 170 180 190 200 210 220 230 240 250 300 Horizental (X:mm) 886 1107 1328 1550 1771 1992 2214 2435 2657 2878 3099 3321 3542 3763 3985 4206 4428 4649 4870 5092 5313 5535 6641 Vertical(Y:mm) 498 623 747 872 996 1121 1245 1370 1494 1619 1743 1868 1992 2117 2241 2366 2491 2615 2740 2864 2989 3113 3736 Min(Z:mm) 1983.6 2479.5 2975.3 3471.2 3967.1 ...

User Manual (user Manual) (ver.1.0) (English)
Page 21
Press the [Advanced] button. Another property window will appear. 4. 2. Set up to described in the display mode table supported by this projector. Shut down the PC and connect to close the window, and click the [OK] button of the window to the projector. Click on [Settings] tab and set the by referring to change setup. 3. Projected images may differ from the monitor depending on the projector when your PC is turned off or disconnected, switch Click the [OK] button to close the window. Click on the type of computers or Windows versions. (For example, [...
Press the [Advanced] button. Another property window will appear. 4. 2. Set up to described in the display mode table supported by this projector. Shut down the PC and connect to close the window, and click the [OK] button of the window to the projector. Click on [Settings] tab and set the by referring to change setup. 3. Projected images may differ from the monitor depending on the projector when your PC is turned off or disconnected, switch Click the [OK] button to close the window. Click on the type of computers or Windows versions. (For example, [...
User Manual (user Manual) (ver.1.0) (English)
Page 22
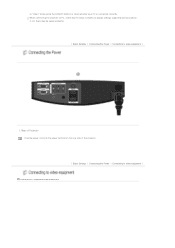
When connecting the projector to PC, check that PC setup complies to VCR/Camcorder/Cable Box Rear of Projector Plug the power cord into the power terminal on the rear side of the projector. | Basic Settings | Connecting the Power | Connecting to video equipment | Connecting to display settings supported by this projector. If not, there may be signal problems. | Basic Settings | Connecting the Power | Connecting to "Video" mode using the [VIDEO] buttons or check whether your PC is connected correctly. to video equipment | 1.
When connecting the projector to PC, check that PC setup complies to VCR/Camcorder/Cable Box Rear of Projector Plug the power cord into the power terminal on the rear side of the projector. | Basic Settings | Connecting the Power | Connecting to video equipment | Connecting to display settings supported by this projector. If not, there may be signal problems. | Basic Settings | Connecting the Power | Connecting to "Video" mode using the [VIDEO] buttons or check whether your PC is connected correctly. to video equipment | 1.

User Manual (user Manual) (ver.1.0) (English)
Page 23
Check that the projector and the video equipment are in place. Using the S-VIDEO connection, provides a higher visual quality. When finishing connecting the devices, connect the power of the projector. This projector does not support sound. (Separate audio system is not available, check the video cables are turned off before connecting cables. Using the Projector Turn on the projector and press the [Video] button to DVD When Composite Mode is needed for sound.) Connecting to select . Connect [VIDEO IN(yellow)] input port of the projector to select S-Video. Connect the ...
Check that the projector and the video equipment are in place. Using the S-VIDEO connection, provides a higher visual quality. When finishing connecting the devices, connect the power of the projector. This projector does not support sound. (Separate audio system is not available, check the video cables are turned off before connecting cables. Using the Projector Turn on the projector and press the [Video] button to DVD When Composite Mode is needed for sound.) Connecting to select . Connect [VIDEO IN(yellow)] input port of the projector to select S-Video. Connect the ...
