
User Guide
Page 6
...and recycle them through your remote control on the remote control, you step on a table or desk. z This may be disposed with other commercial wastes for disposal. Do not use new and used batteries together. Household users should not be damaged. This...turn the product off and unplug the power cord. z If you may fall and hurt yourself or the product may cause electric shock or fire. Business users should not be mixed with other types of its literature, indicates that it responsibly to place your local, free battery return system. Contact a Service Center. Use...
...and recycle them through your remote control on the remote control, you step on a table or desk. z This may be disposed with other commercial wastes for disposal. Do not use new and used batteries together. Household users should not be damaged. This...turn the product off and unplug the power cord. z If you may fall and hurt yourself or the product may cause electric shock or fire. Business users should not be mixed with other types of its literature, indicates that it responsibly to place your local, free battery return system. Contact a Service Center. Use...
User Guide
Page 7
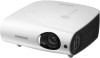
... and a 5-band equalizer is supported. Various input terminals - This unit allows adjustment of 3000 lumen. - Compact size, lightweight, and good portability Minimized fan noise - User adjustments - Provides a bright screen of each input port. - | Product Features | Product Views | Remote Control | Product Specifications | An optical engine adopting new LCD technology - 1024 x 768 panel has been adapted. - Utilizing a 3P-LCD panel. - Increases the connectivity to peripherals by optimizing the internal air flow and the fan installation structure.
... and a 5-band equalizer is supported. Various input terminals - This unit allows adjustment of 3000 lumen. - Compact size, lightweight, and good portability Minimized fan noise - User adjustments - Provides a bright screen of each input port. - | Product Features | Product Views | Remote Control | Product Specifications | An optical engine adopting new LCD technology - 1024 x 768 panel has been adapted. - Utilizing a 3P-LCD panel. - Increases the connectivity to peripherals by optimizing the internal air flow and the fan installation structure.

User Guide
Page 8
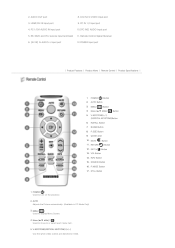
...LED Indications. 2. Lens ※ Refer to select input signals from the external sources. Use this button to enter or exit a menu or to move to move forward in all locations) User Manual CD POWER( ) Button Used to enlarge or reduce image size. TEMP (Red LED) 6. MENU Button Used to turn the projector on or off. - LAMP (Blue LED) - Remote Control Signal Receiver Adjusts the volume. Zoom Knob 3. VOL - / + & Select and Move Button 7. Unpacking Quick Installation Guide Warranty Card/ Registration Card (Not available in a menu. 10.Lens cover 4. Use...
...LED Indications. 2. Lens ※ Refer to select input signals from the external sources. Use this button to enter or exit a menu or to move to move forward in all locations) User Manual CD POWER( ) Button Used to enlarge or reduce image size. TEMP (Red LED) 6. MENU Button Used to turn the projector on or off. - LAMP (Blue LED) - Remote Control Signal Receiver Adjusts the volume. Zoom Knob 3. VOL - / + & Select and Move Button 7. Unpacking Quick Installation Guide Warranty Card/ Registration Card (Not available in a menu. 10.Lens cover 4. Use...

User Guide
Page 9
... 1 below if the lamp cover protecting the lamp unit is not closed or the sensor system is not in normal operating condition. Power Cable Remote Control/ 1 Batteries (CR2025) (Not available in all locations) Cleaning Cloth D-Sub Cable LED Indications ●:Light is On ◐:Light is Blinking ○:Light is Off STAND LAMP BY TEMP Information ● ○ If you press the POWER button on the remote control or projector, the screen ○ appears within...
... 1 below if the lamp cover protecting the lamp unit is not closed or the sensor system is not in normal operating condition. Power Cable Remote Control/ 1 Batteries (CR2025) (Not available in all locations) Cleaning Cloth D-Sub Cable LED Indications ●:Light is On ◐:Light is Blinking ○:Light is Off STAND LAMP BY TEMP Information ● ○ If you press the POWER button on the remote control or projector, the screen ○ appears within...
User Guide
Page 10
... is changed to Cooling mode before it has changed to Cooling mode, because the internal temperature of the projector is not open completely. Cool the projector sufficiently and operate it again. When the screen becomes darker Check the lamp usage time on to keep the unit from overheating. PC OUT port 7. [AV IN] VIDEO Input port If the same problem occurs continually, contact your product distributor or service center. This Projector uses a cooling fan...
... is changed to Cooling mode before it has changed to Cooling mode, because the internal temperature of the projector is not open completely. Cool the projector sufficiently and operate it again. When the screen becomes darker Check the lamp usage time on to keep the unit from overheating. PC OUT port 7. [AV IN] VIDEO Input port If the same problem occurs continually, contact your product distributor or service center. This Projector uses a cooling fan...
User Guide
Page 11
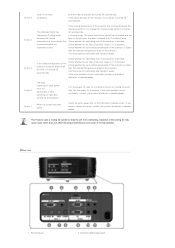
...turn on the projector. 2. AUTO Button 3. QUICK utton 10. EXIT ( ) Button 13. V.KEYSTONE(VERTICAL KEYSTONE) (+/-) Use this when video scenes are distorted or tilted. HDMI/DVI IN Input port 9. PC IN 1,2 Input port 4. AUDIO OUT port 8. [AV IN] S-VIDEO Input port 3. MENU ( ) Used to display Menu Screen. 4. MUTE ( ) Button 11. POWER ( ) Button 2. INFO Button 15. RS-232C port (For service input terminals) 11.Remote Control Signal Receiver 6. [AV IN] R-AUDIO-L Input port 12.POWER Input port | Product Features | Product Views | Remote Control | Product Specifications | 1. STILL Button...
...turn on the projector. 2. AUTO Button 3. QUICK utton 10. EXIT ( ) Button 13. V.KEYSTONE(VERTICAL KEYSTONE) (+/-) Use this when video scenes are distorted or tilted. HDMI/DVI IN Input port 9. PC IN 1,2 Input port 4. AUDIO OUT port 8. [AV IN] S-VIDEO Input port 3. MENU ( ) Used to display Menu Screen. 4. MUTE ( ) Button 11. POWER ( ) Button 2. INFO Button 15. RS-232C port (For service input terminals) 11.Remote Control Signal Receiver 6. [AV IN] R-AUDIO-L Input port 12.POWER Input port | Product Features | Product Views | Remote Control | Product Specifications | 1. STILL Button...
User Guide
Page 12
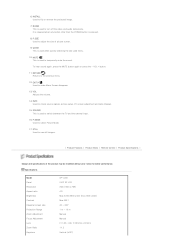
... and the external input. 16. RETURN ( ) Returns to make Menu Screen disappear. 13. SOURCE This is used when quickly selecting the last used to see still images. | Product Features | Product Views | Remote Control | Product Specifications | Design and specifications of picture screen. 9. To hear sound again, press the MUTE button again or press the - Specifications Model Panel Resolution Aspect ratio Brightness Contrast Diagonal screen size Projection Range Zoom Adjustment Focus Adjustment Lens Zoom Ratio Keystone SP-L300 0.63" 3P LCD XGA (1024 x 768) 4:3 Max...
... and the external input. 16. RETURN ( ) Returns to make Menu Screen disappear. 13. SOURCE This is used when quickly selecting the last used to see still images. | Product Features | Product Views | Remote Control | Product Specifications | Design and specifications of picture screen. 9. To hear sound again, press the MUTE button again or press the - Specifications Model Panel Resolution Aspect ratio Brightness Contrast Diagonal screen size Projection Range Zoom Adjustment Focus Adjustment Lens Zoom Ratio Keystone SP-L300 0.63" 3P LCD XGA (1024 x 768) 4:3 Max...
User Guide
Page 13
... LCD panel used in the LCD projector consists of hundreds of thousands of the product. Though a screen may have some dead pixels, this does not affect the overall screen quality and the lifetime of fine pixels. Lamp Input Terminal Speaker Power Noise Dimensions Weight User Environment Power Consumption 220W (Normal : 200W, Eco : 152W ) Life Time 2,000 Hours (Eco : 2,500 Hours ) D-Sub 15p x 2 Analog RGB, analog YPbPr HDMI Digital...
... LCD panel used in the LCD projector consists of hundreds of thousands of the product. Though a screen may have some dead pixels, this does not affect the overall screen quality and the lifetime of fine pixels. Lamp Input Terminal Speaker Power Noise Dimensions Weight User Environment Power Consumption 220W (Normal : 200W, Eco : 152W ) Life Time 2,000 Hours (Eco : 2,500 Hours ) D-Sub 15p x 2 Analog RGB, analog YPbPr HDMI Digital...
User Guide
Page 16
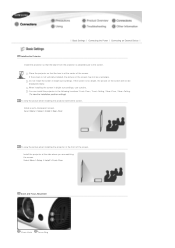
... view the picture when installing the projector behind the screen, Install a semi-transparent screen. Do not install the screen in the front of the screen, Install the projector at the center of the screen. Select Menu > Setup > Install > Rear-Floor To view the picture when installing the projector in bright surroundings. | Basic Settings | Connecting the Power | Connecting an External Device | Installing the Projector Install the projector so that the lens is too bright, the picture on the screen may not be displayed...
... view the picture when installing the projector behind the screen, Install a semi-transparent screen. Do not install the screen in the front of the screen, Install the projector at the center of the screen. Select Menu > Setup > Install > Rear-Floor To view the picture when installing the projector in bright surroundings. | Basic Settings | Connecting the Power | Connecting an External Device | Installing the Projector Install the projector so that the lens is too bright, the picture on the screen may not be displayed...

User Guide
Page 18
Screen Z: Throw Distance Y': Distance from Lens Center to change setup. 3. You do not have to Image Bottom Setting up the PC Environment - A. tab will appear. Click on [Settings] tab and set the by this projector. Press the [Advanced] button. Click the right mouse button on the Windows desktop and click on a 80 ~ 120 inch sized screen. Another property window will appear. 2. Check the following items before connecting your PC to...
Screen Z: Throw Distance Y': Distance from Lens Center to change setup. 3. You do not have to Image Bottom Setting up the PC Environment - A. tab will appear. Click on [Settings] tab and set the by this projector. Press the [Advanced] button. Click the right mouse button on the Windows desktop and click on a 80 ~ 120 inch sized screen. Another property window will appear. 2. Check the following items before connecting your PC to...
User Guide
Page 19
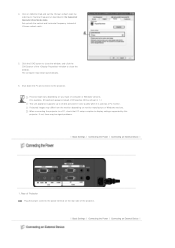
Projected images may restart automatically. 6. When connecting the projector to a PC, check that PC setup complies to display settings supported by referring to 24 bits per pixel in Color quality when it is used as shown in 1.) This unit appliance supports up both the vertical and horizontal frequency instead of the projector. | Basic Settings | Connecting the Power | Connecting an External Device | 4. The computer may differ from the monitor...
Projected images may restart automatically. 6. When connecting the projector to a PC, check that PC setup complies to display settings supported by referring to 24 bits per pixel in Color quality when it is used as shown in 1.) This unit appliance supports up both the vertical and horizontal frequency instead of the projector. | Basic Settings | Connecting the Power | Connecting an External Device | 4. The computer may differ from the monitor...
User Guide
Page 25
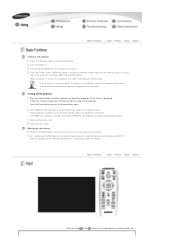
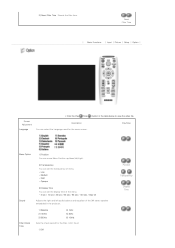
... the lens cover. Select OK using the arrow keys (Remote control or on the projector Check that the STAND BY LED indicator is turned on (with the Power button on . | Basic Functions | Input | Picture | Setup | Option | Turning on top of the projector). When the operation is finished, the LAMP LED indicator is turned off and the LAMP LED indicator blinks. When the power is turned off and the STAND BY LED indicator is opened completely. Press the Power button. The STAND BY LED indicator is turned...
... the lens cover. Select OK using the arrow keys (Remote control or on the projector Check that the STAND BY LED indicator is turned on (with the Power button on . | Basic Functions | Input | Picture | Setup | Option | Turning on top of the projector). When the operation is finished, the LAMP LED indicator is turned off and the LAMP LED indicator blinks. When the power is turned off and the STAND BY LED indicator is opened completely. Press the Power button. The STAND BY LED indicator is turned...
User Guide
Page 27
... using Green or Red enhancement. ▶ When the input signal is PC Timing(D-Sub/HDMI)and PAL and SECAM of the [S-Video] and [AV] modes, the color cannot be set for each color tone of an image. - Digital NR Black Level When a dotted line is displayed or the screen shakes, you adjusted according to your preferences. You can view a better visual quality picture by enabling Noise Reduction. ▶ When the input signal...
... using Green or Red enhancement. ▶ When the input signal is PC Timing(D-Sub/HDMI)and PAL and SECAM of the [S-Video] and [AV] modes, the color cannot be set for each color tone of an image. - Digital NR Black Level When a dotted line is displayed or the screen shakes, you adjusted according to your preferences. You can view a better visual quality picture by enabling Noise Reduction. ▶ When the input signal...

User Guide
Page 28
... as screen shaking. Screen Adjustment Install Description To tailor the picture to the installation location, you can reset the PC menu settings to the factory default settings. Overscan Film Mode PC Zoom Using this function, you can cut the edge of the picture when unnecessary information, images appear on the edge of the picture. ▶This is not supported in [AV] and [S-Video] modes. ▶This is supported only when the input signal is AV Timing...
... as screen shaking. Screen Adjustment Install Description To tailor the picture to the installation location, you can reset the PC menu settings to the factory default settings. Overscan Film Mode PC Zoom Using this function, you can cut the edge of the picture when unnecessary information, images appear on the edge of the picture. ▶This is not supported in [AV] and [S-Video] modes. ▶This is supported only when the input signal is AV Timing...
User Guide
Page 29
... signal from the external device connected to the projector.If a signal is received, the Background you can reset various settings to the factory default settings. 1) Factory Default : Changes the settings to the factory defaults. Factory Default Utilized as 1.33:1 or 1.78:1. Reset Using this using the vertical Keystone function. Lamp Mode V-Keystone Background Test Pattern 4) Rear-Ceiling : Vertically Reversed Image Used to set the image brightness by adjusting the amount of light generated by the lamp. 1) Eco : This mode is distorted or not. 2) Screen Size...
... signal from the external device connected to the projector.If a signal is received, the Background you can reset various settings to the factory default settings. 1) Factory Default : Changes the settings to the factory defaults. Factory Default Utilized as 1.33:1 or 1.78:1. Reset Using this using the vertical Keystone function. Lamp Mode V-Keystone Background Test Pattern 4) Rear-Ceiling : Vertically Reversed Image Used to set the image brightness by adjusting the amount of light generated by the lamp. 1) Eco : This mode is distorted or not. 2) Screen Size...
User Guide
Page 30
... filter time. Medium - Filter Check Time 1) Balance 2) 100Hz 3) 300Hz 4) 1kHz 5) 3kHz 6) 10kHz Sets the check period for the menu screen. Opaque Sound 3) Display Time You can select the Language used for the filter. (Unit: hour) 1) Off Position Transparency Display Time Reset Filter Time | Basic Functions | Input | Picture | Setup | Option | * Click the Play( )/Stop( ) button in the projector. Screen Adjustment Language Description You can set the translucency of the 3W stereo speaker embedded in the table below to view the video...
... filter time. Medium - Filter Check Time 1) Balance 2) 100Hz 3) 300Hz 4) 1kHz 5) 3kHz 6) 10kHz Sets the check period for the menu screen. Opaque Sound 3) Display Time You can select the Language used for the filter. (Unit: hour) 1) Off Position Transparency Display Time Reset Filter Time | Basic Functions | Input | Picture | Setup | Option | * Click the Play( )/Stop( ) button in the projector. Screen Adjustment Language Description You can set the translucency of the 3W stereo speaker embedded in the table below to view the video...
User Guide
Page 31
... no input signal for the specified time, there must be no button input from the remote control or the top of the projector) 1) Off 2) 10 min 3) 20 min 4) 30 min You can check external source signals, picture setup, PC picture adjustment and lamp use time. Auto Power On If the power is supplied to the projector, it is turned off automatically. (But, for the specified time, the projector is turned on . ▶ Filter check message: "Check the filter, and if necessary, clean or replace...
... no input signal for the specified time, there must be no button input from the remote control or the top of the projector) 1) Off 2) 10 min 3) 20 min 4) 30 min You can check external source signals, picture setup, PC picture adjustment and lamp use time. Auto Power On If the power is supplied to the projector, it is turned off automatically. (But, for the specified time, the projector is turned on . ▶ Filter check message: "Check the filter, and if necessary, clean or replace...
User Guide
Page 32
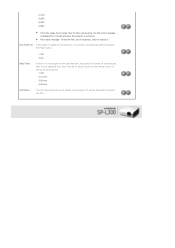
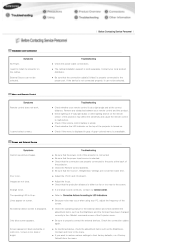
... cause the remote control to the screen. Only blue screen appears. z Check that the proper input source is lit up. Contact your remote control and the product. z Check whether the LED indicator on the ceiling. Screen and External Source Symptoms Cannot see picture images. The operating LED is selected. z Be sure that the connectors are not at the correct distance. z Be sure that the power cord of the Projector menu. z Be sure to LED Indications. Troubleshooting z Check the power cable connections. If...
... cause the remote control to the screen. Only blue screen appears. z Check that the proper input source is lit up. Contact your remote control and the product. z Check whether the LED indicator on the ceiling. Screen and External Source Symptoms Cannot see picture images. The operating LED is selected. z Be sure that the connectors are not at the correct distance. z Be sure that the power cord of the Projector menu. z Be sure to LED Indications. Troubleshooting z Check the power cable connections. If...
User Guide
Page 34
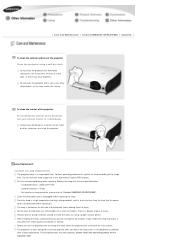
... the time that the power cord is not completely assembled after a lamp replacement. Check that the projector does not work properly, please check the operating status of the indicator LED. | Care and Maintenance | Contact SAMSUNG WORLDWIDE | Authority | To clean the exterior and lens of the projector Clean the projector using a proper vacuum device. Do not clean the projector with a soft cloth on lamp purchase, please refer to the usage time. You can view the lamp usage time...
... the time that the power cord is not completely assembled after a lamp replacement. Check that the projector does not work properly, please check the operating status of the indicator LED. | Care and Maintenance | Contact SAMSUNG WORLDWIDE | Authority | To clean the exterior and lens of the projector Clean the projector using a proper vacuum device. Do not clean the projector with a soft cloth on lamp purchase, please refer to the usage time. You can view the lamp usage time...

User Guide
Page 35
... due to internal heat. Turn off the power of the projector, and then disconnect the power cord after the heat of the projector has cooled sufficiently. Make sure to select the Reset Filter Time option after replacing or cleaning the filter of the projector (when looking from the time that its parts may occur. When replacing the filter, dust may be replaced. The lamp is located on the floor to...
... due to internal heat. Turn off the power of the projector, and then disconnect the power cord after the heat of the projector has cooled sufficiently. Make sure to select the Reset Filter Time option after replacing or cleaning the filter of the projector (when looking from the time that its parts may occur. When replacing the filter, dust may be replaced. The lamp is located on the floor to...


