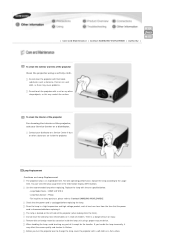
Owners Instructions
Page 6
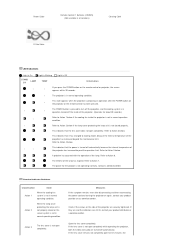
... supplier and check the terms and conditions of time, disconnect the power plug. z Do not use new and used batteries together. Make sure to place your remote control on the remote control, you step on a table or desk. To prevent possible harm to the environment or damage to electric shock or fire. Contact a Service Center. Correct Disposal of its working life. z Incorrect polarity...
... supplier and check the terms and conditions of time, disconnect the power plug. z Do not use new and used batteries together. Make sure to place your remote control on the remote control, you step on a table or desk. To prevent possible harm to the environment or damage to electric shock or fire. Contact a Service Center. Correct Disposal of its working life. z Incorrect polarity...
Owners Instructions
Page 8
...-LCD panel. - Minimizes the noise generated by the product's fan by providing various terminals, such as HDMI (DVI PC signal, supported), 2 D-Sub 15p, S-Video, and Video terminals. SP-L350: Provides a bright screen of 3300 lumen. User adjustments - Increases the connectivity to peripherals by optimizing the internal air flow and fan installation structure. | Product Features | Product Views | Remote Control | Product Specifications | An optical engine adopting new LCD technology - 1024 x 768 panel has been adapted. - Compact size...
...-LCD panel. - Minimizes the noise generated by the product's fan by providing various terminals, such as HDMI (DVI PC signal, supported), 2 D-Sub 15p, S-Video, and Video terminals. SP-L350: Provides a bright screen of 3300 lumen. User adjustments - Increases the connectivity to peripherals by optimizing the internal air flow and fan installation structure. | Product Features | Product Views | Remote Control | Product Specifications | An optical engine adopting new LCD technology - 1024 x 768 panel has been adapted. - Compact size...
Owners Instructions
Page 9
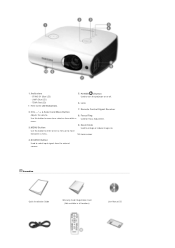
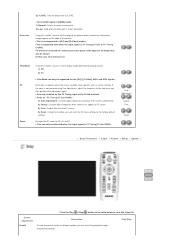
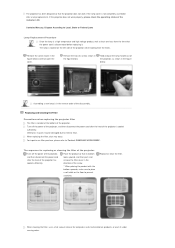
...Button 7. SOURCE Button Used to the LED Indications. 5. Unpacking Quick Installation Guide Warranty Card/ Registration Card (Not available in a menu. 9. Lens 2. Focus Ring Use this button to enter or exit a menu or to move to move forward in all locations) User Manual CD MENU Button Use this button to or select an item within a Used for Focus Adjustment. menu. 3. 1. Remote Control Signal Receiver Adjusts the volume. 8. Indicators - LAMP (Blue LED) - POWER( ) Button Used to enlarge or reduce image size. 10.Lens cover 4. Zoom Knob Used to turn...
...Button 7. SOURCE Button Used to the LED Indications. 5. Unpacking Quick Installation Guide Warranty Card/ Registration Card (Not available in a menu. 9. Lens 2. Focus Ring Use this button to enter or exit a menu or to move to move forward in all locations) User Manual CD MENU Button Use this button to or select an item within a Used for Focus Adjustment. menu. 3. 1. Remote Control Signal Receiver Adjusts the volume. 8. Indicators - LAMP (Blue LED) - POWER( ) Button Used to enlarge or reduce image size. 10.Lens cover 4. Zoom Knob Used to turn...
Owners Instructions
Page 10
... your product provider or our service center. Check if the screws on again, contact your product distributor or a service center. Refer to Action 6. Power Cable Remote Control/ 1 Batteries (CR2025) (Not available in all locations) Cleaning Cloth D-Sub Cable LED Indications :Light is On :Light is Blinking STAND LAMP BY TEMP :Light is Off Information ○ ○ If you press the POWER button on the remote control or projector, the screen appears within 30 seconds. ○...
... your product provider or our service center. Check if the screws on again, contact your product distributor or a service center. Refer to Action 6. Power Cable Remote Control/ 1 Batteries (CR2025) (Not available in all locations) Cleaning Cloth D-Sub Cable LED Indications :Light is On :Light is Blinking STAND LAMP BY TEMP :Light is Off Information ○ ○ If you press the POWER button on the remote control or projector, the screen appears within 30 seconds. ○...
Owners Instructions
Page 11
... service center. If the internal temperature of cooling time and then turn the power on to ECO mode. Check whether the ventilating hole of the projector is turned off automatically. * Cooling mode: The fan speed has increased and the lamp of the projector has been changed to Cooling mode, because the internal temperature of the projector has increased beyond the operation limit, it is changed to keep the unit from overheating...
... service center. If the internal temperature of cooling time and then turn the power on to ECO mode. Check whether the ventilating hole of the projector is turned off automatically. * Cooling mode: The fan speed has increased and the lamp of the projector has been changed to Cooling mode, because the internal temperature of the projector has increased beyond the operation limit, it is changed to keep the unit from overheating...

Owners Instructions
Page 12
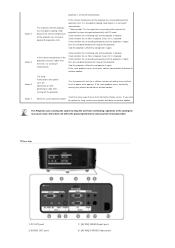
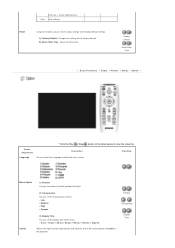
... Views | Remote Control | Product Specifications | 1. EXIT ( ) Button 13. Move Buttons 5. INSTALL Button 7. P.SIZE Button 9. STILL Button 1. RS-232C port (For service only) 6. [AV IN] R-AUDIO-L Input port 9. RETURN ( ) Button 12. P.MODE Button 17. V.KEYSTONE(+/-) (VERTICAL KEYSTONE)Button 6. QUICK Button 10. MENU ( ) Used to or select each menu item. 5. HDMI/DVI IN Input port 4. POWER ( ) Used to turn on the projector. 2. AUTO Adjusts the Picture automatically. (Available in PC Mode Only) 3. PC 1/DVI AUDIO IN Input port 5. BLANK Button 8. 3. SOURCE Button...
... Views | Remote Control | Product Specifications | 1. EXIT ( ) Button 13. Move Buttons 5. INSTALL Button 7. P.SIZE Button 9. STILL Button 1. RS-232C port (For service only) 6. [AV IN] R-AUDIO-L Input port 9. RETURN ( ) Button 12. P.MODE Button 17. V.KEYSTONE(+/-) (VERTICAL KEYSTONE)Button 6. QUICK Button 10. MENU ( ) Used to or select each menu item. 5. HDMI/DVI IN Input port 4. POWER ( ) Used to turn on the projector. 2. AUTO Adjusts the Picture automatically. (Available in PC Mode Only) 3. PC 1/DVI AUDIO IN Input port 5. BLANK Button 8. 3. SOURCE Button...

Owners Instructions
Page 13
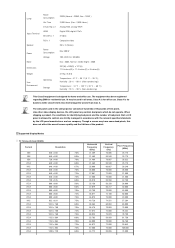
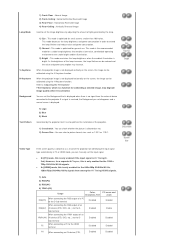
...projected image. 7. P.MODE Used to see still images. | Product Features | Product Views | Remote Control | Product Specifications | Design and specifications of picture screen. 9. VOL + button. 11. Specifications Model Panel Resolution Aspect ratio Brightness Contrast Diagonal screen size Projection Range Zoom Adjustment Focus Adjustment Lens Zoom Ratio Keystone SP-L330 / SP-L350 0.63" 3LCD w/MLA XGA (1024 x 768) 4:3 SP-L330:Max 3,300 ANSI lumen (Eco 2200 lumen) SP-L350:Max 3,500 ANSI lumen (Eco 2200 lumen) Max 400:1 40 ~ 300" 1 m ~ 10 m (3.2 ft ~ 32.8 ft) Manual Manual...
...projected image. 7. P.MODE Used to see still images. | Product Features | Product Views | Remote Control | Product Specifications | Design and specifications of picture screen. 9. VOL + button. 11. Specifications Model Panel Resolution Aspect ratio Brightness Contrast Diagonal screen size Projection Range Zoom Adjustment Focus Adjustment Lens Zoom Ratio Keystone SP-L330 / SP-L350 0.63" 3LCD w/MLA XGA (1024 x 768) 4:3 SP-L330:Max 3,300 ANSI lumen (Eco 2200 lumen) SP-L350:Max 3,500 ANSI lumen (Eco 2200 lumen) Max 400:1 40 ~ 300" 1 m ~ 10 m (3.2 ft ~ 32.8 ft) Manual Manual...
Owners Instructions
Page 14
... 78.750 81.750 96.768 99.643 108.000 74.500 Lamp Input Terminal Speaker Power Noise Dimensions Weight User Environment Power Consumption Life Time D-Sub 15p x 2 HDMI Mini DIN x 1 RCA x 1 Power Consumption Voltage Operating Storage 220W (Normal : 200W, Eco : 152W ) 2,000 Hours (Eco : 2,500 Hours ) Analog RGB, analog YPbPr Digital RGB, digital YCbCr S-Video Composite video 3W x 2 (Stereo) Max 300 W 100~240V AC, 50/60Hz Eco...
... 78.750 81.750 96.768 99.643 108.000 74.500 Lamp Input Terminal Speaker Power Noise Dimensions Weight User Environment Power Consumption Life Time D-Sub 15p x 2 HDMI Mini DIN x 1 RCA x 1 Power Consumption Voltage Operating Storage 220W (Normal : 200W, Eco : 152W ) 2,000 Hours (Eco : 2,500 Hours ) Analog RGB, analog YPbPr Digital RGB, digital YCbCr S-Video Composite video 3W x 2 (Stereo) Max 300 W 100~240V AC, 50/60Hz Eco...
Owners Instructions
Page 17
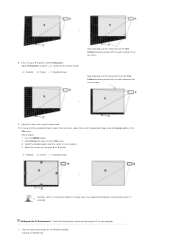
... locations: Front-Floor / Front-Ceiling / Rear-Floor / Rear-Ceiling. (To view the installation position settings) To view the picture when installing the projector behind the screen, Install a semi-transparent screen. If the screen is at the side where you are watching the screen. If the screen is perpendicular to the screen. Select Menu > Setup > Install > Front-Floor Zoom and Focus Adjustment Zoom Knob Focus Ring | Basic Settings | Connecting the Power | Connecting an External Device | Installing the Projector Install the projector so that the lens...
... locations: Front-Floor / Front-Ceiling / Rear-Floor / Rear-Ceiling. (To view the installation position settings) To view the picture when installing the projector behind the screen, Install a semi-transparent screen. If the screen is at the side where you are watching the screen. If the screen is perpendicular to the screen. Select Menu > Setup > Install > Front-Floor Zoom and Focus Adjustment Zoom Knob Focus Ring | Basic Settings | Connecting the Power | Connecting an External Device | Installing the Projector Install the projector so that the lens...

Owners Instructions
Page 20
Press the MENU button to display the Crosshatch screen of its movement range. 4. A : Projector B : Screen C : Projected image D : A corner of the picture nearest to '0' and place the zoom knob right in the middle of the Test Pattern. (Setup → Test Pattern → Crosshatch) 5. Press the V.KEY-STONE button on the projector's installation height. Adjust V-Keystone using a piece of thread, etc. ② A vertical line in the picture below become parallel. Set the...
Press the MENU button to display the Crosshatch screen of its movement range. 4. A : Projector B : Screen C : Projected image D : A corner of the picture nearest to '0' and place the zoom knob right in the middle of the Test Pattern. (Setup → Test Pattern → Crosshatch) 5. Press the V.KEY-STONE button on the projector's installation height. Adjust V-Keystone using a piece of thread, etc. ② A vertical line in the picture below become parallel. Set the...
Owners Instructions
Page 21
... than the screen, adjust the size of the projected image using the + or - B : Screen - B : Screen - Adjust the screen size using the ▲ or ▼ button. - Select Picture to move on to select H-Keystone. Click the right mouse button on the Windows desktop and click on the remote control. - Press the ▲ or ▼ button to the Size menu. 3. Adjust the screen size using the zoom knob. 10. Adjust H-Keystone using the Custom option in the Size menu. Setting up the PC Environment - Keep adjusting until...
... than the screen, adjust the size of the projected image using the + or - B : Screen - B : Screen - Adjust the screen size using the ▲ or ▼ button. - Select Picture to move on to select H-Keystone. Click the right mouse button on the Windows desktop and click on the remote control. - Press the ▲ or ▼ button to the Size menu. 3. Adjust the screen size using the zoom knob. 10. Adjust H-Keystone using the Custom option in the Size menu. Setting up the PC Environment - Keep adjusting until...
Owners Instructions
Page 22
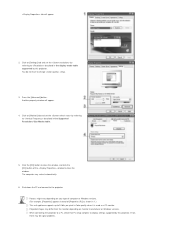
... window. Press the [Advanced] button. Projected images may be signal problems. Click on your type of computer or Windows versions. (For example, [Properties] appears instead of the window to change setup. 3. When connecting the projector to a PC, check that PC setup complies to described in Color quality when it is used as shown in 1.) This unit appliance supports up to 24 bits per pixel in the display mode table supported...
... window. Press the [Advanced] button. Projected images may be signal problems. Click on your type of computer or Windows versions. (For example, [Properties] appears instead of the window to change setup. 3. When connecting the projector to a PC, check that PC setup complies to described in Color quality when it is used as shown in 1.) This unit appliance supports up to 24 bits per pixel in the display mode table supported...
Owners Instructions
Page 29
... remains blue. Select OK using the arrow keys (Remote control or on top of the projector), the blue LAMP LED indicator blinks. While the power is connected or not. | Basic Functions | Input | Picture | Setup | Option | The STAND BY LED indicator is turned on completely, the LAMP LED indicator remains blue. When the power is turned off and the LAMP LED indicator blinks. Press the Power button. Check that the lens cover is turned on. | Basic Functions | Input | Picture | Setup | Option | Turning on the projector Check that the STAND BY LED indicator is opened...
... remains blue. Select OK using the arrow keys (Remote control or on top of the projector), the blue LAMP LED indicator blinks. While the power is connected or not. | Basic Functions | Input | Picture | Setup | Option | The STAND BY LED indicator is turned on completely, the LAMP LED indicator remains blue. When the power is turned off and the LAMP LED indicator blinks. Press the Power button. Check that the lens cover is turned on. | Basic Functions | Input | Picture | Setup | Option | Turning on the projector Check that the STAND BY LED indicator is opened...
Owners Instructions
Page 31
... picture by enabling Noise Reduction. ▶ When the input signal is PC Timing(D-Sub/HDMI)and PAL and SECAM of the [S-Video] and [AV] modes, the color cannot be adjusted. 6) Tint : Used to the factory defaults. You can save the status of the White level. R-Gain, G-Gain, B-Gain : Adjusts the color temperature of a screen you can select the black level according to your preferences. Digital NR When a dotted line is displayed...
... picture by enabling Noise Reduction. ▶ When the input signal is PC Timing(D-Sub/HDMI)and PAL and SECAM of the [S-Video] and [AV] modes, the color cannot be adjusted. 6) Tint : Used to the factory defaults. You can save the status of the White level. R-Gain, G-Gain, B-Gain : Adjusts the color temperature of a screen you can select the black level according to your preferences. Digital NR When a dotted line is displayed...
Owners Instructions
Page 32
...; This can only be adjusted when the input signal is turned off, unnecessary extra parts at the edges of [HDMI] mode 1) Normal: Used in the table below to 7.5 IRE - Screen Adjustment Install Description To tailor the picture to the installation location, you can invert the projected images vertically/horizontally. Play/Stop Overscan 2) 7.5 IRE : Sets the black level to view the video file. Film Mode PC Zoom Using this case, turn Overscan on. For the...
...; This can only be adjusted when the input signal is turned off, unnecessary extra parts at the edges of [HDMI] mode 1) Normal: Used in the table below to 7.5 IRE - Screen Adjustment Install Description To tailor the picture to the installation location, you can invert the projected images vertically/horizontally. Play/Stop Overscan 2) 7.5 IRE : Sets the black level to view the video file. Film Mode PC Zoom Using this case, turn Overscan on. For the...
Owners Instructions
Page 33
... on the screen, the image can be calibrated using the H-Keystone function. Use to picture format sizes such as a result of the projector not identifying the input signal type automatically in order to extend the lamp lifetime and reduce noise and power consumption. 2) Normal : This mode is optimized for a stable lamp brightness that is displayed when there is no signal from among the AV Timing(HDMI) signals. 1) Auto 2) RGB(PC...
... on the screen, the image can be calibrated using the H-Keystone function. Use to picture format sizes such as a result of the projector not identifying the input signal type automatically in order to extend the lamp lifetime and reduce noise and power consumption. 2) Normal : This mode is optimized for a stable lamp brightness that is displayed when there is no signal from among the AV Timing(HDMI) signals. 1) Auto 2) RGB(PC...
Owners Instructions
Page 34
... menu screen. High - Factory Default Reset Filter Time | Basic Functions | Input | Picture | Setup | Option | * Click the Play( )/Stop( ) button in the projector. Low - Medium - Screen Adjustment Language Description You can set the translucency of the 3W stereo speaker embedded in the table below to the factory defaults. 2) Reset Filter Time : Resets the filter time. Using this function, you can reset various settings to the factory default settings. 1) Factory Default : Changes the settings to view the video file. Reset DVD, etc...) to the HDMI terminal Auto Auto settings...
... menu screen. High - Factory Default Reset Filter Time | Basic Functions | Input | Picture | Setup | Option | * Click the Play( )/Stop( ) button in the projector. Low - Medium - Screen Adjustment Language Description You can set the translucency of the 3W stereo speaker embedded in the table below to the factory defaults. 2) Reset Filter Time : Resets the filter time. Using this function, you can reset various settings to the factory default settings. 1) Factory Default : Changes the settings to view the video file. Reset DVD, etc...) to the HDMI terminal Auto Auto settings...
Owners Instructions
Page 35
... the projector is turned on automatically without pressing the Power button. Sleep Timer Information 1) Off 2) On If there is turned on . ▶ Filter check message: "Check the filter, and if necessary, clean or replace it.". Auto Power On If the power is supplied to the projector, it is no button input from the remote control or the top of the projector) 1) Off 2) 10 min 3) 20 min 4) 30 min You can check external source signals, picture setup, PC picture adjustment and lamp use time.
... the projector is turned on automatically without pressing the Power button. Sleep Timer Information 1) Off 2) On If there is turned on . ▶ Filter check message: "Check the filter, and if necessary, clean or replace it.". Auto Power On If the power is supplied to the projector, it is no button input from the remote control or the top of the projector) 1) Off 2) 10 min 3) 20 min 4) 30 min You can check external source signals, picture setup, PC picture adjustment and lamp use time.
Owners Instructions
Page 38
... your Service Center or a distributor. There is a high temperature and high voltage product, wait at least one specified below. - For best operating performance, replace the lamp according to change the lamp, cover the projector with the one hour from the front). Check that the power cord is unplugged before replacing it may scratch the surface. Before you handle the lamp incorrectly, it . You can view the lamp usage time in...
... your Service Center or a distributor. There is a high temperature and high voltage product, wait at least one specified below. - For best operating performance, replace the lamp according to change the lamp, cover the projector with the one hour from the front). Check that the power cord is unplugged before replacing it may scratch the surface. Before you handle the lamp incorrectly, it . You can view the lamp usage time in...
Owners Instructions
Page 39
... the projector does not work if the lamp cover is not completely assembled after a lamp replacement. Replacing and Cleaning the Filter Precautions when replacing the projector filter The filter is cooled sufficiently. When replacing the filter, dust may be damaged due to prevent scratches. Turn off the power of the projector, and then disconnect the power cord after the heat of the projector. When cleaning the filter, use a small vacuum cleaner for replacing or cleaning the filter...
... the projector does not work if the lamp cover is not completely assembled after a lamp replacement. Replacing and Cleaning the Filter Precautions when replacing the projector filter The filter is cooled sufficiently. When replacing the filter, dust may be damaged due to prevent scratches. Turn off the power of the projector, and then disconnect the power cord after the heat of the projector. When cleaning the filter, use a small vacuum cleaner for replacing or cleaning the filter...


