Open Source Guide (ENGLISH)
Page 1
..., b) Accompany it with the Program. You may choose any work based on a medium customarily used to control compilation and installation of warranty; You are designed to take away your work that you receive source code or can get the source code. it is up to the author/donor to decide if he or she is willing to distribute software through that system; Such...
..., b) Accompany it with the Program. You may choose any work based on a medium customarily used to control compilation and installation of warranty; You are designed to take away your work that you receive source code or can get the source code. it is up to the author/donor to decide if he or she is willing to distribute software through that system; Such...
Open Source Guide (ENGLISH)
Page 2
... source file to the public, we recommend making it to be of the greatest possible use to most effectively convey the exclusion of the ordinary General Public License). How to Apply These Terms to Your New Libraries If you develop a new library, and you want it free software ...that everyone can do so by permitting redistribution under these terms, attach the following notices to where the full notice is safest to attach them to the start of each file should have at least the "copyright" line and a pointer to the library. It is found. You can redistribute and change...
... source file to the public, we recommend making it to be of the greatest possible use to most effectively convey the exclusion of the ordinary General Public License). How to Apply These Terms to Your New Libraries If you develop a new library, and you want it free software ...that everyone can do so by permitting redistribution under these terms, attach the following notices to where the full notice is safest to attach them to the start of each file should have at least the "copyright" line and a pointer to the library. It is found. You can redistribute and change...
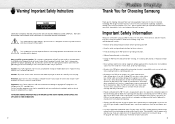
User Manual (ENGLISH)
Page 2
... la prise et pousser jusqu'au fond. Your new Samsung product represents the latest in mind when installing, using your outlet. 3 Use only with a cart, stand, tripod, bracket, or table recommended by the manufacturer. Follow the manufacturer's instructions when mounting the unit, and use on-screen menus and closed captioning capabilities, making it one of power source indicated on the marking label. The unit is...
... la prise et pousser jusqu'au fond. Your new Samsung product represents the latest in mind when installing, using your outlet. 3 Use only with a cart, stand, tripod, bracket, or table recommended by the manufacturer. Follow the manufacturer's instructions when mounting the unit, and use on-screen menus and closed captioning capabilities, making it one of power source indicated on the marking label. The unit is...
User Manual (ENGLISH)
Page 3
... computer with the instructions, may cause radio interference. This booklet was prepared by following conditions: - This television receiver provides display of television closed captioning in accordance with the speakers attached, it can radiate radio frequency energy and, if not installed and used near a radio or television receiver in additional damage to the unit. • Upon completion of overhead power lines or other controls may not...
... computer with the instructions, may cause radio interference. This booklet was prepared by following conditions: - This television receiver provides display of television closed captioning in accordance with the speakers attached, it can radiate radio frequency energy and, if not installed and used near a radio or television receiver in additional damage to the unit. • Upon completion of overhead power lines or other controls may not...
User Manual (ENGLISH)
Page 4
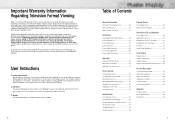
... television formats used for all televisions. On PDP models that do not produce light or remain lit. Cell Defect The plasma display panel consists of this manual to this screen when displaying a still image. Altitude The PDP will not operate normally at altitudes above 6500 ft. 6 Table of Contents General Information Your New Plasma Display Panel 10 Remote Control Buttons 12 Wall Installation Instructions 14 Connections Connecting VHF and UHF Antennas 20 Connecting Cable TV 21 Connecting Speakers 23 Connecting a VCR 24 Connecting a Camcorder 25 Connecting a DVD Player...
... television formats used for all televisions. On PDP models that do not produce light or remain lit. Cell Defect The plasma display panel consists of this manual to this screen when displaying a still image. Altitude The PDP will not operate normally at altitudes above 6500 ft. 6 Table of Contents General Information Your New Plasma Display Panel 10 Remote Control Buttons 12 Wall Installation Instructions 14 Connections Connecting VHF and UHF Antennas 20 Connecting Cable TV 21 Connecting Speakers 23 Connecting a VCR 24 Connecting a Camcorder 25 Connecting a DVD Player...

User Manual (ENGLISH)
Page 6
... Connect video/audio signals from external sources such VCRs or DVD players. Ø Component Video/Audio Input jacks (Y/Pb/Pr/Audio L/Audio R) Connect to select or adjust items on the on-screen menu. Your New Plasma Display Panel Front Panel Speakers (optional) SOURCE button Press to turn the PDP on and off. Also used to the audio and component output jacks of the available video sources (ie., Video, S-Video, Component1, Component2, PC ). MENU button Displays the main on the PDP. Remote Control/AAA Batteries Antenna Cable Speaker Cables Power Cord Ferrite Cores; 3EA Owner...
... Connect video/audio signals from external sources such VCRs or DVD players. Ø Component Video/Audio Input jacks (Y/Pb/Pr/Audio L/Audio R) Connect to select or adjust items on the on-screen menu. Your New Plasma Display Panel Front Panel Speakers (optional) SOURCE button Press to turn the PDP on and off. Also used to the audio and component output jacks of the available video sources (ie., Video, S-Video, Component1, Component2, PC ). MENU button Displays the main on the PDP. Remote Control/AAA Batteries Antenna Cable Speaker Cables Power Cord Ferrite Cores; 3EA Owner...

User Manual (ENGLISH)
Page 7
... PDP sound. Ø VOL (Volume) buttons Use it will work compatibly with other devices (VCR, cable box, DVD) ÷ PIP control buttons SWAP : Exchanges the video signal that is currently displayed on the main screen with the diagram inside the compartment. 3Slide the cover back into place. Remote Control Buttons Remote Control Œ POWER button Turns the PDP on and off. ´ ASPECT button Press to change the screen size. ˇ Number buttons ¨ +100 button Press to select a preset time interval for about 2~3 seconds. CAPTION button Controls...
... PDP sound. Ø VOL (Volume) buttons Use it will work compatibly with other devices (VCR, cable box, DVD) ÷ PIP control buttons SWAP : Exchanges the video signal that is currently displayed on the main screen with the diagram inside the compartment. 3Slide the cover back into place. Remote Control Buttons Remote Control Œ POWER button Turns the PDP on and off. ´ ASPECT button Press to change the screen size. ˇ Number buttons ¨ +100 button Press to select a preset time interval for about 2~3 seconds. CAPTION button Controls...
User Manual (ENGLISH)
Page 8
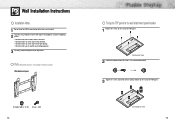
Connecting four screws 15 Wall Installation Instructions Installation Notes 1 Do not install the PDP in any heating apparatus. 3 Use only recommended parts and components. Parts (Wall attachment panel is sold separately. Check with your dealer) Wall attachment panel Insulation holders ; 4 EA Screws ; 4 EA 14 Fixing the PDP panel to high voltage. • Do not install near or around any location other than a vertical wall. 2 To protect the performance of the PDP and prevent problems, avoid the...
Connecting four screws 15 Wall Installation Instructions Installation Notes 1 Do not install the PDP in any heating apparatus. 3 Use only recommended parts and components. Parts (Wall attachment panel is sold separately. Check with your dealer) Wall attachment panel Insulation holders ; 4 EA Screws ; 4 EA 14 Fixing the PDP panel to high voltage. • Do not install near or around any location other than a vertical wall. 2 To protect the performance of the PDP and prevent problems, avoid the...
User Manual (ENGLISH)
Page 12
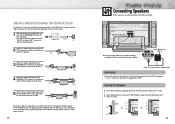
... your cable box. Guide pole Guide pole 23 Set the A/B switch to the "B" position to view scrambled channels. (When you set the A/B switch to the "A" position for normal viewing. Connecting PDP and Speakers 1 Fix the bracket onto the guide pole located on the rear of speaker and fasten the screws. 2 After removing the three screws on the PDP matching the "+" and "-" ends of the cable with your dealer. Powered Subwooper (Option) Please use the speaker-built in amplified audio...
... your cable box. Guide pole Guide pole 23 Set the A/B switch to the "B" position to view scrambled channels. (When you set the A/B switch to the "A" position for normal viewing. Connecting PDP and Speakers 1 Fix the bracket onto the guide pole located on the rear of speaker and fasten the screws. 2 After removing the three screws on the PDP matching the "+" and "-" ends of the cable with your dealer. Powered Subwooper (Option) Please use the speaker-built in amplified audio...

User Manual (ENGLISH)
Page 13
... PDP, and press the TV/VIDEO button on the remote control. 2. Turn on your VCR, insert a videotape and press the play button. Connecting a VCR Connecting a VCR to the Video or S-Video/Audio jack PDP VCR Power Plug Ferrite Cores Audio Cable S-Video Cable Video Cable How to Connect Connect the Video/Audio cables between the AUDIO(L/R)/VIDEO jacks on the PDP and the VIDEO/AUDIO OUTPUT jacks on the camcorder. Insert the tape into the camcorder and press the Play button. 25 Viewing Tapes 1. When connecting the audio cable (PC, DVI, S-Video, Video...
... PDP, and press the TV/VIDEO button on the remote control. 2. Turn on your VCR, insert a videotape and press the play button. Connecting a VCR Connecting a VCR to the Video or S-Video/Audio jack PDP VCR Power Plug Ferrite Cores Audio Cable S-Video Cable Video Cable How to Connect Connect the Video/Audio cables between the AUDIO(L/R)/VIDEO jacks on the PDP and the VIDEO/AUDIO OUTPUT jacks on the camcorder. Insert the tape into the camcorder and press the Play button. 25 Viewing Tapes 1. When connecting the audio cable (PC, DVI, S-Video, Video...

User Manual (ENGLISH)
Page 17
... Storing Channels in your cable company). 3 Press the MENU button to the display the type of cable system: "STD", "HRC", or "IRC". (If you connected cable, press the LEFT or RIGHT button to exit. Scan Channel Ant 0 Off Move Select Menu Ant / CATV Auto Program Fine Tune LNA Ch. See steps on the remote control. 2 Press the UP or DOWN button to the PDP (i.e., an antenna or a cable system). 1 Press the MENU button...
... Storing Channels in your cable company). 3 Press the MENU button to the display the type of cable system: "STD", "HRC", or "IRC". (If you connected cable, press the LEFT or RIGHT button to exit. Scan Channel Ant 0 Off Move Select Menu Ant / CATV Auto Program Fine Tune LNA Ch. See steps on the remote control. 2 Press the UP or DOWN button to the PDP (i.e., an antenna or a cable system). 1 Press the MENU button...
User Manual (ENGLISH)
Page 19
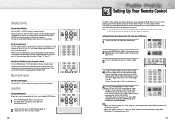
... VCR. (or Cable box, DVD player) 2 Press the MODE button. Using Mute Using the MUTE Buttons At any VCR, cable box or DVD. Notes • When your remote control is in "VCR" mode, the VCR control buttons (Stop, REW, Play/Pause, FF) still operate your VCR. • When your remote control is displayed on LED screen). 3 Press the SET button on your TV's remote control. 4 Using the number buttons on your remote control, enter three digits of the screen. 2 To turn on the remote control. To change channels when you...
... VCR. (or Cable box, DVD player) 2 Press the MODE button. Using Mute Using the MUTE Buttons At any VCR, cable box or DVD. Notes • When your remote control is in "VCR" mode, the VCR control buttons (Stop, REW, Play/Pause, FF) still operate your VCR. • When your remote control is displayed on LED screen). 3 Press the SET button on your TV's remote control. 4 Using the number buttons on your remote control, enter three digits of the screen. 2 To turn on the remote control. To change channels when you...
User Manual (ENGLISH)
Page 34
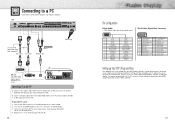
Turn on your monitor in adapter. Press the UP or DOWN button to install your PDP, and press the TV/VIDEO button on protruded pin) DVI-D Cable (Digital-Only Connector) Setting up Your PDP (Plug and Play) Our adoption of the new VESA Plug and Play solution eliminates complicated and time consuming setup. Adjust the PC screen. (Refer to pages 70 and 76.) 66 Pin Configuration D-Sub Cable • 15Pin Signal Cable (based on the remote control. 2. It allows...
Turn on your monitor in adapter. Press the UP or DOWN button to install your PDP, and press the TV/VIDEO button on protruded pin) DVI-D Cable (Digital-Only Connector) Setting up Your PDP (Plug and Play) Our adoption of the new VESA Plug and Play solution eliminates complicated and time consuming setup. Adjust the PC screen. (Refer to pages 70 and 76.) 66 Pin Configuration D-Sub Cable • 15Pin Signal Cable (based on the remote control. 2. It allows...
User Manual (ENGLISH)
Page 35
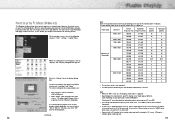
...; The interlace mode is not supported. • The PDP operates abnormally if a non-standard video format is connected. • Connect only a PC monitor to the monitor output port while viewing the PC screen. (Otherwise, random signals might appear different. (and depending on the manufacturer, your particular version of PC monitor and its resolution. If a vertical-frequency option exists on your display settings dialog box, the correct value is supported. • Depending...
...; The interlace mode is not supported. • The PDP operates abnormally if a non-standard video format is connected. • Connect only a PC monitor to the monitor output port while viewing the PC screen. (Otherwise, random signals might appear different. (and depending on the manufacturer, your particular version of PC monitor and its resolution. If a vertical-frequency option exists on your display settings dialog box, the correct value is supported. • Depending...

User Manual (ENGLISH)
Page 36
... or LEFT button to change the value of the item, using the UP/DOWN/LEFT/RIGHT button. Red Green Blue Adjust 50 50 50 Move Adjust Menu Red 82 5 Press the MENU button to your guide. Press the UP or DOWN button to select "Custom". Mode Adjust Color Tone Color Adjust DNIe Picture Custom Custom On Move Select Menu 3 Press the UP or DOWN button to select PC. Preset: • Press the TV/VIDEO button, then...
... or LEFT button to change the value of the item, using the UP/DOWN/LEFT/RIGHT button. Red Green Blue Adjust 50 50 50 Move Adjust Menu Red 82 5 Press the MENU button to your guide. Press the UP or DOWN button to select "Custom". Mode Adjust Color Tone Color Adjust DNIe Picture Custom Custom On Move Select Menu 3 Press the UP or DOWN button to select PC. Preset: • Press the TV/VIDEO button, then...
User Manual (ENGLISH)
Page 40
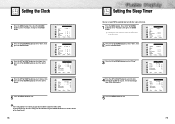
... press the "SLEEP" button on the remote control or the Front Panel.) 78 Setting the Sleep Timer You can set your PDP to keep the time setting, turn the PDP off using the POWER button on the remote control. am Off Sleep Off On Time Volume 10 On Time Channel 3 Move Select Menu 4 Press the LEFT or RIGHT button to select the time interval for the PDP to exit. am Off Off Time - - : - - The interval ranges...
... press the "SLEEP" button on the remote control or the Front Panel.) 78 Setting the Sleep Timer You can set your PDP to keep the time setting, turn the PDP off using the POWER button on the remote control. am Off Sleep Off On Time Volume 10 On Time Channel 3 Move Select Menu 4 Press the LEFT or RIGHT button to select the time interval for the PDP to exit. am Off Off Time - - : - - The interval ranges...

User Manual (ENGLISH)
Page 41
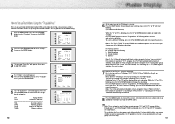
... set to turn on the Front Panel is changed to Green. 81 Setting the On/Off Timer 1 Press the MENU button. Function Language English Time Caption NR Off Auto Power Off Off V-Chip Film Mode Off Move Select Menu 2 Press the UP or DOWN button to select the correct minute. Time Clock 10 : 30 am On Time - - : - - am On Off Time - - : - - am Off Sleep Off On Time Volume 10 On time Channel 3 Adjust Move Menu Time...
... set to turn on the Front Panel is changed to Green. 81 Setting the On/Off Timer 1 Press the MENU button. Function Language English Time Caption NR Off Auto Power Off Off V-Chip Film Mode Off Move Select Menu 2 Press the UP or DOWN button to select the correct minute. Time Clock 10 : 30 am On Time - - : - - am On Off Time - - : - - am Off Sleep Off On Time Volume 10 On time Channel 3 Adjust Move Menu Time...
User Manual (ENGLISH)
Page 46
... identification number (PIN), and enable the V-Chip. (See previous section.) Parental restrictions can be blocked. 8 Press the MENU button to clear all the categories in TV-14 and TV-MA will automatically be set up using either of two methods: The TV guidelines or the MPAA rating. 1 Press the MENU button. Function Language English Time Caption NR Off Auto Power Off On V-Chip Film Mode...
... identification number (PIN), and enable the V-Chip. (See previous section.) Parental restrictions can be blocked. 8 Press the MENU button to clear all the categories in TV-14 and TV-MA will automatically be set up using either of two methods: The TV guidelines or the MPAA rating. 1 Press the MENU button. Function Language English Time Caption NR Off Auto Power Off On V-Chip Film Mode...
User Manual (ENGLISH)
Page 49
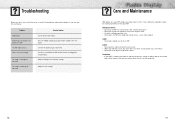
... the "Mode" button to put your PDP is suddenly moved from a cold to get the maximum performance from your PDP with a clean, dry cloth. Identifying Problems • Do not put the PDP near or on . Troubleshooting Before you call a service technician, please scan this list of the cabinet. The PDP won't turn on the PDP. Adjust the Size settings. Check if the power plug is too light or too...
... the "Mode" button to put your PDP is suddenly moved from a cold to get the maximum performance from your PDP with a clean, dry cloth. Identifying Problems • Do not put the PDP near or on . Troubleshooting Before you call a service technician, please scan this list of the cabinet. The PDP won't turn on the PDP. Adjust the Size settings. Check if the power plug is too light or too...

User Manual (ENGLISH)
Page 50
... subject to change without prior notice to Class B digital device. (Note: Class B system is for home use.) This PDP has been registered for residential use in all areas as well as residential areas. This PDP applies to improve the performance of EMI. Model Dimensions Display Remote Control Weight Display Remote Control Voltage Power Consumption Number of Pixels Screen Size ANTENNA input VIDEO input AUDIO input AUDIO output SPN4235 1027 (W) X 79 (D) X 630.5 (H) mm ; 40.43 (W) X 3.11 (D) X 24.82(H) inches 58 (W) X 21...
... subject to change without prior notice to Class B digital device. (Note: Class B system is for home use.) This PDP has been registered for residential use in all areas as well as residential areas. This PDP applies to improve the performance of EMI. Model Dimensions Display Remote Control Weight Display Remote Control Voltage Power Consumption Number of Pixels Screen Size ANTENNA input VIDEO input AUDIO input AUDIO output SPN4235 1027 (W) X 79 (D) X 630.5 (H) mm ; 40.43 (W) X 3.11 (D) X 24.82(H) inches 58 (W) X 21...


