User Manual
Page 2
..., please read the following precautions carefully and use loose power outlets or damaged power cables. Failure to follow the instructions marked with this symbol may cause personal injury or damage to the product or property. | Power Related | Installation Related | Cleaning and Use Related | Insert the power plug firmly so that it may damage the power cord and cause electric shock or fire. Do...
..., please read the following precautions carefully and use loose power outlets or damaged power cables. Failure to follow the instructions marked with this symbol may cause personal injury or damage to the product or property. | Power Related | Installation Related | Cleaning and Use Related | Insert the power plug firmly so that it may damage the power cord and cause electric shock or fire. Do...

User Manual
Page 5
... it may cause damage or injury. Install on a flat and stable location as the front part is heavy. | Power Related | Installation Related | Cleaning and Use Related | Do not insert any of the lamp nor project the picture onto eyes. Do not use or keep the product near flammable sprays or other... the PC/COMPOSITE port, the Power port or the Battery port. z This is a danger of children's reach. z This may cause injury. If water or an alien substance enters the product, turn the product off, disconnect the power cord from a wall outlet and contact a Service Center. Do not...
... it may cause damage or injury. Install on a flat and stable location as the front part is heavy. | Power Related | Installation Related | Cleaning and Use Related | Do not insert any of the lamp nor project the picture onto eyes. Do not use or keep the product near flammable sprays or other... the PC/COMPOSITE port, the Power port or the Battery port. z This is a danger of children's reach. z This may cause injury. If water or an alien substance enters the product, turn the product off, disconnect the power cord from a wall outlet and contact a Service Center. Do not...
User Manual
Page 6
..., unusual noise, or there is damaged, turn the product off and unplug the power cord. z There is exposed to clean the product internally at least once a year. Ask a Service Center to dust, water or alien substances, clean it will be operated for an extended period of time may cause electric shock or fire. When not using a soft dry cloth.
..., unusual noise, or there is damaged, turn the product off and unplug the power cord. z There is exposed to clean the product internally at least once a year. Ask a Service Center to dust, water or alien substances, clean it will be operated for an extended period of time may cause electric shock or fire. When not using a soft dry cloth.
User Manual
Page 8
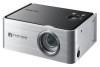
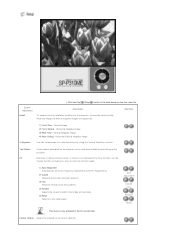
Lightweight. You can enjoy screen viewing without Connecting a Power Cord (For more information about the battery, refer to the battery description. ) - Next Generation Backlight Light Source, LED Lamp - A Battery Pack that Enables Projection without connecting the power cord. The Projector is a custom made projector designed for important marketing activities and presentations of use. High Mobility Design - Small Size. - Effective energy saving by using low voltage. This Portable Projector SP-P310ME provides...
Lightweight. You can enjoy screen viewing without Connecting a Power Cord (For more information about the battery, refer to the battery description. ) - Next Generation Backlight Light Source, LED Lamp - A Battery Pack that Enables Projection without connecting the power cord. The Projector is a custom made projector designed for important marketing activities and presentations of use. High Mobility Design - Small Size. - Effective energy saving by using low voltage. This Portable Projector SP-P310ME provides...

User Manual
Page 9
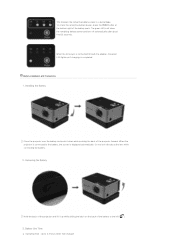
... the Operating LEDs. 9. When pressing the 'SOURCE' button when the menu screen is not displayed, the input source (PC, Composite)is used to exit the OSD or to return to the battery description.) PC/COMPOSITE To connect a PC or VCR, the PC/Composite cable must be connected here. 7. POWER LED If you turn the projector on, the Power LED lights up and if you turn it on . SERVICE The SERVICE terminal is switched. 5. TEMP LED This lights...
... the Operating LEDs. 9. When pressing the 'SOURCE' button when the menu screen is not displayed, the input source (PC, Composite)is used to exit the OSD or to return to the battery description.) PC/COMPOSITE To connect a PC or VCR, the PC/Composite cable must be connected here. 7. POWER LED If you turn the projector on, the Power LED lights up and if you turn it on . SERVICE The SERVICE terminal is switched. 5. TEMP LED This lights...

User Manual
Page 10
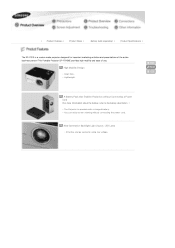
... the product. The cooling fan inside of the product is operating normally. To purchase optional module, contact your dealer or nearby service center. To purchase an additional adapter, contact your dealer or nearby service center. Accessories Quick Installation Guide Warranty (Not available in all locations) User Manual CD Adapter Power Cord PC/Composite cable Lens Cover Stand (View Stand Installation) Carrying Case Use only the adapter supplied with the product. Requires checking.
... the product. The cooling fan inside of the product is operating normally. To purchase optional module, contact your dealer or nearby service center. To purchase an additional adapter, contact your dealer or nearby service center. Accessories Quick Installation Guide Warranty (Not available in all locations) User Manual CD Adapter Power Cord PC/Composite cable Lens Cover Stand (View Stand Installation) Carrying Case Use only the adapter supplied with the product. Requires checking.
User Manual
Page 12
... PUSH button at the lens while connecting the battery. 2. This displays the remaining battery power in a percentage. When the AC power is connected through the adapter, the green LED lights up while sliding the latch on the back of the battery to the left ( ). 3. Do not look directly at the bottom right of the projector forward. Battery Use Time z Operating time : Up to the battery, the screen...
... PUSH button at the lens while connecting the battery. 2. This displays the remaining battery power in a percentage. When the AC power is connected through the adapter, the green LED lights up while sliding the latch on the back of the battery to the left ( ). 3. Do not look directly at the bottom right of the projector forward. Battery Use Time z Operating time : Up to the battery, the screen...
User Manual
Page 13
... the battery to high temperatures such as it may damage the projector. z Adapter Standard : DC 14 V, 3.5 A Charging the battery when the battery is damaged or deformed, immediately remove the battery from the projector when not using the rechargeable battery for the first time or after a long period of the battery or malfunction even if the power has turned off first...
... the battery to high temperatures such as it may damage the projector. z Adapter Standard : DC 14 V, 3.5 A Charging the battery when the battery is damaged or deformed, immediately remove the battery from the projector when not using the rechargeable battery for the first time or after a long period of the battery or malfunction even if the power has turned off first...
User Manual
Page 14
... : 15Pin D-Sub 2) Frequency (Refer to the Supported Display Modes.) Supported Broadcast Signals : NTSC, PAL, SECAM (PAL-60 is broken and the battery fluid comes into contact with high temperatures such as necklaces, coins, keys, etc. Product Specifications Model Panel Light Source Power Dimension Weight Major Functions Input/Output (24Pin) Operating Environment Size Resolution Power Consumption Standard Voltage Brightness Contrast Screen Size Projection Distance Keystone PC Composite Temperature and Humidity EMI Noise SP-P310ME 13...
... : 15Pin D-Sub 2) Frequency (Refer to the Supported Display Modes.) Supported Broadcast Signals : NTSC, PAL, SECAM (PAL-60 is broken and the battery fluid comes into contact with high temperatures such as necklaces, coins, keys, etc. Product Specifications Model Panel Light Source Power Dimension Weight Major Functions Input/Output (24Pin) Operating Environment Size Resolution Power Consumption Standard Voltage Brightness Contrast Screen Size Projection Distance Keystone PC Composite Temperature and Humidity EMI Noise SP-P310ME 13...

User Manual
Page 15
... display elements, the DMD Panel may be used in all areas. This Class B equipment is designed for business while class B emits less electromagnetic waves than class A. Class A is for residential use . Class A is for home and office use. The equipment has been registered regarding EMI for office use . Supported Display Mode Resolution VGA, 640 x 350 VGA, 640 x 350 VGA, 640 X 400 VGA, 640 x 480 VGA, 640 x 480 VGA...
... display elements, the DMD Panel may be used in all areas. This Class B equipment is designed for business while class B emits less electromagnetic waves than class A. Class A is for residential use . Class A is for home and office use. The equipment has been registered regarding EMI for office use . Supported Display Mode Resolution VGA, 640 x 350 VGA, 640 x 350 VGA, 640 X 400 VGA, 640 x 480 VGA, 640 x 480 VGA...

User Manual
Page 17
... Settings | Connecting the Power | Connecting to a PC | Connecting to an AV device | Installing the Projector Install the projector so that the lens is farther or shorter than the specified projection distance (Refer to the screen. When installing the screen in bright surroundings. Select Menu > Setup > Install > Front-Floor Focusing Turn the Focus Ring left or right until the picture on the screen is perpendicular to the Screen Size and Projection Distance), the focus adjustment might fail. To view the picture when installing...
... Settings | Connecting the Power | Connecting to a PC | Connecting to an AV device | Installing the Projector Install the projector so that the lens is farther or shorter than the specified projection distance (Refer to the screen. When installing the screen in bright surroundings. Select Menu > Setup > Install > Front-Floor Focusing Turn the Focus Ring left or right until the picture on the screen is perpendicular to the Screen Size and Projection Distance), the focus adjustment might fail. To view the picture when installing...
User Manual
Page 18
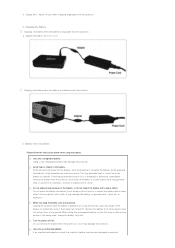
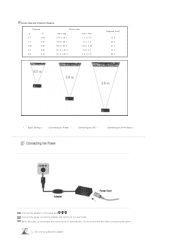
....3 x 62.5 3.28 x 2.46 101.6 x 76.2 4.0 x 3.0 127.0 x 95.3 5.0 x 3.75 Diagonal (inch) 12.5 25.0 41.0 50.0 63.0 | Basic Settings | Connecting the Power | Connecting to a PC | Connecting to an AV device | Connect the adapter to a wall outlet. Connect the power cord to the adapter and connect it to the power port( ). Use only an authorized adapter. When the power is connected, the screen turns on automatically. Do not look at the lens while connecting the power.
....3 x 62.5 3.28 x 2.46 101.6 x 76.2 4.0 x 3.0 127.0 x 95.3 5.0 x 3.75 Diagonal (inch) 12.5 25.0 41.0 50.0 63.0 | Basic Settings | Connecting the Power | Connecting to a PC | Connecting to an AV device | Connect the adapter to a wall outlet. Connect the power cord to the adapter and connect it to the power port( ). Use only an authorized adapter. When the power is connected, the screen turns on automatically. Do not look at the lens while connecting the power.
User Manual
Page 19
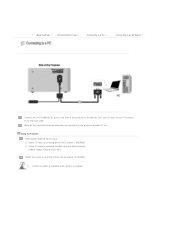
... Adjust buttons. ( Menu > Input > Source List > PC ) Adjust the screen so that the picture can be viewed comfortably. | Basic Settings | Connecting the Power | Connecting to a PC | Connecting to an AV device | Connect the [PC/COMPOSITE] port on . To listen to the Monitor OUT port [D-Sub] of your PC using a PC/Composite cable. When all the connections above have been connected, turn the projector and the PC on the side of the projector to audio, a separate audio...
... Adjust buttons. ( Menu > Input > Source List > PC ) Adjust the screen so that the picture can be viewed comfortably. | Basic Settings | Connecting the Power | Connecting to a PC | Connecting to an AV device | Connect the [PC/COMPOSITE] port on . To listen to the Monitor OUT port [D-Sub] of your PC using a PC/Composite cable. When all the connections above have been connected, turn the projector and the PC on the side of the projector to audio, a separate audio...
User Manual
Page 20
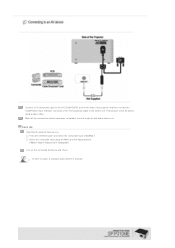
... . When all the connections above have been completed, turn the projector and video devices on the side of the projector and then connect the [COMPOSITE Input (Yellow)] connector of the PC/Composite cable to the VIDEO OUT (Yellow) port of the AV device using the Menu and the Adjust buttons. ( Menu > Input > Source List > Composite ) Turn on the connected AV device and check. Press the SOURCE button and select the Composite input ( SOURCE ) Select the Composite input using a video cable.
... . When all the connections above have been completed, turn the projector and video devices on the side of the projector and then connect the [COMPOSITE Input (Yellow)] connector of the PC/Composite cable to the VIDEO OUT (Yellow) port of the AV device using the Menu and the Adjust buttons. ( Menu > Input > Source List > Composite ) Turn on the connected AV device and check. Press the SOURCE button and select the Composite input ( SOURCE ) Select the Composite input using a video cable.
User Manual
Page 21
...| Buttons | Input | Picture | Setup | Menu Option | Information | To turn it off : Press the Power button until the Power LED is turned on the OSD menu screen. 4. Adjustment Button[ ] Moves the OSD menu or adjusts a value on . | Buttons | Input | Picture | Setup | Menu Option | Information | 1. Pressing the 'SOURCE' button when the menu screen is also used to exit the OSD or to return to a higher level of the OSD menu. 3. Menu Button[ ] Displays the OSD menu. Enter Button [ ] / SOURCE Button Switches the input source or selects an OSD menu. Power Button[ ] To turn it...
...| Buttons | Input | Picture | Setup | Menu Option | Information | To turn it off : Press the Power button until the Power LED is turned on the OSD menu screen. 4. Adjustment Button[ ] Moves the OSD menu or adjusts a value on . | Buttons | Input | Picture | Setup | Menu Option | Information | 1. Pressing the 'SOURCE' button when the menu screen is also used to exit the OSD or to return to a higher level of the OSD menu. 3. Menu Button[ ] Displays the OSD menu. Enter Button [ ] / SOURCE Button Switches the input source or selects an OSD menu. Power Button[ ] To turn it...
User Manual
Page 23
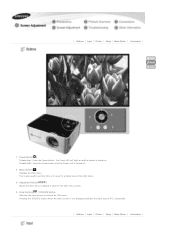
... is bright. 3) Movie Select to view a picture that the color on the screen becomes deeper or lighter. 5) Tint Adjusts the color of the screen according to view the video file. Custom Picture You can select a preset screen mode or make your needs. 1) 4:3 2) 16:9 | Buttons | Input | Picture | Setup | Menu Option | Information | Screen Adjustment Picture Mode * Click the Play( )/Stop( ) button in the table below to your own custom settings. 1) Dynamic Select to a green or red tone.
... is bright. 3) Movie Select to view a picture that the color on the screen becomes deeper or lighter. 5) Tint Adjusts the color of the screen according to view the video file. Custom Picture You can select a preset screen mode or make your needs. 1) 4:3 2) 16:9 | Buttons | Input | Picture | Setup | Menu Option | Information | Screen Adjustment Picture Mode * Click the Play( )/Stop( ) button in the table below to your own custom settings. 1) Dynamic Select to a green or red tone.
User Manual
Page 24
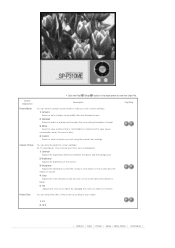
... factory defaults. Screen Adjustment Install * Click the Play( )/Stop( ) button in the PC environment. Play/Stop V-Keystone 1) Front-Floor : Normal Image 2) Front-Ceiling : Horizontal Negative Image 3) Rear-Floor : Vertical Negative Image 4) Rear-Ceiling : Horizontal/Vertical Negative Image You can compensate for a slanted picture by using the Vertical Keystone function. Removes or reduces picture noise. Reversed images as well as negative images are supported. Auto Adjustment Coarse Fine Position Reset This menu is not removed by the projector...
... factory defaults. Screen Adjustment Install * Click the Play( )/Stop( ) button in the PC environment. Play/Stop V-Keystone 1) Front-Floor : Normal Image 2) Front-Ceiling : Horizontal Negative Image 3) Rear-Floor : Vertical Negative Image 4) Rear-Ceiling : Horizontal/Vertical Negative Image You can compensate for a slanted picture by using the Vertical Keystone function. Removes or reduces picture noise. Reversed images as well as negative images are supported. Auto Adjustment Coarse Fine Position Reset This menu is not removed by the projector...
User Manual
Page 27
... A blank screen is operating and check the video output settings. Only a blue screen appears. The screen is perpendicular to the screen. Solution Check the power connection of the Menu Settings. Check if the external device is displayed. Focus the lens. To return the settings of the projector to the corresponding port and check the connectivity. | Please check the Troubleshooting Guide below before calling for service | Installation and Connection Symptom Cannot turn the power on the screen. When using the adaptor : Check the connection status between the...
... A blank screen is operating and check the video output settings. Only a blue screen appears. The screen is perpendicular to the screen. Solution Check the power connection of the Menu Settings. Check if the external device is displayed. Focus the lens. To return the settings of the projector to the corresponding port and check the connectivity. | Please check the Troubleshooting Guide below before calling for service | Installation and Connection Symptom Cannot turn the power on the screen. When using the adaptor : Check the connection status between the...
User Manual
Page 30
...*600) projector provides backwards compatibility for previous computer models. This value is determined as defined by the American National Standards Institute. Since the brightness at the center is not necessary. Compression Mode A mode that displays video in http://www.samsung.com/id http://www.samsung.com/jp http://www.samsung.com/my http://www.samsung.com/ph http://www.samsung.com...
...*600) projector provides backwards compatibility for previous computer models. This value is determined as defined by the American National Standards Institute. Since the brightness at the center is not necessary. Compression Mode A mode that displays video in http://www.samsung.com/id http://www.samsung.com/jp http://www.samsung.com/my http://www.samsung.com/ph http://www.samsung.com...
User Manual
Page 31
... all modes) Hz (kHz, MHz) Hertz (Kilohertz, Megahertz). DVD provides high quality video and audio. Resolution Pixels are , the more pixels there are a number of the Red, Green and Blue video signals on the projected picture on a screen. Since, the more information is used in France to view multiple tasks simultaneously. Vertical Keystone This correction function is displayed, select a higher resolution when you wish to transmit and receive the color...
... all modes) Hz (kHz, MHz) Hertz (Kilohertz, Megahertz). DVD provides high quality video and audio. Resolution Pixels are , the more pixels there are a number of the Red, Green and Blue video signals on the projected picture on a screen. Since, the more information is used in France to view multiple tasks simultaneously. Vertical Keystone This correction function is displayed, select a higher resolution when you wish to transmit and receive the color...


