
Open Source Guide (ENGLISH)
Page 1
... which is a work based on the original authors' reputations. You are distributed under this service if you wish), that you receive source code or can redistribute and change . This product use to the public, the best way to achieve this is to make it free software which everyone can get the source code. The original manual has wrong versions of the free software distribution system, which...
... which is a work based on the original authors' reputations. You are distributed under this service if you wish), that you receive source code or can redistribute and change . This product use to the public, the best way to achieve this is to make it free software which everyone can get the source code. The original manual has wrong versions of the free software distribution system, which...
Open Source Guide (ENGLISH)
Page 2
...to attach them to the start of the greatest possible use to the public, we recommend making it free software that everyone can do so by permitting redistribution under the terms of warranty; and each source file to the library. You can redistribute and change. 16. To apply these terms (or, alternatively, under... INABILITY TO USE THE LIBRARY (INCLUDING BUT NOT LIMITED TO LOSS OF DATA OR DATA BEING RENDERED INACCURATE OR LOSSES SUSTAINED BY YOU OR THIRD PARTIES OR A FAILURE OF THE LIBRARY TO OPERATE WITH ANY OTHER SOFTWARE), EVEN IF SUCH HOLDER OR OTHER PARTY HAS BEEN ADVISED OF THE ...
...to attach them to the start of the greatest possible use to the public, we recommend making it free software that everyone can do so by permitting redistribution under the terms of warranty; and each source file to the library. You can redistribute and change. 16. To apply these terms (or, alternatively, under... INABILITY TO USE THE LIBRARY (INCLUDING BUT NOT LIMITED TO LOSS OF DATA OR DATA BEING RENDERED INACCURATE OR LOSSES SUSTAINED BY YOU OR THIRD PARTIES OR A FAILURE OF THE LIBRARY TO OPERATE WITH ANY OTHER SOFTWARE), EVEN IF SUCH HOLDER OR OTHER PARTY HAS BEEN ADVISED OF THE ...

User Manual (user Manual) (ver.1.0) (English)
Page 2
... recording of copyrighted TV programs is provided to call CATV system installer's attention to Article 820-40 of the National Electrical Code (Section 54 of Canadian Electrical Code, Part I), that the cable ground shall be connected to the grounding system ...plug. Important Safety Instructions CAUTION RISK OF ELECTRIC SHOCK DO NOT OPEN CAUTION: TO REDUCE THE RISK OF ELECTRIC SHOCK, DO NOT REMOVE COVER (OR BACK). It is present inside part of plug to rain or moisture. REFER SERVICING TO QUALIFIED SERVICE PERSONNEL. Certain Canadian programs may also be in part may void the user...
... recording of copyrighted TV programs is provided to call CATV system installer's attention to Article 820-40 of the National Electrical Code (Section 54 of Canadian Electrical Code, Part I), that the cable ground shall be connected to the grounding system ...plug. Important Safety Instructions CAUTION RISK OF ELECTRIC SHOCK DO NOT OPEN CAUTION: TO REDUCE THE RISK OF ELECTRIC SHOCK, DO NOT REMOVE COVER (OR BACK). It is present inside part of plug to rain or moisture. REFER SERVICING TO QUALIFIED SERVICE PERSONNEL. Certain Canadian programs may also be in part may void the user...

User Manual (user Manual) (ver.1.0) (English)
Page 4
... to an antenna discharge unit, size of grounding conductors, location of any service or repairs to this TV, ask the service technician to perform safety checks to the following two conditions: (1) This device may result in a safe operating condition. This device complies with such lines can touch dangerous voltage points or damage parts. This television receiver provides display of television closed captioning in the...
... to an antenna discharge unit, size of grounding conductors, location of any service or repairs to this TV, ask the service technician to perform safety checks to the following two conditions: (1) This device may result in a safe operating condition. This device complies with such lines can touch dangerous voltage points or damage parts. This television receiver provides display of television closed captioning in the...

User Manual (user Manual) (ver.1.0) (English)
Page 6
... Connecting a Camcorder 23 Installing Batteries in the Remote Control 24 Chapter 3: Operation 25 Turning the TV On and Off 25 Plug & Play Feature 25 Viewing the Menus and On-Screen Displays 27 Viewing the Menus 27 Viewing the Display 27 Selecting a Menu Language 28 Memorizing the Channels 29 Selecting the Video Signal-source 29 Storing Channels in Memory (Automatic Method 30 Adding and Erasing Channels (Manual Method 31 Changing Channels 32 Using the Channel Buttons 32 Directly Accessing Channels...
... Connecting a Camcorder 23 Installing Batteries in the Remote Control 24 Chapter 3: Operation 25 Turning the TV On and Off 25 Plug & Play Feature 25 Viewing the Menus and On-Screen Displays 27 Viewing the Menus 27 Viewing the Display 27 Selecting a Menu Language 28 Memorizing the Channels 29 Selecting the Video Signal-source 29 Storing Channels in Memory (Automatic Method 30 Adding and Erasing Channels (Manual Method 31 Changing Channels 32 Using the Channel Buttons 32 Directly Accessing Channels...

User Manual (user Manual) (ver.1.0) (English)
Page 7
... engine 48 Digital Noise Reduction 49 Changing the Screen Size 50 Changing the Color Tone 51 Using the R.Surf Feature 52 Freezing the Picture 52 Setting the On/Off Timer 53 Setting the Sleep Timer 54 Choosing a Multi-Channel Sound (MTS) Soundtrack 55 Extra sound settings (Turbo Sound, Surround, Auto Volume, Melody, BBE or Woofer 56 Viewing Closed Captions 59 Viewing Picture-in-Picture 60 Activating Picture-in-Picture 60 Selecting a Signal Source (External A/V) for PIP 61 Changing the Size of the PIP Window 62...
... engine 48 Digital Noise Reduction 49 Changing the Screen Size 50 Changing the Color Tone 51 Using the R.Surf Feature 52 Freezing the Picture 52 Setting the On/Off Timer 53 Setting the Sleep Timer 54 Choosing a Multi-Channel Sound (MTS) Soundtrack 55 Extra sound settings (Turbo Sound, Surround, Auto Volume, Melody, BBE or Woofer 56 Viewing Closed Captions 59 Viewing Picture-in-Picture 60 Activating Picture-in-Picture 60 Selecting a Signal Source (External A/V) for PIP 61 Changing the Size of the PIP Window 62...

User Manual (user Manual) (ver.1.0) (English)
Page 10
... to change between viewing TV programs and signals from other components. ´ MENU Press to see pages 13-22.) Œ AUDIO INPUT jacks Used to connect the audio signals from a camcorder or video game. ´ VIDEO INPUT jack Used to connect a video signal from a camcorder or video game. ˇ SUPER VIDEO INPUT jack S-Video signal from an S-VHS VCR or DVD player. ¨ HEADPHONE jack Connect a set of your TV's features. ˇ VOL - , + Press to increase or decrease the volume. Side Panel...
... to change between viewing TV programs and signals from other components. ´ MENU Press to see pages 13-22.) Œ AUDIO INPUT jacks Used to connect the audio signals from a camcorder or video game. ´ VIDEO INPUT jack Used to connect a video signal from a camcorder or video game. ˇ SUPER VIDEO INPUT jack S-Video signal from an S-VHS VCR or DVD player. ¨ HEADPHONE jack Connect a set of your TV's features. ˇ VOL - , + Press to increase or decrease the volume. Side Panel...

User Manual (user Manual) (ver.1.0) (English)
Page 11
... antenna or to the Sub-woofer speaker jack (built in Sub-woofer cable). ' DVI AUDIO INPUT jacks (TXN3298HF/TXN3098WHF/ TXN2798HF) Receives the digital audio signals from a set top box. ˝ DIGITAL INPUT (Digital Visual Interface) jack (TXN3298HF/TXN3098WHF/ TXN2798HF) Receives the digital video signals from VCRs, DVD players and similar devices. Note: The common jack of component 1 and AV2, component 2 and AV3 input jacks are output from a monitor in Component 1 or 2 modes. ´,¨,ˆAV INPUT jacks Video...
... antenna or to the Sub-woofer speaker jack (built in Sub-woofer cable). ' DVI AUDIO INPUT jacks (TXN3298HF/TXN3098WHF/ TXN2798HF) Receives the digital audio signals from a set top box. ˝ DIGITAL INPUT (Digital Visual Interface) jack (TXN3298HF/TXN3098WHF/ TXN2798HF) Receives the digital video signals from VCRs, DVD players and similar devices. Note: The common jack of component 1 and AV2, component 2 and AV3 input jacks are output from a monitor in Component 1 or 2 modes. ´,¨,ˆAV INPUT jacks Video...

User Manual (user Manual) (ver.1.0) (English)
Page 12
... the preset factory settings (or select your personal, customized sound settings). ˇ P.MODE Adjust the TV picture by the Samsung remote control (i.e., TV, Set Top Box, VCR, Cable box, or DVD). PRE-CH Tunes to the previous channel. Ò TV/VIDEO Press to display all of the preset factory settings (or select your personal, customized picture settings). ¨ Number buttons Press to select channels directly on -screen menu. ' P.SIZE Press to select channels over 100. While using the remote, always...
... the preset factory settings (or select your personal, customized sound settings). ˇ P.MODE Adjust the TV picture by the Samsung remote control (i.e., TV, Set Top Box, VCR, Cable box, or DVD). PRE-CH Tunes to the previous channel. Ò TV/VIDEO Press to display all of the preset factory settings (or select your personal, customized picture settings). ¨ Number buttons Press to select channels directly on -screen menu. ' P.SIZE Press to select channels over 100. While using the remote, always...
User Manual (user Manual) (ver.1.0) (English)
Page 13
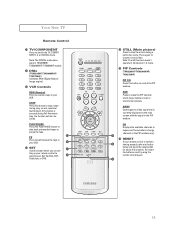
... screen with the signal in the PIP window only). - YOUR NEW TV Remote Control ¿ TV/COMPONENT Press to resume normal video. Note: The DIGITAL mode does work in TXN2798HF/ TXN3098WHF/ TXN3298HF models. ¸ DNIe (TXN3298HF/TXN3098WHF/ TXN2798HF) Activates DNIe (Digital Natural Image engine). ˛ VCR Controls REW (Rewind) Press to rewind a tape in your Set Top Box, VCR, Cable box, or DVD. ± STILL (Main picture) Press to play...
... screen with the signal in the PIP window only). - YOUR NEW TV Remote Control ¿ TV/COMPONENT Press to resume normal video. Note: The DIGITAL mode does work in TXN2798HF/ TXN3098WHF/ TXN3298HF models. ¸ DNIe (TXN3298HF/TXN3098WHF/ TXN2798HF) Activates DNIe (Digital Natural Image engine). ˛ VCR Controls REW (Rewind) Press to rewind a tape in your Set Top Box, VCR, Cable box, or DVD. ± STILL (Main picture) Press to play...

User Manual (user Manual) (ver.1.0) (English)
Page 22
... displayed on the screen in order to digitally connect the TV with a DTV decoder. 22 For detailed information, refer to 1080I OR 480P. Set the DTV decoder DIGITAL OUTPUT jack output setting to the Set Top Box instruction manual. • The DIGITAL INPUT jack is for use with the picture signal of audio cables between the AUDIO INPUT jacks on the TV and the AUDIO OUT jacks on the Set Top Box. 3 Connect a DVI cable between the ANTENNA...
... displayed on the screen in order to digitally connect the TV with a DTV decoder. 22 For detailed information, refer to 1080I OR 480P. Set the DTV decoder DIGITAL OUTPUT jack output setting to the Set Top Box instruction manual. • The DIGITAL INPUT jack is for use with the picture signal of audio cables between the AUDIO INPUT jacks on the TV and the AUDIO OUT jacks on the Set Top Box. 3 Connect a DVI cable between the ANTENNA...
User Manual (user Manual) (ver.1.0) (English)
Page 25
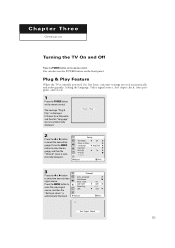
The message "Plug & Play" is initially powered On, five basic customer settings proceed automatically and subsequently: Setting the language, Video signal source, Ant. Plug & Play Feature When the TV is displayed. input check, Auto program, and Clock. 1 Press the POWER button on the front panel. Press the MENU button to enter the language, and then the "Channel" menu is automatically displayed. 25 Press the MENU button to enter the video signal source, and then the "Ant Input check" is...
The message "Plug & Play" is initially powered On, five basic customer settings proceed automatically and subsequently: Setting the language, Video signal source, Ant. Plug & Play Feature When the TV is displayed. input check, Auto program, and Clock. 1 Press the POWER button on the front panel. Press the MENU button to enter the language, and then the "Channel" menu is automatically displayed. 25 Press the MENU button to enter the video signal source, and then the "Ant Input check" is...
User Manual (user Manual) (ver.1.0) (English)
Page 27
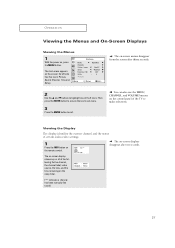
... the MENU button. M You can also use the MENU, CHANNEL, and VOLUME buttons on the remote control. M The on-screen displays disappear after thirty seconds. 2 Use the L and M buttons to exit. Its left side has five icons: Picture, Sound, Channel, Time and Setup. The on-screen display shows any or all of the 5 icons. M The on the screen. OPERATION Viewing the Menus and On-Screen Displays Viewing the Menus 1 With the power on the sleep timer. ("*" indicates a channel has been manually...
... the MENU button. M You can also use the MENU, CHANNEL, and VOLUME buttons on the remote control. M The on-screen displays disappear after thirty seconds. 2 Use the L and M buttons to exit. Its left side has five icons: Picture, Sound, Channel, Time and Setup. The on-screen display shows any or all of the 5 icons. M The on the screen. OPERATION Viewing the Menus and On-Screen Displays Viewing the Menus 1 With the power on the sleep timer. ("*" indicates a channel has been manually...

User Manual (user Manual) (ver.1.0) (English)
Page 42
... VCR (or DVD) LED is set up, press the MODE button any time you enter 3 digits of VCR (or DVD). 5 Press the POWER button on , your remote control is now set correctly. 6 Once your remote control is illuminated. 3 On your brand of the code, even if the first digit is a "0." M The remote control has four "modes": "TV," "VCR", "Cable" and "DVD." Press the "MODE" button to switch the remote control to Operate Your VCR (or DVD) 1 Turn off your VCR...
... VCR (or DVD) LED is set up, press the MODE button any time you enter 3 digits of VCR (or DVD). 5 Press the POWER button on , your remote control is now set correctly. 6 Once your remote control is illuminated. 3 On your brand of the code, even if the first digit is a "0." M The remote control has four "modes": "TV," "VCR", "Cable" and "DVD." Press the "MODE" button to switch the remote control to Operate Your VCR (or DVD) 1 Turn off your VCR...

User Manual (user Manual) (ver.1.0) (English)
Page 65
... button. 2 Press the M button to display the menu. Press the MENU button to 0-0-0-0: POWER OFF ➜ MUTE ➜ 8 ➜ 2 ➜ 4 ➜ POWER ON. 65 SPECIAL FEATURES Using the V-Chip (USA) The V-Chip feature automatically locks out programming that is "0-0-0-0". 3 After entering a valid PIN number, the "V-chip" screen will appear. M Note: If you forget the PIN, press the remote-control keys in the following sequence, which resets...
... button. 2 Press the M button to display the menu. Press the MENU button to 0-0-0-0: POWER OFF ➜ MUTE ➜ 8 ➜ 2 ➜ 4 ➜ POWER ON. 65 SPECIAL FEATURES Using the V-Chip (USA) The V-Chip feature automatically locks out programming that is "0-0-0-0". 3 After entering a valid PIN number, the "V-chip" screen will appear. M Note: If you forget the PIN, press the remote-control keys in the following sequence, which resets...

User Manual (user Manual) (ver.1.0) (English)
Page 70
... soon as the 4 digits are entered, the "Confirm new pin" screen appears. Enter your 4digit PIN number, Note: The default PIN number for children. Re-enter the same 4 digits. Press the M button to select the "Setup", then press the ENTER button. 2 Press the M button to display the menu. Press the M button and select "Change pin." 4 While the "Change pin" field is active, channel-auto program features do not...
... soon as the 4 digits are entered, the "Confirm new pin" screen appears. Enter your 4digit PIN number, Note: The default PIN number for children. Re-enter the same 4 digits. Press the M button to select the "Setup", then press the ENTER button. 2 Press the M button to display the menu. Press the M button and select "Change pin." 4 While the "Change pin" field is active, channel-auto program features do not...

User Manual (user Manual) (ver.1.0) (English)
Page 2
... the wide slot, and fully insert the plug. REFER SERVICING TO QUALIFIED SERVICE PERSONNEL. Note to rain or moisture. copyright laws. This symbol alerts you that this appliance to CATV system installer: This reminder is present inside part of U.S. Certain Canadian programs may void the user's authority to this product. NO USER SERVICEABLE PARTS INSIDE. It is an infringement of...
... the wide slot, and fully insert the plug. REFER SERVICING TO QUALIFIED SERVICE PERSONNEL. Note to rain or moisture. copyright laws. This symbol alerts you that this appliance to CATV system installer: This reminder is present inside part of U.S. Certain Canadian programs may void the user's authority to this product. NO USER SERVICEABLE PARTS INSIDE. It is an infringement of...

User Manual (user Manual) (ver.1.0) (English)
Page 4
... replacement parts are covered by the manufacturer or those controls that are required, be sure the antenna or cable system is grounded so as the original part. Adjusting other electric light or power circuits or where it can fall into the unit - This device complies with part 15 of any kind on the TV. • Ground outdoor antennas. This television receiver provides display of television closed captioning...
... replacement parts are covered by the manufacturer or those controls that are required, be sure the antenna or cable system is grounded so as the original part. Adjusting other electric light or power circuits or where it can fall into the unit - This device complies with part 15 of any kind on the TV. • Ground outdoor antennas. This television receiver provides display of television closed captioning...

User Manual (user Manual) (ver.1.0) (English)
Page 6
... from the TV 2.7 Connecting a DVD Player 2.7 Connecting a Camcorder 2.8 Installing Batteries in the Remote Control 2.9 Chapter 3: Operation 3.1 Turning the TV On and Off 3.1 Plug & Play Feature 3.1 Viewing the Menus and On-Screen Displays 3.3 Viewing the Menus 3.3 Viewing the Display 3.3 Selecting a Menu Language 3.4 Memorizing the Channels 3.5 Selecting the Video Signal-source 3.5 Storing Channels in Memory (Automatic Method 3.6 Adding and Erasing Channels (Manual Method 3.7 Changing Channels 3.8 Using the Channel Buttons 3.8 Directly Accessing Channels 3.8 Using the PRE-CH...
... from the TV 2.7 Connecting a DVD Player 2.7 Connecting a Camcorder 2.8 Installing Batteries in the Remote Control 2.9 Chapter 3: Operation 3.1 Turning the TV On and Off 3.1 Plug & Play Feature 3.1 Viewing the Menus and On-Screen Displays 3.3 Viewing the Menus 3.3 Viewing the Display 3.3 Selecting a Menu Language 3.4 Memorizing the Channels 3.5 Selecting the Video Signal-source 3.5 Storing Channels in Memory (Automatic Method 3.6 Adding and Erasing Channels (Manual Method 3.7 Changing Channels 3.8 Using the Channel Buttons 3.8 Directly Accessing Channels 3.8 Using the PRE-CH...

User Manual (user Manual) (ver.1.0) (English)
Page 12
... Normal screen, Zoom screen or Wide screen. ˆ RESET If your remote control is not functioning properly, take out the batteries and press the reset button for details. Œ POWER Turns the TV on and off the sound. 1.5 CHAPTER ONE: YOUR NEW TV TXM3297HF / TXM3097WHF TXM2797HF / TXM2796HF TXM3296HF Ô MODE Selects a target device to be controlled by the Samsung remote control (i.e., TV, VCR, Cable box, or DVD). SET Use this button when...
... Normal screen, Zoom screen or Wide screen. ˆ RESET If your remote control is not functioning properly, take out the batteries and press the reset button for details. Œ POWER Turns the TV on and off the sound. 1.5 CHAPTER ONE: YOUR NEW TV TXM3297HF / TXM3097WHF TXM2797HF / TXM2796HF TXM3296HF Ô MODE Selects a target device to be controlled by the Samsung remote control (i.e., TV, VCR, Cable box, or DVD). SET Use this button when...


