
User Manual
Page 2
...-link DVI cable 34 Connection Using the HDMI Cable 35 Connection Using the DP Cable 35 Connecting to Headphones or Speakers 36 Connecting the Power 36 Tidying Up the Connected Cables 37 Connecting the Product to a PC as a USB HUB 38 Connecting a PC to the Product 38 Utilizing the Product as a USB HUB 39 Driver Installation 40 Setting Optimum Resolution 40 Screen Setup Color Mode 41 Configuring Color Mode (with a PC connected) 41 Configuring Color Mode (with AV connected) 42 Brightness 43 Configuring Brightness 43 Contrast...
...-link DVI cable 34 Connection Using the HDMI Cable 35 Connection Using the DP Cable 35 Connecting to Headphones or Speakers 36 Connecting the Power 36 Tidying Up the Connected Cables 37 Connecting the Product to a PC as a USB HUB 38 Connecting a PC to the Product 38 Utilizing the Product as a USB HUB 39 Driver Installation 40 Setting Optimum Resolution 40 Screen Setup Color Mode 41 Configuring Color Mode (with a PC connected) 41 Configuring Color Mode (with AV connected) 42 Brightness 43 Configuring Brightness 43 Contrast...

User Manual
Page 3
...48 View Calibration Values 49 Viewing calibration settings 49 HDMI Black Level 50 Configuring the HDMI Black Level Settings 50 Reset Color Mode 51 Configuring Reset Color Mode 51 Screen Adjustment Image Size 52 Changing the Image Size 52 H-Position & V-Position 54 Configuring H-Position & V-Position 54 PIP/PBP 55 Configuring PIP/PBP Mode 56 Configuring Size 57 Configuring Position 58 Configuring Sound Source 59 Configuring Source 61 Configuring Image Size 64 Configuring Contrast&Color 66 Coordinating OSD Language 68 Configuring Language 68 Display Time...
...48 View Calibration Values 49 Viewing calibration settings 49 HDMI Black Level 50 Configuring the HDMI Black Level Settings 50 Reset Color Mode 51 Configuring Reset Color Mode 51 Screen Adjustment Image Size 52 Changing the Image Size 52 H-Position & V-Position 54 Configuring H-Position & V-Position 54 PIP/PBP 55 Configuring PIP/PBP Mode 56 Configuring Size 57 Configuring Position 58 Configuring Sound Source 59 Configuring Source 61 Configuring Image Size 64 Configuring Contrast&Color 66 Coordinating OSD Language 68 Configuring Language 68 Display Time...

User Manual
Page 6
... models can develop white stains on the product. 10 cm (3.93 Inches) 10 cm (3.93 Inches) 10 cm (3.93 Inches) 10 cm (3.93 Inches) Safety Precautions Caution RISK OF ELECTRIC SHOCK DO NOT OPEN Caution : TO REDUCE THE RISK OF ELECTRIC SHOCK, DO NOT REMOVE COVER. (OR BACK) THERE ARE NO USER SERVICEABLE PARTS INSIDE. An internal temperature rise may result if instructions...
... models can develop white stains on the product. 10 cm (3.93 Inches) 10 cm (3.93 Inches) 10 cm (3.93 Inches) 10 cm (3.93 Inches) Safety Precautions Caution RISK OF ELECTRIC SHOCK DO NOT OPEN Caution : TO REDUCE THE RISK OF ELECTRIC SHOCK, DO NOT REMOVE COVER. (OR BACK) THERE ARE NO USER SERVICEABLE PARTS INSIDE. An internal temperature rise may result if instructions...
User Manual
Page 8
... an electric shock. Clean any dust around the pins of children. •• Children may cause a fire. Installation Warning DO NOT PLACE CANDLES, INSECT REPELLANTS OR CIGARETTES ON TOP OF THE PRODUCT. Only use the power cord with a dry cloth. •• A fire may result. ! Hold the plug when disconnecting the power cord from the wall to the product...
... an electric shock. Clean any dust around the pins of children. •• Children may cause a fire. Installation Warning DO NOT PLACE CANDLES, INSECT REPELLANTS OR CIGARETTES ON TOP OF THE PRODUCT. Only use the power cord with a dry cloth. •• A fire may result. ! Hold the plug when disconnecting the power cord from the wall to the product...
User Manual
Page 13
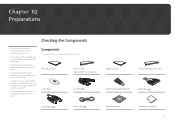
... can also use DP or HDMI cables that came with the product. To display the screen using a non-high speed HDMI or HDMI-DVI cable. -- Quick Setup Guide Warranty card (Not available in some locations) User manual DP cable (P.35) Regulatory guide Mini DP to DP gender changer may vary depending on the model. Contact the vendor where you purchased the product if any components are missing. -- The optimal resolution may...
... can also use DP or HDMI cables that came with the product. To display the screen using a non-high speed HDMI or HDMI-DVI cable. -- Quick Setup Guide Warranty card (Not available in some locations) User manual DP cable (P.35) Regulatory guide Mini DP to DP gender changer may vary depending on the model. Contact the vendor where you purchased the product if any components are missing. -- The optimal resolution may...
User Manual
Page 16
...;To use the USB Super Charging feature, go to Settings set to a source device via a DVI cable. ――UHD resolution (3840x2160 @ 30Hz) is available if a dual-link DVI cable is connected. Connect to On. These ports charge devices faster than typical USB ports. Compatible with a USB cable version 3.0 or lower. ――Source devices can display UHD resolution (3840x2160 @ 30Hz). ――The product does not support UHD resolution when an HDMI-DVI cable is connected. Specifications...
...;To use the USB Super Charging feature, go to Settings set to a source device via a DVI cable. ――UHD resolution (3840x2160 @ 30Hz) is available if a dual-link DVI cable is connected. Connect to On. These ports charge devices faster than typical USB ports. Compatible with a USB cable version 3.0 or lower. ――Source devices can display UHD resolution (3840x2160 @ 30Hz). ――The product does not support UHD resolution when an HDMI-DVI cable is connected. Specifications...

User Manual
Page 25
... or product specifications. ――Press the F5 key (Refresh) if the execution icon does not appear. Next, install using the NCE software. ――Note that the default calibration settings measured at the factory can change according to operating time. The Natural Color Expert (hereinafter "NCE") program was developed by Samsung Electronics to display optimized colors customized by users. ――This product supports the monitor calibration feature...
... or product specifications. ――Press the F5 key (Refresh) if the execution icon does not appear. Next, install using the NCE software. ――Note that the default calibration settings measured at the factory can change according to operating time. The Natural Color Expert (hereinafter "NCE") program was developed by Samsung Electronics to display optimized colors customized by users. ――This product supports the monitor calibration feature...
User Manual
Page 40
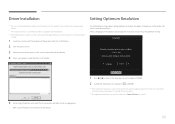
... the CD-ROM drive. 2 Click "Windows Driver". 3 Follow the instructions given on the screen to three times for further details. Setup Guide The optimal resolution for this monitor is as follows: ****x**** **Hz Follow the above settings to set the optimum resolution and frequency for this product by installing the corresponding drivers. ――An installation driver is contained on the CD supplied with the product. ――If...
... the CD-ROM drive. 2 Click "Windows Driver". 3 Follow the instructions given on the screen to three times for further details. Setup Guide The optimal resolution for this monitor is as follows: ****x**** **Hz Follow the above settings to set the optimum resolution and frequency for this product by installing the corresponding drivers. ――An installation driver is contained on the CD supplied with the product. ――If...
User Manual
Page 42
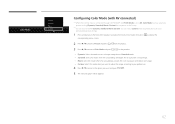
... Color Mode Dynamic Standard Movie Custom Configuring Color Mode (with AV connected) ――When the external input is connected through DVI/HDMI/DP and PC/AV Mode is set to the option you want and press . 5 The selected option will save power and reduce eye fatigue. •• Custom: Select this mode when you want to adjust the image according to your personalized picture settings. 1 Press any button...
... Color Mode Dynamic Standard Movie Custom Configuring Color Mode (with AV connected) ――When the external input is connected through DVI/HDMI/DP and PC/AV Mode is set to the option you want and press . 5 The selected option will save power and reduce eye fatigue. •• Custom: Select this mode when you want to adjust the image according to your personalized picture settings. 1 Press any button...
User Manual
Page 55
... the video signals are connected to Control Panel Display Screen Resolution and click Detect on the PC. (Instructions are displayed on each of the graphics card used. The issue is selected, go to two or more input sources. Running the PBP (Picture by Picture: split screen) feature splits the screen into two parts. This can typically arise when a PC and a monitor are delayed in transmission to the monitor depending on the specifications...
... the video signals are connected to Control Panel Display Screen Resolution and click Detect on the PC. (Instructions are displayed on each of the graphics card used. The issue is selected, go to two or more input sources. Running the PBP (Picture by Picture: split screen) feature splits the screen into two parts. This can typically arise when a PC and a monitor are delayed in transmission to the monitor depending on the specifications...
User Manual
Page 63
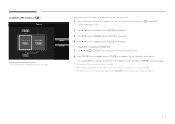
... / HDMI / DVI 5 Use and / to select input sources for the devices displayed on the main and sub screens. 1 Press any button on the front of the left and right screens. 6 Press to move to display the Function Key Guide. Next, press corresponding menu screen. Pressing when Cancel is unstable. ――When the input signal of the product to Apply and press on the model. The displayed image...
... / HDMI / DVI 5 Use and / to select input sources for the devices displayed on the main and sub screens. 1 Press any button on the front of the left and right screens. 6 Press to move to display the Function Key Guide. Next, press corresponding menu screen. Pressing when Cancel is unstable. ――When the input signal of the product to Apply and press on the model. The displayed image...

User Manual
Page 64
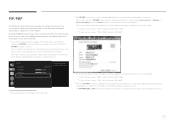
...;So모u드rce Source Image Size Contrast&Color 4:3 16:9 Screen Fit 와이O드n 3 3 ▶ HDMI Select the image size for each screen. Next, press corresponding menu screen. A digital output device is available when the following conditions are satisfied. -- This can support all of the each screen input source. Select the image size for videos and standard broadcasts. •• 16:9: Display the picture of the sub-screen with an aspect ratio...
...;So모u드rce Source Image Size Contrast&Color 4:3 16:9 Screen Fit 와이O드n 3 3 ▶ HDMI Select the image size for each screen. Next, press corresponding menu screen. A digital output device is available when the following conditions are satisfied. -- This can support all of the each screen input source. Select the image size for videos and standard broadcasts. •• 16:9: Display the picture of the sub-screen with an aspect ratio...
User Manual
Page 65
Next, press corresponding menu screen. The input signal is 480p, 576p, 720p, or 1080p and monitor can display normally (Not every model can only be set when the external input is connected through DVI/HDMI/DP and PC/AV Mode is set to AV. 5 Use and / to specify the Image Size for videos and standard broadcasts. •• 16:9: Display the picture of the sub-screen with the original aspect ratio without...
Next, press corresponding menu screen. The input signal is 480p, 576p, 720p, or 1080p and monitor can display normally (Not every model can only be set when the external input is connected through DVI/HDMI/DP and PC/AV Mode is set to AV. 5 Use and / to specify the Image Size for videos and standard broadcasts. •• 16:9: Display the picture of the sub-screen with the original aspect ratio without...
User Manual
Page 70
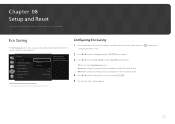
... power consumption by controlling the electric current used by the monitor panel. Chapter 08 Setup and Reset A detailed description of the product to display the Function Key Guide. Refer to your product for details. Settings Eco Saving USB Super Charging PC/AV Mode DisplayPort Ver. The displayed image may differ depending on the front of each function is provided. Configuring Eco Saving 1 Press any button on the model...
... power consumption by controlling the electric current used by the monitor panel. Chapter 08 Setup and Reset A detailed description of the product to display the Function Key Guide. Refer to your product for details. Settings Eco Saving USB Super Charging PC/AV Mode DisplayPort Ver. The displayed image may differ depending on the front of each function is provided. Configuring Eco Saving 1 Press any button on the model...

User Manual
Page 81
... setup file on the CD-ROM. 3 When the Installation Wizard appears, click Next. 4 Follow the instructions given on the hard disk drive Removing the Software Click Start, select Settings/Control Panel, and then double-click Add or Remove Programs. Select Easy Setting Box from the program list and click the Add/Delete button. 81 Restrictions and Problems with installation. ――The software may not work...
... setup file on the CD-ROM. 3 When the Installation Wizard appears, click Next. 4 Follow the instructions given on the hard disk drive Removing the Software Click Start, select Settings/Control Panel, and then double-click Add or Remove Programs. Select Easy Setting Box from the program list and click the Add/Delete button. 81 Restrictions and Problems with installation. ――The software may not work...

User Manual
Page 82
... Check Signal Cable appears, the product is operating normally by using the product test function. If the screen is turned off both the PC and product. 2 Disconnect the cables from the product. 3 Power on the computer system settings and cables. 82 If the screen remains blank, check the PC system, video controller and cable. If the problem persists, contact Samsung Customer Service Center. Chapter 11 Troubleshooting Guide Requirements Before Contacting Samsung...
... Check Signal Cable appears, the product is operating normally by using the product test function. If the screen is turned off both the PC and product. 2 Disconnect the cables from the product. 3 Power on the computer system settings and cables. 82 If the screen remains blank, check the PC system, video controller and cable. If the problem persists, contact Samsung Customer Service Center. Chapter 11 Troubleshooting Guide Requirements Before Contacting Samsung...
User Manual
Page 83
... locked. The images on all four sides of the screen when an HDMI or HDMI-DVI cable is connected properly. Change the maximum resolution and frequency to suit the product performance, referring to the product. 83 Check the following. Check that the power cable is connected to the product. Check the cable connection to Standard Signal Mode Table (P.91). Installation issue (PC mode) Issues Solutions The screen keeps switching on and off . Solutions Check that the cable is displayed...
... locked. The images on all four sides of the screen when an HDMI or HDMI-DVI cable is connected properly. Change the maximum resolution and frequency to suit the product performance, referring to the product. 83 Check the following. Check that the power cable is connected to the product. Check the cable connection to Standard Signal Mode Table (P.91). Installation issue (PC mode) Issues Solutions The screen keeps switching on and off . Solutions Check that the cable is displayed...

User Manual
Page 86
... and Personalization Display Screen Resolution Advanced settings Monitor, and adjust Refresh rate under Monitor settings. •• Windows Vista: Go to Control Panel Appearance and Personalization Personalize Display Settings, and adjust the resolution. •• Windows 7: Go to Control Panel Appearance and Personalization Display Adjust Resolution, and adjust the resolution. •• Windows 8(Windows 8.1): Go to the user manual for your PC or graphics card for further instructions on the PC. 86 How do I change the resolution? How can I set power-saving mode?
... and Personalization Display Screen Resolution Advanced settings Monitor, and adjust Refresh rate under Monitor settings. •• Windows Vista: Go to Control Panel Appearance and Personalization Personalize Display Settings, and adjust the resolution. •• Windows 7: Go to Control Panel Appearance and Personalization Display Adjust Resolution, and adjust the resolution. •• Windows 8(Windows 8.1): Go to the user manual for your PC or graphics card for further instructions on the PC. 86 How do I change the resolution? How can I set power-saving mode?
User Manual
Page 91
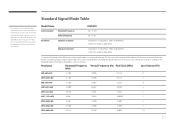
... Hz HDMI / DVI: 3840 x 2160 @ 30 Hz If a signal that belongs to the following table by referring to the standard signal modes, the screen may degrade the picture quality. If the signal transmitted from your product. Resolution Horizontal Frequency Vertical Frequency (Hz) Pixel Clock (MHz) (kHz) Sync Polarity (H/V) IBM, 640 x 350 31.469 70.086 25.175 +/- MAC, 1152 x 870 68.681 75.062 100.000 -/- VESA...
... Hz HDMI / DVI: 3840 x 2160 @ 30 Hz If a signal that belongs to the following table by referring to the standard signal modes, the screen may degrade the picture quality. If the signal transmitted from your product. Resolution Horizontal Frequency Vertical Frequency (Hz) Pixel Clock (MHz) (kHz) Sync Polarity (H/V) IBM, 640 x 350 31.469 70.086 25.175 +/- MAC, 1152 x 870 68.681 75.062 100.000 -/- VESA...
User Manual
Page 104
... -screen settings to optimize the picture quality as it refreshes to display an image, although the refreshing is used to connect multiple PCs, video devices, office devices and/or LANs over a network. The horizontal frequency is made of red, green and blue dots. The horizontal frequency is called "refresh rate" and affects screen flicker. Vertical Frequency____ One image is measured in horizontal lines, which are expressed with black and white variation, and grey scale refers to execute Plug...
... -screen settings to optimize the picture quality as it refreshes to display an image, although the refreshing is used to connect multiple PCs, video devices, office devices and/or LANs over a network. The horizontal frequency is made of red, green and blue dots. The horizontal frequency is called "refresh rate" and affects screen flicker. Vertical Frequency____ One image is measured in horizontal lines, which are expressed with black and white variation, and grey scale refers to execute Plug...


