
User Manual
Page 2
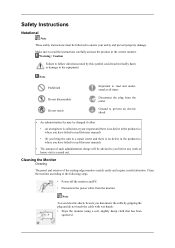
... Warning / Caution Failure to follow directions noted by gripping the plug and do not touch the cable with wet hands. • Wipe the monitor using a soft, slightly damp cloth that has been squeezed . Make sure to the equipment. Note Prohibited Do not disassemble Do not touch Important...Safety Instructions Notational Note These safety instructions must be advised to you before any work or home visit is carried out. Cleaning the Monitor Cleaning The panel and exterior of such administration charge will be followed to ensure your request and there is no defect in the correct...
... Warning / Caution Failure to follow directions noted by gripping the plug and do not touch the cable with wet hands. • Wipe the monitor using a soft, slightly damp cloth that has been squeezed . Make sure to the equipment. Note Prohibited Do not disassemble Do not touch Important...Safety Instructions Notational Note These safety instructions must be advised to you before any work or home visit is carried out. Cleaning the Monitor Cleaning The panel and exterior of such administration charge will be followed to ensure your request and there is no defect in the correct...
User Manual
Page 3
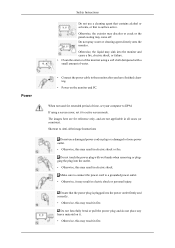
... active screen mode. When not used for reference only, and are not applicable in fire. Do not spray water or cleaning agent directly onto the monitor. Do not touch the power plug with a small amount of time, set it . • Otherwise, this may result in electric shock or ...to Anti-Afterimage Instructions Do not use a cleaning agent that contains alcohol or solvents, or that the power plug is surface active. Shortcut to the monitor after you have finished cleaning. • Power on it to DPM. Power Safety Instructions Do not use a damaged power cord or plug or a...
... active screen mode. When not used for reference only, and are not applicable in fire. Do not spray water or cleaning agent directly onto the monitor. Do not touch the power plug with a small amount of time, set it . • Otherwise, this may result in electric shock or ...to Anti-Afterimage Instructions Do not use a cleaning agent that contains alcohol or solvents, or that the power plug is surface active. Shortcut to the monitor after you have finished cleaning. • Power on it to DPM. Power Safety Instructions Do not use a damaged power cord or plug or a...
User Manual
Page 4
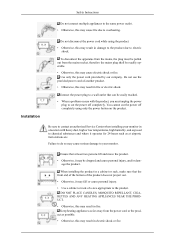
... to the product. To disconnect the apparatus from the power cord or the prod- Be sure to contact an authorized Service Center when installing your monitor. You cannot cut the power off completely using the product. • Otherwise, this may result in fire. Keep heating appliances as possible. •...low temperatures, high humidity, and exposed to overheating. uct as far away from the mains, the plug must unplug the power plug to your monitor in a location with the product, you must be pulled out from the mains socket, therefore the mains plug shall be dropped and cause ...
... to the product. To disconnect the apparatus from the power cord or the prod- Be sure to contact an authorized Service Center when installing your monitor. You cannot cut the power off completely using the product. • Otherwise, this may result in fire. Keep heating appliances as possible. •...low temperatures, high humidity, and exposed to overheating. uct as far away from the mains, the plug must unplug the power plug to your monitor in a location with the product, you must be pulled out from the mains socket, therefore the mains plug shall be dropped and cause ...
User Manual
Page 5
... floor. • Otherwise, this may result in the internal temperature. Ensure that an authorized installation company installs the wall mount. • Otherwise, it . Install your monitor is kept away from the product, disconnect the power plug immediately and contact a Service Center. • Otherwise, this may cause damage to the product or...
... floor. • Otherwise, this may result in the internal temperature. Ensure that an authorized installation company installs the wall mount. • Otherwise, it . Install your monitor is kept away from the product, disconnect the power plug immediately and contact a Service Center. • Otherwise, this may cause damage to the product or...

User Manual
Page 6
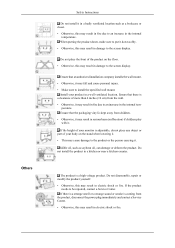
... result in fire due to the cable. Do not use a moving screen saver. Do not try to the cable. Do not lift or move the monitor by a table or curtain. • Otherwise, it may result in electric shock or fire. Make sure that the ventilating opening is broken, turn the power...
... result in fire due to the cable. Do not use a moving screen saver. Do not try to the cable. Do not lift or move the monitor by a table or curtain. • Otherwise, it may result in electric shock or fire. Make sure that the ventilating opening is broken, turn the power...

User Manual
Page 7
When using the monitor for one (1) hour. To avoid eyestrain, do not hang onto the product or climb up onto the product. • The product may fall and cause ...
When using the monitor for one (1) hour. To avoid eyestrain, do not hang onto the product or climb up onto the product. • The product may fall and cause ...
User Manual
Page 15
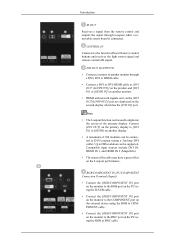
... the COMPONENT port on the external device using the RGB to COMPONENT cable. • Connect the [RGB/COMPONENT IN] port on the monitor to the BNC port on the primary display to DVI-Loopout (using the RGB to the function (Power/Source) control buttons and receives the light ... have a great effect on the second display which has the [DVI IN] port. CONTROL IN Connects to BNC cable. DVI OUT (LOOPOUT) • Connect a monitor to another monitor. • HDMI and network signals sent via the [DVI OUT(LOOPOUT)] port are displayed on the Loopout performance. Up to [DVI OUT (LOOPOUT)] on...
... the COMPONENT port on the external device using the RGB to COMPONENT cable. • Connect the [RGB/COMPONENT IN] port on the monitor to the BNC port on the primary display to DVI-Loopout (using the RGB to the function (Power/Source) control buttons and receives the light ... have a great effect on the second display which has the [DVI IN] port. CONTROL IN Connects to BNC cable. DVI OUT (LOOPOUT) • Connect a monitor to another monitor. • HDMI and network signals sent via the [DVI OUT(LOOPOUT)] port are displayed on the Loopout performance. Up to [DVI OUT (LOOPOUT)] on...
User Manual
Page 16
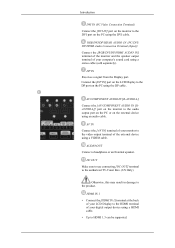
... of your computer's sound card using an audio cable. AV/COMPONENT AUDIO IN [R-AUDIO-L] Connect the [AV/COMPONENT AUDIO IN [RAUDIO-L]] port on the monitor to the audio output port on the PC or on the external device using a stereo cable (sold separately). Connect the [DP IN] port on the... the Display port. HDMI IN 1 • Connect the [HDMI IN 1] terminal at the back of your LCD Display to the HDMI terminal of your monitor to the video output terminal of your digital output device using the DP cable. AUDIO OUT Connect a headphone or an External speaker. Introduction DVI IN...
... of your computer's sound card using an audio cable. AV/COMPONENT AUDIO IN [R-AUDIO-L] Connect the [AV/COMPONENT AUDIO IN [RAUDIO-L]] port on the monitor to the audio output port on the PC or on the external device using a stereo cable (sold separately). Connect the [DP IN] port on the... the Display port. HDMI IN 1 • Connect the [HDMI IN 1] terminal at the back of your LCD Display to the HDMI terminal of your monitor to the video output terminal of your digital output device using the DP cable. AUDIO OUT Connect a headphone or an External speaker. Introduction DVI IN...
User Manual
Page 30
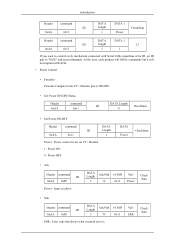
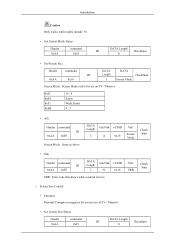
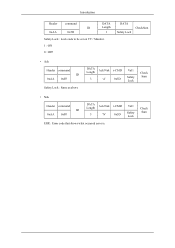
... the time, each product will follow commands but it will not respond with ACK. • Power Control • Function Personal Computer turns TV / Monitor power ON/OFF. • Get Power ON/OFF Status Header 0xAA command 0x11 DATA Length ID CheckSum 0 • Set Power ON/OFF Header command... DATA Length 1 Power : Power code to be set ID part to control every mechanism connected with Serial Cable regardless of its ID, set on TV / Monitor. 1 : Power ON 0 : Power OFF DATA Power CheckSum • Ack Header command ID 0xAA 0xFF Power : Same as above DATA Length 3 Ack/Nak 'A' r-...
... the time, each product will follow commands but it will not respond with ACK. • Power Control • Function Personal Computer turns TV / Monitor power ON/OFF. • Get Power ON/OFF Status Header 0xAA command 0x11 DATA Length ID CheckSum 0 • Set Power ON/OFF Header command... DATA Length 1 Power : Power code to be set ID part to control every mechanism connected with Serial Cable regardless of its ID, set on TV / Monitor. 1 : Power ON 0 : Power OFF DATA Power CheckSum • Ack Header command ID 0xAA 0xFF Power : Same as above DATA Length 3 Ack/Nak 'A' r-...
User Manual
Page 31
...ID CheckSum 0 • Set Volume Header command ID 0xAA 0x12 DATA Length 1 DATA Volume Volume : Volume value code to be set on TV / Monitor. (0 ~ 100) CheckSum • Ack Header command ID 0xAA 0xFF Volume : Same as above DATA Length 3 Ack/Nak r-CMD 'A' 0x12 Val1 ... ERR : Error code that shows what occurred error is. • Input Source Control • Function Personal Computer changes input source of TV / Monitor. • Get Input Source Status Header 0xAA command 0x14 DATA Length ID CheckSum 0 • Set Input Source Header command ID 0xAA 0x14 DATA ...
...ID CheckSum 0 • Set Volume Header command ID 0xAA 0x12 DATA Length 1 DATA Volume Volume : Volume value code to be set on TV / Monitor. (0 ~ 100) CheckSum • Ack Header command ID 0xAA 0xFF Volume : Same as above DATA Length 3 Ack/Nak r-CMD 'A' 0x12 Val1 ... ERR : Error code that shows what occurred error is. • Input Source Control • Function Personal Computer changes input source of TV / Monitor. • Get Input Source Status Header 0xAA command 0x14 DATA Length ID CheckSum 0 • Set Input Source Header command ID 0xAA 0x14 DATA ...

User Manual
Page 32
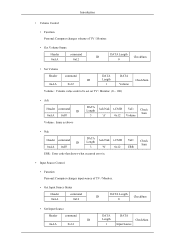
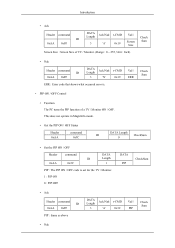
Introduction Input Source : Input Source code to be controlled when Video Wall is on TV / Monitor. 0x14 0x1E 0x18 0x0C 0x04 0x08 0x20 0x1F 0x30 0x40 0x21 0x22 0x23 0x24 0x25 PC BNC DVI AV S-Video Component MagicInfo DVI_VIDEO RF(TV) ... Sum 3 'N' 0x14 ERR ERR : Error code that shows what occurred error is. • Screen Mode Control • Function Personal Computer changes "Screen Mode" of TV / Monitor. Cannot be set on .
Introduction Input Source : Input Source code to be controlled when Video Wall is on TV / Monitor. 0x14 0x1E 0x18 0x0C 0x04 0x08 0x20 0x1F 0x30 0x40 0x21 0x22 0x23 0x24 0x25 PC BNC DVI AV S-Video Component MagicInfo DVI_VIDEO RF(TV) ... Sum 3 'N' 0x14 ERR ERR : Error code that shows what occurred error is. • Screen Mode Control • Function Personal Computer changes "Screen Mode" of TV / Monitor. Cannot be set on .
User Manual
Page 33
... • Set Picture Size Header command ID 0xAA 0x18 DATA Length 1 DATA Screen Mode CheckSum Screen Mode : Screen Mode code to be set on TV / Monitor. 0x01 0x04 0x31 0x0B 16 : 9 Zoom Wide Zoom 4 : 3 • Ack Header command ID 0xAA 0xFF Screen Mode : Same as above DATA Length Ack/Nak r-CMD... 3 'N' 0x18 ERR ERR : Error code that shows what occurred error is. • Screen Size Control • Function Personal Computer recognizes the screen size of TV / Monitor. • Get Screen Size Status Header 0xAA command 0x19 DATA Length ID CheckSum 0
... • Set Picture Size Header command ID 0xAA 0x18 DATA Length 1 DATA Screen Mode CheckSum Screen Mode : Screen Mode code to be set on TV / Monitor. 0x01 0x04 0x31 0x0B 16 : 9 Zoom Wide Zoom 4 : 3 • Ack Header command ID 0xAA 0xFF Screen Mode : Same as above DATA Length Ack/Nak r-CMD... 3 'N' 0x18 ERR ERR : Error code that shows what occurred error is. • Screen Size Control • Function Personal Computer recognizes the screen size of TV / Monitor. • Get Screen Size Status Header 0xAA command 0x19 DATA Length ID CheckSum 0
User Manual
Page 34
... ERR ERR : Error code that shows what occurred error is. • PIP ON / OFF Control • Function The PC turns the PIP function of a TV / Monitor ON / OFF. This does not operate in MagicInfo mode. • Get the PIP ON / OFF Status Header 0xAA command 0x3C DATA Length ID CheckSum 0 •...; Set the PIP ON / OFF Header command ID 0xAA 0x3C DATA Length 1 PIP : The PIP ON / OFF code to set for the TV / Monitor. 1 : PIP ON 0 : PIP OFF DATA PIP CheckSum • Ack Header command ID 0xAA 0xFF PIP : Same as above DATA Length Ack/Nak r-CMD Val1 Check...
... ERR ERR : Error code that shows what occurred error is. • PIP ON / OFF Control • Function The PC turns the PIP function of a TV / Monitor ON / OFF. This does not operate in MagicInfo mode. • Get the PIP ON / OFF Status Header 0xAA command 0x3C DATA Length ID CheckSum 0 •...; Set the PIP ON / OFF Header command ID 0xAA 0x3C DATA Length 1 PIP : The PIP ON / OFF code to set for the TV / Monitor. 1 : PIP ON 0 : PIP OFF DATA PIP CheckSum • Ack Header command ID 0xAA 0xFF PIP : Same as above DATA Length Ack/Nak r-CMD Val1 Check...
User Manual
Page 35
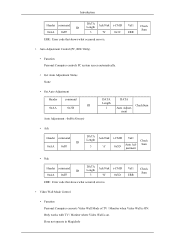
... 0xFF DATA Length Ack/Nak r-CMD Val1 Check Sum 3 'N' 0x3C ERR ERR : Error code that shows what occurred error is on. Only works with TV / Monitor where Video Wall is . • Auto Adjustment Control (PC, BNC Only) • Function Personal Computer controls PC system screen automatically. • Get Auto Adjustment Status... ERR ERR : Error code that shows what occurred error is. • Video Wall Mode Control • Function Personal Computer converts Video Wall Mode of TV / Monitor when Video Wall is ON.
... 0xFF DATA Length Ack/Nak r-CMD Val1 Check Sum 3 'N' 0x3C ERR ERR : Error code that shows what occurred error is on. Only works with TV / Monitor where Video Wall is . • Auto Adjustment Control (PC, BNC Only) • Function Personal Computer controls PC system screen automatically. • Get Auto Adjustment Status... ERR ERR : Error code that shows what occurred error is. • Video Wall Mode Control • Function Personal Computer converts Video Wall Mode of TV / Monitor when Video Wall is ON.
User Manual
Page 36
... Mode Header command ID 0xAA 0x5C DATA Length 1 DATA Video Wall Mode CheckSum Video Wall Mode : Video Wall Mode code to be set on TV / Monitor. 1 : Full 0 : Natural • Ack Header command ID 0xAA 0xFF DATA Length Ack/Nak r-CMD 3 'A' 0x5C Video Wall Mode : same as above Val1 Video Wall Mode...; Set Safety Lock Enable / Disable Can operate regardless of whether power is . • Safety Lock • Function Personal Computer turns Safety Lock function of TV / Monitor ON / OFF.
... Mode Header command ID 0xAA 0x5C DATA Length 1 DATA Video Wall Mode CheckSum Video Wall Mode : Video Wall Mode code to be set on TV / Monitor. 1 : Full 0 : Natural • Ack Header command ID 0xAA 0xFF DATA Length Ack/Nak r-CMD 3 'A' 0x5C Video Wall Mode : same as above Val1 Video Wall Mode...; Set Safety Lock Enable / Disable Can operate regardless of whether power is . • Safety Lock • Function Personal Computer turns Safety Lock function of TV / Monitor ON / OFF.
User Manual
Page 37
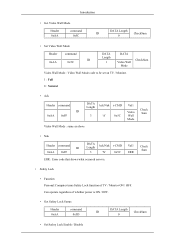
Val1 Safety Lock Check Sum Introduction Header command ID 0xAA 0x5D DATA Length 1 Safety Lock : Lock code to be set on TV / Monitor. 1 : ON 0 : OFF DATA Safety Lock CheckSum • Ack Header command ID 0xAA 0xFF Safety Lock : Same as above DATA Length Ack/Nak r-CMD 3 'A' 0x5D Val1 Safety Lock Check Sum • Nak Header command ID 0xAA 0xFF DATA Length Ack/Nak r-CMD 3 'N' 0x5D ERR : Error code that shows what occurred error is.
Val1 Safety Lock Check Sum Introduction Header command ID 0xAA 0x5D DATA Length 1 Safety Lock : Lock code to be set on TV / Monitor. 1 : ON 0 : OFF DATA Safety Lock CheckSum • Ack Header command ID 0xAA 0xFF Safety Lock : Same as above DATA Length Ack/Nak r-CMD 3 'A' 0x5D Val1 Safety Lock Check Sum • Nak Header command ID 0xAA 0xFF DATA Length Ack/Nak r-CMD 3 'N' 0x5D ERR : Error code that shows what occurred error is.
User Manual
Page 38
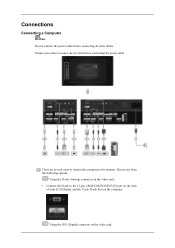
There are several ways to connect the computer to the 15-pin, [RGB/COMPONENT IN] port on the back of your LCD Display and the 15 pin D-sub Port on the video card. Using the DVI (Digital) connector on the computer. Connections Connecting a Computer Note Do not connect the power cable before connecting the power cable. Choose one from the following options. Using the D-sub (Analog) connector on the video card. • Connect the D-sub to the monitor. Ensure you connect a source device first before connecting all other cables.
There are several ways to connect the computer to the 15-pin, [RGB/COMPONENT IN] port on the back of your LCD Display and the 15 pin D-sub Port on the video card. Using the DVI (Digital) connector on the computer. Connections Connecting a Computer Note Do not connect the power cable before connecting the power cable. Choose one from the following options. Using the D-sub (Analog) connector on the video card. • Connect the D-sub to the monitor. Ensure you connect a source device first before connecting all other cables.
User Manual
Page 40
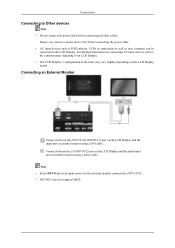
Connecting an External Monitor Connect between the [AUDIO OUT] port on the LCD Display and the audio input port on ...DVD players, VCRs or camcorders as well as an input source for the external monitor connected to [DVI OUT]. • DVI OUT does not support HDCP. For detailed information on another monitor using a DVI cable. Connect between the [DVI OUT(LOOPOUT)] port on ... LCD Display. • The LCD Display 's configuration at the back may vary slightly depending on another monitor using a stereo cable. Ensure you connect a source device first before connecting all other cables.
Connecting an External Monitor Connect between the [AUDIO OUT] port on the LCD Display and the audio input port on ...DVD players, VCRs or camcorders as well as an input source for the external monitor connected to [DVI OUT]. • DVI OUT does not support HDCP. For detailed information on another monitor using a DVI cable. Connect between the [DVI OUT(LOOPOUT)] port on ... LCD Display. • The LCD Display 's configuration at the back may vary slightly depending on another monitor using a stereo cable. Ensure you connect a source device first before connecting all other cables.
User Manual
Page 48
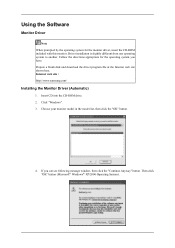
Follow the directions appropriate for the monitor driver, insert the CD-ROM included with this monitor. Using the Software Monitor Driver Note When prompted by the operating system for the operating system you can see following message window, then click the "Continue ...at the Internet web site shown here. Insert CD into the CD-ROM drive. 2. Choose your monitor model in the model list, then click the "OK" button. 4. Internet web site : http://www.samsung.com/ Installing the Monitor Driver (Automatic) 1. Click "Windows". 3. Then click "OK" button (Microsoft® Windows®...
Follow the directions appropriate for the monitor driver, insert the CD-ROM included with this monitor. Using the Software Monitor Driver Note When prompted by the operating system for the operating system you can see following message window, then click the "Continue ...at the Internet web site shown here. Insert CD into the CD-ROM drive. 2. Choose your monitor model in the model list, then click the "OK" button. 4. Internet web site : http://www.samsung.com/ Installing the Monitor Driver (Automatic) 1. Click "Windows". 3. Then click "OK" button (Microsoft® Windows®...
User Manual
Page 49
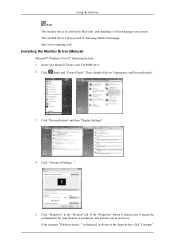
... CD into your CD-ROM drive. 2. Then, double-click on Samsung Monitor homepage. Click "Personalization" and then "Display Settings". 4. is . Click "Advanced Settings...". 5. If the message "Windows needs..." The monitor can be posted on "Appearance and Personalization". 3. The certified driver ...will not damage your system. Click (Start) and "Control Panel". http://www.samsung.com/ Installing the Monitor Driver (Manual) Microsoft® Windows Vista™, Operating System 1. Click "Properties" in the figure below, click "...
... CD into your CD-ROM drive. 2. Then, double-click on Samsung Monitor homepage. Click "Personalization" and then "Display Settings". 4. is . Click "Advanced Settings...". 5. If the message "Windows needs..." The monitor can be posted on "Appearance and Personalization". 3. The certified driver ...will not damage your system. Click (Start) and "Control Panel". http://www.samsung.com/ Installing the Monitor Driver (Manual) Microsoft® Windows Vista™, Operating System 1. Click "Properties" in the figure below, click "...