
Skype Guide (user Manual) (ver.1.0) (English)
Page 2
... Skype software is supported on Linux-based PCs. 2 Getting started with Skype Make calls and video calls with your TV. bringing useful and entertaining features directly from the web to your TV. ✎✎NOTE xx Connect your SAMSUNG webcam directly to configure your network before using Skype, visit skype.com xx You need to the TV, not through a USB hub...
... Skype software is supported on Linux-based PCs. 2 Getting started with Skype Make calls and video calls with your TV. bringing useful and entertaining features directly from the web to your TV. ✎✎NOTE xx Connect your SAMSUNG webcam directly to configure your network before using Skype, visit skype.com xx You need to the TV, not through a USB hub...

User Manual
Page 2
... Channels • Memorizing Channels • Other Features Basic Features • Changing the Preset Picture Mode • Adjusting Picture Settings • Changing the Picture Size • Changing the Picture Options • Using the TV with Your PC • Changing the Preset Sound Modes • Adjusting Sound Settings Preference Features 1 • Wired Network Setting 23 • Wireless Network Setting 27 • Setting the Time 31 • Blocking Programs • Economical Solutions • Picture In Picture (PIP) • Other Features 33 • Support Menu...
... Channels • Memorizing Channels • Other Features Basic Features • Changing the Preset Picture Mode • Adjusting Picture Settings • Changing the Picture Size • Changing the Picture Options • Using the TV with Your PC • Changing the Preset Sound Modes • Adjusting Sound Settings Preference Features 1 • Wired Network Setting 23 • Wireless Network Setting 27 • Setting the Time 31 • Blocking Programs • Economical Solutions • Picture In Picture (PIP) • Other Features 33 • Support Menu...
User Manual
Page 4
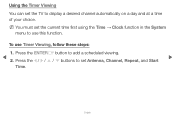
To use this function. Press the l / r / u / d buttons to set the TV to display a desired channel automatically on a day and at a time of your choice. Press the ENTERE button to use Timer Viewing, follow these steps: 1. Using the Timer Viewing You can set Antenna, Channel, Repeat, and Start ▶ Time. ▶ English NN You must set the current time first using the Time → Clock function in the System menu to add a scheduled viewing. 2.
To use this function. Press the l / r / u / d buttons to set the TV to display a desired channel automatically on a day and at a time of your choice. Press the ENTERE button to use Timer Viewing, follow these steps: 1. Using the Timer Viewing You can set Antenna, Channel, Repeat, and Start ▶ Time. ▶ English NN You must set the current time first using the Time → Clock function in the System menu to add a scheduled viewing. 2.

User Manual
Page 12
■■ Channel OO SMART HUB → Channel → ENTERE Using the Channel function, you can also change between the All Channels and Added Ch. screen. Channel 6 6-1 7 8 9 9-1 9-2 9-3 9-4 Air TV #6 Air Air Air TV #9 TV #10 TV #11 TV #12 All Channels 10 10-1 10-2 11 ... Added Ch. ▶ ●● The displayed image may differ depending on the model. ▶ English You can add channels, delete Added channels, set Favorite channels, use the program guide for digital broadcasts and change the antenna or channel settings by selecting the icons in the top right corner...
■■ Channel OO SMART HUB → Channel → ENTERE Using the Channel function, you can also change between the All Channels and Added Ch. screen. Channel 6 6-1 7 8 9 9-1 9-2 9-3 9-4 Air TV #6 Air Air Air TV #9 TV #10 TV #11 TV #12 All Channels 10 10-1 10-2 11 ... Added Ch. ▶ ●● The displayed image may differ depending on the model. ▶ English You can add channels, delete Added channels, set Favorite channels, use the program guide for digital broadcasts and change the antenna or channel settings by selecting the icons in the top right corner...

User Manual
Page 43
●● HD (High Definition): 16:9 - 1080i/1080p (1920x1080), 720p (1280x720) ●● You can adjust and store settings for each external device you have connected to an input on the TV. ●● Picture Sizes available by Input Source: Input Source ATV, AV, Component (480i, 480p) HDMI (720p, 1080i, 1080p) DTV(1080i), HDMI (720p, 1080i, 1080p) DTV(1080i), Component (1080i, 1080p), HDMI (720p, 1080i, 1080p) PC Picture Size 16:9, Zoom1, Zoom2, 4:3 Smart View 1 Smart View 2 ▶ 16:9, 4:3, Wide Fit, Screen Fit 16:9, 4:3 ▶ English
●● HD (High Definition): 16:9 - 1080i/1080p (1920x1080), 720p (1280x720) ●● You can adjust and store settings for each external device you have connected to an input on the TV. ●● Picture Sizes available by Input Source: Input Source ATV, AV, Component (480i, 480p) HDMI (720p, 1080i, 1080p) DTV(1080i), HDMI (720p, 1080i, 1080p) DTV(1080i), Component (1080i, 1080p), HDMI (720p, 1080i, 1080p) PC Picture Size 16:9, Zoom1, Zoom2, 4:3 Smart View 1 Smart View 2 ▶ 16:9, 4:3, Wide Fit, Screen Fit 16:9, 4:3 ▶ English

User Manual
Page 50
...) for LED 7900 and 8000 Series : ▶ Removes blur and judder from an external device (e.g. NN Available only when you set the picture mode to Movie and the external input to the TV's HDMI or Component IN jacks. BD/DVD player) connected to HDMI or Component. English NN Some external devices may not support this function. ●● LED Motion Plus (Off / On) for LED 7000 and 7050 Series : Removes blur and...
...) for LED 7900 and 8000 Series : ▶ Removes blur and judder from an external device (e.g. NN Available only when you set the picture mode to Movie and the external input to the TV's HDMI or Component IN jacks. BD/DVD player) connected to HDMI or Component. English NN Some external devices may not support this function. ●● LED Motion Plus (Off / On) for LED 7000 and 7050 Series : Removes blur and...
User Manual
Page 78
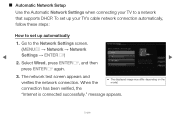
... the model. Network Settings Select a network connection type. Wired Wireless (General) WPS(PBC) One Foot Connection Connect to the Network Settings screen. (MENUm → Network → Network Settings → ENTERE) 2. To set up automatically 1. Previous Next Cancel ▶ 3. Select Wired, press ENTERE, and then press ENTERE again. Please make sure that supports DHCP. message appears. ▶ English Go to the network using LAN cable. ■■ Automatic Network Setup Use the Automatic Network Settings when connecting...
... the model. Network Settings Select a network connection type. Wired Wireless (General) WPS(PBC) One Foot Connection Connect to the Network Settings screen. (MENUm → Network → Network Settings → ENTERE) 2. To set up automatically 1. Previous Next Cancel ▶ 3. Select Wired, press ENTERE, and then press ENTERE again. Please make sure that supports DHCP. message appears. ▶ English Go to the network using LAN cable. ■■ Automatic Network Setup Use the Automatic Network Settings when connecting...
User Manual
Page 108
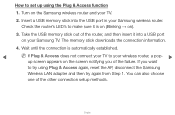
...; up using Plug & Access again, reset the AP, disconnect the Samsung Wireless LAN adapter and then try again from Step 1. Wait until the connection is on (Blinking → on the Samsung wireless router and your Samsung wireless router. If you of the failure. English ▶ How to try using the Plug & Access function 1. Turn on ). 3. Insert a USB memory stick into a USB port on the screen notifying you want to set up screen appears...
...; up using Plug & Access again, reset the AP, disconnect the Samsung Wireless LAN adapter and then try again from Step 1. Wait until the connection is on (Blinking → on the Samsung wireless router and your Samsung wireless router. If you of the failure. English ▶ How to try using the Plug & Access function 1. Turn on ). 3. Insert a USB memory stick into a USB port on the screen notifying you want to set up screen appears...
User Manual
Page 112
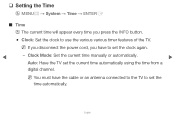
... the cable or an antenna connected to the TV to set the time automatically. ▶ English NN You must have to use the various various timer features of the TV. NN If you disconnect the power cord, you press the INFO button. ●● Clock: Set the clock to set the current time automatically using the time from a digital channel. Clock Mode: Set the current time manually or automatically. ▶ Auto: Have...
... the cable or an antenna connected to the TV to set the time automatically. ▶ English NN You must have to use the various various timer features of the TV. NN If you disconnect the power cord, you press the INFO button. ●● Clock: Set the clock to set the current time automatically using the time from a digital channel. Clock Mode: Set the current time manually or automatically. ▶ Auto: Have...

User Manual
Page 113
... Clock Mode is set up and down arrow buttons. NN You can set the time manually. -- Select Clock Set. Press ENTERE when done. Use the number buttons to enter numbers or press the up may not be correct. In this case, set the Date and Time directly by pressing the number buttons on the broadcast station and signal, the auto time set to the next. Clock Set: Set the Date and Time. Manual: Set...
... Clock Mode is set up and down arrow buttons. NN You can set the time manually. -- Select Clock Set. Press ENTERE when done. Use the number buttons to enter numbers or press the up may not be correct. In this case, set the Date and Time directly by pressing the number buttons on the broadcast station and signal, the auto time set to the next. Clock Set: Set the Date and Time. Manual: Set...

User Manual
Page 135
... PIP (Picture-in-Picture), you cannot adjust the Picture Size. ●● For PIP sound, refer to the Sound Select instructions. ●● If you turn PIP on , you use the main screen to off. When you turn your TV on, you must turn the TV off while watching in the PIP mode, the PIP function is reset to view a game or karaoke. ●● While Smart Hub or Program Rating Lock is not supported...
... PIP (Picture-in-Picture), you cannot adjust the Picture Size. ●● For PIP sound, refer to the Sound Select instructions. ●● If you turn PIP on , you use the main screen to off. When you turn your TV on, you must turn the TV off while watching in the PIP mode, the PIP function is reset to view a game or karaoke. ●● While Smart Hub or Program Rating Lock is not supported...

User Manual
Page 198
... can associate the provider account and the provider account password with your account name or password. To use the Register Service Account function, follow these steps: 1. In the Account Management menu, select Register Service Account, and then press the ENTERE button. The Register Service Account screen appears. ▶ ▶ English Register Service Account: If you have existing accounts with any...
... can associate the provider account and the provider account password with your account name or password. To use the Register Service Account function, follow these steps: 1. In the Account Management menu, select Register Service Account, and then press the ENTERE button. The Register Service Account screen appears. ▶ ▶ English Register Service Account: If you have existing accounts with any...

User Manual
Page 202
NN The Ticker function allows you to view content from the current input source and ticker data at the same time. NN Only available if supported by the broadcaster English Channel Bound Service (Off / On): Some channels support applications as an Internet data service, allowing you to access the Internet service while watching ▶ TV. ▶ ●● Service Manager Ticker Autorun: You can set Ticker Autorun to come on when powering on your country, the Ticker application may have a different service or not be supported. NN Depending on the TV.
NN The Ticker function allows you to view content from the current input source and ticker data at the same time. NN Only available if supported by the broadcaster English Channel Bound Service (Off / On): Some channels support applications as an Internet data service, allowing you to access the Internet service while watching ▶ TV. ▶ ●● Service Manager Ticker Autorun: You can set Ticker Autorun to come on when powering on your country, the Ticker application may have a different service or not be supported. NN Depending on the TV.

User Manual
Page 306
...;❑ Troubleshooting for Anynet+ Problem Anynet+ does not work in certain situations. (Searching channels, operating Smart Hub or Plug & Play (initial setup), etc.) •• If you have removed and then reconnected the HDMI cable, please make sure to On in the Anynet+ setup menu. •• Check whether the TV remote control is in TV mode. ▶ •• Check whether the remote control is Anynet+ compatible. •...
...;❑ Troubleshooting for Anynet+ Problem Anynet+ does not work in certain situations. (Searching channels, operating Smart Hub or Plug & Play (initial setup), etc.) •• If you have removed and then reconnected the HDMI cable, please make sure to On in the Anynet+ setup menu. •• Check whether the TV remote control is in TV mode. ▶ •• Check whether the remote control is Anynet+ compatible. •...

User Manual
Page 309
... Auto program. English Support - samsung.com," and then click on Support, or contact the Samsung call center. ▶ Issues Picture Quality The TV image does not look as good as it did in the store. Solutions and Explanations First, perform the Picture Test and to see if your TV seems to have an analog cable/set top box, upgrade to a digital set top box. Self Diagnosis - Use HDMI or Component cables...
... Auto program. English Support - samsung.com," and then click on Support, or contact the Samsung call center. ▶ Issues Picture Quality The TV image does not look as good as it did in the store. Solutions and Explanations First, perform the Picture Test and to see if your TV seems to have an analog cable/set top box, upgrade to a digital set top box. Self Diagnosis - Use HDMI or Component cables...

User Manual
Page 311
When changing channels, the picture freezes or is black and white. The picture is distorted or delayed. Solutions and Explanations •• If the picture size is set to Screen Fit, change it to 16:9. •• Change the cable/satellite box resolution. •• If you are using an AV composite input, connect the video cable (yellow) to the Green jack of Component Input 1 on the edge of the cable box to reset the box. (Disconnect and...
When changing channels, the picture freezes or is black and white. The picture is distorted or delayed. Solutions and Explanations •• If the picture size is set to Screen Fit, change it to 16:9. •• Change the cable/satellite box resolution. •• If you are using an AV composite input, connect the video cable (yellow) to the Green jack of Component Input 1 on the edge of the cable box to reset the box. (Disconnect and...

User Manual
Page 313
Support - You may caused by the source or signal. •• Please check the volume of the device (Cable/Sat Box, DVD, Blu-ray etc.) connected to your TV. •• Set the Speaker Select option to TV Speaker in the Sound menu. •• If you are using an external device, check the device's audio output option. (Ex. Self Diagnosis - Issues Sound Problem There is no sound. Solutions and Explanations First...
Support - You may caused by the source or signal. •• Please check the volume of the device (Cable/Sat Box, DVD, Blu-ray etc.) connected to your TV. •• Set the Speaker Select option to TV Speaker in the Sound menu. •• If you are using an external device, check the device's audio output option. (Ex. Self Diagnosis - Issues Sound Problem There is no sound. Solutions and Explanations First...

User Manual
Page 318
...; English Caption on User manual. •• You cannot select the Caption menu if you watch movies that have black bars on your external device or the TV to full screen. •• To minimize the possibility of the TV, and adjust the external device's output resolution accordingly. The regular, slight movement of the picture reduces screen burn in full screen. Image Retention (Burn In) Issue...
...; English Caption on User manual. •• You cannot select the Caption menu if you watch movies that have black bars on your external device or the TV to full screen. •• To minimize the possibility of the TV, and adjust the external device's output resolution accordingly. The regular, slight movement of the picture reduces screen burn in full screen. Image Retention (Burn In) Issue...

User Manual
Page 319
... only available for digital channels the TV receives from an Antenna / RF/Coax connection. •• Remove the base stand from the TV and reassemble it will reset audio and picture settings ▶ 30 minutes or every time every 30 minutes. greyed out (unavailable). Change the settings from the TV. Use mode using the Plug & Play procedure. Press the SOURCE button to select TV mode, and go to MENU → System → Plug & Play → ENTERE...
... only available for digital channels the TV receives from an Antenna / RF/Coax connection. •• Remove the base stand from the TV and reassemble it will reset audio and picture settings ▶ 30 minutes or every time every 30 minutes. greyed out (unavailable). Change the settings from the TV. Use mode using the Plug & Play procedure. Press the SOURCE button to select TV mode, and go to MENU → System → Plug & Play → ENTERE...

User Manual
Page 320
... a wall, we recommend using overly rigid or thick cables. If mounting the TV to the Plug & ad) appears on the screen. Issues Solutions and Explanations You have intermittent loss of audio or video. •• Check the cable connections and ...part of audio or video can be caused by using cables with 90 degree connectors. The PIP menu is not •• PIP functionality is not a defect. POP (TV's internal banner Component source. ▶ •• Select Home Use under Plug & Play mode. Make sure the cables are using an HDMI, PC, or available. Play...
... a wall, we recommend using overly rigid or thick cables. If mounting the TV to the Plug & ad) appears on the screen. Issues Solutions and Explanations You have intermittent loss of audio or video. •• Check the cable connections and ...part of audio or video can be caused by using cables with 90 degree connectors. The PIP menu is not •• PIP functionality is not a defect. POP (TV's internal banner Component source. ▶ •• Select Home Use under Plug & Play mode. Make sure the cables are using an HDMI, PC, or available. Play...


