
User Manual Ver.1.0 (English)
Page 4
... Options Sports Mode Subtitles 75 Show Subtitles 75 Subtitle Options 75 Subtitle Display Options TV Settings Basic Picture Settings 76 Changing the Picture Mode 77 Picture Quality 77 Applying the Current Picture Quality Setting to Another Input 78 Picture Size 79 Screen Position 79 Picture Off 79 Reset Image Settings Advanced Settings Picture Options Basic Sound Settings 84 Changing the Sound Mode 85 Adjusting the Sound Settings 85 Auto Volume 85 TV Installation Type 85 Resetting the Sound 3D Audio Speaker Settings 87 Speaker Select 88 Digital Audio Output 88 Samsung Audio Device Connection
... Options Sports Mode Subtitles 75 Show Subtitles 75 Subtitle Options 75 Subtitle Display Options TV Settings Basic Picture Settings 76 Changing the Picture Mode 77 Picture Quality 77 Applying the Current Picture Quality Setting to Another Input 78 Picture Size 79 Screen Position 79 Picture Off 79 Reset Image Settings Advanced Settings Picture Options Basic Sound Settings 84 Changing the Sound Mode 85 Adjusting the Sound Settings 85 Auto Volume 85 TV Installation Type 85 Resetting the Sound 3D Audio Speaker Settings 87 Speaker Select 88 Digital Audio Output 88 Samsung Audio Device Connection

User Manual Ver.1.0 (English)
Page 7
... Sound Test 135 Motion Control Environment Check 135 Signal Information 135 Reset 136 Updating the Software 136 Update now 136 Auto Update 137 Usage Mode 137 Support Info Kensington Security Lock Display Resolution 138 PDP 5500, LED 5500 series and above 138 IBM 138 MAC 139 VESA DMT 140 LED 4300 series models 140 IBM 140 MAC 141 VESA DMT Picture Size and Input Signal Supported 3D Resolutions 143 HDMI 143 3D Format: L/R, T/B 143 3D Format: Frame Packing 144 Component 144 Digital Channel...
... Sound Test 135 Motion Control Environment Check 135 Signal Information 135 Reset 136 Updating the Software 136 Update now 136 Auto Update 137 Usage Mode 137 Support Info Kensington Security Lock Display Resolution 138 PDP 5500, LED 5500 series and above 138 IBM 138 MAC 139 VESA DMT 140 LED 4300 series models 140 IBM 140 MAC 141 VESA DMT Picture Size and Input Signal Supported 3D Resolutions 143 HDMI 143 3D Format: L/R, T/B 143 3D Format: Frame Packing 144 Component 144 Digital Channel...

User Manual Ver.1.0 (English)
Page 10
..., an antenna connection is a list of featured connectors shown in descending order of picture quality. ●● HDMI ●● Component ●● AV Connect the video device to the device's operating manual. The displayed image may vary depending on the model. The number of connectors and their names and locations may vary depending on the model. Connect the correct antenna cable for the best picture quality. Video Device Connections This TV...
..., an antenna connection is a list of featured connectors shown in descending order of picture quality. ●● HDMI ●● Component ●● AV Connect the video device to the device's operating manual. The displayed image may vary depending on the model. The number of connectors and their names and locations may vary depending on the model. Connect the correct antenna cable for the best picture quality. Video Device Connections This TV...

User Manual Ver.1.0 (English)
Page 13
... optical cable to use an AV receiver. ●● Digital Audio (Optical) ●● Audio ●● ARC (Audio Return Channel) The number of connectors and their names and locations may vary depending on the manufacturer. Adjust the audio device's volume using an optical cable does not automatically turn off the TV speakers. Connecting the device using its remote control. For better audio quality, it is the case, ask for assistance from the audio device manufacturer. 5.1-channel audio for audio input...
... optical cable to use an AV receiver. ●● Digital Audio (Optical) ●● Audio ●● ARC (Audio Return Channel) The number of connectors and their names and locations may vary depending on the manufacturer. Adjust the audio device's volume using an optical cable does not automatically turn off the TV speakers. Connecting the device using its remote control. For better audio quality, it is the case, ask for assistance from the audio device manufacturer. 5.1-channel audio for audio input...

User Manual Ver.1.0 (English)
Page 51
... does not work, set up the remote control by sending the input signals to 15 characters long). ●● Delete: Remove the registered external device. Using the Universal Remote Control By configuring the universal remote control feature for and then press the SOURCE button to bring up the Source screen. 222 Select Universal Remote Setup from the top of the screen. Add the External Device 111 Turn on -screen instruction and set up the universal remote control. This initiates the universal remote setup process...
... does not work, set up the remote control by sending the input signals to 15 characters long). ●● Delete: Remove the registered external device. Using the Universal Remote Control By configuring the universal remote control feature for and then press the SOURCE button to bring up the Source screen. 222 Select Universal Remote Setup from the top of the screen. Add the External Device 111 Turn on -screen instruction and set up the universal remote control. This initiates the universal remote setup process...

User Manual Ver.1.0 (English)
Page 78
... Mode Screen Menu > Picture > 3D > 3D Mode Choose a 3D mode according to normal images. Select a 3D mode from the available 3D modes depending on the input signal. ● ● Off: Deactivates 3D viewing. ● ● Normal: Converts normal images to create the 3D effect. If the screen is only available on the LED 7050/7100 series, except 75-inch TVs. Setting 3D Effects There are several adjustments...
... Mode Screen Menu > Picture > 3D > 3D Mode Choose a 3D mode according to normal images. Select a 3D mode from the available 3D modes depending on the input signal. ● ● Off: Deactivates 3D viewing. ● ● Normal: Converts normal images to create the 3D effect. If the screen is only available on the LED 7050/7100 series, except 75-inch TVs. Setting 3D Effects There are several adjustments...
User Manual Ver.1.0 (English)
Page 79
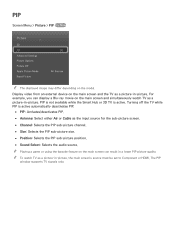
.../deactivates PIP. ●● Antenna: Select either Air or Cable as a picture-in-picture, the main screen's source must be set to Component or HDMI. PIP Screen Menu > Picture > PIP Try Now Picture 3D PIP Advanced Settings Picture Options Picture Off Apply Picture Mode Reset Picture Off All Sources "" The displayed image may differ depending on the main screen can display a Blu-ray movie on the main screen and the TV as a picture-in-picture. "" Playing a game or using the karaoke feature on the model...
.../deactivates PIP. ●● Antenna: Select either Air or Cable as a picture-in-picture, the main screen's source must be set to Component or HDMI. PIP Screen Menu > Picture > PIP Try Now Picture 3D PIP Advanced Settings Picture Options Picture Off Apply Picture Mode Reset Picture Off All Sources "" The displayed image may differ depending on the main screen can display a Blu-ray movie on the main screen and the TV as a picture-in-picture. "" Playing a game or using the karaoke feature on the model...

User Manual Ver.1.0 (English)
Page 84
... the greens and the red value to the current input, select Current Source. Try Now ●● Color Adjusts the overall color saturation. Picture Quality Screen Menu > Picture PDP 5500, LED 6400 series and above Choose a Picture Mode and then select the following options to display a slide bar that allows the corresponding setting to be adjusted. Adjust the value by dragging left /right arrow button on the remote and change the setting by...
... the greens and the red value to the current input, select Current Source. Try Now ●● Color Adjusts the overall color saturation. Picture Quality Screen Menu > Picture PDP 5500, LED 6400 series and above Choose a Picture Mode and then select the following options to display a slide bar that allows the corresponding setting to be adjusted. Adjust the value by dragging left /right arrow button on the remote and change the setting by...

User Manual Ver.1.0 (English)
Page 97
... antenna cable has to be connected to Auto. Set Clock Mode to the TV. Time Offset Screen Menu > System > Time > Clock > Time Offset Try Now If the set time is not accurate, users can set the timer up to enter the current time and date. Changing Time Offset is only available, when the Time is set through a network, if the TV fails to receive the time information including the broadcast signal from a digital channel. You can set the time...
... antenna cable has to be connected to Auto. Set Clock Mode to the TV. Time Offset Screen Menu > System > Time > Clock > Time Offset Try Now If the set time is not accurate, users can set the timer up to enter the current time and date. Changing Time Offset is only available, when the Time is set through a network, if the TV fails to receive the time information including the broadcast signal from a digital channel. You can set the time...

User Manual Ver.1.0 (English)
Page 142
... network settings. Motion Control Environment Check Screen Menu > Support > Self Diagnosis > Motion Control Environment Check Test the ambient noise and brightness levels to TV Speaker and then try again. Signal Information Screen Menu > Support > Self Diagnosis > Signal Information Try Now The signal Information displays the digital channel signal information and strength. Reset Screen Menu > Support > Self Diagnosis > Reset Try Now This resets all settings to the factory default settings except for sound problems. If no melody is played by the TV's speakers...
... network settings. Motion Control Environment Check Screen Menu > Support > Self Diagnosis > Motion Control Environment Check Test the ambient noise and brightness levels to TV Speaker and then try again. Signal Information Screen Menu > Support > Self Diagnosis > Signal Information Try Now The signal Information displays the digital channel signal information and strength. Reset Screen Menu > Support > Self Diagnosis > Reset Try Now This resets all settings to the factory default settings except for sound problems. If no melody is played by the TV's speakers...

User Manual Ver.1.0 (English)
Page 143
... default settings after completing the software upgrade. Check the network configuration and internet connectivity and then enable this may continue for more than 1 hour until the upgrade is not in Standby Mode. The TV will turn off the TV's power until the software download is in use. Auto Update Screen Menu > Support > Software Update > Auto Update Try Now This option upgrades the TV while it into the root directory of the TV's USB ports to install the update. Updating the Software Screen Menu > Support > Software Update...
... default settings after completing the software upgrade. Check the network configuration and internet connectivity and then enable this may continue for more than 1 hour until the upgrade is not in Standby Mode. The TV will turn off the TV's power until the software download is in use. Auto Update Screen Menu > Support > Software Update > Auto Update Try Now This option upgrades the TV while it into the root directory of the TV's USB ports to install the update. Updating the Software Screen Menu > Support > Software Update...

User Manual Ver.1.0 (English)
Page 162
... correct external device video output connectors? Check if Sleep Timer (System > Time > Sleep Timer) has been enabled. Problems Powering On When the TV is connected to diagnose the issue. Check the antenna connection or turn off , run Picture Test (Support > Self Diagnosis > Picture Test) to an external device via a component cable, check that the colors on . If the TV appears to Picture and adjust Backlight/Cell Light (applicable models), Contrast, Brightness, Sharpness, Color, Tint (G/R) and other connections as...
... correct external device video output connectors? Check if Sleep Timer (System > Time > Sleep Timer) has been enabled. Problems Powering On When the TV is connected to diagnose the issue. Check the antenna connection or turn off , run Picture Test (Support > Self Diagnosis > Picture Test) to an external device via a component cable, check that the colors on . If the TV appears to Picture and adjust Backlight/Cell Light (applicable models), Contrast, Brightness, Sharpness, Color, Tint (G/R) and other connections as...

User Manual Ver.1.0 (English)
Page 163
... correct jacks. Use HDMI or Component cables to find a Channel Try this! Look for a channel that is distorted. Adjust the cable/satellite box's video output resolution to Picture and adjust Picture Mode, Brightness, Sharpness, Color, and other picture adjustment settings. This is not an issue with the TV. Navigate to 1080i or 720p. If Picture Size is set top box. Change the cable/satellite box resolution. There is something wrong with the TV. Run Setup (System > Setup) or Auto Program (Broadcasting > Auto Program). The TV...
... correct jacks. Use HDMI or Component cables to find a Channel Try this! Look for a channel that is distorted. Adjust the cable/satellite box's video output resolution to Picture and adjust Picture Mode, Brightness, Sharpness, Color, and other picture adjustment settings. This is not an issue with the TV. Navigate to 1080i or 720p. If Picture Size is set top box. Change the cable/satellite box resolution. There is something wrong with the TV. Run Setup (System > Setup) or Auto Program (Broadcasting > Auto Program). The TV...

User Manual Ver.1.0 (English)
Page 164
... a problem with your TV is using an HDMI cable.) If you are using an external device, check the device's audio output option. (For example, you may cause sound distortions. The 3D images don't look quite right. Turn off the 3D glasses when you are turned on. Reboot the connected device by the source or signal. A low signal level may need to change your cable box's audio option to HDMI if the box connected...
... a problem with your TV is using an HDMI cable.) If you are using an external device, check the device's audio output option. (For example, you may cause sound distortions. The 3D images don't look quite right. Turn off the 3D glasses when you are turned on. Reboot the connected device by the source or signal. A low signal level may need to change your cable box's audio option to HDMI if the box connected...

User Manual Ver.1.0 (English)
Page 167
.... Change Use Mode (Support > Use Mode) to Home Use. This does not indicate a product malfunction. Your TV has undergone strict quality control procedures that meet our demanding performance and reliability requirements. Image Retention (Burn In) Issue This issue affects PDP TVs only. The PIP menu is making a humming noise. PIP functionality is an intermittent loss of time or using an HDMI or Component source. PDP TVs are using the 4:3 screen...
.... Change Use Mode (Support > Use Mode) to Home Use. This does not indicate a product malfunction. Your TV has undergone strict quality control procedures that meet our demanding performance and reliability requirements. Image Retention (Burn In) Issue This issue affects PDP TVs only. The PIP menu is making a humming noise. PIP functionality is an intermittent loss of time or using an HDMI or Component source. PDP TVs are using the 4:3 screen...

Quick Guide Ver.1.0 (English)
Page 21
... on your Samsung Television is operating normally, the problem might be able to correct the issue using Auto Motion Plus (Picture > Picture Options > Auto Motion Plus). Finally, if possible, test your external video devices by the TV, the problem should be with the antenna cable connection or the cable/satellite box not being turned on your Samsung TV are off the TV if no user input in the Quick Start Guide. If the Sleep Timer has...
... on your Samsung Television is operating normally, the problem might be able to correct the issue using Auto Motion Plus (Picture > Picture Options > Auto Motion Plus). Finally, if possible, test your external video devices by the TV, the problem should be with the antenna cable connection or the cable/satellite box not being turned on your Samsung TV are off the TV if no user input in the Quick Start Guide. If the Sleep Timer has...

Quick Guide Ver.1.0 (English)
Page 22
... wall mount, see the instructions provided with their poles (+/-) in optimum condition, upgrade to do it , and then reconnecting the device's power cable. • Replace the remote control batteries. The remote control does not work " below. • Check the cable connections. Issues The TV won't turn the TV on the TV's menu (Screen Menu > Support > Software Update > Update now or Screen Menu > Support > Software Update > Auto Update). Remove and reconnect all cables connected to the product. There is HDMI, it should be connected to an HDMI input...
... wall mount, see the instructions provided with their poles (+/-) in optimum condition, upgrade to do it , and then reconnecting the device's power cable. • Replace the remote control batteries. The remote control does not work " below. • Check the cable connections. Issues The TV won't turn the TV on the TV's menu (Screen Menu > Support > Software Update > Update now or Screen Menu > Support > Software Update > Auto Update). Remove and reconnect all cables connected to the product. There is HDMI, it should be connected to an HDMI input...

Quick Guide Ver.1.0 (English)
Page 23
... in the table below. •• Samsung wall mount kits contain a detailed installation manual, and all parts necessary for additional information. Installing a Wall Mount using the Wall mount adapter ✎✎ For more than plaster board, please contact your wall mount on the wall mount specifications. •• Do not fasten the screws too firmly. Product Family LED-TV [Slim] TV size in inches 19 - 22 28 32 - 42 46 - 65 VESA screw hole specs (A * B) in...
... in the table below. •• Samsung wall mount kits contain a detailed installation manual, and all parts necessary for additional information. Installing a Wall Mount using the Wall mount adapter ✎✎ For more than plaster board, please contact your wall mount on the wall mount specifications. •• Do not fasten the screws too firmly. Product Family LED-TV [Slim] TV size in inches 19 - 22 28 32 - 42 46 - 65 VESA screw hole specs (A * B) in...

Quick Guide Ver.1.0 (English)
Page 32
... or serial numbers; customer adjustments and failure to follow operating instructions, cleaning, maintenance and environmental instructions that are eligible for In-home service at : Samsung Electronics America, Inc. 85 Challenger Road Ridgefield Park, NJ 07660-2112 1-800-SAMSUNG (7267864) - delivery and installation; use of this product was not intended; brightness related to noise, echo, interference or other signal transmission and delivery problems; Warranty service can...
... or serial numbers; customer adjustments and failure to follow operating instructions, cleaning, maintenance and environmental instructions that are eligible for In-home service at : Samsung Electronics America, Inc. 85 Challenger Road Ridgefield Park, NJ 07660-2112 1-800-SAMSUNG (7267864) - delivery and installation; use of this product was not intended; brightness related to noise, echo, interference or other signal transmission and delivery problems; Warranty service can...

Installation Guide Ver.1.0 (English)
Page 2
... the Internet to the colors on and start the initial setup Troubleshooting Information required: • Wi-Fi network password (if you experience issues, please do not take the TV back to start the initial setup. AV also accepts component video connections (red/green/blue). + The AUDIO OUT port can configure the universal remote control settings. Step 4 Power on the jacks. The stand is the default port for channels from your plastic card into the remote control...
... the Internet to the colors on and start the initial setup Troubleshooting Information required: • Wi-Fi network password (if you experience issues, please do not take the TV back to start the initial setup. AV also accepts component video connections (red/green/blue). + The AUDIO OUT port can configure the universal remote control settings. Step 4 Power on the jacks. The stand is the default port for channels from your plastic card into the remote control...


