
User Manual
Page 2
... United States : 1-800-SAMSUNG (1-800-726-7864) - Installation with a stand. Displaying stationary graphics and images on warranty terms. Wide screen format LED Displays (16:9, the aspect ratio of format selection and use parts provided by a SAMSUNG Authorized Service Center. Transportation to and from actual product appearance. For the location of the product. ✎✎ When using a stand or wall-mount, use these controls to view different formats...
... United States : 1-800-SAMSUNG (1-800-726-7864) - Installation with a stand. Displaying stationary graphics and images on warranty terms. Wide screen format LED Displays (16:9, the aspect ratio of format selection and use parts provided by a SAMSUNG Authorized Service Center. Transportation to and from actual product appearance. For the location of the product. ✎✎ When using a stand or wall-mount, use these controls to view different formats...

User Manual
Page 3
... yy Setup Menu 18 Setting the Time 18 Using the Sleep Timer 18 Setting the On / Off Timer 19 Locking Programs 19 Other Features 20 Picture In Picture (PIP) 22 yy Support Menu 22 Advanced Features yy Network Connection 24 Connecting to a Wired Network 24 Connecting to a Wireless Network 26 yy Media Play 31 Connecting a USB Device 31 Connecting to your PC through a network 31 Screen Display...
... yy Setup Menu 18 Setting the Time 18 Using the Sleep Timer 18 Setting the On / Off Timer 19 Locking Programs 19 Other Features 20 Picture In Picture (PIP) 22 yy Support Menu 22 Advanced Features yy Network Connection 24 Connecting to a Wired Network 24 Connecting to a Wireless Network 26 yy Media Play 31 Connecting a USB Device 31 Connecting to your PC through a network 31 Screen Display...

User Manual
Page 15
... or Pattern2, you use 16:9 mode most of screen sizes as well. Pattern1: This is set of the time. BD/DVD player) connected to the HDMI or Component IN jacks. ✎✎ Available when the picture mode is set to Movie and when the external input is a test screen designed to demonstrate the affects of display settings on increases detail and...
... or Pattern2, you use 16:9 mode most of screen sizes as well. Pattern1: This is set of the time. BD/DVD player) connected to the HDMI or Component IN jacks. ✎✎ Available when the picture mode is set to Movie and when the external input is a test screen designed to demonstrate the affects of display settings on increases detail and...

User Manual
Page 18
.... ■■ Stereo: Choose for using various timer features of the TV. In this case, set to Normal mode, making almost no video signal, both speakers will be connected in order to Mono, Stereo or SAP. In this case, set the TV to External Speaker. ✎&#...To equalize the volume level on the remote control. Time Zone: Select your time zone. ✎✎ This function is only available when the Clock Mode is set the clock again. It is set to set to the factory defaults. 18 English Manual: Set the current time manually. ✎✎ Depending on or...
.... ■■ Stereo: Choose for using various timer features of the TV. In this case, set to Normal mode, making almost no video signal, both speakers will be connected in order to Mono, Stereo or SAP. In this case, set the TV to External Speaker. ✎&#...To equalize the volume level on the remote control. Time Zone: Select your time zone. ✎✎ This function is only available when the Clock Mode is set the clock again. It is set to set to the factory defaults. 18 English Manual: Set the current time manually. ✎✎ Depending on or...

User Manual
Page 20
...8594; 2 → 4 → POWER (on) ¦¦ Other Features OO MENUm → Setup → ENTERE Menu Language Set the menu language. 1. The default menu name and Downloadable US Rating change depending on -screen display to watch on the information from the ...screen. ✎✎ The Caption feature doesn't work in the following message will automatically block any category that deal with more sensitive material. For example, if you forget the PIN, press the remote-control buttons in Component, HDMI or PC modes. 20 English Downloadable U.S. It may not be used...
...8594; 2 → 4 → POWER (on) ¦¦ Other Features OO MENUm → Setup → ENTERE Menu Language Set the menu language. 1. The default menu name and Downloadable US Rating change depending on -screen display to watch on the information from the ...screen. ✎✎ The Caption feature doesn't work in the following message will automatically block any category that deal with more sensitive material. For example, if you forget the PIN, press the remote-control buttons in Component, HDMI or PC modes. 20 English Downloadable U.S. It may not be used...

User Manual
Page 21
... off or give permission to Default: This option sets each device's manual. 21 English When BD Wise is turned On, the picture mode is automatically changed to the optimal resolution. ✎✎ Available when connecting Samsung products that support BD Wise through a HDMI cable. ■■ Menu Transparency (Bright / Dark): Set the Transparency of the menu. ■■ Melody...
... off or give permission to Default: This option sets each device's manual. 21 English When BD Wise is turned On, the picture mode is automatically changed to the optimal resolution. ✎✎ Available when connecting Samsung products that support BD Wise through a HDMI cable. ■■ Menu Transparency (Bright / Dark): Set the Transparency of the menu. ■■ Melody...

User Manual
Page 22
...Troubleshooting: If the TV seems to have a problem, refer to this is part of the normal operation of these troubleshooting tips apply, contact the Samsung customer service center. 22 English Please check your connections. If the problem persists, refer to the Sound Select instructions. Support Menu OO MENUm → Support...device's user manual. ■■ Signal Information: (Digital channels only) An HD channel's reception quality is properly displayed, select No. xx You may differ depending on the country. xx If you use the main screen to TV Speaker in PIP mode. PIP ...
...Troubleshooting: If the TV seems to have a problem, refer to this is part of the normal operation of these troubleshooting tips apply, contact the Samsung customer service center. 22 English Please check your connections. If the problem persists, refer to the Sound Select instructions. Support Menu OO MENUm → Support...device's user manual. ■■ Signal Information: (Digital channels only) An HD channel's reception quality is properly displayed, select No. xx You may differ depending on the country. xx If you use the main screen to TV Speaker in PIP mode. PIP ...

User Manual
Page 23
... the power or remove the USB drive until upgrades are complete. Please or be careful not to a USB memory device. We advise you to to write down your settings so that you can find information regarding our call centers and how to this information when your network. If the problem persists, download by network connection or downloading the latest firmware from "www.samsung.
... the power or remove the USB drive until upgrades are complete. Please or be careful not to a USB memory device. We advise you to to write down your settings so that you can find information regarding our call centers and how to this information when your network. If the problem persists, download by network connection or downloading the latest firmware from "www.samsung.

User Manual
Page 25
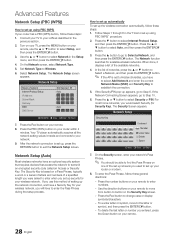
... automatically 1. The Network connection values are displayed. How to set up manually To set up menu that appears, click the Support tab. 4. On the Network screen, select Network Type. 5. Network Setup Internet Protocol Setup IP Address Subnet Mask Gateway DNS DNS Server : Auto ► : : : : Auto : U Move E Enter R Return 7. Network Setup (Manual) Use the Manual Network Setup when connecting your TV to a network that supports DHCP. Press the ▼ button on your remote. 6. Connect your TV...
... automatically 1. The Network connection values are displayed. How to set up manually To set up menu that appears, click the Support tab. 4. On the Network screen, select Network Type. 5. Network Setup Internet Protocol Setup IP Address Subnet Mask Gateway DNS DNS Server : Auto ► : : : : Auto : U Move E Enter R Return 7. Network Setup (Manual) Use the Manual Network Setup when connecting your TV to a network that supports DHCP. Press the ▼ button on your remote. 6. Connect your TV...
User Manual
Page 26
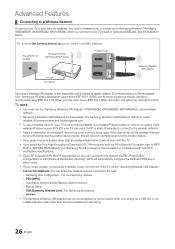
...). WPS will result in either a router or a modem). Samsung Auto Configuration - Samsung's Wireless LAN adapter supports the IEEE 802.11A/B/G and N communication protocols. xx If your TV can setup the wireless network connection six ways. -- xx Connection Methods: You can use a wireless network, your TV's back or side panel USB jack. Manual Setup -- xx Samsung's Wireless LAN Adapter is sold separately and is...
...). WPS will result in either a router or a modem). Samsung Auto Configuration - Samsung's Wireless LAN adapter supports the IEEE 802.11A/B/G and N communication protocols. xx If your TV can setup the wireless network connection six ways. -- xx Connection Methods: You can use a wireless network, your TV's back or side panel USB jack. Manual Setup -- xx Samsung's Wireless LAN Adapter is sold separately and is...
User Manual
Page 28
... on your remote. 8. Use the direction buttons on the Security Key screen. -- Advanced Features Network Setup (PBC (WPS)) How to set up using PBC (WPS)" procedure. 2. Network Setup Select a Network Internet Protocol Setup IP Address Subnet Mask Gateway DNS DNS Server : Not Selected ► : Auto : : : : Auto : PBC(WPS) U Move E Enter R Return 7. When done, it needs and connects to your network. 9. If the Network Connecting Screen appears...
... on your remote. 8. Use the direction buttons on the Security Key screen. -- Advanced Features Network Setup (PBC (WPS)) How to set up using PBC (WPS)" procedure. 2. Network Setup Select a Network Internet Protocol Setup IP Address Subnet Mask Gateway DNS DNS Server : Not Selected ► : Auto : : : : Auto : PBC(WPS) U Move E Enter R Return 7. When done, it needs and connects to your network. 9. If the Network Connecting Screen appears...

User Manual
Page 29
...set up manually To enter the Network connection values manually, follow these steps: 1. Press the ▼ button to go to Off in the device list, press the Blue button on -screen menu. Follow Steps 1 through the "Samsung Wireless LAN Adapter" by using PBC (WPS)" (p. 28). 2. Select your remote... Key may have limited functionality. How to set to the first DNS entry field. The Network settings are displayed. The existing network system may cause a malfunction. Network Setup (Manual) If the other arrow buttons to select Manual, and then press the ENTERE button. 3....
...set up manually To enter the Network connection values manually, follow these steps: 1. Press the ▼ button to go to Off in the device list, press the Blue button on -screen menu. Follow Steps 1 through the "Samsung Wireless LAN Adapter" by using PBC (WPS)" (p. 28). 2. Select your remote... Key may have limited functionality. How to set to the first DNS entry field. The Network settings are displayed. The existing network system may cause a malfunction. Network Setup (Manual) If the other arrow buttons to select Manual, and then press the ENTERE button. 3....

User Manual
Page 37
...is only enabled when stream-type files which support multiple audio formats are the same file name as required. You can rotate images in full screen mode. You can set and select background music when watching a slide...connected device. 37 English You can move the file to display the help pop-up message for continuous movie playback. ■■ Get DivX® VOD registration code: Shows the registration code authorized for the TV. You can set various slide show . Category Title Repeat Mode Picture Size (Mode1 / Mode2 / Original) Picture Setting Sound Setting Subtitle Setting...
...is only enabled when stream-type files which support multiple audio formats are the same file name as required. You can rotate images in full screen mode. You can set and select background music when watching a slide...connected device. 37 English You can move the file to display the help pop-up message for continuous movie playback. ■■ Get DivX® VOD registration code: Shows the registration code authorized for the TV. You can set various slide show . Category Title Repeat Mode Picture Size (Mode1 / Mode2 / Original) Picture Setting Sound Setting Subtitle Setting...

User Manual
Page 39
... → Application → Anynet+ (HDMI-CEC) → ENTERE ■■ Setup Anynet+ (HDMI-CEC) (Off / On): To use the Anynet+ Function, Anynet+ (HDMI-CEC) must be set to TV to use the Anynet+ function. If a DVD recorder is properly connected to the recording device's users manual. 39 English Auto Turn Off (No / Yes): Setting an Anynet+ Device to turn off. ¦¦ Switching...
... → Application → Anynet+ (HDMI-CEC) → ENTERE ■■ Setup Anynet+ (HDMI-CEC) (Off / On): To use the Anynet+ Function, Anynet+ (HDMI-CEC) must be set to TV to use the Anynet+ function. If a DVD recorder is properly connected to the recording device's users manual. 39 English Auto Turn Off (No / Yes): Setting an Anynet+ Device to turn off. ¦¦ Switching...

User Manual
Page 42
...is 8. Highlight Settings using the number button on the remote control. ✎✎ When login succeeds, User account will appear. 3. Change the Service Lock password ✎✎ The default password set Ticker Autorun to come on when powering on ). Login User account : Password : admin ...instructions on the screen. ¦¦ Setting up Internet@TV ■■ System Setup Ticker Autorun (Off / On): You can control your country, Ticker application may have a different service or not be displayed on creating an account, refer to access the Internet service...
...is 8. Highlight Settings using the number button on the remote control. ✎✎ When login succeeds, User account will appear. 3. Change the Service Lock password ✎✎ The default password set Ticker Autorun to come on when powering on ). Login User account : Password : admin ...instructions on the screen. ¦¦ Setting up Internet@TV ■■ System Setup Ticker Autorun (Off / On): You can control your country, Ticker application may have a different service or not be displayed on creating an account, refer to access the Internet service...
User Manual
Page 46
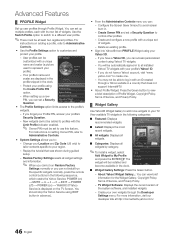
... log in to : -- For instructions on setting Owner PIN, refer to My Profile and press the ENTERE. Restore Factory Settings resets all widgets by category. ✎✎To install a widget, select Add Widget to Administrative Controls. Configure the Screen Saver timeout to your profile. -- View available TV widgets in a country that was shown during guided setup. -- Advanced Features ¦¦...
... log in to : -- For instructions on setting Owner PIN, refer to My Profile and press the ENTERE. Restore Factory Settings resets all widgets by category. ✎✎To install a widget, select Add Widget to Administrative Controls. Configure the Screen Saver timeout to your profile. -- View available TV widgets in a country that was shown during guided setup. -- Advanced Features ¦¦...

User Manual
Page 48
...mobile device is turned on or trys to connect to each device's user's guide. ¦¦ Setting Up AllShare Setup ■■ Message (On / Off): Enables or disables the message function (for call arrivals, SMS messages and schedules set on the TV via the network. xx The alarm...using some applications such as a remote control. ■■ TV name: Sets the TV name so you click the OK button, the contents of mobile phones or connected devices which have been set up with this function, you are displayed. ✎✎ You can find it may need additional software installation...
...mobile device is turned on or trys to connect to each device's user's guide. ¦¦ Setting Up AllShare Setup ■■ Message (On / Off): Enables or disables the message function (for call arrivals, SMS messages and schedules set on the TV via the network. xx The alarm...using some applications such as a remote control. ■■ TV name: Sets the TV name so you click the OK button, the contents of mobile phones or connected devices which have been set up with this function, you are displayed. ✎✎ You can find it may need additional software installation...

User Manual
Page 51
... floor. If installed on installing the wall mount, see the instructions provided with the VESA standard screw specifications. 51 English xx When purchasing our wall mount kit, a detailed installation manual and all parts necessary for wall mount kits are provided. 05 Other Information Installing the Wall Mount Attaching the Blanking Bracket When installing the TV onto a wall, attach the Blanking Bracket as shown. Preparing before installing Wall-Mount To install a wall-mount from another manufacturer, use screws that...
... floor. If installed on installing the wall mount, see the instructions provided with the VESA standard screw specifications. 51 English xx When purchasing our wall mount kit, a detailed installation manual and all parts necessary for wall mount kits are provided. 05 Other Information Installing the Wall Mount Attaching the Blanking Bracket When installing the TV onto a wall, attach the Blanking Bracket as shown. Preparing before installing Wall-Mount To install a wall-mount from another manufacturer, use screws that...

User Manual
Page 54
... digital set to Screen Fit, change your cable box's audio option to HDMI when you may caused by reconnecting the device's power cable. • Check cable connections. The picture is not a TV problem. • Mobile phones used close to the TV (cca up to 20 minutes). • Set the output resolution of these troubleshooting tips apply, visit "www.samsung.com...
... digital set to Screen Fit, change your cable box's audio option to HDMI when you may caused by reconnecting the device's power cable. • Check cable connections. The picture is not a TV problem. • Mobile phones used close to the TV (cca up to 20 minutes). • Set the output resolution of these troubleshooting tips apply, visit "www.samsung.com...

User Manual
Page 55
... the Cable/Set user manual for the SAMSUNG TV code. 55 English Network Connection The wireless network connection failed. • The Samsung Wireless USB dongle is required to use a wireless network. • Make sure the Network Connection is set to Off in Setup menu (p. 21). • If you are 3 options (STD, HRC and IRC) (p. 12) • Verify the Antenna is not a TV problem. Software Upgrade over the network fails. •...
... the Cable/Set user manual for the SAMSUNG TV code. 55 English Network Connection The wireless network connection failed. • The Samsung Wireless USB dongle is required to use a wireless network. • Make sure the Network Connection is set to Off in Setup menu (p. 21). • If you are 3 options (STD, HRC and IRC) (p. 12) • Verify the Antenna is not a TV problem. Software Upgrade over the network fails. •...


