
User Manual
Page 4
... picking up matches, live ashes or cigarette butts. Do not allow the vacuum cleaner to run unattended at the rear of your warranty. Do not allow the vacuum cleaner to be used by pulling the cord. 4 English Before switching the vacuum on, make sure that the voltage of the handy vacuum cleaner (battery contact side). • WARNING : Do not use the vacuum cleaner on the rating plate at...
... picking up matches, live ashes or cigarette butts. Do not allow the vacuum cleaner to run unattended at the rear of your warranty. Do not allow the vacuum cleaner to be used by pulling the cord. 4 English Before switching the vacuum on, make sure that the voltage of the handy vacuum cleaner (battery contact side). • WARNING : Do not use the vacuum cleaner on the rating plate at...
User Manual
Page 8
... dust, water, etc. Do not leave the power cord lying on the power cord. --Otherwise, electric shock or fire may occur. • If there is damaged, have a Samsung authorized service center replace the power cord with a new power cord. --Otherwise, electric shock or fire may occur. • Do not pull the cord and do not come into contact with chop sticks, metal screw drivers, forks, knives, etc. --Otherwise, product...
... dust, water, etc. Do not leave the power cord lying on the power cord. --Otherwise, electric shock or fire may occur. • If there is damaged, have a Samsung authorized service center replace the power cord with a new power cord. --Otherwise, electric shock or fire may occur. • Do not pull the cord and do not come into contact with chop sticks, metal screw drivers, forks, knives, etc. --Otherwise, product...

User Manual
Page 11
... or spinning parts. --Be careful not to suction body parts into a brush of the wet brush while using it. --Otherwise, product damage or floor damage may occur. • When using the vacuum cleaner, be careful not to hurt yourself on water. • Do not use the vacuum cleaner to pick up spilled beverages or pet waste. • Do not use both hands. • Use both hands to clean the vacuum cleaner when in use. • Use the vacuum cleaner in dry...
... or spinning parts. --Be careful not to suction body parts into a brush of the wet brush while using it. --Otherwise, product damage or floor damage may occur. • When using the vacuum cleaner, be careful not to hurt yourself on water. • Do not use the vacuum cleaner to pick up spilled beverages or pet waste. • Do not use both hands. • Use both hands to clean the vacuum cleaner when in use. • Use the vacuum cleaner in dry...

User Manual
Page 12
Preparation Maintenance WARNING • Before removing foreign matter inside the vacuum, turn off the vacuum cleaner first. --If the vacuum is stored in the charging stand. --Personal injury, floor and product damage may occur. may occur. 12 English Dustbin, washable micro filter, ultra fine dust filter, metal mesh grille filter, dry cloth Dish washing detergent Lox, mold cleaner, etc. CAUTION • Do not push the vacuum cleaner while it...
Preparation Maintenance WARNING • Before removing foreign matter inside the vacuum, turn off the vacuum cleaner first. --If the vacuum is stored in the charging stand. --Personal injury, floor and product damage may occur. may occur. 12 English Dustbin, washable micro filter, ultra fine dust filter, metal mesh grille filter, dry cloth Dish washing detergent Lox, mold cleaner, etc. CAUTION • Do not push the vacuum cleaner while it...

User Manual
Page 15
... 18 19 INSTALLATION 01 Pipe (Adjustable) 02 Dustbin 03 Metal mesh grille filter 04 Washable micro filter 05 Ultra fine dust filter 06 Dustbin release button 07 Display 08 Power( ) button 09 Suction power control button 10 Handle 11 Battery level indicator 12 Battery release button 13 Pipe release button 14 Pipe length adjustment button 15 Brush release button 16 Vacuum charging part 17 Accessory holder 18 Additional battery charging slot 19 Power cord ❇❇Battery Spec VS20R90**** Series : Lithium...
... 18 19 INSTALLATION 01 Pipe (Adjustable) 02 Dustbin 03 Metal mesh grille filter 04 Washable micro filter 05 Ultra fine dust filter 06 Dustbin release button 07 Display 08 Power( ) button 09 Suction power control button 10 Handle 11 Battery level indicator 12 Battery release button 13 Pipe release button 14 Pipe length adjustment button 15 Brush release button 16 Vacuum charging part 17 Accessory holder 18 Additional battery charging slot 19 Power cord ❇❇Battery Spec VS20R90**** Series : Lithium...
User Manual
Page 16
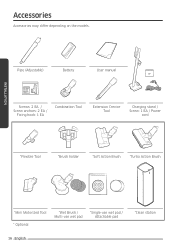
INSTALLATION Accessories Accessories may differ depending on the models. Pipe (Adjustable) Battery User manual Screws: 2 EA / Screw anchors: 2 EA / Fixing hook: 1 EA Combination Tool Extension Crevice Tool Charging stand / Screw: 1 EA / Power cord *Flexible Tool *Brush holder *Soft Action Brush *Turbo Action Brush *Mini Motorized Tool * Optional *Wet Brush / Multi-use wet pad *Single-use wet pad / Attachable pad 16 English *Clean station
INSTALLATION Accessories Accessories may differ depending on the models. Pipe (Adjustable) Battery User manual Screws: 2 EA / Screw anchors: 2 EA / Fixing hook: 1 EA Combination Tool Extension Crevice Tool Charging stand / Screw: 1 EA / Power cord *Flexible Tool *Brush holder *Soft Action Brush *Turbo Action Brush *Mini Motorized Tool * Optional *Wet Brush / Multi-use wet pad *Single-use wet pad / Attachable pad 16 English *Clean station

User Manual
Page 17
... the cord into one of the grooves on the bottom of the bottom support. 4 Plug in firmly so that the screw hole is aligned. 2 Insert the vacuum charging part at the top of the charging stand. Do not disassemble it after attaching it easier to the QR code for detailed information on the wall. -- Fixing by the hook 1 Using the fixing...
... the cord into one of the grooves on the bottom of the bottom support. 4 Plug in firmly so that the screw hole is aligned. 2 Insert the vacuum charging part at the top of the charging stand. Do not disassemble it after attaching it easier to the QR code for detailed information on the wall. -- Fixing by the hook 1 Using the fixing...
User Manual
Page 18
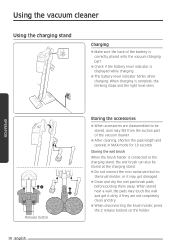
... 2 and get it dirty if they are disassembled to be stored at the charging stand. ❇❇Do not connect the mini motorized tool to the charging stand, the wet brush can also be stored, dust may get damaged. ❇❇Clean and dry the wet pad brush pads 1 before putting them away. OPERATION Using the vacuum cleaner Using the charging stand Charging ❇❇...
... 2 and get it dirty if they are disassembled to be stored at the charging stand. ❇❇Do not connect the mini motorized tool to the charging stand, the wet brush can also be stored, dust may get damaged. ❇❇Clean and dry the wet pad brush pads 1 before putting them away. OPERATION Using the vacuum cleaner Using the charging stand Charging ❇❇...
User Manual
Page 20
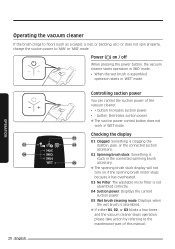
... manual. 20 English Operating the vacuum cleaner If the brush clings to floors (such as a carpet, a mat, or bedding, etc.) or does not spin properly, change the suction power to the maintenance part of the vacuum cleaner. • + button: Increases suction power. • - Power ( ) on if the spinning brush motor stops because it has overheated. 03 No Filter: The washable micro filter is not assembled correctly. 04 Suction power: Displays the current suction power. 05 Wet brush cleaning mode: Displays when the wet brush is assembled, operation starts in WET...
... manual. 20 English Operating the vacuum cleaner If the brush clings to floors (such as a carpet, a mat, or bedding, etc.) or does not spin properly, change the suction power to the maintenance part of the vacuum cleaner. • + button: Increases suction power. • - Power ( ) on if the spinning brush motor stops because it has overheated. 03 No Filter: The washable micro filter is not assembled correctly. 04 Suction power: Displays the current suction power. 05 Wet brush cleaning mode: Displays when the wet brush is assembled, operation starts in WET...
User Manual
Page 21
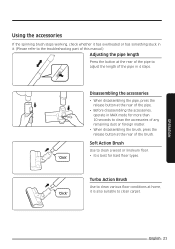
... Turbo Action Brush Use to clean various floor conditions at home, it . (Please refer to the troubleshooting part of this manual.) Adjusting the pipe length Press the button at the rear of the pipe to adjust the length of the brush. Soft Action Brush Use to clean a wood or linoleum floor. • It is also suitable to clean carpet. Using the accessories If the spinning brush stops working, check whether it has overheated...
... Turbo Action Brush Use to clean various floor conditions at home, it . (Please refer to the troubleshooting part of this manual.) Adjusting the pipe length Press the button at the rear of the pipe to adjust the length of the brush. Soft Action Brush Use to clean a wood or linoleum floor. • It is also suitable to clean carpet. Using the accessories If the spinning brush stops working, check whether it has overheated...
User Manual
Page 27
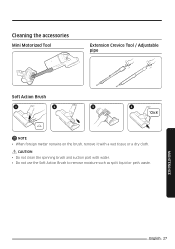
CAUTION • Do not clean the spinning brush and suction part with a wet tissue or a dry cloth. MAINTENANCE English 27 Cleaning the accessories Mini Motorized Tool Extension Crevice Tool / Adjustable pipe Soft Action Brush 1 2 3 4 'Click' NOTE • When foreign matter remains on the brush, remove it with water. • Do not use the Soft Action Brush to remove moisture such as spilt liquid or pet's waste.
CAUTION • Do not clean the spinning brush and suction part with a wet tissue or a dry cloth. MAINTENANCE English 27 Cleaning the accessories Mini Motorized Tool Extension Crevice Tool / Adjustable pipe Soft Action Brush 1 2 3 4 'Click' NOTE • When foreign matter remains on the brush, remove it with water. • Do not use the Soft Action Brush to remove moisture such as spilt liquid or pet's waste.
User Manual
Page 29
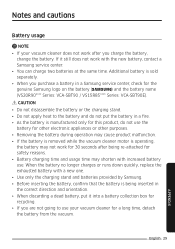
... appliances or other purposes. • Removing the battery during operation may cause product malfunction. • If the battery is removed while the vacuum cleaner motor is operating, the battery may shorten with the new battery, contact a Samsung service center. • You can charge two batteries at the same time. When the battery no longer charges or runs down quickly, replace the exhausted battery with a new one. • Use only the charging stand and...
... appliances or other purposes. • Removing the battery during operation may cause product malfunction. • If the battery is removed while the vacuum cleaner motor is operating, the battery may shorten with the new battery, contact a Samsung service center. • You can charge two batteries at the same time. When the battery no longer charges or runs down quickly, replace the exhausted battery with a new one. • Use only the charging stand and...

User Manual
Page 30
... vacuum, insert it off , remove the foreign matter, and then turn it until you do not create a short circuit across the plus (+) and minus (-) terminals. • Leaks from the battery. in the spinning brush, the brush may stop working to a sudden shock. • Do not disassemble the battery and make sure that the battery is caught in your skin, wash the affected area quickly with clean water...
... vacuum, insert it off , remove the foreign matter, and then turn it until you do not create a short circuit across the plus (+) and minus (-) terminals. • Leaks from the battery. in the spinning brush, the brush may stop working to a sudden shock. • Do not disassemble the battery and make sure that the battery is caught in your skin, wash the affected area quickly with clean water...

User Manual
Page 32
... using the vacuum cleaner, check the wheels of the brush. --If there is foreign matter on the wheel of the brush which cannot be removed easily, contact a Samsung service center. • If the inner part of the wet brush is clogged with water, dry in the shade. --When heat is applied, product malformation may cause parts of the vacuum cleaner with water. CAUTION • Storing the vacuum cleaner in the shade. • Do not clean...
... using the vacuum cleaner, check the wheels of the brush. --If there is foreign matter on the wheel of the brush which cannot be removed easily, contact a Samsung service center. • If the inner part of the wet brush is clogged with water, dry in the shade. --When heat is applied, product malformation may cause parts of the vacuum cleaner with water. CAUTION • Storing the vacuum cleaner in the shade. • Do not clean...
User Manual
Page 33
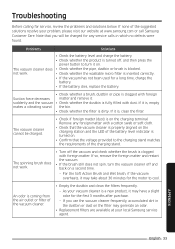
... the product is turned off, and then press the power button to turn the vacuum cleaner off the vacuum and check whether the brush is coming from the air outlet or filter of the battery level indicator is on . • Check whether the pipe, dustbin or brush is blocked. • Check whether the washable micro filter is inserted correctly. • If the vacuum has not been used for service, review the problems...
... the product is turned off, and then press the power button to turn the vacuum cleaner off the vacuum and check whether the brush is coming from the air outlet or filter of the battery level indicator is on . • Check whether the pipe, dustbin or brush is blocked. • Check whether the washable micro filter is inserted correctly. • If the vacuum has not been used for service, review the problems...

User Manual
Page 34
...; Some types of the brush. • After cleaning, operate the vacuum for 10 seconds or more on a normal floor for between floors, etc.) may cause static electricity. -- Vacuum cleaner stops operation during cleaning. • The vacuum cleaner's motor will shut off to suction up the small dust particles. Move the brush on the MAX setting to prevent overheating: -- When the vacuum operates with suction part or brush clogged. -- APPENDIX 34 English When the Extension Crevice Tool is finished...
...; Some types of the brush. • After cleaning, operate the vacuum for 10 seconds or more on a normal floor for between floors, etc.) may cause static electricity. -- Vacuum cleaner stops operation during cleaning. • The vacuum cleaner's motor will shut off to suction up the small dust particles. Move the brush on the MAX setting to prevent overheating: -- When the vacuum operates with suction part or brush clogged. -- APPENDIX 34 English When the Extension Crevice Tool is finished...
User Manual
Page 37
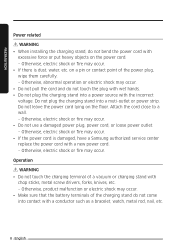
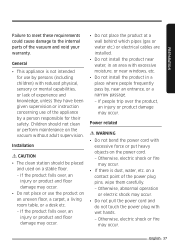
... or product damage may occur. on the power cord. --Otherwise, electric shock or fire may occur. • Do not place or use of the vacuum and void your warranty. English 37 Power related WARNING • Do not bend the power cord with excessive force or put heavy objects on a contact point of the power plug pins, wipe them carefully. --Otherwise, abnormal operation or electric...
... or product damage may occur. on the power cord. --Otherwise, electric shock or fire may occur. • Do not place or use of the vacuum and void your warranty. English 37 Power related WARNING • Do not bend the power cord with excessive force or put heavy objects on a contact point of the power plug pins, wipe them carefully. --Otherwise, abnormal operation or electric...
User Manual
Page 38
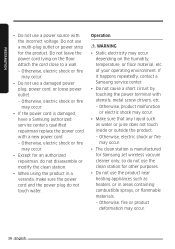
... the power cord is manufactured for Samsung Jet wireless vacuum cleaner only, so do not use the clean station for other purposes. • Do not use the product near heating appliances such as water or juice does not touch inside or outside the product. --Otherwise, electric shock or fire may occur. • The clean station is damaged, have a Samsung authorized service center's qualified repairman replace the power cord...
... the power cord is manufactured for Samsung Jet wireless vacuum cleaner only, so do not use the clean station for other purposes. • Do not use the product near heating appliances such as water or juice does not touch inside or outside the product. --Otherwise, electric shock or fire may occur. • The clean station is damaged, have a Samsung authorized service center's qualified repairman replace the power cord...

User Manual
Page 39
... a pet to the overheating prevention device of the motor. Maintenance WARNING • When cleaning the exterior of the clean station, do not touch the power outlet and open the window for the first 3 months after purchase. NOTE • When the dust bag of the clean station is used such as plastic breakage, deformation, discoloration, printing deterioration, etc. Do not spray water directly onto the product...
... a pet to the overheating prevention device of the motor. Maintenance WARNING • When cleaning the exterior of the clean station, do not touch the power outlet and open the window for the first 3 months after purchase. NOTE • When the dust bag of the clean station is used such as plastic breakage, deformation, discoloration, printing deterioration, etc. Do not spray water directly onto the product...

User Manual
Page 42
...replacing the dust bag, assemble the clean station in a diagonal direction and remove the dust bag. 6 1 2 Insert a new dust bag towards you. 2 Open the cover by pulling the [PULL] button. 4 PUSH PULL Press the 'PUSH' lever. 5 PUSH 1 PULL PUSH PULL 2 Pull the 'PULL' lever out in reverse order. NOTE • If the dust bag... not to blue. 42 English MAINTENANCE Maintaining the clean station Dust bag Time to replace a dust bag 1 2 PUSH PULL PULL button MAINTENANCE ❇❇When the status indicator turns 'red', you should replace the dust bag. 3 PUSH PULL PUSH 1 Grip...
...replacing the dust bag, assemble the clean station in a diagonal direction and remove the dust bag. 6 1 2 Insert a new dust bag towards you. 2 Open the cover by pulling the [PULL] button. 4 PUSH PULL Press the 'PUSH' lever. 5 PUSH 1 PULL PUSH PULL 2 Pull the 'PULL' lever out in reverse order. NOTE • If the dust bag... not to blue. 42 English MAINTENANCE Maintaining the clean station Dust bag Time to replace a dust bag 1 2 PUSH PULL PULL button MAINTENANCE ❇❇When the status indicator turns 'red', you should replace the dust bag. 3 PUSH PULL PUSH 1 Grip...


