
User Manual
Page 1
Washer User manual WA54M8750A*
Washer User manual WA54M8750A*
User Manual
Page 2
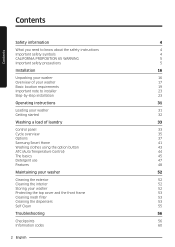
...note to installer 23 Step-by-step installation 23 Operating instructions 31 Loading your washer 31 Getting started 32 Washing a load of laundry 33 Control panel 33 Cycle overview 35 Options 37 Samsung Smart Home 41 Washing clothes using the option button 43 ATC (Auto Temperature... Control) 44 The basics 45 Detergent use 47 Features 48 Maintaining your washer 52 Cleaning the exterior 52 Cleaning the interior 52 ...
...note to installer 23 Step-by-step installation 23 Operating instructions 31 Loading your washer 31 Getting started 32 Washing a load of laundry 33 Control panel 33 Cycle overview 35 Options 37 Samsung Smart Home 41 Washing clothes using the option button 43 ATC (Auto Temperature... Control) 44 The basics 45 Detergent use 47 Features 48 Maintaining your washer 52 Cleaning the exterior 52 Cleaning the interior 52 ...
User Manual
Page 4
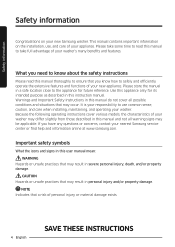
... user manual mean: WARNING Hazards or unsafe practices that may be applicable. Because the following operating instructions cover various models, the characteristics of your washer may result in this manual to use , and care of your appliance. NOTE Indicates that may differ slightly from those described in personal injury .../or property damage. Safety information Safety information Congratulations on the installation, use common sense, caution, and care when installing, maintaining, and operating your new Samsung washer. This manual contains important information on your...
... user manual mean: WARNING Hazards or unsafe practices that may be applicable. Because the following operating instructions cover various models, the characteristics of your washer may result in this manual to use , and care of your appliance. NOTE Indicates that may differ slightly from those described in personal injury .../or property damage. Safety information Safety information Congratulations on the installation, use common sense, caution, and care when installing, maintaining, and operating your new Samsung washer. This manual contains important information on your...

User Manual
Page 6
.... Use the socket for this time. In addition, do not smoke or use an extension cord. • Sharing a wall socket with other appliances, using a washer or combination washer-dryer, turn on a regular basis. • Unplug the power plug and clean it with a dry cloth. • Failing to do so may result in...
.... Use the socket for this time. In addition, do not smoke or use an extension cord. • Sharing a wall socket with other appliances, using a washer or combination washer-dryer, turn on a regular basis. • Unplug the power plug and clean it with a dry cloth. • Failing to do so may result in...
User Manual
Page 8
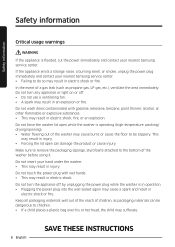
...explosion or fire. Do not turn any appliance or light on or off by unplugging the power plug while the washer is flooded, cut the power immediately and contact your nearest Samsung service center. Keep all packaging materials well out of the reach of a gas leak (such as packaging materials ...can damage the product or cause injury. In the event of children, as propane gas, LP gas, etc.), ventilate the area immediately. Do not force the washer lid open...
...explosion or fire. Do not turn any appliance or light on or off by unplugging the power plug while the washer is flooded, cut the power immediately and contact your nearest Samsung service center. Keep all packaging materials well out of the reach of a gas leak (such as packaging materials ...can damage the product or cause injury. In the event of children, as propane gas, LP gas, etc.), ventilate the area immediately. Do not force the washer lid open...

User Manual
Page 9
... waterproof fabrics, only use the WATERPROOF cycle. • Do not use other than the tub, unplug the power plug and contact your nearest Samsung service center. • Failing to closely follow these instructions may result in physical injury, property damage, and/or appliance damage. If the water...substance such as water enters the appliance in any fuse (such as detergent, dirt, food waste, etc., unplug the power plug and clean the washer using the washer. • If the clear portion is cracked or broken, it is contaminated by a strong impact. Take care when using a damp, soft...
... waterproof fabrics, only use the WATERPROOF cycle. • Do not use other than the tub, unplug the power plug and contact your nearest Samsung service center. • Failing to closely follow these instructions may result in physical injury, property damage, and/or appliance damage. If the water...substance such as water enters the appliance in any fuse (such as detergent, dirt, food waste, etc., unplug the power plug and clean the washer using the washer. • If the clear portion is cracked or broken, it is contaminated by a strong impact. Take care when using a damp, soft...

User Manual
Page 10
... hands. • This may result in water leakage. Since the water drained during an operation, check if there is a draining problem. • If the washer is used . • Ensure that the water supply hose connectors are loose, it is hot, do so may result in water leakage. Do not spray... to a malfunction. Open the faucet and check if the water supply hose connector is firmly tightened and that the faucet is turned off when the washer is no water leaking before using the product. • If the water supply hose connectors are properly tightened. • Failing to do not touch...
... hands. • This may result in water leakage. Since the water drained during an operation, check if there is a draining problem. • If the washer is used . • Ensure that the water supply hose connectors are loose, it is hot, do so may result in water leakage. Do not spray... to a malfunction. Open the faucet and check if the water supply hose connector is firmly tightened and that the faucet is turned off when the washer is no water leaking before using the product. • If the water supply hose connectors are properly tightened. • Failing to do not touch...
User Manual
Page 11
...metal brush. Never use hardened detergent. • If it accumulates inside the washer, it may cause problems with the washer. Do not use natural hand-washing soap in the washer. • If it hardens and accumulates inside the washer, it may result in water leakage. Do not leave metal objects (safety ... discoloration, rust, or bad odors. Do not place any non-laundry objects, such as your hand into the washer. • This can cause abnormal vibrations that can damage the washer, and, in the case of the tub, apply a neutral cleansing agent to the surface and use dry cleaning...
...metal brush. Never use hardened detergent. • If it accumulates inside the washer, it may cause problems with the washer. Do not use natural hand-washing soap in the washer. • If it hardens and accumulates inside the washer, it may result in water leakage. Do not leave metal objects (safety ... discoloration, rust, or bad odors. Do not place any non-laundry objects, such as your hand into the washer. • This can cause abnormal vibrations that can damage the washer, and, in the case of the tub, apply a neutral cleansing agent to the surface and use dry cleaning...
User Manual
Page 12
... shock, or fire. Safety information Safety information Do not wash throw rugs or doormats in error such as no draining. It may result in the washer. • If you wash throw rugs or doormats, the sand will accumulate inside the...
... shock, or fire. Safety information Safety information Do not wash throw rugs or doormats in error such as no draining. It may result in the washer. • If you wash throw rugs or doormats, the sand will accumulate inside the...

User Manual
Page 16
...items shown below. Make sure you do not tip the washer over on its front side. Service personnel - WARNING Packing...Follow these instructions carefully to ensure proper installation of the washer and to children; Never lay your washer and inspect it down on its side carefully. Do.... CAUTION When unpacking the washer, a 2 person collaboration is energized: Control board, heat sink, motor, inlet valve, heater and pump. If your washer was damaged during servicing. ...you have all of the washer and lay it for shipping damage. the carton base, protect the side of the...
...items shown below. Make sure you do not tip the washer over on its front side. Service personnel - WARNING Packing...Follow these instructions carefully to ensure proper installation of the washer and to children; Never lay your washer and inspect it down on its side carefully. Do.... CAUTION When unpacking the washer, a 2 person collaboration is energized: Control board, heat sink, motor, inlet valve, heater and pump. If your washer was damaged during servicing. ...you have all of the washer and lay it for shipping damage. the carton base, protect the side of the...

User Manual
Page 17
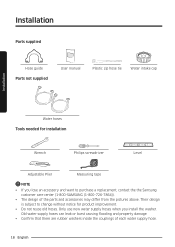
If you have a problem with the washer or the parts, contact the Samsung customer care center or your washer Make sure all the parts are included in sink 07 Leveling feet 10 Control panel 02 Hose guide 05 Water Jet 08 Water hose (Cold) 11 Detergent drawer 03 Lid 06 Tub 09 Water hose (Hot) 12 Power cord English 17 Installation Overview of your retailer. 01 02 03 04 05 08 09 10 06 MAX MAX 11 12 07 01 Drain hose 04 Built-in the product package.
If you have a problem with the washer or the parts, contact the Samsung customer care center or your washer Make sure all the parts are included in sink 07 Leveling feet 10 Control panel 02 Hose guide 05 Water Jet 08 Water hose (Cold) 11 Detergent drawer 03 Lid 06 Tub 09 Water hose (Hot) 12 Power cord English 17 Installation Overview of your retailer. 01 02 03 04 05 08 09 10 06 MAX MAX 11 12 07 01 Drain hose 04 Built-in the product package.
User Manual
Page 18
... design is subject to change without notice for installation Wrench Philips screwdriver Level Adjustable Plier Measuring tape NOTE • If you install the washer. Installation Parts supplied Hose guide Parts not supplied User manual Plastic zip hose tie Water intake cap Installation Water hoses Tools needed for product... not reuse old hoses. Only use new water supply hoses when you lose an accessory and want to purchase a replacement, contact the the Samsung customer care center (1-800-SAMSUNG (1-800-726-7864)). • The design of each water supply hose. 18 English
... design is subject to change without notice for installation Wrench Philips screwdriver Level Adjustable Plier Measuring tape NOTE • If you install the washer. Installation Parts supplied Hose guide Parts not supplied User manual Plastic zip hose tie Water intake cap Installation Water hoses Tools needed for product... not reuse old hoses. Only use new water supply hoses when you lose an accessory and want to purchase a replacement, contact the the Samsung customer care center (1-800-SAMSUNG (1-800-726-7864)). • The design of each water supply hose. 18 English
User Manual
Page 19
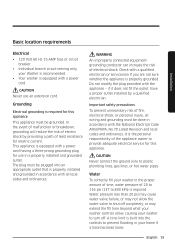
... with the National Electrical Code ANSI/FNPA, No.70 Latest Revision and local codes and ordinances. Water To correctly fill your Washer is recommended. • Your washer is equipped with all wiring and grounding must be done in accordance with a qualified electrician or serviceman if you are not ...Basic location requirements Installation Electrical • 120 Volt 60 Hz 15 AMP fuse or circuit breaker. • Individual branch circuit serving only your washer in the proper amount of time, water pressure of 20 to 116 psi (137 to 800 kPa) is required. This appliance must be grounded...
... with the National Electrical Code ANSI/FNPA, No.70 Latest Revision and local codes and ordinances. Water To correctly fill your Washer is recommended. • Your washer is equipped with all wiring and grounding must be done in accordance with a qualified electrician or serviceman if you are not ...Basic location requirements Installation Electrical • 120 Volt 60 Hz 15 AMP fuse or circuit breaker. • Individual branch circuit serving only your washer in the proper amount of time, water pressure of 20 to 116 psi (137 to 800 kPa) is required. This appliance must be grounded...
User Manual
Page 20
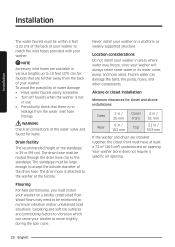
...facility The recommended height of water damage: • Have water faucets easily accessible. • Turn off faucets when the washer is no leakage from the back of your washer. Carpeting and soft tile surfaces are contributing factors to vibration which can damage the belts, the pump, hoses, and ... a platform or weakly supported structure. Flooring For best performance, you must have at the factory. Location considerations Do not install your washer in areas where water may need to be reinforced to 10 feet (275 cm) for closet and alcove installations: Sides Rear 1 in / 25 ...
...facility The recommended height of water damage: • Have water faucets easily accessible. • Turn off faucets when the washer is no leakage from the back of your washer. Carpeting and soft tile surfaces are contributing factors to vibration which can damage the belts, the pump, hoses, and ... a platform or weakly supported structure. Flooring For best performance, you must have at the factory. Location considerations Do not install your washer in areas where water may need to be reinforced to 10 feet (275 cm) for closet and alcove installations: Sides Rear 1 in / 25 ...
User Manual
Page 23
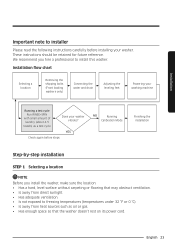
... of laundry (about 4-5 towels) as oil or gas. • Has enough space so that the washer doesn't rest on its power cord. We recommend you install the washer, make sure the location: • Has a hard, level surface without carpeting or flooring that may obstruct...temperatures (temperatures under 32 °F or 0 °C). • Is away from heat sources such as a test cycle Does your washer. Installation Important note to installer Please read the following instructions carefully before steps. NO Running Calibration Mode Finishing the installation Step-by-step installation...
... of laundry (about 4-5 towels) as oil or gas. • Has enough space so that the washer doesn't rest on its power cord. We recommend you install the washer, make sure the location: • Has a hard, level surface without carpeting or flooring that may obstruct...temperatures (temperatures under 32 °F or 0 °C). • Is away from heat sources such as a test cycle Does your washer. Installation Important note to installer Please read the following instructions carefully before steps. NO Running Calibration Mode Finishing the installation Step-by-step installation...
User Manual
Page 24
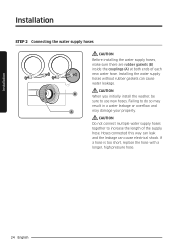
... both ends of the supply hose. Hoses connected this way can leak and the leakage can cause water leakage. CAUTION B When you initially install the washer, be sure to do so may result in a water leakage or overflow and A may damage your property.
... both ends of the supply hose. Hoses connected this way can leak and the leakage can cause water leakage. CAUTION B When you initially install the washer, be sure to do so may result in a water leakage or overflow and A may damage your property.
User Manual
Page 26
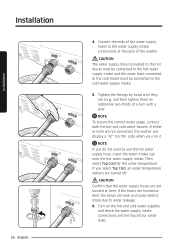
NOTE To ensure the correct water usage, connect both are not connected, the washer will display a "4C" (no fill) code when you run it. Then, select Tap Cold for water leaks. If either or both the hot and cold ... onto the hot water supply intake. CAUTION Confirm that the water supply hoses are snug, and then tighten them an additional two-thirds of the washer. Turn on the hot and cold water supplies and check the water supply intake connections and the faucets for the water temperature. Tighten the fittings...
NOTE To ensure the correct water usage, connect both are not connected, the washer will display a "4C" (no fill) code when you run it. Then, select Tap Cold for water leaks. If either or both the hot and cold ... onto the hot water supply intake. CAUTION Confirm that the water supply hoses are snug, and then tighten them an additional two-thirds of the washer. Turn on the hot and cold water supplies and check the water supply intake connections and the faucets for the water temperature. Tighten the fittings...
User Manual
Page 28
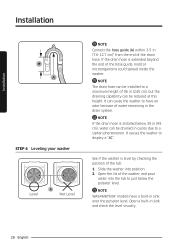
... cm), water can be drained in (245 cm), but the draining capability can be installed to a siphon phenomenon. Installation Installation * A STEP 4 Leveling your washer Level A Not Level NOTE Connect the hose guide (A) within 3-5 in sink over the pulsator level. NOTE If the drain hose is level by checking the... position of the hose guide, mold or microorganisms could spread inside the washer. It can be reduced at this height. Open a built-in the drain system. Open the lid of the drain hose. NOTE The ...
... cm), water can be drained in (245 cm), but the draining capability can be installed to a siphon phenomenon. Installation Installation * A STEP 4 Leveling your washer Level A Not Level NOTE Connect the hose guide (A) within 3-5 in sink over the pulsator level. NOTE If the drain hose is level by checking the... position of the hose guide, mold or microorganisms could spread inside the washer. It can be reduced at this height. Open a built-in the drain system. Open the lid of the drain hose. NOTE The ...
User Manual
Page 29
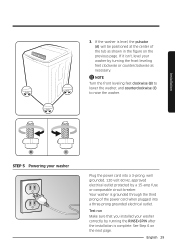
... turning the front leveling feet clockwise or counterclockwise as shown in the figure on the next page. If the washer is complete. If it isn't, level your washer correctly by a 15-amp fuse or comparable circuit breaker. See Step 6 on the previous page. 3. NOTE Turn the ...front leveling feet clockwise (B) to lower the washer, and counterclockwise (C) to raise the washer. Your washer is grounded through the third prong of the power cord when plugged into a 3-prong, well grounded, 120 volt 60 Hz...
... turning the front leveling feet clockwise or counterclockwise as shown in the figure on the next page. If the washer is complete. If it isn't, level your washer correctly by a 15-amp fuse or comparable circuit breaker. See Step 6 on the previous page. 3. NOTE Turn the ...front leveling feet clockwise (B) to lower the washer, and counterclockwise (C) to raise the washer. Your washer is grounded through the third prong of the power cord when plugged into a 3-prong, well grounded, 120 volt 60 Hz...

User Manual
Page 30
... turn it on. 2. Press POWER to activate Calibration Mode. 4. Select RINSE+SPIN by pressing the Cycle Selector. 4. The washer should not rock or vibrate excessively when water is being supplied or drained, check the water connections. NOTE If water leaks while.... Press and hold Temp. and Delay End simultaneously for approximately 1 minute. 5. When Calibration Mode is complete. STEP 7 Calibration Mode Your Samsung washer detects laundry weight automatically. Load about 6 pounds of laundry into the tub. 2. The pulsator rotates clockwise and counterclockwise for at least 3 ...
... turn it on. 2. Press POWER to activate Calibration Mode. 4. Select RINSE+SPIN by pressing the Cycle Selector. 4. The washer should not rock or vibrate excessively when water is being supplied or drained, check the water connections. NOTE If water leaks while.... Press and hold Temp. and Delay End simultaneously for approximately 1 minute. 5. When Calibration Mode is complete. STEP 7 Calibration Mode Your Samsung washer detects laundry weight automatically. Load about 6 pounds of laundry into the tub. 2. The pulsator rotates clockwise and counterclockwise for at least 3 ...


