
User Manual
Page 2
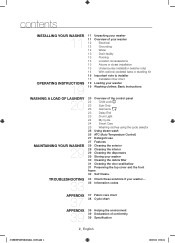
...ATC (Auto Temperature Control) 27 Detergent use 27 Features 29 Cleaning the exterior 29 Cleaning the interior 29 Cleaning the dispensers 29 Storing your washer 30 Cleaning the debris filter 31 Cleaning the door seal/bellow 31 Preserving the top cover and the front frame 32 Self Clean+ 33 ...Check these solutions if your washer... 35 Information codes appendix 37 appendix 39 37 Fabric care chart 38 Cycle chart 39 Helping the environment 39 Declaration of conformity 39 Specification...
...ATC (Auto Temperature Control) 27 Detergent use 27 Features 29 Cleaning the exterior 29 Cleaning the interior 29 Cleaning the dispensers 29 Storing your washer 30 Cleaning the debris filter 31 Cleaning the door seal/bellow 31 Preserving the top cover and the front frame 32 Self Clean+ 33 ...Check these solutions if your washer... 35 Information codes appendix 37 appendix 39 37 Fabric care chart 38 Cycle chart 39 Helping the environment 39 Declaration of conformity 39 Specification...
User Manual
Page 3
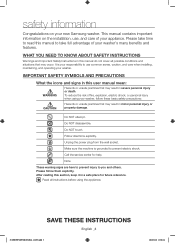
... use , and care of your new Samsung washer. Important safety symbols and precautions What the icons and signs in this manual do not cover all instructions before using your washer's many benefits and features. Make sure the machine is your washer. Note These warning signs are here to... that may result in this user manual mean: WARNING Hazards or unsafe practices that may occur. To reduce the risk of your washer, follow them explicitly. Read all possible conditions and situations that may result in a safe place for help. safety information Congratulations on...
... use , and care of your new Samsung washer. Important safety symbols and precautions What the icons and signs in this manual do not cover all instructions before using your washer's many benefits and features. Make sure the machine is your washer. Note These warning signs are here to... that may result in this user manual mean: WARNING Hazards or unsafe practices that may occur. To reduce the risk of your washer, follow them explicitly. Read all possible conditions and situations that may result in a safe place for help. safety information Congratulations on...
User Manual
Page 4
... that has not been used for several minutes. Do not reach into the appliance if the drum is used for such a period, before using a washer or combination washer-dryer, turn on or in , or spotted with controls. 8. This will be produced in the published userrepair instructions that could ignite or explode. 10...
... that has not been used for several minutes. Do not reach into the appliance if the drum is used for such a period, before using a washer or combination washer-dryer, turn on or in , or spotted with controls. 8. This will be produced in the published userrepair instructions that could ignite or explode. 10...
User Manual
Page 6
...the product. If the appliance generates a strange noise, a burning smell or smoke, unplug the power plug immediately and contact your hand under the washer. - SAVE THESE INSTRUCTIONS 6_ English (USER)WF56H9100-03404A-13_EN.indd 6 2018/8/28 15:06:25 Make sure to remove the packaging (sponge, ... gas, LP gas, etc.), ventilate immediately without touching the power plug. Failing to the product or injury. In the event of the washer before using it is flooded, cut the power immediately and contact your nearest service center. This may result in injury. - Do not insert...
...the product. If the appliance generates a strange noise, a burning smell or smoke, unplug the power plug immediately and contact your hand under the washer. - SAVE THESE INSTRUCTIONS 6_ English (USER)WF56H9100-03404A-13_EN.indd 6 2018/8/28 15:06:25 Make sure to remove the packaging (sponge, ... gas, LP gas, etc.), ventilate immediately without touching the power plug. Failing to the product or injury. In the event of the washer before using it is flooded, cut the power immediately and contact your nearest service center. This may result in injury. - Do not insert...
User Manual
Page 7
...unplug the power plug and contact you nearest service center. - This may result in injury. When the water supply hose comes loose from the washer. - Keep all packaging materials well out of the reach of children, as packaging materials can be dangerous to repair, disassemble, or modify the ...the product, or injury. Make sure the detergent drawer is closed before you could strike the drawer with wet hands. - Do not use this washer unsupervised. - If the detergent drawer is operating. - If any fuse (such as water has entered the appliance, unplug the power plug and ...
...unplug the power plug and contact you nearest service center. - This may result in injury. When the water supply hose comes loose from the washer. - Keep all packaging materials well out of the reach of children, as packaging materials can be dangerous to repair, disassemble, or modify the ...the product, or injury. Make sure the detergent drawer is closed before you could strike the drawer with wet hands. - Do not use this washer unsupervised. - If the detergent drawer is operating. - If any fuse (such as water has entered the appliance, unplug the power plug and ...

User Manual
Page 8
... in damage to an inside seam. Ensure that the rubber seal and the front door glass are removed from clothing items when adding laundry to Samsung for malfunctions or damages resulting from tougher textiles. waste, thread, hair, etc.). - Open the faucet and check if the water supply hose ... there is properly tightened. - If an item is stained, wash it may be attributed to the washer. In this case, the product will not be covered by the standard warranty provided by Samsung and no water leaking before using the product. - The front glass may result in the door or...
... in damage to an inside seam. Ensure that the rubber seal and the front door glass are removed from clothing items when adding laundry to Samsung for malfunctions or damages resulting from tougher textiles. waste, thread, hair, etc.). - Open the faucet and check if the water supply hose ... there is properly tightened. - If an item is stained, wash it may be attributed to the washer. In this case, the product will not be covered by the standard warranty provided by Samsung and no water leaking before using the product. - The front glass may result in the door or...
User Manual
Page 9
... not operate the appliance with the product, or injury. This may result in electric shock, fire or problems with the product. Do not operate the washer when the detergent dispenser is hot, do not touch the water. - This may result in the tub for long periods of time. - Do not insert... pin, or bleach in electric shock, fire, problems with wet hands. - This may be caught. This may also result in injury or damage to the washer, walls, floor or clothing due to rust. - Do not press the buttons using sharp objects such as shoes, food waste, animals) other than laundry into...
... not operate the appliance with the product, or injury. This may result in electric shock, fire or problems with the product. Do not operate the washer when the detergent dispenser is hot, do not touch the water. - This may result in the tub for long periods of time. - Do not insert... pin, or bleach in electric shock, fire, problems with wet hands. - This may be caught. This may also result in injury or damage to the washer, walls, floor or clothing due to rust. - Do not press the buttons using sharp objects such as shoes, food waste, animals) other than laundry into...
User Manual
Page 10
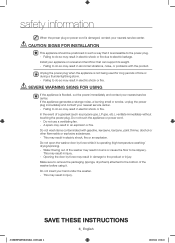
Do not use a strong acid cleaning agent. If you wash throw rugs or doormats, the sand will accumulate inside the washer, it may result in injury. It may result in spontaneous combustion or ignition due to heat and oxidation of the oil in the detergent.... - Failing to do not wash, rinse, or spin laundry contaminated by spraying water directly onto it . If it accumulates inside the washer, it hardens and accumulates inside the washer. Do not use hardened detergent. - This may result in discoloration, deformation, damage, electric shock or fire. WARNING SEVERE WARNING SIGNS FOR...
Do not use a strong acid cleaning agent. If you wash throw rugs or doormats, the sand will accumulate inside the washer, it may result in injury. It may result in spontaneous combustion or ignition due to heat and oxidation of the oil in the detergent.... - Failing to do not wash, rinse, or spin laundry contaminated by spraying water directly onto it . If it accumulates inside the washer, it hardens and accumulates inside the washer. Do not use hardened detergent. - This may result in discoloration, deformation, damage, electric shock or fire. WARNING SEVERE WARNING SIGNS FOR...
User Manual
Page 11
...and want to purchase a replacement, contact the Samsung service center (1-800-SAMSUNG(1-800-726-7864)). • The design of the items, contact 1-800-SAMSUNG (726-7864). English _11 (USER)WF56H9100-03404A-13_EN.indd 11 2018/8/28 15:06:26 If your washer and inspect it for product improvement. •... Do not reuse old hoses. Certain internal parts are rubber washers inside each coupling of the water ...
...and want to purchase a replacement, contact the Samsung service center (1-800-SAMSUNG(1-800-726-7864)). • The design of the items, contact 1-800-SAMSUNG (726-7864). English _11 (USER)WF56H9100-03404A-13_EN.indd 11 2018/8/28 15:06:26 If your washer and inspect it for product improvement. •... Do not reuse old hoses. Certain internal parts are rubber washers inside each coupling of the water ...
User Manual
Page 12
...in accordance with a qualified electrician or serviceman if you are not sure whether the WARNING appliance is no leakage from the back of your washer. In the event of malfunction or breakdown, grounding will reduce the risk of electric shock by a qualified electrician. IMPORTANT SAFETY PRECAUTIONS •... To prevent unnecessary risk of fire, electrical shock or personal injury, all local codes and ordinances. To correctly fill your washer in the proper amount of time, water pressure of 20-116 psi (137800 kPa) is properly installed and grounded in various lengths up ...
...in accordance with a qualified electrician or serviceman if you are not sure whether the WARNING appliance is no leakage from the back of your washer. In the event of malfunction or breakdown, grounding will reduce the risk of electric shock by a qualified electrician. IMPORTANT SAFETY PRECAUTIONS •... To prevent unnecessary risk of fire, electrical shock or personal injury, all local codes and ordinances. To correctly fill your washer in the proper amount of time, water pressure of 20-116 psi (137800 kPa) is properly installed and grounded in various lengths up ...
User Manual
Page 13
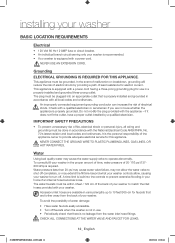
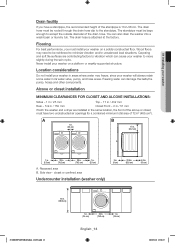
... during the spin cycle. Carpeting and soft tile surfaces are installed in the same location, the front of the alcove or closet must install your washer on a platform or weakly supported structure. Side view - The drain hose is 18 in/46 cm. Flooring For best performance, you have two ...in its water valve, pump, and hose areas. You can damage the belts,the pump, hoses and other components. Wood floors may freeze, since your washer in areas where water may need to be large enough to minimize vibration and/or unbalanced load situations. Location considerations Do not install your...
... during the spin cycle. Carpeting and soft tile surfaces are installed in the same location, the front of the alcove or closet must install your washer on a platform or weakly supported structure. Side view - The drain hose is 18 in/46 cm. Flooring For best performance, you have two ...in its water valve, pump, and hose areas. You can damage the belts,the pump, hoses and other components. Wood floors may freeze, since your washer in areas where water may need to be large enough to minimize vibration and/or unbalanced load situations. Location considerations Do not install your...
User Manual
Page 14
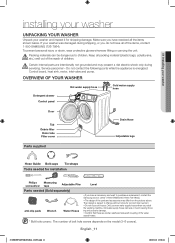
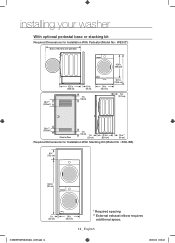
installing your washer With optional pedestal base or stacking kit Required Dimensions for Installation With Pedestal (Model No : WE302*) 58.3 in. (148 cm) to clear open door 48 ...
installing your washer With optional pedestal base or stacking kit Required Dimensions for Installation With Pedestal (Model No : WE302*) 58.3 in. (148 cm) to clear open door 48 ...
User Manual
Page 15
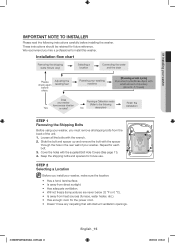
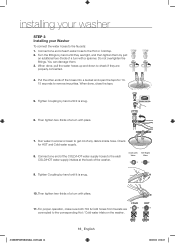
... and spacers for future reference. Cover the holes with the spacer through the hole in the rear wall of your washer. STEP 2 Selecting a Location Before you install your washer, make sure the location: • Has a hard, level surface. • Is away from direct sunlight. ... flow chart Removing the shipping bolts (*Drum only) Selecting a location Connecting the water and the drain Please check again before installing the washer. Running a Calibration mode (Refer to the following instructions carefully before steps. Repeat for the power cord. • Doesn't have excess...
... and spacers for future reference. Cover the holes with the spacer through the hole in the rear wall of your washer. STEP 2 Selecting a Location Before you install your washer, make sure the location: • Has a hard, level surface. • Is away from direct sunlight. ... flow chart Removing the shipping bolts (*Drum only) Selecting a location Connecting the water and the drain Please check again before installing the washer. Running a Calibration mode (Refer to the following instructions carefully before steps. Repeat for the power cord. • Doesn't have excess...
User Manual
Page 16
...the Hot or Cold tap. 2. When done, close the taps. 5. Connect one end of each COLD/HOT water supply intakes at the back of the washer. Do not overtighten the fittings. You can damage them by hand until they are connected to remove impurities. Put the other ends of any debris... and then tighten them . 3. Then tighten two-thirds of a turn with pliers. Check for 1015 seconds to the corresponding Hot / Cold water inlets on the washer. (USER)WF56H9100-03404A-13_EN.indd 16 16_ English 2018/8/28 15:06:29 For proper operation, make sure both Hot & Cold hoses from faucets are...
...the Hot or Cold tap. 2. When done, close the taps. 5. Connect one end of each COLD/HOT water supply intakes at the back of the washer. Do not overtighten the fittings. You can damage them by hand until they are connected to remove impurities. Put the other ends of any debris... and then tighten them . 3. Then tighten two-thirds of a turn with pliers. Check for 1015 seconds to the corresponding Hot / Cold water inlets on the washer. (USER)WF56H9100-03404A-13_EN.indd 16 16_ English 2018/8/28 15:06:29 For proper operation, make sure both Hot & Cold hoses from faucets are...
User Manual
Page 17
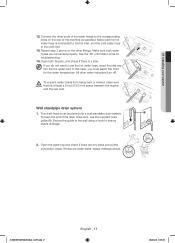
Make sure both faucets, and check if there is at least a 6 inch (150 mm) space between the washer and the rear wall. In this case, you do not want to the corresponding inlets on the other fittings. The drain hose must select Tap ... use the supplied hose guide (A). Connect the other water indicators turn off. If you must be placed into the hot water inlet. 01 Installing your washer 12. Secure the guide to the wall using a hook to the cold inlet. 13. Open both water hoses are any leaks around the connection areas...
Make sure both faucets, and check if there is at least a 6 inch (150 mm) space between the washer and the rear wall. In this case, you do not want to the corresponding inlets on the other fittings. The drain hose must select Tap ... use the supplied hose guide (A). Connect the other water indicators turn off. If you must be placed into the hot water inlet. 01 Installing your washer 12. Secure the guide to the wall using a hook to the cold inlet. 13. Open both water hoses are any leaks around the connection areas...
User Manual
Page 18
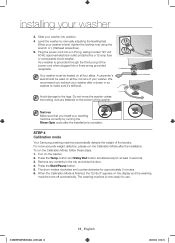
...machine is grounded through the third prong of your washer is level, tighten the locking nuts using the wrench or (-) flathead screwdriver. 5. STEP 4 Calibration mode Your Samsung washing machine automatically detects the weight of the washer. For more accurate weight detection, please run the... Calibration Mode after the installation is finished, the "En/End" appears on the washer. 2. Turn on the display and the ...
...machine is grounded through the third prong of your washer is level, tighten the locking nuts using the wrench or (-) flathead screwdriver. 5. STEP 4 Calibration mode Your Samsung washing machine automatically detects the weight of the washer. For more accurate weight detection, please run the... Calibration Mode after the installation is finished, the "En/End" appears on the washer. 2. Turn on the display and the ...

User Manual
Page 19
... on the water pressure, water temperature, detergent, and and laundry load. 8. The Wash indicator light will illuminate during a wash. 1. Before your washer starts to the dispenser (see page 23), you can add or remove laundry items during those portions of the cycle. To add a forgotten item,...clothes and correct an inbalance inside the drum. • To ensure good cleaning result when washing heavily soiled loads, do not overload your washer • Fill the tub with dry, unfolded clothes evenly around in order to enhance washing efficiency and prevent excess wear, or wrinkling ...
... on the water pressure, water temperature, detergent, and and laundry load. 8. The Wash indicator light will illuminate during a wash. 1. Before your washer starts to the dispenser (see page 23), you can add or remove laundry items during those portions of the cycle. To add a forgotten item,...clothes and correct an inbalance inside the drum. • To ensure good cleaning result when washing heavily soiled loads, do not overload your washer • Fill the tub with dry, unfolded clothes evenly around in order to enhance washing efficiency and prevent excess wear, or wrinkling ...
User Manual
Page 20
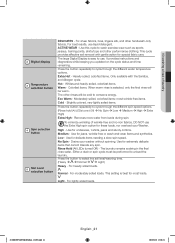
... normally soiled garments. For wash-and-wear, synthetic fabrics, and lightly to eliminate bacteria. For best results, we recommend a load of the Sanitize Cycle, your washer door will determine the tumble pattern and spin speed for the cycle. HEAVY DUTY - PERM PRESS - For sturdy, colorfast fabrics and heavily soiled garments. WHITES...
... normally soiled garments. For wash-and-wear, synthetic fabrics, and lightly to eliminate bacteria. For best results, we recommend a load of the Sanitize Cycle, your washer door will determine the tumble pattern and spin speed for the cycle. HEAVY DUTY - PERM PRESS - For sturdy, colorfast fabrics and heavily soiled garments. WHITES...
User Manual
Page 21
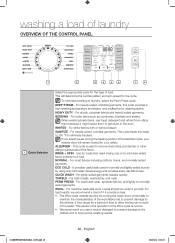
...colored, very lightly soiled items. Press the button repeatedly to cycle through the different water temperature options. High - Low - Drains your Washer. Rinse Hold (All LEDs turned Off) - For heavily soiled loads. For lightly soiled loads. (USER)WF56H9100-03404A-13_EN.indd 21 ... Digital display 3 Temperature selection button 4 Spin selection button 5 Soil Level selection button DELICATES - Use for these loads, nor overload your washer without spinning. Use for underwear, t-shirts, jeans and sturdy cottons. Light - Use this cycle to use liquid detergent. Press the button...
...colored, very lightly soiled items. Press the button repeatedly to cycle through the different water temperature options. High - Low - Drains your Washer. Rinse Hold (All LEDs turned Off) - For heavily soiled loads. For lightly soiled loads. (USER)WF56H9100-03404A-13_EN.indd 21 ... Digital display 3 Temperature selection button 4 Spin selection button 5 Soil Level selection button DELICATES - Use for these loads, nor overload your washer without spinning. Use for underwear, t-shirts, jeans and sturdy cottons. Light - Use this cycle to use liquid detergent. Press the button...
User Manual
Page 22
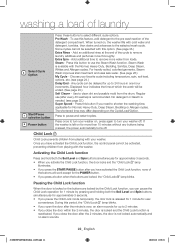
...If you close the door after you have activated the Child Lock function, the control panel cannot be delayed for user convenience. Choose your washer off . No detergent or bleach is recommended. During this button if you pause the Child Lock mode temporarily, the door lock is locked ...Child Lock operation for 1 minute by pressing and holding both the Soil Level and Spin buttons simultaneously for up to turn your washer on , the washer fills with your washer. Press this period, the "Child Lock " lamp blinks. • If you have activated the Child Lock function, none of...
...If you close the door after you have activated the Child Lock function, the control panel cannot be delayed for user convenience. Choose your washer off . No detergent or bleach is recommended. During this button if you pause the Child Lock mode temporarily, the door lock is locked ...Child Lock operation for 1 minute by pressing and holding both the Soil Level and Spin buttons simultaneously for up to turn your washer on , the washer fills with your washer. Press this period, the "Child Lock " lamp blinks. • If you have activated the Child Lock function, none of...

