
Quick Guide (KOREAN)
Page 2
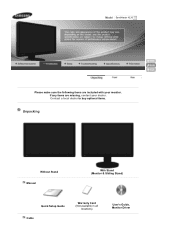
If any items are included with your dealer. Model SyncMaster XL30 Please make sure the following items are missing, contact your monitor. Contact a local dealer to buy optional items. Unpacking Without Stand Manual With Stand (Monitor & Sliding Stand) Quick Setup Guide Cable Warranty Card (Not available in all locations) User's Guide, Monitor Driver
If any items are included with your dealer. Model SyncMaster XL30 Please make sure the following items are missing, contact your monitor. Contact a local dealer to buy optional items. Unpacking Without Stand Manual With Stand (Monitor & Sliding Stand) Quick Setup Guide Cable Warranty Card (Not available in all locations) User's Guide, Monitor Driver
Quick Guide (KOREAN)
Page 5
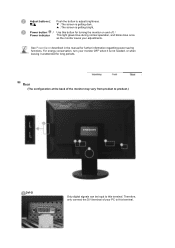
.... Power button [ ] / Use this terminal. Therefore, only connect the DVI terminal of the monitor may vary from product to product.) DVI-D Only digital signals can be input to this button for turning the monitor on and off. / Power indicator This light glows blue during normal operation, and blinks blue once as the monitor saves your monitor OFF when it unattended for further information regarding power saving functions. Adjust buttons [ ] Push the button to adjust brightness. ▼ : The screen is...
.... Power button [ ] / Use this terminal. Therefore, only connect the DVI terminal of the monitor may vary from product to product.) DVI-D Only digital signals can be input to this button for turning the monitor on and off. / Power indicator This light glows blue during normal operation, and blinks blue once as the monitor saves your monitor OFF when it unattended for further information regarding power saving functions. Adjust buttons [ ] Push the button to adjust brightness. ▼ : The screen is...
Quick Guide (KOREAN)
Page 6
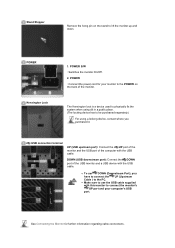
... power cord for further information regarding cable connections. USB connection terminal UP (USB upstream port): Connect the UP port of the monitor and the USB port of the USB monitor and a USB device with the USB cable. DOWN (USB downstream port): Connect the DOWN port of the computer with this monitor to connect the monitor's UP port and your monitor to the POWER on the stand to the PC. Stand Stopper Remove the fixing pin on the back of the monitor. z Make sure to use...
... power cord for further information regarding cable connections. USB connection terminal UP (USB upstream port): Connect the UP port of the monitor and the USB port of the USB monitor and a USB device with the USB cable. DOWN (USB downstream port): Connect the DOWN port of the computer with this monitor to connect the monitor's UP port and your monitor to the POWER on the stand to the PC. Stand Stopper Remove the fixing pin on the back of the monitor. z Make sure to use...
Quick Guide (KOREAN)
Page 7
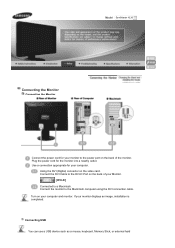
Plug the power cord for your computer. Using the DVI (Digital) connector on your computer and monitor. Connecting USB You can use a USB device such as a mouse, keyboard, Memory Stick, or external hard If your monitor displays an image, installation is completed. Turn on the video card. Connect the monitor to a Macintosh. Use a connection appropriate for the monitor into a nearby outlet. Connect the DVI Cable to the DVI-D Port on the back of your Monitor. [ DVI-D ] Connected to the Macintosh computer using the DVI connection cable. Model SyncMaster XL30 Connecting the...
Plug the power cord for your computer. Using the DVI (Digital) connector on your computer and monitor. Connecting USB You can use a USB device such as a mouse, keyboard, Memory Stick, or external hard If your monitor displays an image, installation is completed. Turn on the video card. Connect the monitor to a Macintosh. Use a connection appropriate for the monitor into a nearby outlet. Connect the DVI Cable to the DVI-D Port on the back of your Monitor. [ DVI-D ] Connected to the Macintosh computer using the DVI connection cable. Model SyncMaster XL30 Connecting the...

Quick Guide (KOREAN)
Page 11
... installation instructions. Turn off your monitor and unplug its power cord. 2. Attaching a Base This monitor accepts a 200 mm x 100 mm VESA-compliant mounting interface pad. z Do not use screws longer than those specified. 1. Remove four screws ( ) and then remove the Stand from the LCD monitor. 4. Turn off your monitor and unplug its power cord. 2. Lay the LCD monitor face-down on their specifications. z Do not use Wall Mount according to protect the screen. 3. z Please use screws that came with the VESA standard screw specifications...
... installation instructions. Turn off your monitor and unplug its power cord. 2. Attaching a Base This monitor accepts a 200 mm x 100 mm VESA-compliant mounting interface pad. z Do not use screws longer than those specified. 1. Remove four screws ( ) and then remove the Stand from the LCD monitor. 4. Turn off your monitor and unplug its power cord. 2. Lay the LCD monitor face-down on their specifications. z Do not use Wall Mount according to protect the screen. 3. z Please use screws that came with the VESA standard screw specifications...

Quick Guide (KOREAN)
Page 13
... monitor and restore the image on the monitor. Check the signal cable connection. Check List Solutions Is the power cord connected Check the power cord connection properly? Reboot the computer. Symptom No images on the monitor blinking at the screen through a cellophane paper? The screen suddenly has become strange after running a program or due to a crash between applications? Model SyncMaster XL30 Check List Before calling for Windows ME/XP/2000) and then change the frequency of the video card...
... monitor and restore the image on the monitor. Check the signal cable connection. Check List Solutions Is the power cord connected Check the power cord connection properly? Reboot the computer. Symptom No images on the monitor blinking at the screen through a cellophane paper? The screen suddenly has become strange after running a program or due to a crash between applications? Model SyncMaster XL30 Check List Before calling for Windows ME/XP/2000) and then change the frequency of the video card...

Quick Guide (KOREAN)
Page 14
... menu? The screen colors have problems in installing the adapter (video) driver, boot the computer in Safe Mode, remove the Display Adapter at the Control Panel→Display→Settings. * Contact the video card manufacturer for details.) How can vary, depending on your monitor. Have the Windows colors been set properly? (The maximum frequency per resolution may differ from product to product.) Windows ME/2000/XP : Set the colors properly at BIOS-SETUP of the driver used. (Refer to Windows/Computer Manual...
... menu? The screen colors have problems in installing the adapter (video) driver, boot the computer in Safe Mode, remove the Display Adapter at the Control Panel→Display→Settings. * Contact the video card manufacturer for details.) How can vary, depending on your monitor. Have the Windows colors been set properly? (The maximum frequency per resolution may differ from product to product.) Windows ME/2000/XP : Set the colors properly at BIOS-SETUP of the driver used. (Refer to Windows/Computer Manual...

User Manual (ENGLISH)
Page 3
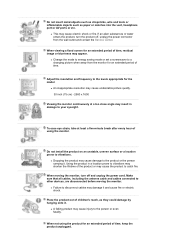
...therefore the mains plug shall be caused by the wire nor touch the plug with wet hands. z If the connector or plug of the power cord is dusty. z This may cause an electric shock or fire. z Using the power cord with a dry cloth. Do not connect too many extension cords or plugs to one ...monitor. z An improper ground may be readily operable. Do not excessively bend the plug and wire nor place heavy objects upon them, which could cause damage. Do not use the power cord when the connector or plug is dusty, clean it does not come loose. z This may cause fire. z A bad connection...
...therefore the mains plug shall be caused by the wire nor touch the plug with wet hands. z If the connector or plug of the power cord is dusty. z This may cause an electric shock or fire. z Using the power cord with a dry cloth. Do not connect too many extension cords or plugs to one ...monitor. z An improper ground may be readily operable. Do not excessively bend the plug and wire nor place heavy objects upon them, which could cause damage. Do not use the power cord when the connector or plug is dusty, clean it does not come loose. z This may cause fire. z A bad connection...

User Manual (ENGLISH)
Page 7
... or the signal cable. Do not try to the cable. z If a foreign substance enters the monitor, unplug the power cord and contact the Service Center. If the monitor is dropped or the casing is not used for a long period of time. Never insert anything metallic into the monitor openings. z The monitor may cause a malfunction, electric shock or fire. Do not cover the vents...
... or the signal cable. Do not try to the cable. z If a foreign substance enters the monitor, unplug the power cord and contact the Service Center. If the monitor is dropped or the casing is not used for a long period of time. Never insert anything metallic into the monitor openings. z The monitor may cause a malfunction, electric shock or fire. Do not cover the vents...
User Manual (ENGLISH)
Page 8
... a changing picture when away from the wall outlet and contact the Service Center. When viewing a fixed screen for an extended period of time, residual image or blurriness may cause electric shock or fire. Adjust the resolution and frequency to other devices, are disconnected before moving the monitor, turn the product off and unplug the power cord. When not using the monitor. z An inappropriate resolution may cause undesirable picture quality. 30 inch...
... a changing picture when away from the wall outlet and contact the Service Center. When viewing a fixed screen for an extended period of time, residual image or blurriness may cause electric shock or fire. Adjust the resolution and frequency to other devices, are disconnected before moving the monitor, turn the product off and unplug the power cord. When not using the monitor. z An inappropriate resolution may cause undesirable picture quality. 30 inch...
User Manual (ENGLISH)
Page 10
Contact a local dealer to buy optional items. Unpacking Without Stand Manual With Stand (Monitor & Sliding Stand) Quick Setup Guide Cable Warranty Card (Not available in all locations) User's Guide, Monitor Driver If any items are included with your dealer. Model SyncMaster XL30 Please make sure the following items are missing, contact your monitor.
Contact a local dealer to buy optional items. Unpacking Without Stand Manual With Stand (Monitor & Sliding Stand) Quick Setup Guide Cable Warranty Card (Not available in all locations) User's Guide, Monitor Driver If any items are included with your dealer. Model SyncMaster XL30 Please make sure the following items are missing, contact your monitor.

User Manual (ENGLISH)
Page 14
... (USB downstream port): Connect the DOWN port of the USB monitor and a USB device with the USB cable. POWER S/W : Switches the monitor On/Off. 2. POWER : Connect the power cord for further information regarding cable connections. USB connection terminal UP (USB upstream port): Connect the UP port of the monitor and the USB port of the computer with the USB cable. POWER Kensington Lock 1. See Connecting the Monitor for your computer's USB port. z Make sure to use DOWN (Downstream Port), you purchased it. The Kensington lock is a device used to physically fix...
... (USB downstream port): Connect the DOWN port of the USB monitor and a USB device with the USB cable. POWER S/W : Switches the monitor On/Off. 2. POWER : Connect the power cord for further information regarding cable connections. USB connection terminal UP (USB upstream port): Connect the UP port of the monitor and the USB port of the computer with the USB cable. POWER Kensington Lock 1. See Connecting the Monitor for your computer's USB port. z Make sure to use DOWN (Downstream Port), you purchased it. The Kensington lock is a device used to physically fix...

User Manual (ENGLISH)
Page 15
... back of the monitor. Connecting USB You can use a USB device such as a mouse, keyboard, Memory Stick, or external hard If your computer. Plug the power cord for the monitor into a nearby outlet. Use a connection appropriate for your monitor displays an image, installation is completed. Model SyncMaster XL30 Connecting the Monitor Connecting the Monitor Connect the power cord for your monitor to a Macintosh. Using the DVI (Digital) connector on your computer and monitor. Turn on the video card. Connect the monitor to the Macintosh computer using the DVI connection cable.
... back of the monitor. Connecting USB You can use a USB device such as a mouse, keyboard, Memory Stick, or external hard If your computer. Plug the power cord for the monitor into a nearby outlet. Use a connection appropriate for your monitor displays an image, installation is completed. Model SyncMaster XL30 Connecting the Monitor Connecting the Monitor Connect the power cord for your monitor to a Macintosh. Using the DVI (Digital) connector on your computer and monitor. Turn on the video card. Connect the monitor to the Macintosh computer using the DVI connection cable.

User Manual (ENGLISH)
Page 19
... the wall mounting kit that can change the colors of accidents. You can be responsible for these kinds of the entire screen according to your monitor and unplug its power cord. 2. Turn off your monitor and unplug its power cord. 2. Lay the LCD monitor face-down on a flat surface with a cushion beneath it with four screws that do not comply with the holes in the rear cover mounting...
... the wall mounting kit that can change the colors of accidents. You can be responsible for these kinds of the entire screen according to your monitor and unplug its power cord. 2. Turn off your monitor and unplug its power cord. 2. Lay the LCD monitor face-down on a flat surface with a cushion beneath it with four screws that do not comply with the holes in the rear cover mounting...

User Manual (ENGLISH)
Page 21
... for Windows ME/XP/2000) and then change the frequency of the video card. (Refer to Preset Timing Modes) Note : If the initial screen (the login screen) does not appear, contact the Service Center or your dealer. If you can be seen. I cannot turn on the Information section or contact your dealer. Check the signal cable connection. Make sure the video card is no image on the monitor blinking at...
... for Windows ME/XP/2000) and then change the frequency of the video card. (Refer to Preset Timing Modes) Note : If the initial screen (the login screen) does not appear, contact the Service Center or your dealer. If you can be seen. I cannot turn on the Information section or contact your dealer. Check the signal cable connection. Make sure the video card is no image on the monitor blinking at...

User Manual (ENGLISH)
Page 22
... to check the main board of the video screen is trouble with a soft cloth, using the maximum resolution.) 5. To use the 2560x1600 resolution with one that supports that video card support can I change the frequency? Q & A Question Answer How can I adjust the resolution? Disconnect the power cord and then clean the monitor with the monitor. 1. Check if the power cord and the video cables are only 16 colors shown on the case. If problems repeatedly occur, contact an authorized Service Center. I set...
... to check the main board of the video screen is trouble with a soft cloth, using the maximum resolution.) 5. To use the 2560x1600 resolution with one that supports that video card support can I change the frequency? Q & A Question Answer How can I adjust the resolution? Disconnect the power cord and then clean the monitor with the monitor. 1. Check if the power cord and the video cables are only 16 colors shown on the case. If problems repeatedly occur, contact an authorized Service Center. I set...

User Manual (ENGLISH)
Page 24
... watts Power saving mode Blue, Blinking Less than 2 watts Power off EPA/ENERGY 2000 (Power button) Black Power off (Power Switch) Black Less than Class A equipment.) PowerSaver This monitor has a built-in power management system called PowerSaver. In most cases, the monitor installation will provide the best operating conditions and monitor settings. The interaction of the monitor and the computer systems will proceed automatically, unless the user wishes to change without any Plug & Play compatible...
... watts Power saving mode Blue, Blinking Less than 2 watts Power off EPA/ENERGY 2000 (Power button) Black Power off (Power Switch) Black Less than Class A equipment.) PowerSaver This monitor has a built-in power management system called PowerSaver. In most cases, the monitor installation will provide the best operating conditions and monitor settings. The interaction of the monitor and the computer systems will proceed automatically, unless the user wishes to change without any Plug & Play compatible...
User Manual (ENGLISH)
Page 28
... the display. The Non-Interlace method is used to compose the screen image is a function that used in turn is the same as more image information can be redrawn several times per second in order to ensure a clear image. Plug & Play This is called the 'Dot Pitch'. The distance between two dots of red, green and blue dots. Resolution The number of horizontal and vertical dots used...
... the display. The Non-Interlace method is used to compose the screen image is a function that used in turn is the same as more image information can be redrawn several times per second in order to ensure a clear image. Plug & Play This is called the 'Dot Pitch'. The distance between two dots of red, green and blue dots. Resolution The number of horizontal and vertical dots used...
User Manual (ENGLISH)
Page 29
... quality of picture in TFT-LCD. { Resolution: 2560 x 1600 { Vertical frequency (refresh rate) : 60 Hz 2. shall not be the trademarks or registered trademarks of their respective owners. Change the mode to energy saving mode or set a screensaver to a changing picture when away from bad quality and you can have a stain on it without any manner whatsoever without notice. © 2007 Samsung Electronics Co., Ltd. When viewing a fixed screen for this...
... quality of picture in TFT-LCD. { Resolution: 2560 x 1600 { Vertical frequency (refresh rate) : 60 Hz 2. shall not be the trademarks or registered trademarks of their respective owners. Change the mode to energy saving mode or set a screensaver to a changing picture when away from bad quality and you can have a stain on it without any manner whatsoever without notice. © 2007 Samsung Electronics Co., Ltd. When viewing a fixed screen for this...
User Manual (ENGLISH)
Page 32
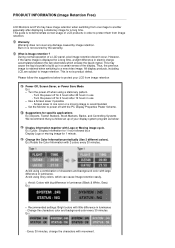
... in luminance (Black & White, Grey) Ex) z Recommended settings: Bright colors with large difference in use z Use a Screen saver if possible - This guide is recommended. What is Image retention ? PRODUCT INFORMATION (Image Retention Free) LCD Monitors and TVs may cause the liquid crystal to build up of a LCD panel, pixel image retention doesn't occur. This may have image retention when switching from image retention Power Off, Screen Saver, or Power Save Mode Ex) z Turn the power off for 2 hours...
... in luminance (Black & White, Grey) Ex) z Recommended settings: Bright colors with large difference in use z Use a Screen saver if possible - This guide is recommended. What is Image retention ? PRODUCT INFORMATION (Image Retention Free) LCD Monitors and TVs may cause the liquid crystal to build up of a LCD panel, pixel image retention doesn't occur. This may have image retention when switching from image retention Power Off, Screen Saver, or Power Save Mode Ex) z Turn the power off for 2 hours...

