
Instruction Manual
Page 1
INSTRUCTION MANUAL Rear View Back up Camera System CCA-BC200 CAUTION • Installation and wiring require technical expertise and experience. To ensure proper installation and safety, consult the dealer where the product was purchased. SANYO'S HELP-LINE Call the toll-free number below if you have any difficulties operating this product. 1-800-421-5013 (Weekdays 7:30 AM - 5:00 PM, Pacific Time)
INSTRUCTION MANUAL Rear View Back up Camera System CCA-BC200 CAUTION • Installation and wiring require technical expertise and experience. To ensure proper installation and safety, consult the dealer where the product was purchased. SANYO'S HELP-LINE Call the toll-free number below if you have any difficulties operating this product. 1-800-421-5013 (Weekdays 7:30 AM - 5:00 PM, Pacific Time)
Instruction Manual
Page 3
... up camera, read this instruction manual for proper use of other passengers. A CAUTION indicates a situation in which serious injury or death could result if the caution is for exclusive use with DC 12V, negative ground vehicles. Do not use this Rear View Back up Camera System on DC 24V vehicles (such as directed. • Sanyo and...
... up camera, read this instruction manual for proper use of other passengers. A CAUTION indicates a situation in which serious injury or death could result if the caution is for exclusive use with DC 12V, negative ground vehicles. Do not use this Rear View Back up Camera System on DC 24V vehicles (such as directed. • Sanyo and...
Instruction Manual
Page 7
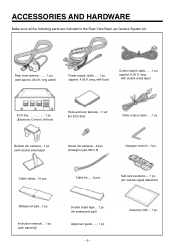
....2 ft. ACCESSORIES AND HARDWARE Make sure all the following parts are included in the Rear View Back up Camera System kit. 1 Rear view camera.........1 pc. (with double sided tape) Screw (for camera)...2 pcs. (Hexagon type, M3 x 6) Hexagon wrench...1 pc. Cable tie......2 pcs. Instruction manual... 1 pc. (with warranty) Double sided tape... 1 pc. (for reverse signal detection) Waterproof pad...1 pc...
....2 ft. ACCESSORIES AND HARDWARE Make sure all the following parts are included in the Rear View Back up Camera System kit. 1 Rear view camera.........1 pc. (with double sided tape) Screw (for camera)...2 pcs. (Hexagon type, M3 x 6) Hexagon wrench...1 pc. Cable tie......2 pcs. Instruction manual... 1 pc. (with warranty) Double sided tape... 1 pc. (for reverse signal detection) Waterproof pad...1 pc...
Instruction Manual
Page 10
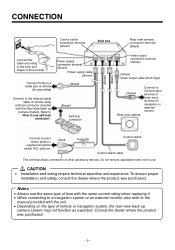
...terminal (Yellow) (Yellow) Video output cable (RCA Type) (Yellow) Rear view camera Connect to Camera input terminal or video input terminal on the type of vehicle or navigation system, the rear view back up Camera System. To ensure proper installation and safety, consult the dealer where ... monitor, also refer to the manual provided with the Rear View Back up camera system may not function as expected. Consult the dealer where the product was purchased. CONNECTION Control switch connection terminal (Green) ECU box Rear view camera connection terminal (Black) Connect the...
...terminal (Yellow) (Yellow) Video output cable (RCA Type) (Yellow) Rear view camera Connect to Camera input terminal or video input terminal on the type of vehicle or navigation system, the rear view back up Camera System. To ensure proper installation and safety, consult the dealer where ... monitor, also refer to the manual provided with the Rear View Back up camera system may not function as expected. Consult the dealer where the product was purchased. CONNECTION Control switch connection terminal (Green) ECU box Rear view camera connection terminal (Black) Connect the...
Instruction Manual
Page 17
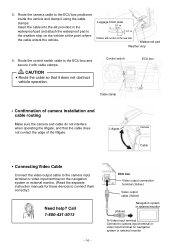
... and cable routing Make sure the camera and cable do not interfere when operating the liftgate, and that it using the cable clamps. Position with no ribs on the navigation system or external monitor. (Read the separate instruction manuals for these devices to the ECU box ... cable to connect them correctly.) Need help? Liftgate Camera Cable • Connecting Video Cable Connect the video output cable to the camera input terminal or video input terminal on the rear side Waterproof pad Weather strip 4. 3. Route the camera cable to the ECU box positioned inside the vehicle ...
... and cable routing Make sure the camera and cable do not interfere when operating the liftgate, and that it using the cable clamps. Position with no ribs on the navigation system or external monitor. (Read the separate instruction manuals for these devices to the ECU box ... cable to connect them correctly.) Need help? Liftgate Camera Cable • Connecting Video Cable Connect the video output cable to the camera input terminal or video input terminal on the rear side Waterproof pad Weather strip 4. 3. Route the camera cable to the ECU box positioned inside the vehicle ...
Instruction Manual
Page 19
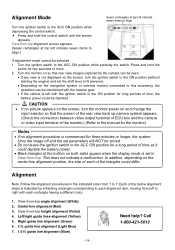
...change the input selector so that the screen of the rear view back up camera system appears. (Check the connection between video output terminal of ECU box and the camera or video input terminal of the monitor.) (Refer to the manual for the monitor) Notes • If no alignment ...) 4. In addition, depending on the navigation system or external monitor connected to 7. View-from 1 to this accessory, the operation can be seen. • If any view is not displayed on so that rear view images captured by a flashing rectangle corresponding to align If adjustment mode cannot be interlocked ...
...change the input selector so that the screen of the rear view back up camera system appears. (Check the connection between video output terminal of ECU box and the camera or video input terminal of the monitor.) (Refer to the manual for the monitor) Notes • If no alignment ...) 4. In addition, depending on the navigation system or external monitor connected to 7. View-from 1 to this accessory, the operation can be seen. • If any view is not displayed on so that rear view images captured by a flashing rectangle corresponding to align If adjustment mode cannot be interlocked ...
Instruction Manual
Page 24
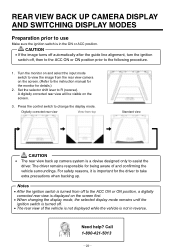
.... (Refer to the instruction manual for the monitor for the driver to take extra precautions when backing up camera system is a devise designed only to assist the driver. Call 1-800-421-5013 ʵ23ʵ Digitally corrected rear view View-from the rear view camera on the screen first. &#... the following procedure. 1. For safety reasons, it is important for details.) 2. Press the control switch to R (reverse). REAR VIEW BACK UP CAMERA DISPLAY AND SWITCHING DISPLAY MODES Preparation prior to use Make sure the ignition switch is in reverse. Need help? Turn the monitor...
.... (Refer to the instruction manual for the monitor for the driver to take extra precautions when backing up camera system is a devise designed only to assist the driver. Call 1-800-421-5013 ʵ23ʵ Digitally corrected rear view View-from the rear view camera on the screen first. &#... the following procedure. 1. For safety reasons, it is important for details.) 2. Press the control switch to R (reverse). REAR VIEW BACK UP CAMERA DISPLAY AND SWITCHING DISPLAY MODES Preparation prior to use Make sure the ignition switch is in reverse. Need help? Turn the monitor...