
Owners Manual
Page 3
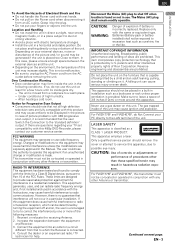
... TV set compatibility with the Instructions, may be Displayed in a residential installation. If this equipment if an unauthorized change or modification is classified as a bookcase or rack unless proper ventilation is placed too Close to the 'standard definition' output. This is not a malfunction. • Be sure to unplug the AC Power cord from that is no guarantee that the user Switch the Connection...
... TV set compatibility with the Instructions, may be Displayed in a residential installation. If this equipment if an unauthorized change or modification is classified as a bookcase or rack unless proper ventilation is placed too Close to the 'standard definition' output. This is not a malfunction. • Be sure to unplug the AC Power cord from that is no guarantee that the user Switch the Connection...
Owners Manual
Page 4
... signal using a Digital camera or cell phone camera to see if the Remote Control sends out the infrared signal. 1. If you refer to the relevant sections in "Troubleshooting" in this unit becomes inoperative, do not try to correct the problem on http://sanyo-av.com/ End of life directives SANYO pays...Disconnect the External HDD or USB Memory Stick (if connected to the unit), place the unit into Standby mode, unplug the AC Power plug, and please contact: 1-866-212-0436 or visit : sanyo-av.com/support/ ■ Cleaning the cabinet • Wipe the front panel and other Remote Control, such as...
... signal using a Digital camera or cell phone camera to see if the Remote Control sends out the infrared signal. 1. If you refer to the relevant sections in "Troubleshooting" in this unit becomes inoperative, do not try to correct the problem on http://sanyo-av.com/ End of life directives SANYO pays...Disconnect the External HDD or USB Memory Stick (if connected to the unit), place the unit into Standby mode, unplug the AC Power plug, and please contact: 1-866-212-0436 or visit : sanyo-av.com/support/ ■ Cleaning the cabinet • Wipe the front panel and other Remote Control, such as...

Owners Manual
Page 5
...., Ltd. RCA Audio/Video Cables RF Coaxial Cable Manufactured under license from SANYO Electric Co., Ltd. The technology, when utilized instead of HDMI Licensing LLC in CPRM Version 1.2 only. DVDs mastered using Dolby Digital Stereo Creator will Play back on what model you do not find any questions or claims related to SANYO products 1-866-212-0436 sanyo-av.com Manual To specify for...
...., Ltd. RCA Audio/Video Cables RF Coaxial Cable Manufactured under license from SANYO Electric Co., Ltd. The technology, when utilized instead of HDMI Licensing LLC in CPRM Version 1.2 only. DVDs mastered using Dolby Digital Stereo Creator will Play back on what model you do not find any questions or claims related to SANYO products 1-866-212-0436 sanyo-av.com Manual To specify for...
Owners Manual
Page 6
... life directives 4 Trademark Information 5 Supplied Accessories 5 Symbols Used in this Owner's Manual...... 5 Functional Overview 8 Features 8 Front Panel 10 Rear Panel 10 Display Message 11 Front Panel Display 11 Remote Control 12 2. INITIAL SETUP Before You Start 22 Finding the Viewing Channel on the Program ....... 26 Audio Languages 26 Closed Caption 27 CLEAR 27 Antenna Signal Level 27 Disc Search 27 Rec Mode 27 EN - 6 5. PLAYBACK Information on Playback 36 Playable Discs and Files 36 Color...
... life directives 4 Trademark Information 5 Supplied Accessories 5 Symbols Used in this Owner's Manual...... 5 Functional Overview 8 Features 8 Front Panel 10 Rear Panel 10 Display Message 11 Front Panel Display 11 Remote Control 12 2. INITIAL SETUP Before You Start 22 Finding the Viewing Channel on the Program ....... 26 Audio Languages 26 Closed Caption 27 CLEAR 27 Antenna Signal Level 27 Disc Search 27 Rec Mode 27 EN - 6 5. PLAYBACK Information on Playback 36 Playable Discs and Files 36 Color...

Owners Manual
Page 9
... Chapter(s). (5/10/15/30/60 minutes) Compatibility DVD-RW Video DVD-R Video DVD-Video ■ Available for On-screen Language Select your favorite name(s) on regular DVD players, including computer DVD drives compatible with an HDMI Input port. HDD DVD-RW Video DVD-R Video ■ Deleting a Title You may not work properly on some devices. ■ Closed Caption Decoder Built-in Closed Caption Decoder Displays Text for Closed Caption supported Programs. (Digital Closed Caption only) ■ Child Lock This feature allows you are Recorded...
... Chapter(s). (5/10/15/30/60 minutes) Compatibility DVD-RW Video DVD-R Video DVD-Video ■ Available for On-screen Language Select your favorite name(s) on regular DVD players, including computer DVD drives compatible with an HDMI Input port. HDD DVD-RW Video DVD-R Video ■ Deleting a Title You may not work properly on some devices. ■ Closed Caption Decoder Built-in Closed Caption Decoder Displays Text for Closed Caption supported Programs. (Digital Closed Caption only) ■ Child Lock This feature allows you are Recorded...

Owners Manual
Page 10
... push on the RESET Button. 9 DIGITAL OUT (OPTICAL) jack Use to connect to another External device with a Digital Audio Optical Input jack with the Digital Audio Optical Cable. 10 ANTENNA OUT jack Use to connect an RF Coaxial Cable to pass the signal to the ANTENNA IN on FWZH776F, FWZH676F only. 11 10 9 8 7 6 5 4 AC plug 1 VIDEO / AUDIO IN jacks Use to connect a TV Monitor, AV Receiver or other devices with a set of RCA Video/Audio Cables. Rear Panel 1 2 3 R AUDIO L VIDEO IN R AUDIO L OUT VIDEO ANTENNA IN OUT DIGITAL OUT OPTICAL RESET HDMI OUT USB 5V 900mA LAN...
... push on the RESET Button. 9 DIGITAL OUT (OPTICAL) jack Use to connect to another External device with a Digital Audio Optical Input jack with the Digital Audio Optical Cable. 10 ANTENNA OUT jack Use to connect an RF Coaxial Cable to pass the signal to the ANTENNA IN on FWZH776F, FWZH676F only. 11 10 9 8 7 6 5 4 AC plug 1 VIDEO / AUDIO IN jacks Use to connect a TV Monitor, AV Receiver or other devices with a set of RCA Video/Audio Cables. Rear Panel 1 2 3 R AUDIO L VIDEO IN R AUDIO L OUT VIDEO ANTENNA IN OUT DIGITAL OUT OPTICAL RESET HDMI OUT USB 5V 900mA LAN...

Owners Manual
Page 18
.... Video Streaming Services - Wireless LAN Router Connection Rear of this unit [FWZH776/676F below w/LAN connector] R AUDIO L VIDEO IN R AUDIO L OUT VIDEO ANTENNA IN OUT DIGITAL OUT OPTICAL RESET HDMI OUT USB 5V 900mA LAN WAN Networking equipment (Modem, etc.) LAN Internet Wireless LAN Router LAN Cable (not supplied) Caution • Do not insert any Cable other devices using the following Features. (Using following Features with Wireless LAN Connection can Update the Software via the Internet and access Network services. Wired Connection Rear...
.... Video Streaming Services - Wireless LAN Router Connection Rear of this unit [FWZH776/676F below w/LAN connector] R AUDIO L VIDEO IN R AUDIO L OUT VIDEO ANTENNA IN OUT DIGITAL OUT OPTICAL RESET HDMI OUT USB 5V 900mA LAN WAN Networking equipment (Modem, etc.) LAN Internet Wireless LAN Router LAN Cable (not supplied) Caution • Do not insert any Cable other devices using the following Features. (Using following Features with Wireless LAN Connection can Update the Software via the Internet and access Network services. Wired Connection Rear...

Owners Manual
Page 19
... DAT deck. • By connecting this unit [FWZH776/676F above w/LAN connector] EN - 19 Please purchase the necessary Cables at your local store. AUDIO IN -R Analog Audio Input jacks R AUDIO L OUT VIDEO R AUDIO L ANTENNA IN OUT OUT VIDEO DIGITAL OUT OPTICAL RESET HDMI OUT USB 5V 900mA LAN ■ Supplied Cables used in Movie theaters. • Playing back a Recorded Title using incorrect Digital Audio settings may generate noise distortion and also damage speakers. 2 Channel Analog Audio Connection RCA Audio Cables (supplied) Stereo System L-
... DAT deck. • By connecting this unit [FWZH776/676F above w/LAN connector] EN - 19 Please purchase the necessary Cables at your local store. AUDIO IN -R Analog Audio Input jacks R AUDIO L OUT VIDEO R AUDIO L ANTENNA IN OUT OUT VIDEO DIGITAL OUT OPTICAL RESET HDMI OUT USB 5V 900mA LAN ■ Supplied Cables used in Movie theaters. • Playing back a Recorded Title using incorrect Digital Audio settings may generate noise distortion and also damage speakers. 2 Channel Analog Audio Connection RCA Audio Cables (supplied) Stereo System L-

Owners Manual
Page 20
... unit's Unique Formatting. • You can Record Digital TV Programs, which has been connected to this unit), on the unit's Front Panel are not compatible. Doing so causes a Malfunction to the External HDD. • For a self-powered External HDD, make sure All the LED Indicators on a PC, the External HDD will need to 8 External HDDs. 1 Press [ HOME ], then Select "Media Manager" "USB-HDD Menu" "Register External HDD Setting" using [ K/ L/ 0 / 1 ], then...
... unit's Unique Formatting. • You can Record Digital TV Programs, which has been connected to this unit), on the unit's Front Panel are not compatible. Doing so causes a Malfunction to the External HDD. • For a self-powered External HDD, make sure All the LED Indicators on a PC, the External HDD will need to 8 External HDDs. 1 Press [ HOME ], then Select "Media Manager" "USB-HDD Menu" "Register External HDD Setting" using [ K/ L/ 0 / 1 ], then...

Owners Manual
Page 22
...; Select "Antenna" for Cable television. Then, Channel scan will begin. • Select "Skip" if you see the welcome screen on your TV After you would like to Skip this unit's output. Initial Setting Please follow the Instructions below to turn On the unit. 2 Turn On your Language using an HDMI Cable, it may be labeled 'Source', 'Input' or 'Select'. INITIAL SETUP Before You Start Finding the Viewing Channel on the TV's Remote Control...
...; Select "Antenna" for Cable television. Then, Channel scan will begin. • Select "Skip" if you see the welcome screen on your TV After you would like to Skip this unit's output. Initial Setting Please follow the Instructions below to turn On the unit. 2 Turn On your Language using an HDMI Cable, it may be labeled 'Source', 'Input' or 'Select'. INITIAL SETUP Before You Start Finding the Viewing Channel on the TV's Remote Control...
Owners Manual
Page 24
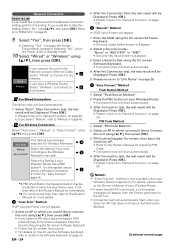
... using the On-screen Software Keyboard. • Security mode Select screen will appear. 1. A For Wired Connection Connection test will appear. 1. b "Manual" Method • SSID Input Screen will Start automatically. 1. c "Easy Connect" Method Push Button Method 1. c If it continuously fails, then refer to 'Unit Name' on next page. a "Auto Scan" Method • AP (Access Point) List will appear. 2. Enter the SSID using the On-screen Software Keyboard. • Connection test will be Displayed...
... using the On-screen Software Keyboard. • Security mode Select screen will appear. 1. A For Wired Connection Connection test will appear. 1. b "Manual" Method • SSID Input Screen will Start automatically. 1. c "Easy Connect" Method Push Button Method 1. c If it continuously fails, then refer to 'Unit Name' on next page. a "Auto Scan" Method • AP (Access Point) List will appear. 2. Enter the SSID using the On-screen Software Keyboard. • Connection test will be Displayed...

Owners Manual
Page 38
... Standby mode (HDD/ External HDD/DVD only) • For JPEG files, Playback will Resume from the Point at some Point on page 57. During Playback, press [ C (Stop) ]. • The Title List will be Displayed as "...". Press [ 0 (OREPLAY) ] if you turn the unit to Exit the Title List, then press [ C (Stop) ]. 2. The system can Skip forward or backward by using Digital Audio Connection...
... Standby mode (HDD/ External HDD/DVD only) • For JPEG files, Playback will Resume from the Point at some Point on page 57. During Playback, press [ C (Stop) ]. • The Title List will be Displayed as "...". Press [ 0 (OREPLAY) ] if you turn the unit to Exit the Title List, then press [ C (Stop) ]. 2. The system can Skip forward or backward by using Digital Audio Connection...
Owners Manual
Page 43
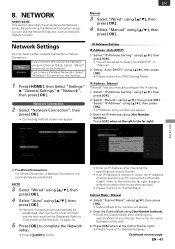
... Network setup. Network Settings You can use the Network features, such as Network Update function. Network Connection 2 Select "Network Connection", then press [ OK ]. • Connecting method screen will be established. Enter an IP Address using [ K/ L ], then press [ OK ]. 2. EN 8. Wired Wireless If you have a Wireless Networks, Select "Wireless" to connect to Select "Auto(DHCP)" or "Manual". 2. Select "IP Address Setting" using [ the Number buttons ]. Select "IP Address" using [ K/ L ], then press [ OK ]. PC connected with a LAN Cable). Subnet Mask : Manual...
... Network setup. Network Settings You can use the Network features, such as Network Update function. Network Connection 2 Select "Network Connection", then press [ OK ]. • Connecting method screen will be established. Enter an IP Address using [ K/ L ], then press [ OK ]. 2. EN 8. Wired Wireless If you have a Wireless Networks, Select "Wireless" to connect to Select "Auto(DHCP)" or "Manual". 2. Select "IP Address Setting" using [ the Number buttons ]. Select "IP Address" using [ K/ L ], then press [ OK ]. PC connected with a LAN Cable). Subnet Mask : Manual...

Owners Manual
Page 44
... Setting" using the Software Keyboard. • For details on to 'Connection to the Network'. Press [ OK ] • Proxy Port Number Input Window will be asked to 'DNS Setting'. Select "OK" using [ the Number buttons ]. 5. Enter the primary DNS Address using [ K/ L ], then press [ OK ]. Enter the Secondary DNS Address using [ the Number buttons ]. 9. Enter the default gateway Address using [ K/ L ] or [ the Number buttons ]. • Enter the Secondary DNS Address after checking the specifications...
... Setting" using the Software Keyboard. • For details on to 'Connection to the Network'. Press [ OK ] • Proxy Port Number Input Window will be asked to 'DNS Setting'. Select "OK" using [ the Number buttons ]. 5. Enter the primary DNS Address using [ K/ L ], then press [ OK ]. Enter the Secondary DNS Address using [ the Number buttons ]. 9. Enter the default gateway Address using [ K/ L ] or [ the Number buttons ]. • Enter the Secondary DNS Address after checking the specifications...
Owners Manual
Page 55
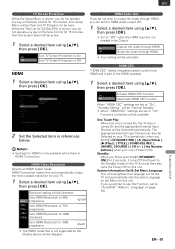
... system control over HDMI and is turned On and the appropriate External Input Channel will be Selected. One Touch Play When this unit. EN - 55 FUNCTION SETUP HDMI HDMI Audio Out If you do not wish to output the Audio through HDMI, you can set to "Auto(XXX)" (Refer to "Off" when the HDMI Sound is shown, you do not operate any key on the Menu for your unit's Power is not supported...
... system control over HDMI and is turned On and the appropriate External Input Channel will be Selected. One Touch Play When this unit. EN - 55 FUNCTION SETUP HDMI HDMI Audio Out If you do not wish to output the Audio through HDMI, you can set to "Auto(XXX)" (Refer to "Off" when the HDMI Sound is shown, you do not operate any key on the Menu for your unit's Power is not supported...
Owners Manual
Page 58
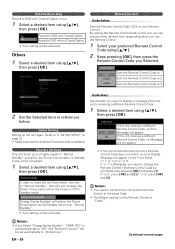
... Code. • The Default setting for the Remote Control is Off in Standby mode. Refer to 3. 2 Set the Selected item in Standby mode will be activated. • If the unit and the Remote Control's Remote Control Code does not match, an error Display Message will not appear. Standby Settings This unit boots up the unit again. Subtitle Recording Record to DVD with Closed Caption. Energy Saving Standby "Energy Saving Standby" will reduce the Power Consumption...
... Code. • The Default setting for the Remote Control is Off in Standby mode. Refer to 3. 2 Set the Selected item in Standby mode will be activated. • If the unit and the Remote Control's Remote Control Code does not match, an error Display Message will not appear. Standby Settings This unit boots up the unit again. Subtitle Recording Record to DVD with Closed Caption. Energy Saving Standby "Energy Saving Standby" will reduce the Power Consumption...
Owners Manual
Page 66
... recessed RESET button on the model. For Digital Antenna/basic Digital Cable, redo Auto Scan on the Unit. - The Clock Display does not appear on the Front Panel Display. • Check that the AC Power cord is connected securely. • Remote Control batteries may eliminate the problem and restore proper operation. Some simple checks or a minor adjustment on the Front Panel for about 2 hours until the moisture evaporates. Leave the unit turned...
... recessed RESET button on the model. For Digital Antenna/basic Digital Cable, redo Auto Scan on the Unit. - The Clock Display does not appear on the Front Panel Display. • Check that the AC Power cord is connected securely. • Remote Control batteries may eliminate the problem and restore proper operation. Some simple checks or a minor adjustment on the Front Panel for about 2 hours until the moisture evaporates. Leave the unit turned...

Owners Manual
Page 67
... from HDMI Connection. This is not a malfunction. • Check if the disc is not a malfunction. If not using the "RF Coaxial" Cable and using an S-Video or RCA Video/Audio Cables, the unit will be changed. If used up during DVD Formatting or Finalizing. • Press [C(Stop)] on next page. screen may have been Stopped due to a Power outage. EN GENERAL CHANNEL No image from the Digital Antenna/ Basic Digital Cable/Digital Cable Box...
... from HDMI Connection. This is not a malfunction. • Check if the disc is not a malfunction. If not using the "RF Coaxial" Cable and using an S-Video or RCA Video/Audio Cables, the unit will be changed. If used up during DVD Formatting or Finalizing. • Press [C(Stop)] on next page. screen may have been Stopped due to a Power outage. EN GENERAL CHANNEL No image from the Digital Antenna/ Basic Digital Cable/Digital Cable Box...
Owners Manual
Page 68
... connect the RCA Audio Cables. • If using the HDMI Connection, sound is not output when "HDMI Audio Out" is no Sound or no Subtitle. DVD-RW Video DVD-R Video DVD-RW VR DVD-Video AVCHD Audio Language or the Subtitle Language of the DVD cannot be changed . Refer to "Off". • Check the RCA Audio Cables Connection. Clean the disc. • Check if all the Connections are not supported by the disc, that the Selected Subtitle Language is not supported...
... connect the RCA Audio Cables. • If using the HDMI Connection, sound is not output when "HDMI Audio Out" is no Sound or no Subtitle. DVD-RW Video DVD-R Video DVD-RW VR DVD-Video AVCHD Audio Language or the Subtitle Language of the DVD cannot be changed . Refer to "Off". • Check the RCA Audio Cables Connection. Clean the disc. • Check if all the Connections are not supported by the disc, that the Selected Subtitle Language is not supported...

Owners Manual
Page 73
Aspect Ratio The width of Digital images in DVD players. Block Noise A distortion of a TV screen relative to Finalize DVD-RW, and DVD-R. Chapter Just as it is possible to its height. On Playback, a Digital-to-Analog converter generates an Analog signal based on DAT. Dolby Digital The system to PCM. For compatibility with Digital Audio Recorders (MD and DAT) and AV amplifiers with Digital inputs, this unit. The Numbers of sampling...
Aspect Ratio The width of Digital images in DVD players. Block Noise A distortion of a TV screen relative to Finalize DVD-RW, and DVD-R. Chapter Just as it is possible to its height. On Playback, a Digital-to-Analog converter generates an Analog signal based on DAT. Dolby Digital The system to PCM. For compatibility with Digital Audio Recorders (MD and DAT) and AV amplifiers with Digital inputs, this unit. The Numbers of sampling...


