Owners Manual
Page 1
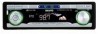
OPERATING INSTRUCTIONS FXCD-1350 Fold Down Design Full Panel Detachable FM Stereo/AM Receiver Auto Reverse Cassette Player Compact Disc Player With CD Changer Controller ISO Mounting with Removable Trim Ring (English) OPERATING INSTRUCTIONS 1~29 GB (Español) LIBRITO DE INSTRUCCIONES 30~57 E
OPERATING INSTRUCTIONS FXCD-1350 Fold Down Design Full Panel Detachable FM Stereo/AM Receiver Auto Reverse Cassette Player Compact Disc Player With CD Changer Controller ISO Mounting with Removable Trim Ring (English) OPERATING INSTRUCTIONS 1~29 GB (Español) LIBRITO DE INSTRUCCIONES 30~57 E
Owners Manual
Page 2
SANYO MOBILE AUDIO MODEL FXCD-1350 LIMITED WARRANTY OBLIGATIONS In order to obtain warranty service, the product must be obtained by the user, abuse, misuse, neglect, accident, incorrect power line voltage, fire, flood or other obligation or liability. For product operation, authorized service center referral, service assistance or problem resolution, call CUSTOMER INFORMATION 1-800-421-5013 Weekdays 8:00 AM - 5:00 PM Pacific Time For...
SANYO MOBILE AUDIO MODEL FXCD-1350 LIMITED WARRANTY OBLIGATIONS In order to obtain warranty service, the product must be obtained by the user, abuse, misuse, neglect, accident, incorrect power line voltage, fire, flood or other obligation or liability. For product operation, authorized service center referral, service assistance or problem resolution, call CUSTOMER INFORMATION 1-800-421-5013 Weekdays 8:00 AM - 5:00 PM Pacific Time For...
Owners Manual
Page 3
... fuse. CAUTION • This unit is designed to which can radiate radio frequency energy and, If not installed and used in a residential installation. CONTENTS English COMPACT DISC CARE 3 REMOTE CONTROLLER 5 DIGITAL DISPLAY 7 DETACHABLE FRONT PANEL 8 GENERAL OPERATION 9 RADIO OPERATION 11 TAPE OPERATION 13 CD OPERATION 15 CD CHANGER OPERATION 17 ERROR SIGNS 19 CLOCK 20 HINTS FOR PROPER AND SAFE OPERATION 21 TROUBLESHOOTING 22 ACCESSORIES AND HARDWARE 23 INSTALLATION 23 UNIT REMOVAL 26 ELECTRICAL CONNECTIONS 27 LINE OUT / CD CHANGER CONNECTIONS 28 SPECIFICATIONS...
... fuse. CAUTION • This unit is designed to which can radiate radio frequency energy and, If not installed and used in a residential installation. CONTENTS English COMPACT DISC CARE 3 REMOTE CONTROLLER 5 DIGITAL DISPLAY 7 DETACHABLE FRONT PANEL 8 GENERAL OPERATION 9 RADIO OPERATION 11 TAPE OPERATION 13 CD OPERATION 15 CD CHANGER OPERATION 17 ERROR SIGNS 19 CLOCK 20 HINTS FOR PROPER AND SAFE OPERATION 21 TROUBLESHOOTING 22 ACCESSORIES AND HARDWARE 23 INSTALLATION 23 UNIT REMOVAL 26 ELECTRICAL CONNECTIONS 27 LINE OUT / CD CHANGER CONNECTIONS 28 SPECIFICATIONS...
Owners Manual
Page 6
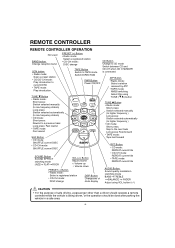
... TAPE mode CD-CH when CD CHANGER is connected Switch DIRECTION PWR Button Power ON/OFF ATP Button • Radio mode: Select a station received by ATP • TAPE mode: AMSS switching Select title using VOL button (+/-) CAUTION • For the purpose of safe driving, a passenger other than a driver should operate a remote controller while the vehicle is being driven, or the operation should be done after parking the vehicle in a safe area. -5- REMOTE CONTROLLER REMOTE CONTROLLER OPERATION Not used PRESET (+) Button • Radio mode: BAND button Change reception band Select...
... TAPE mode CD-CH when CD CHANGER is connected Switch DIRECTION PWR Button Power ON/OFF ATP Button • Radio mode: Select a station received by ATP • TAPE mode: AMSS switching Select title using VOL button (+/-) CAUTION • For the purpose of safe driving, a passenger other than a driver should operate a remote controller while the vehicle is being driven, or the operation should be done after parking the vehicle in a safe area. -5- REMOTE CONTROLLER REMOTE CONTROLLER OPERATION Not used PRESET (+) Button • Radio mode: BAND button Change reception band Select...

Owners Manual
Page 7
... the instructions to prevent accidental swallowing. • If the battery is swallowed, contact a doctor immediately. CAUTION • Install the battery with water completely. The remote controller may not be operable. BATTERY REPLACEMENT TIMING When battery power is depleted, the buttons may deform because of the heat. (Be especially careful of time, or if the battery is parked in an area exposed to direct sunlight, remove the remote controller from...
... the instructions to prevent accidental swallowing. • If the battery is swallowed, contact a doctor immediately. CAUTION • Install the battery with water completely. The remote controller may not be operable. BATTERY REPLACEMENT TIMING When battery power is depleted, the buttons may deform because of the heat. (Be especially careful of time, or if the battery is parked in an area exposed to direct sunlight, remove the remote controller from...
Owners Manual
Page 8
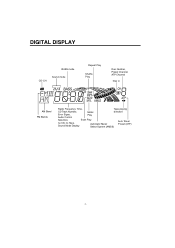
DIGITAL DISPLAY BASS mode CD-CH Sound mode Repeat Play Shuffle Play Disc Number, Preset Channel, ATP Channel Disc in AM Band FM Bands Radio Frequency, Time, Tape playing CD Track Number, Metal direction Error Signs, Play Audio Control Selection, Scan Play no CD, no Tape, Sound Mode Display Automatic Music Select System (AMSS) Auto Travel Preset (ATP) -7-
DIGITAL DISPLAY BASS mode CD-CH Sound mode Repeat Play Shuffle Play Disc Number, Preset Channel, ATP Channel Disc in AM Band FM Bands Radio Frequency, Time, Tape playing CD Track Number, Metal direction Error Signs, Play Audio Control Selection, Scan Play no CD, no Tape, Sound Mode Display Automatic Music Select System (AMSS) Auto Travel Preset (ATP) -7-
Owners Manual
Page 9
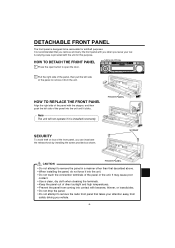
... connection terminals of the panel with the unit for antitheft purposes. OPEN BUTTON 2 Pull the right side of the panel, then pull the left side of the front panel, you remove and carry the front panel with benzene, thinner, or insecticides. • Do not drop the panel. • Do not attempt to remove the radio front panel that takes your car. DETACHABLE FRONT PANEL...
... connection terminals of the panel with the unit for antitheft purposes. OPEN BUTTON 2 Pull the right side of the panel, then pull the left side of the front panel, you remove and carry the front panel with benzene, thinner, or insecticides. • Do not drop the panel. • Do not attempt to remove the radio front panel that takes your car. DETACHABLE FRONT PANEL...
Owners Manual
Page 10
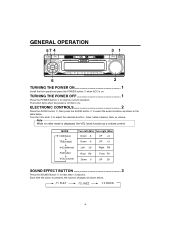
... function changes as a volume control. ELECTRONIC CONTROLS 2 Press the AUDIO button , then press the AUDIO button to select the audio functions as shown in the table below . 1 FLAT 2 JAZZ 3 ROCK -9- TURNING THE POWER OFF 1 Press the POWER button to adjust the selected function ; bass, treble, balance, fade, or volume. MODE bAS(bass) TRE(treble) bAL(balance) FAd(fader) VOL(volume) Turn left (Min) Turn right (Max) Down -5 UP +5 Down -5 UP +5 Left L9 Right R9 Rear R9 Down 0 Front F9 UP 35 SOUND...
... function changes as a volume control. ELECTRONIC CONTROLS 2 Press the AUDIO button , then press the AUDIO button to select the audio functions as shown in the table below . 1 FLAT 2 JAZZ 3 ROCK -9- TURNING THE POWER OFF 1 Press the POWER button to adjust the selected function ; bass, treble, balance, fade, or volume. MODE bAS(bass) TRE(treble) bAL(balance) FAd(fader) VOL(volume) Turn left (Min) Turn right (Max) Down -5 UP +5 Down -5 UP +5 Left L9 Right R9 Rear R9 Down 0 Front F9 UP 35 SOUND...
Owners Manual
Page 11
CLOCK BUTTON (DISP 6 Press the DISP button to radio. When an audio function is performed while the time display is displayed. -10- The beep tones are set and "bP : on" is selected, the audio display will appear for 5 seconds, then the display will change the mode as shown below. BASS CONTROL 3 Press the SOUND button for more than 1.5 second to switch ON/OFF of the BASS mode. Each time the button is displayed. 3 To turn on , "BASS" is displayed and...
CLOCK BUTTON (DISP 6 Press the DISP button to radio. When an audio function is performed while the time display is displayed. -10- The beep tones are set and "bP : on" is selected, the audio display will appear for 5 seconds, then the display will change the mode as shown below. BASS CONTROL 3 Press the SOUND button for more than 1.5 second to switch ON/OFF of the BASS mode. Each time the button is displayed. 3 To turn on , "BASS" is displayed and...
Owners Manual
Page 12
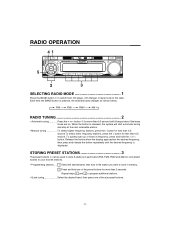
... time the BAND button is displayed. RADIO OPERATION 41 5 2 3 SELECTING RADIO MODE 1 Press the BAND button to switch from CD player, CD changer or tape mode to program additional stations. • Quick tuning Select the desired band, then press one of the six preset buttons. -11- When the button is released, the system will start automatic tuning and stop at the next receivable station. • Manual tuning To select higher frequency stations, press the > button for less than 0.5 second.To select lower frequency stations...
... time the BAND button is displayed. RADIO OPERATION 41 5 2 3 SELECTING RADIO MODE 1 Press the BAND button to switch from CD player, CD changer or tape mode to program additional stations. • Quick tuning Select the desired band, then press one of the six preset buttons. -11- When the button is released, the system will start automatic tuning and stop at the next receivable station. • Manual tuning To select higher frequency stations, press the > button for less than 0.5 second.To select lower frequency stations...
Owners Manual
Page 13
... the display. • If fewer than 6 stations can be received, the system will select and receive each of the preset stations stored in the display. • To scan programmed stations See "PRESET-SCAN-BUTTON OPERATION". ATP (AUTO TRAVEL PRESET) OPERATION 4 The Auto Travel Preset function searches for and memorizes the 6 strongest stations in one . • If ATP mode is selected in the display. 3 While ATP is illuminated, press the ATP button and the unit seeks...
... the display. • If fewer than 6 stations can be received, the system will select and receive each of the preset stations stored in the display. • To scan programmed stations See "PRESET-SCAN-BUTTON OPERATION". ATP (AUTO TRAVEL PRESET) OPERATION 4 The Auto Travel Preset function searches for and memorizes the 6 strongest stations in one . • If ATP mode is selected in the display. 3 While ATP is illuminated, press the ATP button and the unit seeks...
Owners Manual
Page 14
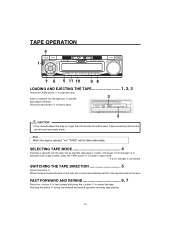
SELECTING TAPE MODE 4 Inserting a cassette into the tape slot and the tape player will automatically switch to the opposite side of one side, the unit will start the tape player. FAST FORWARD AND REWIND 6, 7 Press the > button to fast forward and press the < button to tape mode. * If a CD changer is connected. If radio, CD player or CD changer* is ejected, "no longer than 90 minutes should be flash alternately...
SELECTING TAPE MODE 4 Inserting a cassette into the tape slot and the tape player will automatically switch to the opposite side of one side, the unit will start the tape player. FAST FORWARD AND REWIND 6, 7 Press the > button to fast forward and press the < button to tape mode. * If a CD changer is connected. If radio, CD player or CD changer* is ejected, "no longer than 90 minutes should be flash alternately...
Owners Manual
Page 16
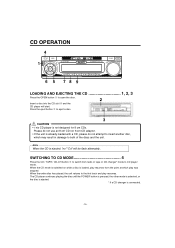
... CD MODE 4 Press the CD / TAPE / CD-CH button to switch from the point at which may result in damage to both of the discs and the unit. The CD player continues playing the disc until the POWER button is pressed, the other mode is selected, or the disc is ejected. * If a CD changer is already loaded with a CD, please do not use an 8 cm CD nor 8 cm CD adaptor. • If the unit is connected...
... CD MODE 4 Press the CD / TAPE / CD-CH button to switch from the point at which may result in damage to both of the discs and the unit. The CD player continues playing the disc until the POWER button is pressed, the other mode is selected, or the disc is ejected. * If a CD changer is already loaded with a CD, please do not use an 8 cm CD nor 8 cm CD adaptor. • If the unit is connected...
Owners Manual
Page 18
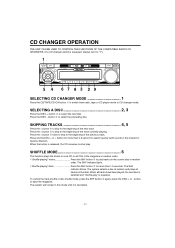
... 8 3 29 SELECTING CD CHANGER MODE 1 Press the CD/TAPE/CD-CH button to switch from radio, tape or CD player mode to search quickly (with sound) in the forward or reverse direction. again, press the DISC + or - CD CHANGER OPERATION THE UNIT CAN BE USED TO CONTROL THE FUNCTIONS OF THE COMPATIBLE SANYO CD CHANGERS. (If a CD changer switch is cancelled. The SHF indicator blinks. Press the < button to skip to the beginning of the next track. SHUFFLE MODE 6 This function plays the...
... 8 3 29 SELECTING CD CHANGER MODE 1 Press the CD/TAPE/CD-CH button to switch from radio, tape or CD player mode to search quickly (with sound) in the forward or reverse direction. again, press the DISC + or - CD CHANGER OPERATION THE UNIT CAN BE USED TO CONTROL THE FUNCTIONS OF THE COMPATIBLE SANYO CD CHANGERS. (If a CD changer switch is cancelled. The SHF indicator blinks. Press the < button to skip to the beginning of the next track. SHUFFLE MODE 6 This function plays the...
Owners Manual
Page 20
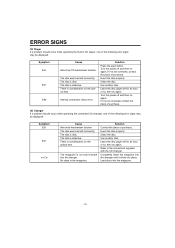
... the eject button. The disc is defective. Completely insert the magazine into place. Symptom E01 E07 no Cd Cause Abnormal mechanism function The disc was inserted incorrectly. The disc is dirty. The disc is dirty. Use another disc. CD Changer If a problem should occur while operating the built-in the magazine. There is not corrected, contact the place of the following error signs may be displayed...
... the eject button. The disc is defective. Completely insert the magazine into place. Symptom E01 E07 no Cd Cause Abnormal mechanism function The disc was inserted incorrectly. The disc is dirty. The disc is dirty. Use another disc. CD Changer If a problem should occur while operating the built-in the magazine. There is not corrected, contact the place of the following error signs may be displayed...
Owners Manual
Page 21
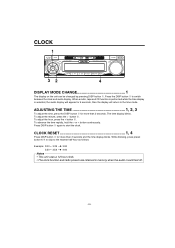
... unit uses a 12-hour clock. • The clock function and radio presets are retained in memory when the audio is selected, the audio display will appear for 5 seconds, then the display will return to the time mode. ADJUSTING THE TIME 1, 2, 3 To adjust the time, press the DISP button for more than 2 seconds and the time display blinks. To advance the time rapidly, hold the > or < button continuously. CLOCK RESET 1, 4 Press DISP button for more than 2 seconds. The time display...
... unit uses a 12-hour clock. • The clock function and radio presets are retained in memory when the audio is selected, the audio display will appear for 5 seconds, then the display will return to the time mode. ADJUSTING THE TIME 1, 2, 3 To adjust the time, press the DISP button for more than 2 seconds and the time display blinks. To advance the time rapidly, hold the > or < button continuously. CLOCK RESET 1, 4 Press DISP button for more than 2 seconds. The time display...
Owners Manual
Page 22
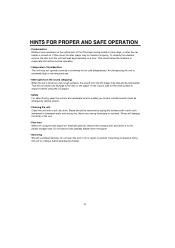
... safer driving, keep the volume at a moderate level to enable you to evaporate and restore normal operation. • Temperature Consideration The unit may skip and be removed by wiping the surfaces with a soft, dry cloth. Do not leave a disc partially ejected from the unit and wait approximately one hour. To remedy the situation, remove the disc from the player. • Servicing Should a problem develop...
... safer driving, keep the volume at a moderate level to enable you to evaporate and restore normal operation. • Temperature Consideration The unit may skip and be removed by wiping the surfaces with a soft, dry cloth. Do not leave a disc partially ejected from the unit and wait approximately one hour. To remedy the situation, remove the disc from the player. • Servicing Should a problem develop...
Owners Manual
Page 23
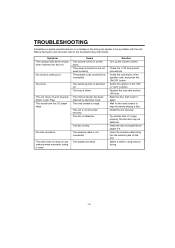
... before playing a disc. Replace the fuse with the unit. TROUBLESHOOTING Sometimes a simple operational error or a mistake in the wiring can appear to be defective. The power connections are weak. The microcomputer has been affected by electrical noise. Before having the unit serviced, refer to the troubleshooting chart below. The speaker code connection is not mounted securely. The antenna cable is defective. The disc is not connected. Insert the antenna cable firmly into the unit. Select a station using manual tuning. -22...
... before playing a disc. Replace the fuse with the unit. TROUBLESHOOTING Sometimes a simple operational error or a mistake in the wiring can appear to be defective. The power connections are weak. The microcomputer has been affected by electrical noise. Before having the unit serviced, refer to the troubleshooting chart below. The speaker code connection is not mounted securely. The antenna cable is defective. The disc is not connected. Insert the antenna cable firmly into the unit. Select a station using manual tuning. -22...
Owners Manual
Page 28
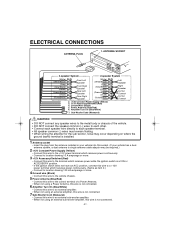
... which receives power continuously. (Same as item 2.) • Connect to location drawing 100 mA amperage or more. 4 Ground wire (Black) • Connect this wire to the vehicle chassis. 5 Power Antenna (Blue/Red) • Connect this wire to the control terminal of a Power Antenna. • When not using a Power Antenna, this wire is not connected. 6 Amplifier Turn On (Blue/White) • Connect this wire to an external amplifier. • When not using an external amplifier, this wire is not connected. 7 Sub-Woofer Cord...
... which receives power continuously. (Same as item 2.) • Connect to location drawing 100 mA amperage or more. 4 Ground wire (Black) • Connect this wire to the vehicle chassis. 5 Power Antenna (Blue/Red) • Connect this wire to the control terminal of a Power Antenna. • When not using a Power Antenna, this wire is not connected. 6 Amplifier Turn On (Blue/White) • Connect this wire to an external amplifier. • When not using an external amplifier, this wire is not connected. 7 Sub-Woofer Cord...
Owners Manual
Page 29
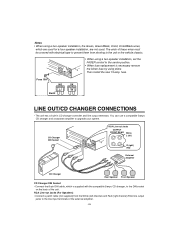
... amp. CD Changer DIN Socket RCA Line-out Jacks OUTPUT FRONT REAR White L (eft) R (ight) Red External Amplifier CD Changer Rear Speaker Front Speaker CD Changer DIN Socket • Connect the 8-pin DIN cable, which are used for a four-speaker installation, are not used. Notes • When using a two-speaker installation, the Green, Green/Black, Violet, Violet/Black wires, which is necessary remove the blown fuse by using a two-speaker installation, set the FADER control to the center position. • When fuse replacement...
... amp. CD Changer DIN Socket RCA Line-out Jacks OUTPUT FRONT REAR White L (eft) R (ight) Red External Amplifier CD Changer Rear Speaker Front Speaker CD Changer DIN Socket • Connect the 8-pin DIN cable, which are used for a four-speaker installation, are not used. Notes • When using a two-speaker installation, the Green, Green/Black, Violet, Violet/Black wires, which is necessary remove the blown fuse by using a two-speaker installation, set the FADER control to the center position. • When fuse replacement...


