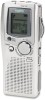
Instruction Manual
Page 2
... live in! ENGLISH CONTENTS PRECAUTIONS 2 CONTROLS 3 POWER SUPPLY 5 SD CARD 6 BEFORE OPERATION 7 ADJUSTING THE DATE AND TIME 8 SELECTING THE FOLDER AND MENU 9 RECORDING 13 EDITING THE RECORDED DATA 15 PLAYBACK 17 SELECTING DISPLAY 19 ERASING 20 ERASE GUARD 24 ALARM TIMER 25 BEFORE INSTALLING THE APPLICATION SOFTWARE 26 PLAYING BACK/EDITING A DATA FILE RECORDED WITH YOUR PC ......... 26 PC CONNECTION 28 CLEANING THE CABINET 30 TROUBLESHOOTING GUIDE 31 USER LICENSE AGREEMENT 33 Your SANYO product is...
... live in! ENGLISH CONTENTS PRECAUTIONS 2 CONTROLS 3 POWER SUPPLY 5 SD CARD 6 BEFORE OPERATION 7 ADJUSTING THE DATE AND TIME 8 SELECTING THE FOLDER AND MENU 9 RECORDING 13 EDITING THE RECORDED DATA 15 PLAYBACK 17 SELECTING DISPLAY 19 ERASING 20 ERASE GUARD 24 ALARM TIMER 25 BEFORE INSTALLING THE APPLICATION SOFTWARE 26 PLAYING BACK/EDITING A DATA FILE RECORDED WITH YOUR PC ......... 26 PC CONNECTION 28 CLEANING THE CABINET 30 TROUBLESHOOTING GUIDE 31 USER LICENSE AGREEMENT 33 Your SANYO product is...
Instruction Manual
Page 3
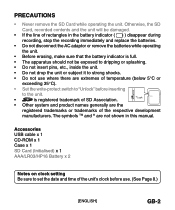
...;C). • Set the write-protect switch to "Unlock" before inserting to set the date and time of SD Association. • Other system and product names generally are not shown in the battery indicator ( ) disappear during recording, stop the recording immediately and replace the batteries. • Do not disconnect the AC adaptor or remove the batteries while operating the unit. • Before erasing, make sure that the battery indicator...
...;C). • Set the write-protect switch to "Unlock" before inserting to set the date and time of SD Association. • Other system and product names generally are not shown in the battery indicator ( ) disappear during recording, stop the recording immediately and replace the batteries. • Do not disconnect the AC adaptor or remove the batteries while operating the unit. • Before erasing, make sure that the battery indicator...

Instruction Manual
Page 4
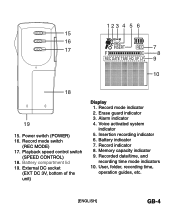
Recording indicator 3. External microphone socket (MIC) 4. Built-in speaker 9 11. Display GB-3 [ENGLISH] Built-in microphone 5. Control button (VOLUME, TIME/SET, MENU/ FOLDER) 6 7. Index/Cancel button (INDEX/CANCEL) 13. Create file/Pause button 7 (CREATE FILE) 9. Earphone socket (EAR) 2. Fast forward/Rewind buttons (F,E) 8. Erasing button (ERASE) 12. CONTROLS 2 1 34 14 13 12 11 10 1. Operation switch (DICT, STOP, PLAY, REV) 5 6. Digital I/O terminal cover 8 (DIGITAL I/O) 10. SD Card compartment lid 14.
Recording indicator 3. External microphone socket (MIC) 4. Built-in speaker 9 11. Display GB-3 [ENGLISH] Built-in microphone 5. Control button (VOLUME, TIME/SET, MENU/ FOLDER) 6 7. Index/Cancel button (INDEX/CANCEL) 13. Create file/Pause button 7 (CREATE FILE) 9. Earphone socket (EAR) 2. Fast forward/Rewind buttons (F,E) 8. Erasing button (ERASE) 12. CONTROLS 2 1 34 14 13 12 11 10 1. Operation switch (DICT, STOP, PLAY, REV) 5 6. Digital I/O terminal cover 8 (DIGITAL I/O) 10. SD Card compartment lid 14.
Instruction Manual
Page 5
Record mode switch (REC MODE) 17. Record indicator 8. Playback speed control switch (SPEED CONTROL) 18. Voice activated system indicator 5. Erase guard indicator 3. Recorded date/time, and recording time mode indicators 10. Alarm indicator 4. Insertion recording indicator 6. Memory capacity indicator 9. Battery compartment lid 19. External DC socket (EXT DC 3V, bottom of the unit) Display 1. 123 4 5 6 15 16 VAS 17 INSERT F REC 7 E 8 REC DATE TIME HQ SP LP 9 10 18 19 15. Record mode indicator 2. User, folder, recording time, operation guides, etc. [ENGLISH...
Record mode switch (REC MODE) 17. Record indicator 8. Playback speed control switch (SPEED CONTROL) 18. Voice activated system indicator 5. Erase guard indicator 3. Recorded date/time, and recording time mode indicators 10. Alarm indicator 4. Insertion recording indicator 6. Memory capacity indicator 9. Battery compartment lid 19. External DC socket (EXT DC 3V, bottom of the unit) Display 1. 123 4 5 6 15 16 VAS 17 INSERT F REC 7 E 8 REC DATE TIME HQ SP LP 9 10 18 19 15. Record mode indicator 2. User, folder, recording time, operation guides, etc. [ENGLISH...

Instruction Manual
Page 7
.... 2. Open the SD Card compartment lid. 3. Check the edge of the unit) to static electricity or electric noise. • Recorded data on the card may not work correctly with a different Digital Voice Recorder. • If the card is not inserted, "NO CARD" appears when the power is turned on. • When a SD Card is loaded, the unit automatically creates a VoiceRec folder, etc. Inserting the SD Card 1. Open...
.... 2. Open the SD Card compartment lid. 3. Check the edge of the unit) to static electricity or electric noise. • Recorded data on the card may not work correctly with a different Digital Voice Recorder. • If the card is not inserted, "NO CARD" appears when the power is turned on. • When a SD Card is loaded, the unit automatically creates a VoiceRec folder, etc. Inserting the SD Card 1. Open...
Instruction Manual
Page 8
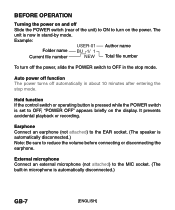
BEFORE OPERATION Turning the power on and off Slide the POWER switch (rear of the unit) to ON to turn off automatically in about 10 minutes after entering the stop mode. Example: USER-01 Author name Folder name BU 1/ 1 Current file number NEW Total file number To turn on the display. It prevents accidental playback or recording. External microphone Connect an external microphone (not attached) to the MIC socket. (The built-in microphone is automatically disconnected.) Note...
BEFORE OPERATION Turning the power on and off Slide the POWER switch (rear of the unit) to ON to turn off automatically in about 10 minutes after entering the stop mode. Example: USER-01 Author name Folder name BU 1/ 1 Current file number NEW Total file number To turn on the display. It prevents accidental playback or recording. External microphone Connect an external microphone (not attached) to the MIC socket. (The built-in microphone is automatically disconnected.) Note...
Instruction Manual
Page 11
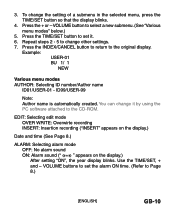
... the TIME/SET button to set the alarm ON time. (Refer to select a new submenu. (See "Various menu modes" below.) 5. To change it . 6. ID99/USER-99 Note: Author name is automatically created. VOLUME buttons to set it by using the PC software attached to the CD-ROM. Example: USER-01 BU 1/ 1 NEW Various menu modes AUTHOR: Selecting ID number/Author name ID01/USER-01 - Use the TIME/SET, + and - VOLUME button to Page 8.) [ENGLISH] GB...
... the TIME/SET button to set the alarm ON time. (Refer to select a new submenu. (See "Various menu modes" below.) 5. To change it . 6. ID99/USER-99 Note: Author name is automatically created. VOLUME buttons to set it by using the PC software attached to the CD-ROM. Example: USER-01 BU 1/ 1 NEW Various menu modes AUTHOR: Selecting ID number/Author name ID01/USER-01 - Use the TIME/SET, + and - VOLUME button to Page 8.) [ENGLISH] GB...
Instruction Manual
Page 12
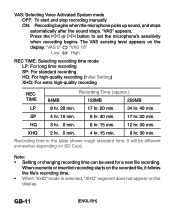
... the sound stops. "VAS 0" "VAS 10" Low High REC TIME: Selecting recording time mode LP: For long time recording SP: For standard recording HQ: For high-quality recording (Initial Setting) XHQ: For extra high-quality recording REC TIME 64MB Recording Time (approx.) 128MB 256MB LP 8 hr. 20 min. 17 hr. 20 min. 34 hr. 40 min. GB-11 [ENGLISH] Press the F or E button to set the microphone's sensitivity when recording begins. The VAS sensing level...
... the sound stops. "VAS 0" "VAS 10" Low High REC TIME: Selecting recording time mode LP: For long time recording SP: For standard recording HQ: For high-quality recording (Initial Setting) XHQ: For extra high-quality recording REC TIME 64MB Recording Time (approx.) 128MB 256MB LP 8 hr. 20 min. 17 hr. 20 min. 34 hr. 40 min. GB-11 [ENGLISH] Press the F or E button to set the microphone's sensitivity when recording begins. The VAS sensing level...
Instruction Manual
Page 14
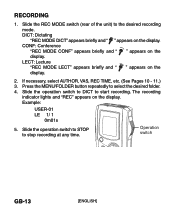
... display. Example: USER-01 LE 1/ 1 0m01s 5. RECORDING 1. LECT: Lecture "REC MODE LECT" appears briefly and " " appears on the display. Slide the REC MODE switch (rear of the unit) to start recording. DICT: Dictating "REC MODE DICT" appears briefly and " " appears on the display. 2. If necessary, select AUTHOR, VAS, REC TIME, etc. (See Pages 10 - 11.) 3. Press the MENU/FOLDER button repeatedly to stop recording at any time. Slide the operation switch to STOP to select the desired folder. 4. Operation switch...
... display. Example: USER-01 LE 1/ 1 0m01s 5. RECORDING 1. LECT: Lecture "REC MODE LECT" appears briefly and " " appears on the display. Slide the REC MODE switch (rear of the unit) to start recording. DICT: Dictating "REC MODE DICT" appears briefly and " " appears on the display. 2. If necessary, select AUTHOR, VAS, REC TIME, etc. (See Pages 10 - 11.) 3. Press the MENU/FOLDER button repeatedly to stop recording at any time. Slide the operation switch to STOP to select the desired folder. 4. Operation switch...
Instruction Manual
Page 15
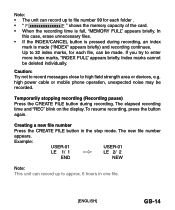
... recording continues. Up to file number 99 for each folder . • "F E " shows the memory capacity of the card. • When the recording time is pressed during recording. Caution: Try not to record messages close to enter more index marks, "INDEX FULL" appears briefly. high power cable or mobile phone operation, unexpected noise may be deleted individually. The elapsed recording time and "REC" blink on the display. Example: USER-01 USER-01 LE 1/ 1 x LE 2/ 2 END NEW...
... recording continues. Up to file number 99 for each folder . • "F E " shows the memory capacity of the card. • When the recording time is pressed during recording. Caution: Try not to record messages close to enter more index marks, "INDEX FULL" appears briefly. high power cable or mobile phone operation, unexpected noise may be deleted individually. The elapsed recording time and "REC" blink on the display. Example: USER-01 USER-01 LE 1/ 1 x LE 2/ 2 END NEW...

Instruction Manual
Page 19
Review To review the recorded sound while playing back the selected file, slide and hold the operation switch to REV. The unit will search at high speed in the stop mode. These buttons are also used in the forward or reverse direction while the button is released, playback will continue. Index search If an index mark was made in the file, press the INDEX/CANCEL button during playback, the unit will search for...
Review To review the recorded sound while playing back the selected file, slide and hold the operation switch to REV. The unit will search at high speed in the stop mode. These buttons are also used in the forward or reverse direction while the button is released, playback will continue. Index search If an index mark was made in the file, press the INDEX/CANCEL button during playback, the unit will search for...

Instruction Manual
Page 20
...In the playback mode: Recorded date/time v Current day/time v Remaining playing time v Original display returns In the stop mode. When the remaining recording time is less than one hour, it is displayed as 1h24m. SELECTING DISPLAY Press the TIME/SET button repeatedly during recording, playing and stop mode: Remaining recording time v Current day/time v Original display returns GB-19 [ENGLISH] The display changes as follows: In the recording mode: Remaining recording time v Current day/time v Original display returns Example of remaining recording time: Author USER-01 REMAIN...
...In the playback mode: Recorded date/time v Current day/time v Remaining playing time v Original display returns In the stop mode. When the remaining recording time is less than one hour, it is displayed as 1h24m. SELECTING DISPLAY Press the TIME/SET button repeatedly during recording, playing and stop mode: Remaining recording time v Current day/time v Original display returns GB-19 [ENGLISH] The display changes as follows: In the recording mode: Remaining recording time v Current day/time v Original display returns Example of remaining recording time: Author USER-01 REMAIN...
Instruction Manual
Page 21
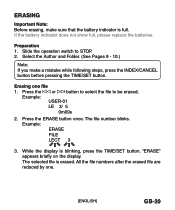
... Folder. (See Pages 9 - 10.) Note: If you make sure that the battery indicator is full. Press the ERASE button once. Example: ERASE FILE LECT 3 3. All the file numbers after the erased file are reduced by one file 1. Slide the operation switch to be erased. Erasing one . [ENGLISH] GB-20 While the display is erased. Press the F or E button to select the file to STOP. 2. The selected file is blinking, press the TIME/SET button. The file number blinks. ERASING...
... Folder. (See Pages 9 - 10.) Note: If you make sure that the battery indicator is full. Press the ERASE button once. Example: ERASE FILE LECT 3 3. All the file numbers after the erased file are reduced by one file 1. Slide the operation switch to be erased. Erasing one . [ENGLISH] GB-20 While the display is erased. Press the F or E button to select the file to STOP. 2. The selected file is blinking, press the TIME/SET button. The file number blinks. ERASING...
Instruction Manual
Page 23
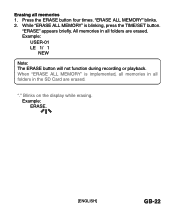
Example: ERASE. [ENGLISH] GB-22 "ERASE" appears briefly. When "ERASE ALL MEMORY" is blinking, press the TIME/SET button. "." Blinks on the display while erasing. Erasing all folders are erased. "ERASE ALL MEMORY" blinks. 2. Example: USER-01 LE 1/ 1 NEW Note: The ERASE button will not function during recording or playback. All memories in the SD Card are erased. While "ERASE ALL MEMORY" is implemented, all memories in all folders in all memories 1. Press the ERASE button four times.
Example: ERASE. [ENGLISH] GB-22 "ERASE" appears briefly. When "ERASE ALL MEMORY" is blinking, press the TIME/SET button. "." Blinks on the display while erasing. Erasing all folders are erased. "ERASE ALL MEMORY" blinks. 2. Example: USER-01 LE 1/ 1 NEW Note: The ERASE button will not function during recording or playback. All memories in the SD Card are erased. While "ERASE ALL MEMORY" is implemented, all memories in all folders in all memories 1. Press the ERASE button four times.
Instruction Manual
Page 24
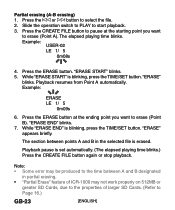
... pause at the ending point you want to erase (Point B). Slide the operation switch to PLAY to Page 16.) GB-23 [ENGLISH] The section between points A and B in partial erasing. • "Partial Erase" feature of ICR-1000 may be produced to the time between A and B designated in the selected file is set automatically. (The elapsed playing time blinks.) Press the CREATE FILE button again or stop playback. Press the ERASE button...
... pause at the ending point you want to erase (Point B). Slide the operation switch to PLAY to Page 16.) GB-23 [ENGLISH] The section between points A and B in partial erasing. • "Partial Erase" feature of ICR-1000 may be produced to the time between A and B designated in the selected file is set automatically. (The elapsed playing time blinks.) Press the CREATE FILE button again or stop playback. Press the ERASE button...
Instruction Manual
Page 27
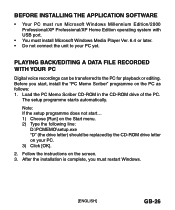
.... The setup programme starts automatically. Note: If the setup programme does not start , install the "PC Memo Scriber" programme on your PC yet. After the installation is complete, you start ... 1) Choose [Run] on the Start menu. 2) Type the following line: D:\PCMEMO\setup.exe "D" (the drive letter) should be transferred to your PC. 3) Click [OK]. 2. PLAYING BACK/EDITING A DATA FILE RECORDED WITH YOUR PC Digital voice recordings can be replaced by...
.... The setup programme starts automatically. Note: If the setup programme does not start , install the "PC Memo Scriber" programme on your PC yet. After the installation is complete, you start ... 1) Choose [Run] on the Start menu. 2) Type the following line: D:\PCMEMO\setup.exe "D" (the drive letter) should be transferred to your PC. 3) Click [OK]. 2. PLAYING BACK/EDITING A DATA FILE RECORDED WITH YOUR PC Digital voice recordings can be replaced by...
Instruction Manual
Page 31
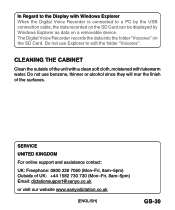
The Digital Voice Recorder records the data into the folder "Voicerec" on a removable device. CLEANING THE CABINET Clean the outside of the unit with a clean soft cloth, moistened with Windows Explorer When the Digital Voice Recorder is connected to a PC by the USB connection cable, the data recorded on the SD Card can be displayed by Windows Explorer as data on the SD Card. SERVICE UNITED KINGDOM For online support and assistance contact: UK...
The Digital Voice Recorder records the data into the folder "Voicerec" on a removable device. CLEANING THE CABINET Clean the outside of the unit with a clean soft cloth, moistened with Windows Explorer When the Digital Voice Recorder is connected to a PC by the USB connection cable, the data recorded on the SD Card can be displayed by Windows Explorer as data on the SD Card. SERVICE UNITED KINGDOM For online support and assistance contact: UK...
Instruction Manual
Page 32
... not operate. The batteries are discharged or not installed. Unplug the earphone. Press the + VOLUME button to ON. Insertion recording is plugged in. GB-31 [ENGLISH] " " and "LOW BATT" appear. No sound. The earphone is not available. Cannot erase. The memory capacity is turned down completely. "MEMORY FULL" appears. Insert two new "AAA/LR03/HP16" batteries. Slide the POWER switch to adjust the sound level. The erase guard is set . Refer to "ERASING...
... not operate. The batteries are discharged or not installed. Unplug the earphone. Press the + VOLUME button to ON. Insertion recording is plugged in. GB-31 [ENGLISH] " " and "LOW BATT" appear. No sound. The earphone is not available. Cannot erase. The memory capacity is turned down completely. "MEMORY FULL" appears. Insert two new "AAA/LR03/HP16" batteries. Slide the POWER switch to adjust the sound level. The erase guard is set . Refer to "ERASING...
Instruction Manual
Page 34
... Agreement") shall serve as a legally binding instrument between you (as user manuals), and electronic documents whether or not retrieved by licensee "on-line", and shall include any updates and upgrades thereof supplied by Licensor having additional features and functions. BY INSTALLING, COPYING, ACCESSING, DOWNLOADING, AND/OR USING THIS THE SOFTWARE, YOU ARE CONSENTING TO BE BOUND BY AND ARE BECOMING A PARTY...
... Agreement") shall serve as a legally binding instrument between you (as user manuals), and electronic documents whether or not retrieved by licensee "on-line", and shall include any updates and upgrades thereof supplied by Licensor having additional features and functions. BY INSTALLING, COPYING, ACCESSING, DOWNLOADING, AND/OR USING THIS THE SOFTWARE, YOU ARE CONSENTING TO BE BOUND BY AND ARE BECOMING A PARTY...
Instruction Manual
Page 36
... in the Software not specifically provided herein. All additional software code made available by anything contained in or done pursuant to this Software shall remain with the Licensor's policy set out in User Manual, On-line documents, or other printed matters made available to Licensee as user manual and any and all copies thereof. The proprietary ownership of all data operated using this...
... in the Software not specifically provided herein. All additional software code made available by anything contained in or done pursuant to this Software shall remain with the Licensor's policy set out in User Manual, On-line documents, or other printed matters made available to Licensee as user manual and any and all copies thereof. The proprietary ownership of all data operated using this...


