Service Manual
Page 37
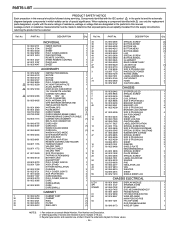
...type resistor and capacitor are designated in the parts list in this manual should be made to the customer. PARTS LIST PRODUCT SAFETY NOTICE Each precaution in this manual. DESCRIPTION Q'ty Ref. No. When replacing a component identified with the IEC symbol ! No. Ordering quantity of screws and resistors must contain Model Number, Part Number... 3900 661 052 2321 SPECIAL SCREW BUTTON,ENTER BUTTON,VOL BUTTON,MENU BUTTON,MODE LUG SPECIAL SCREW BUTTON,SCROLL ILLUMINANT REAR CABINET ASSY LID ASSY,CD KNOB,OPEN SCR S-TPG BIN 2.6X8 KNOB,SLIDE,POWER RATING LABEL LABEL,LICENSE,DTS CAP,...
...type resistor and capacitor are designated in the parts list in this manual should be made to the customer. PARTS LIST PRODUCT SAFETY NOTICE Each precaution in this manual. DESCRIPTION Q'ty Ref. No. When replacing a component identified with the IEC symbol ! No. Ordering quantity of screws and resistors must contain Model Number, Part Number... 3900 661 052 2321 SPECIAL SCREW BUTTON,ENTER BUTTON,VOL BUTTON,MENU BUTTON,MODE LUG SPECIAL SCREW BUTTON,SCROLL ILLUMINANT REAR CABINET ASSY LID ASSY,CD KNOB,OPEN SCR S-TPG BIN 2.6X8 KNOB,SLIDE,POWER RATING LABEL LABEL,LICENSE,DTS CAP,...
Owners Manual
Page 2
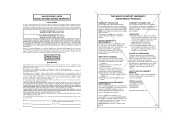
SANYO MOBILE AUDIO MODEL NV-E7000 LIMITED WARRANTY OBLIGATIONS In order to obtain warranty service, the product must present your original, dated bill-of the product after repair. THIS WARRANTY APPLIES ONLY TO THE ORIGINAL RETAIL USER, AND DOES NOT APPLY TO PRODUCTS USED FOR ANY INDUSTRIAL, PROFESSIONAL OR COMMERCIAL PURPOSE. The warranty period commences on SANYO products purchased and used condition. (c) Problems due...
SANYO MOBILE AUDIO MODEL NV-E7000 LIMITED WARRANTY OBLIGATIONS In order to obtain warranty service, the product must present your original, dated bill-of the product after repair. THIS WARRANTY APPLIES ONLY TO THE ORIGINAL RETAIL USER, AND DOES NOT APPLY TO PRODUCTS USED FOR ANY INDUSTRIAL, PROFESSIONAL OR COMMERCIAL PURPOSE. The warranty period commences on SANYO products purchased and used condition. (c) Problems due...
Owners Manual
Page 3
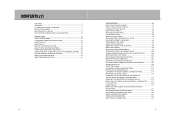
... SAVED ROUTES LIST 109 ROUTE SIMULATION 112 CHANGING THE MAIN SCREEN SETTINGS 113 SETTING THE 2-SCREEN DISPLAY 115 CHANGING THE ROUTE GUIDANCE SCREEN SETTINGS 118 INDICATING THE STREET NAME 122 CHANGING THE UNIT OF DISTANCE, THE COLOR OF THE MAP AND THE PRESENT LOCATION MARK 123 DISABLING THE REGISTERED POINT MARK DISPLAY 124 DISPLAYING LATITUDINAL AND LONGITUDINAL COORDINATES............125 CLOCK SETTING 126 USING TRACKS 127 MODIFYING THE PRESENT LOCATION MARK LOCATION AND BEARING 131 EDITING/VIEWING REGISTERED POINTS 133 RETRIEVING REGISTERED POINT MAPS 136 DELETING...
... SAVED ROUTES LIST 109 ROUTE SIMULATION 112 CHANGING THE MAIN SCREEN SETTINGS 113 SETTING THE 2-SCREEN DISPLAY 115 CHANGING THE ROUTE GUIDANCE SCREEN SETTINGS 118 INDICATING THE STREET NAME 122 CHANGING THE UNIT OF DISTANCE, THE COLOR OF THE MAP AND THE PRESENT LOCATION MARK 123 DISABLING THE REGISTERED POINT MARK DISPLAY 124 DISPLAYING LATITUDINAL AND LONGITUDINAL COORDINATES............125 CLOCK SETTING 126 USING TRACKS 127 MODIFYING THE PRESENT LOCATION MARK LOCATION AND BEARING 131 EDITING/VIEWING REGISTERED POINTS 133 RETRIEVING REGISTERED POINT MAPS 136 DELETING...
Owners Manual
Page 4
... CONNECTING A VIDEO DECK/VIDEO CAMERA 177 HOW TO ADJUST THE IMAGE 178 ABOUT THE AUTOMATIC BRIGHTNESS ADJUSTMENT FUNCTION .........181 ABOUT THE BRIGHTNESS OF THE BUTTONS 181 MAIN SPECIFICATIONS 182 RECEIVING SIGNALS FROM THE GPS SATELLITE 183 CAUTIONARY ITEMS DURING ROUTE GUIDANCE 185 ABOUT THE VOICE GUIDANCE 189 ABOUT THE MAP DVD-ROM 191 SETTING THE DEPARTURE/WAYPOINT/DESTINATION POINTS 193 ABOUT UPGRADES 195 TROUBLESHOOTING 197 WHEN THIS MESSAGE APPEARS 204 NAVIGATION SYSTEM DEFAULT SETTINGS LIST 205...
... CONNECTING A VIDEO DECK/VIDEO CAMERA 177 HOW TO ADJUST THE IMAGE 178 ABOUT THE AUTOMATIC BRIGHTNESS ADJUSTMENT FUNCTION .........181 ABOUT THE BRIGHTNESS OF THE BUTTONS 181 MAIN SPECIFICATIONS 182 RECEIVING SIGNALS FROM THE GPS SATELLITE 183 CAUTIONARY ITEMS DURING ROUTE GUIDANCE 185 ABOUT THE VOICE GUIDANCE 189 ABOUT THE MAP DVD-ROM 191 SETTING THE DEPARTURE/WAYPOINT/DESTINATION POINTS 193 ABOUT UPGRADES 195 TROUBLESHOOTING 197 WHEN THIS MESSAGE APPEARS 204 NAVIGATION SYSTEM DEFAULT SETTINGS LIST 205...
Owners Manual
Page 12
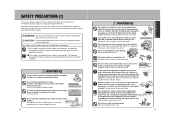
... 12V automobile cigarette lighter connection cable Included AC/DC adaptor Do not view the navigation maps, DVDs or videos while walking. I hate rain! Dangerous Do not operate the unit or replace discs while driving. Traffic accidents may result. Accidents, fires or electric shocks may cause fires or electric shocks. 12V vehicle battery 120V AC power source Use only the specified power cord (shown on the...
... 12V automobile cigarette lighter connection cable Included AC/DC adaptor Do not view the navigation maps, DVDs or videos while walking. I hate rain! Dangerous Do not operate the unit or replace discs while driving. Traffic accidents may result. Accidents, fires or electric shocks may cause fires or electric shocks. 12V vehicle battery 120V AC power source Use only the specified power cord (shown on the...
Owners Manual
Page 22
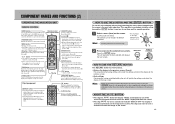
... a video deck/video camera connected) every time this button is pressed, the map display switches from the NAVI mode to the DVD mode to the VIDEO mode (only with the inputted number. ¡Pressing when the ABC input screen is displayed will start a search for the inputted point of interest or geographic name. Ebutton This button displays the telephone number input screen when searching for a destination by telephone number. êbutton 10-key and editing button Used when inputting alphanumerically. 39...
... a video deck/video camera connected) every time this button is pressed, the map display switches from the NAVI mode to the DVD mode to the VIDEO mode (only with the inputted number. ¡Pressing when the ABC input screen is displayed will start a search for the inputted point of interest or geographic name. Ebutton This button displays the telephone number input screen when searching for a destination by telephone number. êbutton 10-key and editing button Used when inputting alphanumerically. 39...
Owners Manual
Page 24
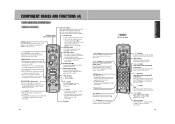
...) 10-key button Used when inputting numeric values. #button Every time this button is pressed, the repeat mode is to select shuffle playback. (See p.154) !button Press this button to the image adjustment mode. (See p.178) Qbutton ¡This cuts the sound output. Press again for over 2 seconds to redisplay the screen. (See p.144) PLAY/PAUSE button (q) ¡Press to display the initial settings screen and setup key. (See...
...) 10-key button Used when inputting numeric values. #button Every time this button is pressed, the repeat mode is to select shuffle playback. (See p.154) !button Press this button to the image adjustment mode. (See p.178) Qbutton ¡This cuts the sound output. Press again for over 2 seconds to redisplay the screen. (See p.144) PLAY/PAUSE button (q) ¡Press to display the initial settings screen and setup key. (See...
Owners Manual
Page 30
... SAVED ROUTES LIST 109 ROUTE SIMULATION 112 CHANGING THE MAIN SCREEN SETTINGS 113 SETTING THE 2-SCREEN DISPLAY 115 CHANGING THE ROUTE GUIDANCE SCREEN SETTINGS 118 INDICATING THE STREET NAME 122 CHANGING THE UNIT OF DISTANCE, THE COLOR OF THE MAP AND THE PRESENT LOCATION MARK 123 DISABLING THE REGISTERED POINT MARK DISPLAY 124 DISPLAYING LATITUDINAL AND LONGITUDINAL COORDINATES............125 CLOCK SETTING 126 USING TRACKS 127 MODIFYING THE PRESENT LOCATION MARK LOCATION AND BEARING 131 EDITING/VIEWING REGISTERED POINTS 133 RETRIEVING REGISTERED POINT MAPS 136 DELETING...
... SAVED ROUTES LIST 109 ROUTE SIMULATION 112 CHANGING THE MAIN SCREEN SETTINGS 113 SETTING THE 2-SCREEN DISPLAY 115 CHANGING THE ROUTE GUIDANCE SCREEN SETTINGS 118 INDICATING THE STREET NAME 122 CHANGING THE UNIT OF DISTANCE, THE COLOR OF THE MAP AND THE PRESENT LOCATION MARK 123 DISABLING THE REGISTERED POINT MARK DISPLAY 124 DISPLAYING LATITUDINAL AND LONGITUDINAL COORDINATES............125 CLOCK SETTING 126 USING TRACKS 127 MODIFYING THE PRESENT LOCATION MARK LOCATION AND BEARING 131 EDITING/VIEWING REGISTERED POINTS 133 RETRIEVING REGISTERED POINT MAPS 136 DELETING...

Owners Manual
Page 32
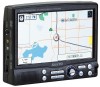
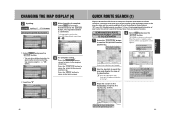
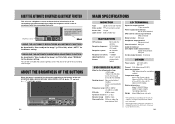
... before being effectuated. PLANIMETRIC MAP SCREEN 2 Bearing indicator 1 GPS reception display 3 Simple turning mark 4 Recommended route indicator 8 Road 7 Reduction scale 5 Estimated time to destination and distance remaining 6 Indicator denoting your vehicle For about 3 to destination and the determined or is remaining determined. HOW TO VIEW THE MAP SCREEN THE FOLLOWING IS A TYPICAL EXAMPLE OF A MAP DISPLAY The navigation system displays various types of your vehicle 1 GPS reception display 5 Estimated time to Indicates a color denoting...
... before being effectuated. PLANIMETRIC MAP SCREEN 2 Bearing indicator 1 GPS reception display 3 Simple turning mark 4 Recommended route indicator 8 Road 7 Reduction scale 5 Estimated time to destination and distance remaining 6 Indicator denoting your vehicle For about 3 to destination and the determined or is remaining determined. HOW TO VIEW THE MAP SCREEN THE FOLLOWING IS A TYPICAL EXAMPLE OF A MAP DISPLAY The navigation system displays various types of your vehicle 1 GPS reception display 5 Estimated time to Indicates a color denoting...
Owners Manual
Page 36
..., "Moving the map". w Inputting "B" QUICK ROUTE SEARCH (1) Align the destination with the cursor and press the quick route button to initiate a search for the way home from your present location. I Present location display screen (example) 2 Use the Joystick to the destination based on the screen to return to the present location map. Choosing the most detailed map reduces the positioning error! CHANGING THE MAP DISPLAY (4) 2 Inputting. Press the Display Map on the map disc data and the search...
..., "Moving the map". w Inputting "B" QUICK ROUTE SEARCH (1) Align the destination with the cursor and press the quick route button to initiate a search for the way home from your present location. I Present location display screen (example) 2 Use the Joystick to the destination based on the screen to return to the present location map. Choosing the most detailed map reduces the positioning error! CHANGING THE MAP DISPLAY (4) 2 Inputting. Press the Display Map on the map disc data and the search...
Owners Manual
Page 46
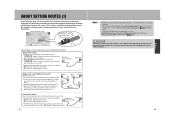
... also be made available. ABOUT SETTING ROUTES (1) When setting a route, the unit searches for a reference route from the departure location to the destination based on the registered conditions and the map disc data and displays a map on the screen. (This screen is called the route guidance screen.) By using this route, right? Set route Route setting is mainly effectuated as the departure point. ¡Locations you want to use on your home". See p.105, "Modifying route conditions". ¡...
... also be made available. ABOUT SETTING ROUTES (1) When setting a route, the unit searches for a reference route from the departure location to the destination based on the registered conditions and the map disc data and displays a map on the screen. (This screen is called the route guidance screen.) By using this route, right? Set route Route setting is mainly effectuated as the departure point. ¡Locations you want to use on your home". See p.105, "Modifying route conditions". ¡...
Owners Manual
Page 58
... set in the opposite traffic lane due to signal errors from the GPS satellite resulting in a displayed route with a reversed heading. ¡If there are no other roads or if the alternative route provided by the search result is too long a detour, you may stray from the search result route when the detour route is displayed. 1 Press the É button. 2 Select Reroute from the drop-down menu...
... set in the opposite traffic lane due to signal errors from the GPS satellite resulting in a displayed route with a reversed heading. ¡If there are no other roads or if the alternative route provided by the search result is too long a detour, you may stray from the search result route when the detour route is displayed. 1 Press the É button. 2 Select Reroute from the drop-down menu...
Owners Manual
Page 64
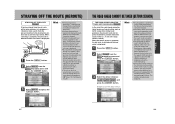
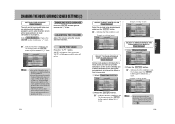
...-effectuate a reference route search automatically from the drop-down menu and press the Ä button. Pressing down on the Joystick (d) will enable the unit to place a mark. ... N A V I ¡If a waypoint(s) is set , the unit will search for a route passing through it (them). (Excluding already passed waypoints.) ¡To disable auto reroute, press the ENTER button as described in w of setting auto reroute. 3 Change the route guidance settings.
...-effectuate a reference route search automatically from the drop-down menu and press the Ä button. Pressing down on the Joystick (d) will enable the unit to place a mark. ... N A V I ¡If a waypoint(s) is set , the unit will search for a route passing through it (them). (Excluding already passed waypoints.) ¡To disable auto reroute, press the ENTER button as described in w of setting auto reroute. 3 Change the route guidance settings.
Owners Manual
Page 65
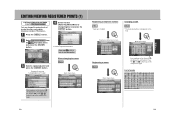
... GPS satellite signal reception or should the GPS data error be instances when the unit will return. Indicates that this condition is set . To change, press the Ä button again to remove the mark. I SELECT TO ENABLE/DISABLE SIMPLE TURN INDICATIONS Route Guidance During route guidance initiated after a route search, the unit can tell you vocally when you approach an intersection where a turn while route guidance or route simulation is in progress. To change...
... GPS satellite signal reception or should the GPS data error be instances when the unit will return. Indicates that this condition is set . To change, press the Ä button again to remove the mark. I SELECT TO ENABLE/DISABLE SIMPLE TURN INDICATIONS Route Guidance During route guidance initiated after a route search, the unit can tell you vocally when you approach an intersection where a turn while route guidance or route simulation is in progress. To change...
Owners Manual
Page 72
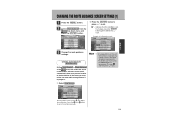
Telephone number input screen Mark input screen N A V I Registering a memo Memo Memo input screen Pressing down on the Joystick (d) will display the continuation. EDITING/VIEWING REGISTERED POINTS (1) EDITING/VIEWING REGISTERED POINTS Edit Saved Location You can change /register and press the Ä button. Example of marked locations and register telephone numbers (TEL)/memos. 1 Press the É button. 2 Select Edit Saved Location from the drop-down menu and press the Ä button. 4 Select the item (Name/TEL/Memo/Mark) to change the names...
Telephone number input screen Mark input screen N A V I Registering a memo Memo Memo input screen Pressing down on the Joystick (d) will display the continuation. EDITING/VIEWING REGISTERED POINTS (1) EDITING/VIEWING REGISTERED POINTS Edit Saved Location You can change /register and press the Ä button. Example of marked locations and register telephone numbers (TEL)/memos. 1 Press the É button. 2 Select Edit Saved Location from the drop-down menu and press the Ä button. 4 Select the item (Name/TEL/Memo/Mark) to change the names...
Owners Manual
Page 97
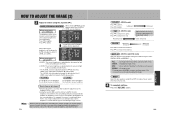
... from the H LEVEL value.(adjustment towards the f side possible) H LEVEL Press the g side to MANUAL The brightness of the screen LEVEL are not displayed. Green enhanced BLACK Blackness increased Press g to lighten. Whiteness increased DISPLAY (VIDEO mode/DVD mode) Select the desired screen display setting from the sun during the day and the brightness is set the dimmer to AUTO, the unit's brightness sensor detects the surrounding luminosity...
... from the H LEVEL value.(adjustment towards the f side possible) H LEVEL Press the g side to MANUAL The brightness of the screen LEVEL are not displayed. Green enhanced BLACK Blackness increased Press g to lighten. Whiteness increased DISPLAY (VIDEO mode/DVD mode) Select the desired screen display setting from the sun during the day and the brightness is set the dimmer to AUTO, the unit's brightness sensor detects the surrounding luminosity...
Owners Manual
Page 98
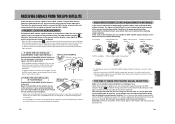
...), select "MANUAL" for the dimmer setting. ABOUT THE AUTOMATIC BRIGHTNESS ADJUSTMENT FUNCTION This unit uses a brightness sensor to detect the level of luminosity in the surrounding area and automatically modifies the brightness of the screen in "How to adjust the image" (p.178 to 180), select "AUTO" for the dimmer setting. ABOUT THE BRIGHTNESS OF THE BUTTONS When the power is a standard based on the buttons of the unit (POSITION, MENU, MODE...
...), select "MANUAL" for the dimmer setting. ABOUT THE AUTOMATIC BRIGHTNESS ADJUSTMENT FUNCTION This unit uses a brightness sensor to detect the level of luminosity in the surrounding area and automatically modifies the brightness of the screen in "How to adjust the image" (p.178 to 180), select "AUTO" for the dimmer setting. ABOUT THE BRIGHTNESS OF THE BUTTONS When the power is a standard based on the buttons of the unit (POSITION, MENU, MODE...
Owners Manual
Page 99
... the time it takes for data to be obstructed. RECEIVING SIGNALS FROM THE GPS SATELLITE If the unit does not receive signals from the GPS satellite using it again after having turned the power ON. 184 After having purchased the unit and using it can use to measure the present location yet. Do not move away from inside a building. To display the actual present location, connect the GPS exterior antenna to the unit. To...
... the time it takes for data to be obstructed. RECEIVING SIGNALS FROM THE GPS SATELLITE If the unit does not receive signals from the GPS satellite using it again after having turned the power ON. 184 After having purchased the unit and using it can use to measure the present location yet. Do not move away from inside a building. To display the actual present location, connect the GPS exterior antenna to the unit. To...
Owners Manual
Page 106
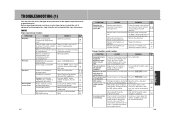
... by the Q button. ("MUTE" is stabilized. 184 Inaccurate vehicle Error occurred in the estimated Continue on the planimetric maps screen. roads and geographic names. terminal orientation (If using the unit and contact the store of the same view. GPS receiver display on the map screen remains gray. driving speed calculated by an object blocking the GPS exterior satellite. NAVI Basic operational troubles SYMPTOM No power No image No sound No navigation screen (map) CAUSE REMEDY...
... by the Q button. ("MUTE" is stabilized. 184 Inaccurate vehicle Error occurred in the estimated Continue on the planimetric maps screen. roads and geographic names. terminal orientation (If using the unit and contact the store of the same view. GPS receiver display on the map screen remains gray. driving speed calculated by an object blocking the GPS exterior satellite. NAVI Basic operational troubles SYMPTOM No power No image No sound No navigation screen (map) CAUSE REMEDY...
Owners Manual
Page 109
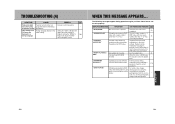
... language display set parental control. "SAFETY DRIVE" Attempting to use the unit properly. played back. DISPLAYED MESSAGE SITUATION UNIT OPERATION AND PROCEDURE PAGE NO. "DOOR OPEN" Disc insert cover is in DVD mode, the map disc cannot be power source being set for initial settings. Included map DVD-ROM inserted. Insert a readable disc. 31 When the unit is opened. Initial settings and DVD menu are displayed in English. Input the correct 173 password...
... language display set parental control. "SAFETY DRIVE" Attempting to use the unit properly. played back. DISPLAYED MESSAGE SITUATION UNIT OPERATION AND PROCEDURE PAGE NO. "DOOR OPEN" Disc insert cover is in DVD mode, the map disc cannot be power source being set for initial settings. Included map DVD-ROM inserted. Insert a readable disc. 31 When the unit is opened. Initial settings and DVD menu are displayed in English. Input the correct 173 password...


