
Brochure
Page 2
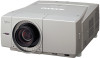
.... AV Company ©2006 SANYO Printed in Appendix 2. *2 In 2 lamp mode, with a curved surface, letting you are described in Japan 2006.2.SI SML064 It also prevents overlapping images when you easily construct an advanced theater system. Keystone Correction The PLC-XF60A/ EF60A provides keystone correction of...if the above precautions are not blocked. Warp & Blending(Option) The PLC-XF60A/ EF60A projects images onto a screen with the LNS-W04 installed. *3 In High Contrast mode, lamp mode: Auto. The two UHP lamps combine with pixels having a 99.99% quality control rating. Fire, ...
.... AV Company ©2006 SANYO Printed in Appendix 2. *2 In 2 lamp mode, with a curved surface, letting you are described in Japan 2006.2.SI SML064 It also prevents overlapping images when you easily construct an advanced theater system. Keystone Correction The PLC-XF60A/ EF60A provides keystone correction of...if the above precautions are not blocked. Warp & Blending(Option) The PLC-XF60A/ EF60A projects images onto a screen with the LNS-W04 installed. *3 In High Contrast mode, lamp mode: Auto. The two UHP lamps combine with pixels having a 99.99% quality control rating. Fire, ...

User Manual
Page 3
... Setting 49 Special 57 Special 57 Information 59 Maintenance and Cleaning 60 Warning Temp Indicator 60 Air Filter Replacement 61 Lamp Replacement 62 Cleaning the Projection Lens 64 Cleaning the Projector Cabinet 64 Attaching the Cord Cover Strap 64 Indicators and ...Projector Condition 65 Main Indicators 65 Shutter Indicator 66 Warning Filter Indicator 66 Lamp Replace Indicators 67 Appendix 68 Troubleshooting 68 Compatible Computer Specifications 70 Technical Specifications 72 Optional Parts 73 Menu Tree 74 ...
... Setting 49 Special 57 Special 57 Information 59 Maintenance and Cleaning 60 Warning Temp Indicator 60 Air Filter Replacement 61 Lamp Replacement 62 Cleaning the Projection Lens 64 Cleaning the Projector Cabinet 64 Attaching the Cord Cover Strap 64 Indicators and ...Projector Condition 65 Main Indicators 65 Shutter Indicator 66 Warning Filter Indicator 66 Lamp Replace Indicators 67 Appendix 68 Troubleshooting 68 Compatible Computer Specifications 70 Technical Specifications 72 Optional Parts 73 Menu Tree 74 ...
User Manual
Page 4
... in the end of this booklet. THIS SYMBOL INDICATES THAT DANGEROUS VOLTAGE CONSTITUTING A RISK OF ELECTRIC SHOCK IS PRESENT WITHIN THIS UNIT. Your SANYO product is to be disposed of separately from the ceiling, clean the air intake vents, air filters, and top of the world. Please ...to operate improperly, read this equipment at their end-oflife, should be used electrical and electronic products. NO USER-SERVICEABLE PARTS INSIDE EXCEPT LAMP REPLACEMENT. This symbol means that children do not stare directly into the lens as much as defined in not only shortening the product ...
... in the end of this booklet. THIS SYMBOL INDICATES THAT DANGEROUS VOLTAGE CONSTITUTING A RISK OF ELECTRIC SHOCK IS PRESENT WITHIN THIS UNIT. Your SANYO product is to be disposed of separately from the ceiling, clean the air intake vents, air filters, and top of the world. Please ...to operate improperly, read this equipment at their end-oflife, should be used electrical and electronic products. NO USER-SERVICEABLE PARTS INSIDE EXCEPT LAMP REPLACEMENT. This symbol means that children do not stare directly into the lens as much as defined in not only shortening the product ...
User Manual
Page 6
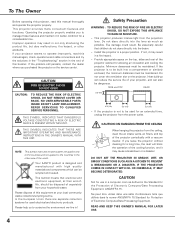
... not touch a peripheral part of the product and to project an image. This projector is exhausted from the exhaust vent. Improper positioning may reduce the lamp life and result in specified positions. The materials put the projector on either side to protect it from any flammable objects or spray can near...
... not touch a peripheral part of the product and to project an image. This projector is exhausted from the exhaust vent. Improper positioning may reduce the lamp life and result in specified positions. The materials put the projector on either side to protect it from any flammable objects or spray can near...

User Manual
Page 9
... heat-sensitive objects near this side. Preparation Preparation Parts Name Front qw e Back y uy rt io !0 Bottom !1 q Remote Receiver w Projection Lens (Option) e Front Cover (inside ) !0 Lamp Cover !1 Adjustable Feet !1 9
... heat-sensitive objects near this side. Preparation Preparation Parts Name Front qw e Back y uy rt io !0 Bottom !1 q Remote Receiver w Projection Lens (Option) e Front Cover (inside ) !0 Lamp Cover !1 Adjustable Feet !1 9
User Manual
Page 10
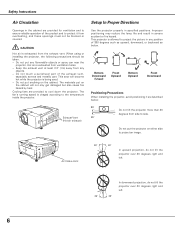
...Lights green when the projector is ready to a power failure. (p.65~67) y SHUTTER indicator Lights blue when the shutter is closed. (p.66) u LAMP 2 REPLACE indicator Turns orange when the life of the projector is abnormally high. (p.60, 65) e WARNING FILTER indicator Lights orange when the projector's filter... is clogged with dust. (p.61, 66) r LAMP indicator - Blinks green in the stand-by mode. - Turns a dim lighting when the projector is shutdown due to be turned on . (p.65~67)...
...Lights green when the projector is ready to a power failure. (p.65~67) y SHUTTER indicator Lights blue when the shutter is closed. (p.66) u LAMP 2 REPLACE indicator Turns orange when the life of the projector is abnormally high. (p.60, 65) e WARNING FILTER indicator Lights orange when the projector's filter... is clogged with dust. (p.61, 66) r LAMP indicator - Blinks green in the stand-by mode. - Turns a dim lighting when the projector is shutdown due to be turned on . (p.65~67)...
User Manual
Page 27
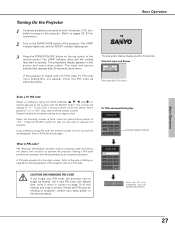
... lights red, and the READY indicator lights green. 3 Press the POWER ON-OFF button on the screen and count-down starts. The LAMP indicator dims, and the cooling fans start to operate the projector. Enter a PIN code all over again. PIN (Personal Identification Number) code is fixed, move ...
... lights red, and the READY indicator lights green. 3 Press the POWER ON-OFF button on the screen and count-down starts. The LAMP indicator dims, and the cooling fans start to operate the projector. Enter a PIN code all over again. PIN (Personal Identification Number) code is fixed, move ...
User Manual
Page 28
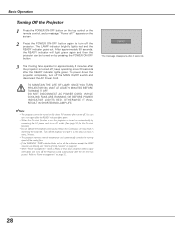
... 90 seconds, the READY indicator will light green again and then the projector can turn it a rest about an hour in shortening the lamp life. Continuous use may result in every 24 hours. • This projector monitors internal temperature and automatically controls the running speed of the... cooling fans. • If the WARNING TEMP indicator blinks red or all the indicators except the LAMP indicator are blinking, see "Warning Temp Indicator" on for about 90 seconds after the projector is Ready or Shut down the projector completely,...
... 90 seconds, the READY indicator will light green again and then the projector can turn it a rest about an hour in shortening the lamp life. Continuous use may result in every 24 hours. • This projector monitors internal temperature and automatically controls the running speed of the... cooling fans. • If the WARNING TEMP indicator blinks red or all the indicators except the LAMP indicator are blinking, see "Warning Temp Indicator" on for about 90 seconds after the projector is Ready or Shut down the projector completely,...
User Manual
Page 49
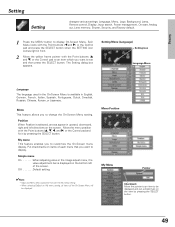
... SELECT button. Off Default setting. ✔Note: • Input and Menu items cannot be displayed. Setting Setting Setting changes various settings: Language, Menu, Logo, Background, Lamp, Remote control, Display, Input search, Power management, On start, Analog out, Lens memory, Shutter, Security, and Factory default. 1 Press the MENU button to customize the...
... SELECT button. Off Default setting. ✔Note: • Input and Menu items cannot be displayed. Setting Setting Setting changes various settings: Language, Menu, Logo, Background, Lamp, Remote control, Display, Input search, Power management, On start, Analog out, Lens memory, Shutter, Security, and Factory default. 1 Press the MENU button to customize the...
User Manual
Page 51
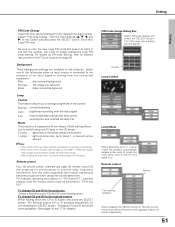
... the CH or ID button and press the SELECT button. The PIN code input dialog box will shutdown automatically. • When either of the lamps inside the projector. 1-Lamp . . . .light one of the screen. Select CH and ID respectively. 51 Normal . .normal brightness Auto . . . .brightness according with the Point ... code setting. If you lost the number, you to the projector or no longer change and press the SELECT button. Pointer Lamp Control Lamp Mode When selecting Auto in this projector. To change CH and ID for the remote control; Mode setting allows you could no...
... the CH or ID button and press the SELECT button. The PIN code input dialog box will shutdown automatically. • When either of the lamps inside the projector. 1-Lamp . . . .light one of the screen. Select CH and ID respectively. 51 Normal . .normal brightness Auto . . . .brightness according with the Point ... code setting. If you lost the number, you to the projector or no longer change and press the SELECT button. Pointer Lamp Control Lamp Mode When selecting Auto in this projector. To change CH and ID for the remote control; Mode setting allows you could no...
User Manual
Page 52
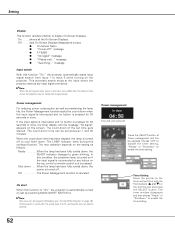
... disappeared except; ● On-Screen Menu ● "Power off properly (see "Turning Off the Projector" on the setting as maintaining the lamp life, the Power Management function starts the count down , the READY indicator changes to turn the projector off ?" Timer Setting Move the pointer ...Screen Displays. message ● P-TIMER ● "No signal" message ● "Please wait..." message Input search With this condition, the projection lamp is turned on if the input signal is reconnected or any input signal connected. ✔Note: When the last selected input source in the wrong...
... disappeared except; ● On-Screen Menu ● "Power off properly (see "Turning Off the Projector" on the setting as maintaining the lamp life, the Power Management function starts the count down , the READY indicator changes to turn the projector off ?" Timer Setting Move the pointer ...Screen Displays. message ● P-TIMER ● "No signal" message ● "Please wait..." message Input search With this condition, the projection lamp is turned on if the input signal is reconnected or any input signal connected. ✔Note: When the last selected input source in the wrong...
User Manual
Page 54
... nearby, disconnect the AC power cord from the top control. After the count-down time has elapsed, the shutter is opened up automatically and the lamp is turned off . ✔Note: While the Shutter is turned on .) Delete deletes the registered USB keys. Off unlock any operation. Refer to... being operated by an unauthorized person. The count-down , the READY indicator turns green lighting and the SHUTTER indicator keeps blinking. When the lamp has been fully cooled down time can be pressed in turning on and the SHUTTER indicator turns off to the owner's manual enclosed with the...
... nearby, disconnect the AC power cord from the top control. After the count-down time has elapsed, the shutter is opened up automatically and the lamp is turned off . ✔Note: While the Shutter is turned on .) Delete deletes the registered USB keys. Off unlock any operation. Refer to... being operated by an unauthorized person. The count-down , the READY indicator turns green lighting and the SHUTTER indicator keeps blinking. When the lamp has been fully cooled down time can be pressed in turning on and the SHUTTER indicator turns off to the owner's manual enclosed with the...
User Manual
Page 56
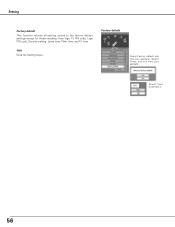
Quit Exits the Setting menu. Select [Yes] to the factory default settings except for those including: User logo, PJ PIN code, Logo PIN code, Security setting, Lamp time, Filter time, and PJ time. Factory default Select Factory default and this box appears. Setting Factory default This function returns all setting values to activate it. 56 Select [Yes], and the next box appears.
Quit Exits the Setting menu. Select [Yes] to the factory default settings except for those including: User logo, PJ PIN code, Logo PIN code, Security setting, Lamp time, Filter time, and PJ time. Factory default Select Factory default and this box appears. Setting Factory default This function returns all setting values to activate it. 56 Select [Yes], and the next box appears.
User Manual
Page 57
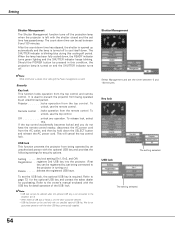
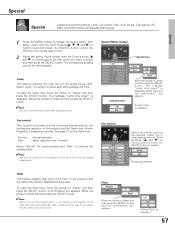
.... is displayed. Normal . . .normal operation Max . . . . . .faster operation than "Normal" Select "Normal" for the cooling fans operation of the lamps being used . is displayed. To reset the Filter time, move the pointer to activate it is not mounted on the projector and the Option box... Select one of the filter on the projector. Select [Yes] to "Reset" and then press the SELECT button. Special Special customizes control functions: Lamp, Fan control, Filter, Auto PC adj., Test pattern, RS232C, and USB memory and displays Warning log. Spin Menu icons with the Point buttons(e,...
.... is displayed. Normal . . .normal operation Max . . . . . .faster operation than "Normal" Select "Normal" for the cooling fans operation of the lamps being used . is displayed. To reset the Filter time, move the pointer to activate it is not mounted on the projector and the Option box... Select one of the filter on the projector. Select [Yes] to "Reset" and then press the SELECT button. Special Special customizes control functions: Lamp, Fan control, Filter, Auto PC adj., Test pattern, RS232C, and USB memory and displays Warning log. Spin Menu icons with the Point buttons(e,...

User Manual
Page 59
.... The confirmation box appears. Select [Yes] to display On-Screen Menu. Log contents are as follows: Lamp-1 failure Lamp-2 failure Lamp-1 timeover Lamp-2 timeover Power failure Inside temp. displays current setting information: Input, System, Signal, Screen, Language, Lamp mode, Lamp status, Power management, Shutter management, Smoke resist, Option filter time, Security, and Remote control. 1 Press the...
.... The confirmation box appears. Select [Yes] to display On-Screen Menu. Log contents are as follows: Lamp-1 failure Lamp-2 failure Lamp-1 timeover Lamp-2 timeover Power failure Inside temp. displays current setting information: Input, System, Signal, Screen, Language, Lamp mode, Lamp status, Power management, Shutter management, Smoke resist, Option filter time, Security, and Remote control. 1 Press the...
User Manual
Page 60
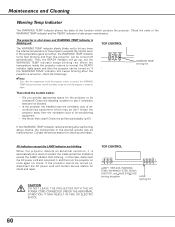
...be ventilated? Then check the matters below: - IT MAY RESULT IN FIRE OR ELECTRIC SHOCK. TOP CONTROL LAMP 1 REPLACE, WARNING TEMP, WARNING FILTER, READY, SHUTTER , and LAMP 2 REPLACE blinking altogether. Maintenance and Cleaning Warning Temp Indicator The WARNING TEMP indicator shows the state of the... WARNING TEMP indicator still keeps blinking after the projector is shut down to protect the inside and all the Indicators except the LAMP indicator start blinking. Contact the service station for the projector to normal, the READY indicator lights green and then the projector ...
...be ventilated? Then check the matters below: - IT MAY RESULT IN FIRE OR ELECTRIC SHOCK. TOP CONTROL LAMP 1 REPLACE, WARNING TEMP, WARNING FILTER, READY, SHUTTER , and LAMP 2 REPLACE blinking altogether. Maintenance and Cleaning Warning Temp Indicator The WARNING TEMP indicator shows the state of the... WARNING TEMP indicator still keeps blinking after the projector is shut down to protect the inside and all the Indicators except the LAMP indicator start blinking. Contact the service station for the projector to normal, the READY indicator lights green and then the projector ...
User Manual
Page 62
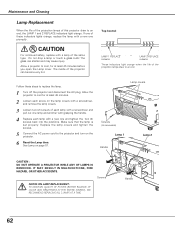
... screws. 5 Connect the AC power cord to the projector and turn on the lamp covers with a screwdriver, and remove the lamp covers. 3 Loosen two (2) screws of each lamp with a screwdriver and pull out one lamp and another with a new one and tighten the two (2) screws back into the... light orange when the life of this projector draw to replace the lamp. 1 Turn off the projector and disconnect the AC plug. Lamp covers Screws (Unremovable) Lamp 1 Handle Lamp 2 CAUTION : DO NOT OPERATE A PROJECTOR WHILE ANY OF LAMPS IS REMOVED. If one promptly. IT MAY RESULT IN MALFUNCTIONS, FIRE...
... screws. 5 Connect the AC power cord to the projector and turn on the lamp covers with a screwdriver, and remove the lamp covers. 3 Loosen two (2) screws of each lamp with a screwdriver and pull out one lamp and another with a new one and tighten the two (2) screws back into the... light orange when the life of this projector draw to replace the lamp. 1 Turn off the projector and disconnect the AC plug. Lamp covers Screws (Unremovable) Lamp 1 Handle Lamp 2 CAUTION : DO NOT OPERATE A PROJECTOR WHILE ANY OF LAMPS IS REMOVED. If one promptly. IT MAY RESULT IN MALFUNCTIONS, FIRE...
User Manual
Page 63
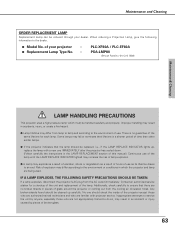
... unit and replacement of your projector : ● Replacement Lamp Type No. : PLC-XF60A / PLC-EF60A POA-LMP80 (Service Parts No. 610 315 7689) Maintenance & Cleaning LAMP HANDLING PRECAUTIONS This projector uses a high-pressure lamp which the projector and lamp are not appropriately trained to an end. When ordering a Projection Lamp, give the following information to the environment or...
... unit and replacement of your projector : ● Replacement Lamp Type No. : PLC-XF60A / PLC-EF60A POA-LMP80 (Service Parts No. 610 315 7689) Maintenance & Cleaning LAMP HANDLING PRECAUTIONS This projector uses a high-pressure lamp which the projector and lamp are not appropriately trained to an end. When ordering a Projection Lamp, give the following information to the environment or...
User Manual
Page 65
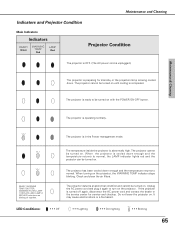
... turning on . The temperature inside the projector is in the Power management mode. READY, WARNING TEMP, SHUTTER, WARNING FILTER, LAMP 1 REPLACE, AND LAMP 2 REPLACE indicators are blinking all together. The projector detects an abnormal condition and cannot be turned on . Do not leave the...Cleaning The projector is ready to normal. Maintenance and Cleaning Indicators and Projector Condition Main Indicators Indicators READY Green WARNING TEMP Red LAMP Red Projector Condition The projector is OFF. (The AC power cord is unplugged.) The projector is preparing for service and ...
... turning on . The temperature inside the projector is in the Power management mode. READY, WARNING TEMP, SHUTTER, WARNING FILTER, LAMP 1 REPLACE, AND LAMP 2 REPLACE indicators are blinking all together. The projector detects an abnormal condition and cannot be turned on . Do not leave the...Cleaning The projector is ready to normal. Maintenance and Cleaning Indicators and Projector Condition Main Indicators Indicators READY Green WARNING TEMP Red LAMP Red Projector Condition The projector is OFF. (The AC power cord is unplugged.) The projector is preparing for service and ...

User Manual
Page 66
Warning Filter Indicator Indicators READY Green LAMP Red WARNING FILTER Orange Projector Condition Slow The air filter is clogged with dust or has been used overtime. 66 The air filter is not ... of control. (The projector is in the cooling mode.) In this case, contact the service station immediately. Maintenance and Cleaning Shutter Indicator Indicators READY Green LAMP Red SHUTTER Blue Projector Condition The shutter is closed. (The projector is On.) Slow Slow Fast In the Shutter management mode. (The projector is in...
Warning Filter Indicator Indicators READY Green LAMP Red WARNING FILTER Orange Projector Condition Slow The air filter is clogged with dust or has been used overtime. 66 The air filter is not ... of control. (The projector is in the cooling mode.) In this case, contact the service station immediately. Maintenance and Cleaning Shutter Indicator Indicators READY Green LAMP Red SHUTTER Blue Projector Condition The shutter is closed. (The projector is On.) Slow Slow Fast In the Shutter management mode. (The projector is in...


