Instruction Manual, PLC-XP200L
Page 2
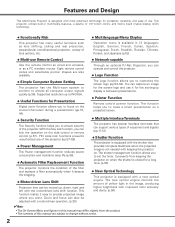
...a motor-driven operation. (p.30) ◆ New Optical Technology This projector is closed for Presentation Digital zoom function allows you to ensure security of use Remote Control ◆ Network-capable Use the remote control as wired and wireless, or as lens shifting, ceiling and ... when the projected image is not needed with keeping the projector on. This projector utilizes built-in multimedia features, a palette of 1.07 billion colors, and matrix liquid crystal display (LCD) technology. ◆ Functionally Rich This projector has many useful functions such as a PC wireless mouse....
...a motor-driven operation. (p.30) ◆ New Optical Technology This projector is closed for Presentation Digital zoom function allows you to ensure security of use Remote Control ◆ Network-capable Use the remote control as wired and wireless, or as lens shifting, ceiling and ... when the projected image is not needed with keeping the projector on. This projector utilizes built-in multimedia features, a palette of 1.07 billion colors, and matrix liquid crystal display (LCD) technology. ◆ Functionally Rich This projector has many useful functions such as a PC wireless mouse....

Instruction Manual, PLC-XP200L
Page 3
... 24 Connecting the AC Power Cord 25 Basic Operation 26 Turning On the Projector 26 Turning Off the Projector 27 How to Operate the On-Screen Menu 28 Menu Bar 29 Operating with Projector Control 30 Sound Adjustment 31 Operating with Remote Control 32 Pointer Function 34 Wireless Mouse Operation 34 Input Selection 35...
... 24 Connecting the AC Power Cord 25 Basic Operation 26 Turning On the Projector 26 Turning Off the Projector 27 How to Operate the On-Screen Menu 28 Menu Bar 29 Operating with Projector Control 30 Sound Adjustment 31 Operating with Remote Control 32 Pointer Function 34 Wireless Mouse Operation 34 Input Selection 35...
Instruction Manual, PLC-XP200L
Page 10
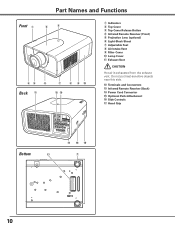
Part Names and Functions Front q w e rt y Back !1 u i o !0 !2 !3 q Indicators w Top Cover e Top Cover Release Button r Infrared Remote Receiver (Front) t Projection Lens (optional) y Light-Block Sheet u Adjustable Feet i Air Intake Vent o Filter Cover !0 Lamp Cover !1 Exhaust Vent CAUTION Hot air is exhausted from the exhaust vent. Do not put heat-sensitive objects near this side. !2 Terminals and Connectors !3 Infrared Remote Receiver (Back) !4 Power Cord Connector !5 Optional Parts Attachment !6 Side Controls !7 Hand Grip Bottom !7 !4 !5 !6 u 10
Part Names and Functions Front q w e rt y Back !1 u i o !0 !2 !3 q Indicators w Top Cover e Top Cover Release Button r Infrared Remote Receiver (Front) t Projection Lens (optional) y Light-Block Sheet u Adjustable Feet i Air Intake Vent o Filter Cover !0 Lamp Cover !1 Exhaust Vent CAUTION Hot air is exhausted from the exhaust vent. Do not put heat-sensitive objects near this side. !2 Terminals and Connectors !3 Infrared Remote Receiver (Back) !4 Power Cord Connector !5 Optional Parts Attachment !6 Side Controls !7 Hand Grip Bottom !7 !4 !5 !6 u 10
Instruction Manual, PLC-XP200L
Page 11
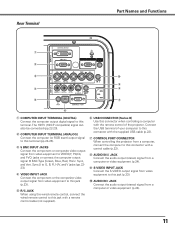
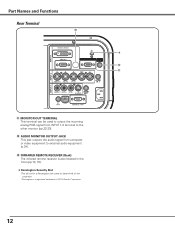
...(p.24). 11 r VIDEO INPUT JACK Connect the component or the composite video output signal from video equipment to this connector with a remote control cable (not supplied). The HDTV (HDCP compatible) signal can also be connected (pp.22-23). w COMPUTER INPUT TERMINAL (...ANALOG) Connect the computer (or RGB scart) output signal to this terminal (pp.22-23). Connect the USB terminal of the projector. Rear Terminal Part Names and Functions q w e !0 o r i t u y q COMPUTER INPUT TERMINAL (DIGITAL) Connect the computer output digital signal...
...(p.24). 11 r VIDEO INPUT JACK Connect the component or the composite video output signal from video equipment to this connector with a remote control cable (not supplied). The HDTV (HDCP compatible) signal can also be connected (pp.22-23). w COMPUTER INPUT TERMINAL (...ANALOG) Connect the computer (or RGB scart) output signal to this terminal (pp.22-23). Connect the USB terminal of the projector. Rear Terminal Part Names and Functions q w e !0 o r i t u y q COMPUTER INPUT TERMINAL (DIGITAL) Connect the computer output digital signal...
Instruction Manual, PLC-XP200L
Page 12
....22-23). !2 AUDIO MONITOR OUTPUT JACK This jack outputs the audio signal from computer or video equipment to external audio equipment (p.24). !3 Infrared Remote Receiver (Back) The infrared remote receiver is also located in the front (pp.10, 16). ] Kensington Security Slot This slot is for a Kensington lock used to deter theft...
....22-23). !2 AUDIO MONITOR OUTPUT JACK This jack outputs the audio signal from computer or video equipment to external audio equipment (p.24). !3 Infrared Remote Receiver (Back) The infrared remote receiver is also located in the front (pp.10, 16). ] Kensington Security Slot This slot is for a Kensington lock used to deter theft...
Instruction Manual, PLC-XP200L
Page 14
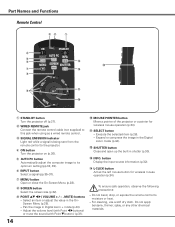
...). - e Signal Emission indicator Light red while a signal is being sent from the remote control to moisture or heat. - Do not bend, drop, or expose the remote control to the projector. button Display the input source information (p.32). !4 L-Click button Act as a wired remote control. For cleaning, use a soft dry cloth. Part Names and Functions...
...). - e Signal Emission indicator Light red while a signal is being sent from the remote control to moisture or heat. - Do not bend, drop, or expose the remote control to the projector. button Display the input source information (p.32). !4 L-Click button Act as a wired remote control. For cleaning, use a soft dry cloth. Part Names and Functions...
Instruction Manual, PLC-XP200L
Page 15
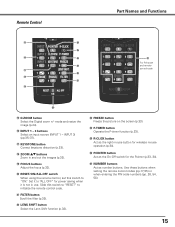
... in and out the images (p.32). !9 FOCUS buttons Adjust the focus (p.32). @0 RESET/ON/ALL-OFF switch When using the remote control, set this switch to "RESET" to initialize the remote control code. @1 FILTER button Scroll the filter (p.33). @2 LENS SHIFT button Select the Lens Shift function (p.32). @3 FREEZE button... the Pointer (p.33, 34). @7 Number buttons Act as the On-Off switch for power saving when it to "ON." Use these buttons when setting the remote control codes (pp.17, 55) or when entering the PIN code numbers (pp. 26, 54, 58). 15 mode and resize the image (p.44). !6 INPUT 1 -...
... in and out the images (p.32). !9 FOCUS buttons Adjust the focus (p.32). @0 RESET/ON/ALL-OFF switch When using the remote control, set this switch to "RESET" to initialize the remote control code. @1 FILTER button Scroll the filter (p.33). @2 LENS SHIFT button Select the Lens Shift function (p.32). @3 FREEZE button... the Pointer (p.33, 34). @7 Number buttons Act as the On-Off switch for power saving when it to "ON." Use these buttons when setting the remote control codes (pp.17, 55) or when entering the PIN code numbers (pp. 26, 54, 58). 15 mode and resize the image (p.44). !6 INPUT 1 -...
Instruction Manual, PLC-XP200L
Page 16
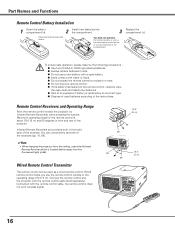
... provided both of used battery. ● Avoid contact with a used batteries according to Infrared Remote Receivers) when pressing the buttons. Remote Control Receivers and Operating Range Point the remote control toward the projector (to the instructions. Part Names and Functions Remote Control Battery Installation 1 Open the battery compartment lid. 2 Install new batteries into the compartment...
... provided both of used battery. ● Avoid contact with a used batteries according to Infrared Remote Receivers) when pressing the buttons. Remote Control Receivers and Operating Range Point the remote control toward the projector (to the instructions. Part Names and Functions Remote Control Battery Installation 1 Open the battery compartment lid. 2 Install new batteries into the compartment...
Instruction Manual, PLC-XP200L
Page 17
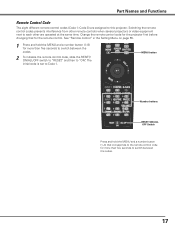
...a number button (1-8) that for more than five seconds to switch between the codes. 17 Switching the remote control codes prevents interference from other remote controls when several projectors or video equipment next to Code 1. MENU button Number buttons RESET/ON/ALL OFF Switch Press and ... to "ON." Part Names and Functions Remote Control Code The eight different remote control codes (Code 1-Code 8) are operated at the same time. Change the remote control code for the projector first before changing that corresponds to the remote control code for more than five seconds ...
...a number button (1-8) that for more than five seconds to switch between the codes. 17 Switching the remote control codes prevents interference from other remote controls when several projectors or video equipment next to Code 1. MENU button Number buttons RESET/ON/ALL OFF Switch Press and ... to "ON." Part Names and Functions Remote Control Code The eight different remote control codes (Code 1-Code 8) are operated at the same time. Change the remote control code for the projector first before changing that corresponds to the remote control code for more than five seconds ...
Instruction Manual, PLC-XP200L
Page 18
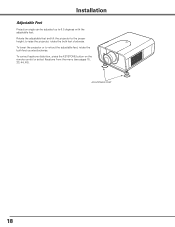
Installation Adjustable Feet Projection angle can be adjusted up to the proper height; To correct keystone distortion, press the KEYSTONE button on the remote control or select Keystone from the menu (see pages 15, 33, 44, 48). to retract the adjustable feet, rotate the both feet clockwise. Rotate the adjustable feet and tilt the projector to 6.5 degrees with the adjustable feet. ADJUSTABLE FEET 18 To lower the projector or to raise the projector, rotate the both feet counterclockwise.
Installation Adjustable Feet Projection angle can be adjusted up to the proper height; To correct keystone distortion, press the KEYSTONE button on the remote control or select Keystone from the menu (see pages 15, 33, 44, 48). to retract the adjustable feet, rotate the both feet clockwise. Rotate the adjustable feet and tilt the projector to 6.5 degrees with the adjustable feet. ADJUSTABLE FEET 18 To lower the projector or to raise the projector, rotate the both feet counterclockwise.
Instruction Manual, PLC-XP200L
Page 26
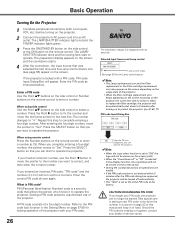
... selected the last time and the Lamp control status icon (see page 55) appear on the remote control to complete entering a four-digit number. What is taken to "Set." A PIN code consists of the projector. The preparation display appears on the side control to enter a number. After entering the four-... and the POWER indicator lights green. 3 Press the ON/STAND-BY button on the side control or the ON button on the remote control to select a number. If the projector is selected in setting a new PIN code; Enter the correct PIN code all operations are invalid. • If the PIN code...
... selected the last time and the Lamp control status icon (see page 55) appear on the remote control to complete entering a four-digit number. What is taken to "Set." A PIN code consists of the projector. The preparation display appears on the side control to enter a number. After entering the four-... and the POWER indicator lights green. 3 Press the ON/STAND-BY button on the side control or the ON button on the remote control to select a number. If the projector is selected in setting a new PIN code; Enter the correct PIN code all operations are invalid. • If the PIN code...
Instruction Manual, PLC-XP200L
Page 27
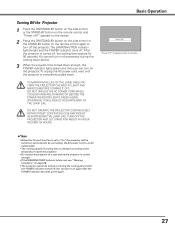
... the ON/STAND-BY button on the side control or the STAND-BY button on the remote control again to turn off the projector. You cannot turn on automatically by connecting the AC power cord to an AC outlet (p.56). • The running speed of cooling fans is cooled ... cooled down . TURN OFF THE PROJECTOR AND LET STAND FOR ABOUT AN HOUR IN EVERY 24 HOURS. CONTINUOUS USE MAY RESULT IN SHORTENING THE LAMP LIFE. appears on the screen. 2 Press the ON/STAND-BY button on the side control or the STAND-BY button on the remote control, and "Power off...
... the ON/STAND-BY button on the side control or the STAND-BY button on the remote control again to turn off the projector. You cannot turn on automatically by connecting the AC power cord to an AC outlet (p.56). • The running speed of cooling fans is cooled ... cooled down . TURN OFF THE PROJECTOR AND LET STAND FOR ABOUT AN HOUR IN EVERY 24 HOURS. CONTINUOUS USE MAY RESULT IN SHORTENING THE LAMP LIFE. appears on the screen. 2 Press the ON/STAND-BY button on the side control or the STAND-BY button on the remote control, and "Power off...
Instruction Manual, PLC-XP200L
Page 28
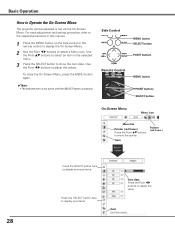
... items. Item data Press the Point 7 8 buttons to adjust the values. Quit Exit this manual. 1 Press the MENU button on the side control or the remote control to display the On-Screen Menu. 2 Use the Point 7 8 buttons to move the pointer. Use the Point 7 8 buttons to adjust the value. ... in the selected menu. 3 Press the SELECT button to Operate the On-Screen Menu The projector can be adjusted or set via the On-Screen Menu. Side Control MENU button SELECT button POINT buttons Remote Control MENU button POINT buttons SELECT button On-Screen Menu Menu icon Menu bar Pointer (red...
... items. Item data Press the Point 7 8 buttons to adjust the values. Quit Exit this manual. 1 Press the MENU button on the side control or the remote control to display the On-Screen Menu. 2 Use the Point 7 8 buttons to move the pointer. Use the Point 7 8 buttons to adjust the value. ... in the selected menu. 3 Press the SELECT button to Operate the On-Screen Menu The projector can be adjusted or set via the On-Screen Menu. Side Control MENU button SELECT button POINT buttons Remote Control MENU button POINT buttons SELECT button On-Screen Menu Menu icon Menu bar Pointer (red...

Instruction Manual, PLC-XP200L
Page 30
...operation mode. Use the Point ed7 8 buttons to position the screen to the screen. Use the Point ed buttons to close the shutter inside the projector. Use the Point ed buttons to 50 percent, or sideways up the shutter, press the SHUTTER button again. Zoom ➜ Focus ➜ ...the Shutter function. ✔Note: • The SHUTTER button on the side control and the remote control cannot be made with the Lens button on the side control. Basic Operation Operating with Projector Control Lens Operation The following lens operation can be moved up or down automatically when the set...
...operation mode. Use the Point ed7 8 buttons to position the screen to the screen. Use the Point ed buttons to close the shutter inside the projector. Use the Point ed buttons to 50 percent, or sideways up the shutter, press the SHUTTER button again. Zoom ➜ Focus ➜ ...the Shutter function. ✔Note: • The SHUTTER button on the side control and the remote control cannot be made with the Lens button on the side control. Basic Operation Operating with Projector Control Lens Operation The following lens operation can be moved up or down automatically when the set...
Instruction Manual, PLC-XP200L
Page 31
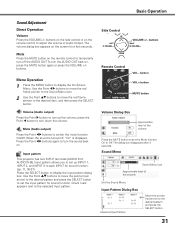
... pattern. Input pattern allows you to display the input pattern dialog box. Check mark appears next to display the On-Screen Menu. buttons Remote Control VOL - Sound Menu Sound Menu icon Approximate level of the volume. Basic Operation Sound Adjustment Direct Operation Volume Press the VOLUME+/- buttons... item, and then press the SELECT button. To turn up INPUT 1, INPUT 2, and INPUT 3 to each INPUT for a few seconds. Input pattern This projector has two INPUT terminals [AUDIO IN I/ AUDIO IN II]. Use the Point 7 8 buttons to move the red frame pointer to the Sound Menu icon. ...
... pattern. Input pattern allows you to display the input pattern dialog box. Check mark appears next to display the On-Screen Menu. buttons Remote Control VOL - Sound Menu Sound Menu icon Approximate level of the volume. Basic Operation Sound Adjustment Direct Operation Volume Press the VOLUME+/- buttons... item, and then press the SELECT button. To turn up INPUT 1, INPUT 2, and INPUT 3 to each INPUT for a few seconds. Input pattern This projector has two INPUT terminals [AUDIO IN I/ AUDIO IN II]. Use the Point 7 8 buttons to move the red frame pointer to the Sound Menu icon. ...
Instruction Manual, PLC-XP200L
Page 32
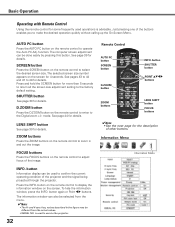
... to operate the Auto PC Adj. Press the INFO. The information window can also be used to service the projector. 32 Remote Control AUTO PC button SCREEN button D.ZOOM button INFO. and V-sync freq. button SHUTTER button POINT ed7 8 buttons ZOOM buttons LENS SHIFT button... described in and out the image. Basic Operation Operating with Remote Control Using the remote control for some frequently used operations is used to confirm the current operating condition of the projector and the signal being projected through the projector. Just pressing one of the buttons enables you to make the...
... to operate the Auto PC Adj. Press the INFO. The information window can also be used to service the projector. 32 Remote Control AUTO PC button SCREEN button D.ZOOM button INFO. and V-sync freq. button SHUTTER button POINT ed7 8 buttons ZOOM buttons LENS SHIFT button... described in and out the image. Basic Operation Operating with Remote Control Using the remote control for some frequently used operations is used to confirm the current operating condition of the projector and the signal being projected through the projector. Just pressing one of the buttons enables you to make the...
Instruction Manual, PLC-XP200L
Page 33
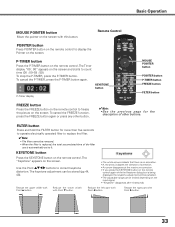
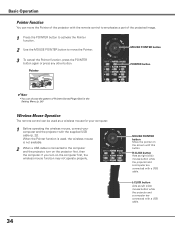
...any other button. ✔Note: • See the previous page for more than five seconds to operate electrically operated filter to 0. Remote Control POINTER button Press POINTER button on the screen. KEYSTONE button P-Timer display MOUSE POINTER button POINTER button P-TIMER button FREEZE button FILTER...left part with Point e button. The Timer display "00 : 00" appears on the screen and starts to freeze the picture on the remote control again while the Keystone dialog box is being displayed, the keystone adjustment will be canceled. • The adjustable range can be rewound....
...any other button. ✔Note: • See the previous page for more than five seconds to operate electrically operated filter to 0. Remote Control POINTER button Press POINTER button on the screen. KEYSTONE button P-Timer display MOUSE POINTER button POINTER button P-TIMER button FREEZE button FILTER...left part with Point e button. The Timer display "00 : 00" appears on the screen and starts to freeze the picture on the remote control again while the Keystone dialog box is being displayed, the keystone adjustment will be canceled. • The adjustable range can be rewound....
Instruction Manual, PLC-XP200L
Page 34
... not operate properly. 34 MOUSE POINTER button Move the pointer on the projector first, then the computer. L-CLICK button Acts as left (click) mouse button while the projector and a computer are connected with the remote control to emphasize a part of the projector with a USB cable. Basic Operation Pointer Function You can be used , the...
... not operate properly. 34 MOUSE POINTER button Move the pointer on the projector first, then the computer. L-CLICK button Acts as left (click) mouse button while the projector and a computer are connected with the remote control to emphasize a part of the projector with a USB cable. Basic Operation Pointer Function You can be used , the...
Instruction Manual, PLC-XP200L
Page 35
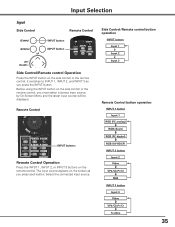
... 3 buttons on the screen as you press the INPUT button. Before using the INPUT button on the side control or the remote control. Select the connected input source. Remote Control button operation INPUT 1 button Input 1 RGB (PC analog) RGB (Scart) RGB (PC digital) RGB (AV HDCP... each button. Input Side Control Input Selection Remote Control INPUT button INPUT button Side Control/Remote control button operation INPUT button Input 1 Input 2 Input 3 Side Control/Remote control Operation Press the INPUT button on the side control or the remote control, you must select a correct input...
... 3 buttons on the screen as you press the INPUT button. Before using the INPUT button on the side control or the remote control. Select the connected input source. Remote Control button operation INPUT 1 button Input 1 RGB (PC analog) RGB (Scart) RGB (PC digital) RGB (AV HDCP... each button. Input Side Control Input Selection Remote Control INPUT button INPUT button Side Control/Remote control button operation INPUT button Input 1 Input 2 Input 3 Side Control/Remote control Operation Press the INPUT button on the side control or the remote control, you must select a correct input...
Instruction Manual, PLC-XP200L
Page 36
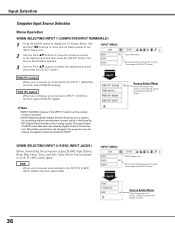
... to display the On-Screen Menu. Input 1 RGB (PC digital) When your computer is delivered by HDCP. Should the specification be changed, this projector may not display the digital content protected by DVI (Digital Visual Interface) from the computer to G, B, R, H/HV, and V jacks: RGB ...to INPUT 1 (DIGITAL) terminal, select RGB (PC digital). ✔Note: • INPUT SOURCE changes if the INPUT 1 button on the remote control is pressed. • HDCP (High-bandwidth Digital Content Protection) is a system for protecting digital entertainment content which is connected to the desired...
... to display the On-Screen Menu. Input 1 RGB (PC digital) When your computer is delivered by HDCP. Should the specification be changed, this projector may not display the digital content protected by DVI (Digital Visual Interface) from the computer to G, B, R, H/HV, and V jacks: RGB ...to INPUT 1 (DIGITAL) terminal, select RGB (PC digital). ✔Note: • INPUT SOURCE changes if the INPUT 1 button on the remote control is pressed. • HDCP (High-bandwidth Digital Content Protection) is a system for protecting digital entertainment content which is connected to the desired...


