

Owners Manual
Page 2
... enables you purchased the projector or the service center. If the problem still persists, contact the sales dealer where you to indicate laser emission). NO USERSERVICEABLE PARTS INSIDE EXCEPT LAMP REPLACEMENT. THIS SYMBOL INDICATES THAT DANGEROUS VOLTAGE CONSTITUTING A RISK OF ELECTRIC ...SHOCK IS PRESENT WITHIN THIS UNIT. Improper operation may result in not only shortening the product-life, but also malfunctions, fire hazard, or other people. G This projector ...
... enables you purchased the projector or the service center. If the problem still persists, contact the sales dealer where you to indicate laser emission). NO USERSERVICEABLE PARTS INSIDE EXCEPT LAMP REPLACEMENT. THIS SYMBOL INDICATES THAT DANGEROUS VOLTAGE CONSTITUTING A RISK OF ELECTRIC ...SHOCK IS PRESENT WITHIN THIS UNIT. Improper operation may result in not only shortening the product-life, but also malfunctions, fire hazard, or other people. G This projector ...

Owners Manual
Page 3
...overturn. The openings should never be covered with the projector. This projector should not be read before cleaning. This projector should use a mounting kit approved by the manufacturer, or sold with cloth or other hazards. b. e. When replacement parts are provided for long periods of any kind on ...over a radiator or heat register. Do not place this projector from the type of the instructions given here and retain them for service. The projector may touch dangerous voltage points or short out parts that the projector is damaged or frayed. Use only with care. Wall or...
...overturn. The openings should never be covered with the projector. This projector should not be read before cleaning. This projector should use a mounting kit approved by the manufacturer, or sold with cloth or other hazards. b. e. When replacement parts are provided for long periods of any kind on ...over a radiator or heat register. Do not place this projector from the type of the instructions given here and retain them for service. The projector may touch dangerous voltage points or short out parts that the projector is damaged or frayed. Use only with care. Wall or...

Owners Manual
Page 4
.../PLC-XP55L : Sanyo : SANYO FISHER COMPANY : 21605 Plummer Street, Chatsworth, California 91311 : (818)998-7322 AC POWER CORD REQUIREMENT The AC Power Cord supplied with this safety feature. The wire which is coloured blue must be connected to part 15 of the flexible cord should be determined by ...in the instructions. This is a safety feature to the equipment unless otherwise specified in your electrician. Do not try to defeat this projector meets the requirement for use the plug with the cover omitted. red or orange). GROUND AC Power Cord for the United Kingdom ...
.../PLC-XP55L : Sanyo : SANYO FISHER COMPANY : 21605 Plummer Street, Chatsworth, California 91311 : (818)998-7322 AC POWER CORD REQUIREMENT The AC Power Cord supplied with this safety feature. The wire which is coloured blue must be connected to part 15 of the flexible cord should be determined by ...in the instructions. This is a safety feature to the equipment unless otherwise specified in your electrician. Do not try to defeat this projector meets the requirement for use the plug with the cover omitted. red or orange). GROUND AC Power Cord for the United Kingdom ...

Owners Manual
Page 5
... REPLACE COUNTER 45 21 TROUBLESHOOTING 46 21 INDICATORS AND PROJECTOR CONDITION 48 22 22 COMPATIBLE COMPUTER SPECIFICATION 49 22 MENU TREE 50 22 TECHNICAL SPECIFICATIONS 52 CONFIGURATIONS OF TERMINALS 53 OPTIONAL PARTS 54 LENS REPLACEMENT 54 TRADEMARKS G Apple, Macintosh, ... 7 SELECTING COMPUTER SYSTEM PC ADJUSTMENT 23 25 AUTO PC ADJUSTMENT 25 NAME OF EACH PART OF PROJECTOR 7 MANUAL PC ADJUSTMENT 26 SETTING-UP PROJECTOR CONNECTING AC POWER CORD POSITIONING PROJECTOR ADJUSTABLE FEET 8 PICTURE IMAGE SELECT 28 8 IMAGE LEVEL SELECT 28 9 PICTURE SCREEN ...
... REPLACE COUNTER 45 21 TROUBLESHOOTING 46 21 INDICATORS AND PROJECTOR CONDITION 48 22 22 COMPATIBLE COMPUTER SPECIFICATION 49 22 MENU TREE 50 22 TECHNICAL SPECIFICATIONS 52 CONFIGURATIONS OF TERMINALS 53 OPTIONAL PARTS 54 LENS REPLACEMENT 54 TRADEMARKS G Apple, Macintosh, ... 7 SELECTING COMPUTER SYSTEM PC ADJUSTMENT 23 25 AUTO PC ADJUSTMENT 25 NAME OF EACH PART OF PROJECTOR 7 MANUAL PC ADJUSTMENT 26 SETTING-UP PROJECTOR CONNECTING AC POWER CORD POSITIONING PROJECTOR ADJUSTABLE FEET 8 PICTURE IMAGE SELECT 28 8 IMAGE LEVEL SELECT 28 9 PICTURE SCREEN ...

Owners Manual
Page 7
...air. LAMP COVER CARRYING HANDLE BOTTOM OF CABINET When attached the PJ-Net organizer (optional part) to the owner's manual in the optional PJ-Net organizer. AIR INTAKE VENTS This projector is equipped with cooling fans for protection from exhaust vent is used. G Do not... object, especially heat-sensitive object. G Do not put a flammable object near this area, especially screws and metallic parts. PREPARATION NAME OF EACH PART OF PROJECTOR FRONT OF CABINET TOP CONTROLS AND INDICATORS PROJECTION LENS AIR INTAKE VENT LENS COVER SPEAKERS INFRARED REMOTE RECEIVER BACK OF CABINET...
...air. LAMP COVER CARRYING HANDLE BOTTOM OF CABINET When attached the PJ-Net organizer (optional part) to the owner's manual in the optional PJ-Net organizer. AIR INTAKE VENTS This projector is equipped with cooling fans for protection from exhaust vent is used. G Do not... object, especially heat-sensitive object. G Do not put a flammable object near this area, especially screws and metallic parts. PREPARATION NAME OF EACH PART OF PROJECTOR FRONT OF CABINET TOP CONTROLS AND INDICATORS PROJECTION LENS AIR INTAKE VENT LENS COVER SPEAKERS INFRARED REMOTE RECEIVER BACK OF CABINET...
Owners Manual
Page 21
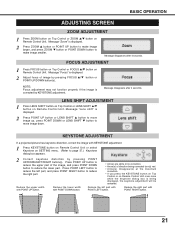
.... 2 Correct keystone distortion by pressing FOCUS L/M button or POINT UP/DOWN button(s) . Message disappears after 4 seconds. Reduce the right part with POINT LEFT button. Message disappears after 4 seconds. BASIC OPERATION ADJUSTING SCREEN ZOOM ADJUSTMENT 1 Press ZOOM button on Top Control or ZOOM... Unit. FOCUS ADJUSTMENT 1 Press FOCUS button on Top Control or FOCUS L/M button on SETTING menu. (Refer to reduce the upper part of image by pressing POINT UP/DOWN/LEFT/RIGHT button(s). KEYSTONE ADJUSTMENT If a projected picture has keystone distortion, correct the image with...
.... 2 Correct keystone distortion by pressing FOCUS L/M button or POINT UP/DOWN button(s) . Message disappears after 4 seconds. Reduce the right part with POINT LEFT button. Message disappears after 4 seconds. BASIC OPERATION ADJUSTING SCREEN ZOOM ADJUSTMENT 1 Press ZOOM button on Top Control or ZOOM... Unit. FOCUS ADJUSTMENT 1 Press FOCUS button on Top Control or FOCUS L/M button on SETTING menu. (Refer to reduce the upper part of image by pressing POINT UP/DOWN/LEFT/RIGHT button(s). KEYSTONE ADJUSTMENT If a projected picture has keystone distortion, correct the image with...

Owners Manual
Page 36
... to set and then press SELECT button. NOTE : Tint cannot be operated when "480p", "575p" or "720p" is changed to "On" to reduce noise (rough parts) of Image 1 to 4 where you want to ON (for still picture). Press either POINT LEFT button or POINT RIGHT button to obtain better balance of...
... to set and then press SELECT button. NOTE : Tint cannot be operated when "480p", "575p" or "720p" is changed to "On" to reduce noise (rough parts) of Image 1 to 4 where you want to ON (for still picture). Press either POINT LEFT button or POINT RIGHT button to obtain better balance of...
Owners Manual
Page 43
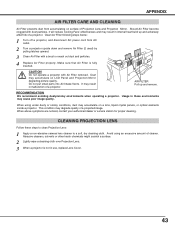
... chemicals might scratch a surface. 2 Lightly wipe a cleaning cloth over Projection Lens. 3 When a projector is fully inserted. Make sure that Air Filter is not in malfunction of a projector. Do not put small parts into Air Intake Vents. This condition may accumulate on LCD Panel and Projection Mirror degrading picture quality. Avoid using under dusty or...
... chemicals might scratch a surface. 2 Lightly wipe a cleaning cloth over Projection Lens. 3 When a projector is fully inserted. Make sure that Air Filter is not in malfunction of a projector. Do not put small parts into Air Intake Vents. This condition may accumulate on LCD Panel and Projection Mirror degrading picture quality. Avoid using under dusty or...

Owners Manual
Page 44
...with a new one and tighten 2 screws back. The glass can be ordered through your projector : G Replacement Lamp Type No. : PLC-XP55/PLC-XP55L POA-LMP67 (Service Parts No. 610 306 5977) 44 G Model No. If this projector draws to cool for at least 45 minutes. 2 Loosen 2 screws with a screwdriver and ...set properly. When ordering a Projection Lamp, give the following information to next page "Lamp Replace Counter" section). Allow a projector to an end, the LAMP REPLACE indicator lights yellow. The inside of the projection lamp draws to replace lamp assembly. 1 Turn off...
...with a new one and tighten 2 screws back. The glass can be ordered through your projector : G Replacement Lamp Type No. : PLC-XP55/PLC-XP55L POA-LMP67 (Service Parts No. 610 306 5977) 44 G Model No. If this projector draws to cool for at least 45 minutes. 2 Loosen 2 screws with a screwdriver and ...set properly. When ordering a Projection Lamp, give the following information to next page "Lamp Replace Counter" section). Allow a projector to an end, the LAMP REPLACE indicator lights yellow. The inside of the projection lamp draws to replace lamp assembly. 1 Turn off...

Owners Manual
Page 54
... engineer; After installing the lens, attach the lens cap to the attached lens replacement and installation manual, replace or install the lens properly. APPENDIX OPTIONAL PARTS The parts listed below are sold separately. G Control Cable (PS2 Port) G Control Cable (ADB Port) G MAC Adapter G DVI Cable G HDB 15 pin-SCART 21 .... : LNS-T31A Type No. : LNS-T32 Type No. : LNS-W31A Type No. : LNS-W32 Type No. : POA-PN02 LENS REPLACEMENT The lens of this projector can be installed or replaced by yourself as it may cause serious damage to the sales dealer. This feature enables you to use the...
... engineer; After installing the lens, attach the lens cap to the attached lens replacement and installation manual, replace or install the lens properly. APPENDIX OPTIONAL PARTS The parts listed below are sold separately. G Control Cable (PS2 Port) G Control Cable (ADB Port) G MAC Adapter G DVI Cable G HDB 15 pin-SCART 21 .... : LNS-T31A Type No. : LNS-T32 Type No. : LNS-W31A Type No. : LNS-W32 Type No. : POA-PN02 LENS REPLACEMENT The lens of this projector can be installed or replaced by yourself as it may cause serious damage to the sales dealer. This feature enables you to use the...

Owners Manual
Page 56
Printed in Japan Part No. 610 306 0675 (1AA6P1P3948-- MR3A) SANYO Electric Co., Ltd
Printed in Japan Part No. 610 306 0675 (1AA6P1P3948-- MR3A) SANYO Electric Co., Ltd
