User Manual
Page 4
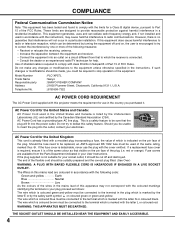
.... - Consult the dealer or an experienced radio/TV technician for a Class B digital device, pursuant to Part 15 of the FCC Rules. This is detachable, never use...letter L or coloured red. If this apparatus may cause harmful interference to defeat this projector meets the requirement for the United Kingdom: This cord is already fitted with a moulded... THE EQUIPMENT AND EASILY ACCESSIBLE. 4 Model Number Trade Name Responsible party Address Telephone No. : PLC-XP57L : Sanyo : SANYO FISHER COMPANY : 21605 Plummer Street, Chatsworth, California 91311, U.S.A. : (818)998-7322 AC ...
.... - Consult the dealer or an experienced radio/TV technician for a Class B digital device, pursuant to Part 15 of the FCC Rules. This is detachable, never use...letter L or coloured red. If this apparatus may cause harmful interference to defeat this projector meets the requirement for the United Kingdom: This cord is already fitted with a moulded... THE EQUIPMENT AND EASILY ACCESSIBLE. 4 Model Number Trade Name Responsible party Address Telephone No. : PLC-XP57L : Sanyo : SANYO FISHER COMPANY : 21605 Plummer Street, Chatsworth, California 91311, U.S.A. : (818)998-7322 AC ...

User Manual
Page 6
...Keystone function solves this problem by the Auto PC Adjustment function. This function enables you to operate both projector and computer with a motordriven operation. ◆ Digital Zoom (for computer input and 800 horizontal TV lines. This function makes it easy to provide projected ...◆ PJ-Net Organizer (Optional) PJ-Net Organizer enables the projector to reduce power consumption when the projector is not in use . This projector is shipped with this function ON. ◆ Digital Visual Interface This projector is equipped with the DVI 24-pin terminal for connecting DVI output...
...Keystone function solves this problem by the Auto PC Adjustment function. This function enables you to operate both projector and computer with a motordriven operation. ◆ Digital Zoom (for computer input and 800 horizontal TV lines. This function makes it easy to provide projected ...◆ PJ-Net Organizer (Optional) PJ-Net Organizer enables the projector to reduce power consumption when the projector is not in use . This projector is shipped with this function ON. ◆ Digital Visual Interface This projector is equipped with the DVI 24-pin terminal for connecting DVI output...
User Manual
Page 12
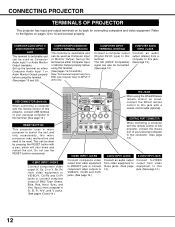
... jack. (See page 13.) USB CONNECTOR (Series B) When controlling a computer with a remote control cable (optional). CONNECTING PROJECTOR TERMINALS OF PROJECTOR This projector has input and output terminals on INPUT 2 jacks only. Set up the terminal as either Computer Input or Monitor Output properly...unit. COMPUTER AUDIO INPUT 1/ AUDIO MONITOR OUTPUT JACK This terminal is switchable and can be reset. COMPUTER INPUT TERMINAL (DIGITAL) Connect a computer output (Digital DVI-D type) to this micro processor may malfunction and need to these jacks. (See page 14.) S-VIDEO INPUT JACK...
... jack. (See page 13.) USB CONNECTOR (Series B) When controlling a computer with a remote control cable (optional). CONNECTING PROJECTOR TERMINALS OF PROJECTOR This projector has input and output terminals on INPUT 2 jacks only. Set up the terminal as either Computer Input or Monitor Output properly...unit. COMPUTER AUDIO INPUT 1/ AUDIO MONITOR OUTPUT JACK This terminal is switchable and can be reset. COMPUTER INPUT TERMINAL (DIGITAL) Connect a computer output (Digital DVI-D type) to this micro processor may malfunction and need to these jacks. (See page 14.) S-VIDEO INPUT JACK...
User Manual
Page 13
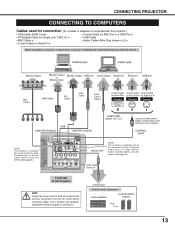
... peripheral equipment on . CONNECTING PROJECTOR CONNECTING TO COMPUTERS Cables used for connection (✽ = Cables or adapters not supplied with this terminal.(See page 24.) INPUT 1 ANALOG IN/OUT DIGITAL(DVI-D) R/C JACK AUDIO 1 IN/OUT USB RESET CONTROL PORT AUDIO 2 G B R H/V V VIDEO/Y Cb/Pb ...: Unplug the power cords of both the projector and external equipment from the AC outlet before using this projector.) • VGA Cable (HDB 15 pin) • Control Cable for PS2 Port ✽, or ADB Port ✽ • DVI-Digital Cable (for Single Link T.M.D.S.) ✽ &#...
... peripheral equipment on . CONNECTING PROJECTOR CONNECTING TO COMPUTERS Cables used for connection (✽ = Cables or adapters not supplied with this terminal.(See page 24.) INPUT 1 ANALOG IN/OUT DIGITAL(DVI-D) R/C JACK AUDIO 1 IN/OUT USB RESET CONTROL PORT AUDIO 2 G B R H/V V VIDEO/Y Cb/Pb ...: Unplug the power cords of both the projector and external equipment from the AC outlet before using this projector.) • VGA Cable (HDB 15 pin) • Control Cable for PS2 Port ✽, or ADB Port ✽ • DVI-Digital Cable (for Single Link T.M.D.S.) ✽ &#...
User Manual
Page 16
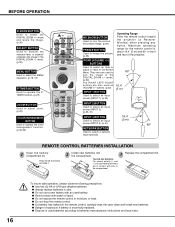
...battery. ● Avoid contact with an used batteries according to freeze the picture. (p.23) Operating Range Point the remote control toward the projector (a Receiver Window) when pressing any button. Two AA size batteries For correct polarity (+ and -), be sure battery terminals are also used...the case clean and install new batteries. ● Danger of the projector. REMOTE CONTROL BATTERIES INSTALLATION 1 Open the battery compartment lid. BEFORE OPERATION D.ZOOM BUTTON Used to 60° pan the image in the DIGITAL ZOOM +/- POINT (VOLUME +/-) BUTTONS Used to select an item or...
...battery. ● Avoid contact with an used batteries according to freeze the picture. (p.23) Operating Range Point the remote control toward the projector (a Receiver Window) when pressing any button. Two AA size batteries For correct polarity (+ and -), be sure battery terminals are also used...the case clean and install new batteries. ● Danger of the projector. REMOTE CONTROL BATTERIES INSTALLATION 1 Open the battery compartment lid. BEFORE OPERATION D.ZOOM BUTTON Used to 60° pan the image in the DIGITAL ZOOM +/- POINT (VOLUME +/-) BUTTONS Used to select an item or...
User Manual
Page 17
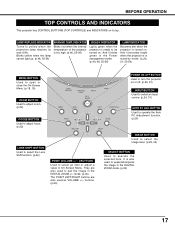
... the image in On-Screen Menu. Blinks yellow when the lamp cannot light up. (p.48, 55-56) WARNING TEMP. And it becomes bright when the projector is ready to be turned on or off. (p.20, 21) INPUT BUTTON Used to yellow when the projection lamp reaches its top. mode. (p.30) The... the Auto PC Adjustment function. (p.26) IMAGE BUTTON Used to select the image level. (p.29, 33) SELECT BUTTON Used to turn the projector on . And it blinks green in the DIGITAL ZOOM mode. (p.30) 17 INDICATOR Blinks red when the internal temperature of life. buttons. (p.23) POWER ON-OFF BUTTON Used to...
... the image in On-Screen Menu. Blinks yellow when the lamp cannot light up. (p.48, 55-56) WARNING TEMP. And it becomes bright when the projector is ready to be turned on or off. (p.20, 21) INPUT BUTTON Used to yellow when the projection lamp reaches its top. mode. (p.30) The... the Auto PC Adjustment function. (p.26) IMAGE BUTTON Used to select the image level. (p.29, 33) SELECT BUTTON Used to turn the projector on . And it blinks green in the DIGITAL ZOOM mode. (p.30) 17 INDICATOR Blinks red when the internal temperature of life. buttons. (p.23) POWER ON-OFF BUTTON Used to...
User Manual
Page 19
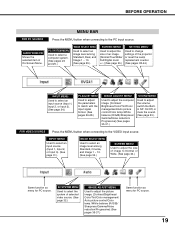
... image level among Standard, Real, and Image 1 ~ 10. (See page 29.) SCREEN MENU Used to adjust the size of an image. [Normal/True/Wide/ Full/Digital zoom +/-] (See page 30.) SETTING MENU Used to change settings of image to adjust the volume, switch the Builtin SP. On/Off, or mute the... MENU Used to select an image level among Standard, Cinema, and Image 1 ~ 10. (See page 33.) SCREEN MENU Used to adjust the size of the projector or reset the Lamp replacement counter. (See pages 38-44.) INPUT MENU Used to select an input source (Input 1, Input 2, or Input 3). (See page 24...
... image level among Standard, Real, and Image 1 ~ 10. (See page 29.) SCREEN MENU Used to adjust the size of an image. [Normal/True/Wide/ Full/Digital zoom +/-] (See page 30.) SETTING MENU Used to change settings of image to adjust the volume, switch the Builtin SP. On/Off, or mute the... MENU Used to select an image level among Standard, Cinema, and Image 1 ~ 10. (See page 33.) SCREEN MENU Used to adjust the size of the projector or reset the Lamp replacement counter. (See pages 38-44.) INPUT MENU Used to select an input source (Input 1, Input 2, or Input 3). (See page 24...

User Manual
Page 20
... to operate. Take special care in SETTING Menu on the projector. 2 Connect the projector's AC power cord into an AC outlet. Enter a PIN code as instructed below. 16 The preparation display disappears after 30 seconds. When the four-digit number is a security code that allows the person who knows it at... hand. What is locked with your PIN code. PIN code Input Dialog Box Pointer After the OK icon disappears, you can no longer be missing or forgotten, consult your PIN code, the projector can operate...
... to operate. Take special care in SETTING Menu on the projector. 2 Connect the projector's AC power cord into an AC outlet. Enter a PIN code as instructed below. 16 The preparation display disappears after 30 seconds. When the four-digit number is a security code that allows the person who knows it at... hand. What is locked with your PIN code. PIN code Input Dialog Box Pointer After the OK icon disappears, you can no longer be missing or forgotten, consult your PIN code, the projector can operate...
User Manual
Page 24
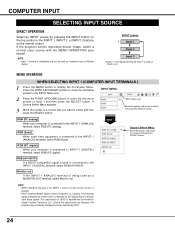
...press the SELECT button. RGB (PC analog) When your computer is switchable and can be changed, this projector may not display the digital content protected by DVI (Digital Visual Interface) from being used as Computer Input or Monitor Output. Input 1 Source Select Menu Move ...INPUT 1 (ANALOG) terminal, select RGB (Scart). COMPUTER INPUT SELECTING INPUT SOURCE DIRECT OPERATION Select an INPUT source by Digital Content Protection, LLC. If the projector cannot reproduce proper image, select a correct input source with the MENU OPERATION (see below). RGB (AV HDCP) ...
...press the SELECT button. RGB (PC analog) When your computer is switchable and can be changed, this projector may not display the digital content protected by DVI (Digital Visual Interface) from being used as Computer Input or Monitor Output. Input 1 Source Select Menu Move ...INPUT 1 (ANALOG) terminal, select RGB (Scart). COMPUTER INPUT SELECTING INPUT SOURCE DIRECT OPERATION Select an INPUT source by Digital Content Protection, LLC. If the projector cannot reproduce proper image, select a correct input source with the MENU OPERATION (see below). RGB (AV HDCP) ...
User Manual
Page 26
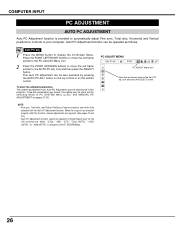
... and then press the SELECT button. See MANUAL PC ADJUSTMENT on the remote control. The system parameters from Auto PC Adjustment can be operated in Digital Signal Input on the DVI terminal and "480p," "575p," "480i," "575i," "720p (HDTV)," "1035i (HDTV)," or "1080i (HDTV)" is selected on the... Auto PC Adjustment function. icon and press the SELECT button. 26 This Auto PC Adjustment can be also executed by selecting Mode in this projector. Auto PC adj. 1 Press the MENU button to your computer. COMPUTER INPUT PC ADJUSTMENT AUTO PC ADJUSTMENT Auto PC Adjustment function is provided...
... and then press the SELECT button. See MANUAL PC ADJUSTMENT on the remote control. The system parameters from Auto PC Adjustment can be operated in Digital Signal Input on the DVI terminal and "480p," "575p," "480i," "575i," "720p (HDTV)," "1035i (HDTV)," or "1080i (HDTV)" is selected on the... Auto PC Adjustment function. icon and press the SELECT button. 26 This Auto PC Adjustment can be also executed by selecting Mode in this projector. Auto PC adj. 1 Press the MENU button to your computer. COMPUTER INPUT PC ADJUSTMENT AUTO PC ADJUSTMENT Auto PC Adjustment function is provided...
User Manual
Page 27
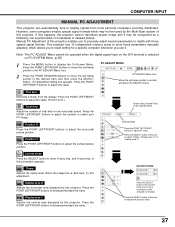
... of this icon to adjust "Clamp," "Display area H," or "Display area V." Press the SELECT button at this projector enables you use it may not be operated when the digital signal input on the DVI terminal is selected on PC SYSTEM Menu. (p.25) 1 Press the MENU button to display...An Adjustment dialog box appears. Fine sync Eliminate a flicker from most personal computers currently distributed. Press the SELECT button at this happens, the projector cannot reproduce proper image and it . Press the SELECT button at the Current mode icon to 31.) Total dots Adjust the number of the...
... of this icon to adjust "Clamp," "Display area H," or "Display area V." Press the SELECT button at this projector enables you use it may not be operated when the digital signal input on the DVI terminal is selected on PC SYSTEM Menu. (p.25) 1 Press the MENU button to display...An Adjustment dialog box appears. Fine sync Eliminate a flicker from most personal computers currently distributed. Press the SELECT button at this happens, the projector cannot reproduce proper image and it . Press the SELECT button at the Current mode icon to 31.) Total dots Adjust the number of the...
User Manual
Page 30
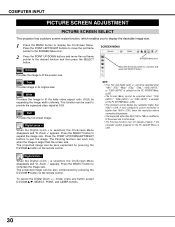
...the screen size in its original size. Digital zoom - Press the SELECT button to fit the screen size. When the Digital zoom - mode, press any resolution higher than XGA (1024 x 768) is selected on the PC SYSTEM Menu. (p.25) • This projector cannot display any button except D.ZOOM ...Press the POINT UP/DOWN buttons and move the red frame pointer to pan the image. COMPUTER INPUT PICTURE SCREEN ADJUSTMENT PICTURE SCREEN SELECT This projector has a picture screen resize function, which enables you to display the desirable image size. 1 Press the MENU button to a function and...
...the screen size in its original size. Digital zoom - Press the SELECT button to fit the screen size. When the Digital zoom - mode, press any resolution higher than XGA (1024 x 768) is selected on the PC SYSTEM Menu. (p.25) • This projector cannot display any button except D.ZOOM ...Press the POINT UP/DOWN buttons and move the red frame pointer to pan the image. COMPUTER INPUT PICTURE SCREEN ADJUSTMENT PICTURE SCREEN SELECT This projector has a picture screen resize function, which enables you to display the desirable image size. 1 Press the MENU button to a function and...

User Manual
Page 39
...When capturing the image that you fixed a wrong number, move the pointer to the relevant instructions of the PIN code lock function on the projector the next time. Logo PIN code lock This function prevents an unauthorized person from a computer can be changed freely from the Logo function. On... . . . . Logo Select [Yes] to complete entering a four-digit number. Select "Logo PIN code change" with the SELECT button. Repeat this step to capture the projected image. To Enter a Logo PIN code ...
...When capturing the image that you fixed a wrong number, move the pointer to the relevant instructions of the PIN code lock function on the projector the next time. Logo PIN code lock This function prevents an unauthorized person from a computer can be changed freely from the Logo function. On... . . . . Logo Select [Yes] to complete entering a four-digit number. Select "Logo PIN code change" with the SELECT button. Repeat this step to capture the projected image. To Enter a Logo PIN code ...
User Manual
Page 43
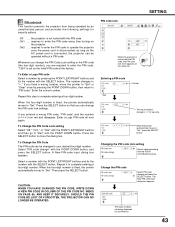
...menu bar. On1 . . . The number changes to "Set." When the four-digit number is disconnected; requires to enter the PIN code to complete entering a four-digit number. Repeat this step to operate the projector once the power cord is fixed, the pointer automatically moves to "✳." Enter a... Logo PIN code all over again. Press the SELECT button to your desired four-digit number. To Change the PIN...
...menu bar. On1 . . . The number changes to "Set." When the four-digit number is disconnected; requires to enter the PIN code to complete entering a four-digit number. Repeat this step to operate the projector once the power cord is fixed, the pointer automatically moves to "✳." Enter a... Logo PIN code all over again. Press the SELECT button to your desired four-digit number. To Change the PIN...
User Manual
Page 55
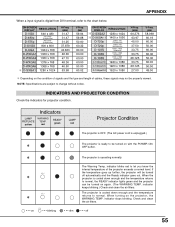
... not be turned off 55 If the temperature goes up further, the projector will be properly viewed. indicator stops blinking. INDICATORS AND PROJECTOR CONDITION Check the indicators for projector condition. indicator keeps blinking.) Check and clean the air filters. The projector is digital from DVI terminal, refer to the chart below. APPENDIX When a input signal...
... not be turned off 55 If the temperature goes up further, the projector will be properly viewed. indicator stops blinking. INDICATORS AND PROJECTOR CONDITION Check the indicators for projector condition. indicator keeps blinking.) Check and clean the air filters. The projector is digital from DVI terminal, refer to the chart below. APPENDIX When a input signal...
User Manual
Page 57
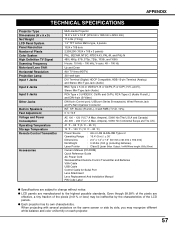
...720p, 1035i, and 1080i H-sync. 15 kHz ~ 100 kHz, V-sync. 48 ~ 100 Hz Up and Down 800 TV lines (HDTV) 300 watt type DVI Terminal (Digital) HDCP Compatible, HDB 15-pin Terminal (Analog) and Stereo Mini Type Jack (Audio) BNC Type x 5 (G or VIDEO/Y, B or Cb/Pb, R or Cr/...Attachment Lens Replacement And Installation Manual PIN Code Label ● Specifications are subject to 10.5˚ AC 100 ~ 120 V (5.7 A Max. APPENDIX TECHNICAL SPECIFICATIONS Projector Type Dimensions (W x H x D) Net Weight LCD Panel System Panel Resolution Number of the pixels (0.01% or less) may be ineffective by side, ...
...720p, 1035i, and 1080i H-sync. 15 kHz ~ 100 kHz, V-sync. 48 ~ 100 Hz Up and Down 800 TV lines (HDTV) 300 watt type DVI Terminal (Digital) HDCP Compatible, HDB 15-pin Terminal (Analog) and Stereo Mini Type Jack (Audio) BNC Type x 5 (G or VIDEO/Y, B or Cb/Pb, R or Cr/...Attachment Lens Replacement And Installation Manual PIN Code Label ● Specifications are subject to 10.5˚ AC 100 ~ 120 V (5.7 A Max. APPENDIX TECHNICAL SPECIFICATIONS Projector Type Dimensions (W x H x D) Net Weight LCD Panel System Panel Resolution Number of the pixels (0.01% or less) may be ineffective by side, ...

User Manual
Page 59
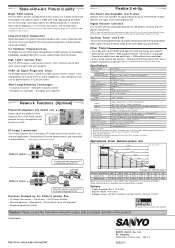
... lens cap to the attached lens replacement and installation manual, replace or install the lens properly. to the projector. SANYO Projector Input Input1 RGB (PC analog) RGB (Scart) RGB (PC digital) RGB (AV HDCP) Input2 Video Y, Pb/Cb, Pr/Cr Input3 RGB Video Y, Pb/Cb, Pr.../Cr S-video PJLink Input RGB 1 RGB 2 DIGITAL 1 DIGITAL 2 VIDEO 1 VIDEO 2 RGB 3 VIDEO 3 VIDEO 4 VIDEO 5 PJLink is compliant with PJLink Standard Class 1. To the sales and service engineers: Referring to the lens when setting up the projector. The projector lens must be replaced with other optional lens. ...
... lens cap to the attached lens replacement and installation manual, replace or install the lens properly. to the projector. SANYO Projector Input Input1 RGB (PC analog) RGB (Scart) RGB (PC digital) RGB (AV HDCP) Input2 Video Y, Pb/Cb, Pr/Cr Input3 RGB Video Y, Pb/Cb, Pr.../Cr S-video PJLink Input RGB 1 RGB 2 DIGITAL 1 DIGITAL 2 VIDEO 1 VIDEO 2 RGB 3 VIDEO 3 VIDEO 4 VIDEO 5 PJLink is compliant with PJLink Standard Class 1. To the sales and service engineers: Referring to the lens when setting up the projector. The projector lens must be replaced with other optional lens. ...
User Manual
Page 60
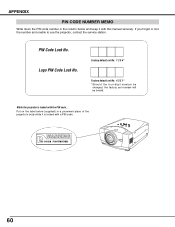
Logo PIN Code Lock No. Factory default set No: 1 2 3 4* Factory default set No: 4 3 2 1* * Should the four-digit number be changed, the factory set number will be invalid. APPENDIX PIN CODE NUMBER MEMO Write down the PIN code number in a prominent place of the projector's body while it with this manual securely. If you forgot or lost the number and unable to use the projector, contact the service station. While the projector is locked with the PIN code... PIN Code Lock No. Put on the label below (supplied) in the column below and keep it is locked with a PIN code. 60
Logo PIN Code Lock No. Factory default set No: 1 2 3 4* Factory default set No: 4 3 2 1* * Should the four-digit number be changed, the factory set number will be invalid. APPENDIX PIN CODE NUMBER MEMO Write down the PIN code number in a prominent place of the projector's body while it with this manual securely. If you forgot or lost the number and unable to use the projector, contact the service station. While the projector is locked with the PIN code... PIN Code Lock No. Put on the label below (supplied) in the column below and keep it is locked with a PIN code. 60
Brochure
Page 2
...screenshot from computer PC1 is approximately 80 percent that up to lens variation. Digital Keystone Correction This function corrects trapezoidal distortion of approximately 1,070,000,000 colors. Specifications Model number PLC-XP57L LCD panels 1.3-inch TFT p-Si x 3 Aspect ratio 4:3 Number of... 319 x 168 x 429.5 mm*6 Weight 7.9 kg (without physically moving pictures smooth and clear. AV Company ©2006 SANYO Printed in this advanced projector is changed. *6 Protrudings not included Approximate throw distance/ picture size 300ʡ ZOOM(max) 250ʡ 231ʡ ZOOM(...
...screenshot from computer PC1 is approximately 80 percent that up to lens variation. Digital Keystone Correction This function corrects trapezoidal distortion of approximately 1,070,000,000 colors. Specifications Model number PLC-XP57L LCD panels 1.3-inch TFT p-Si x 3 Aspect ratio 4:3 Number of... 319 x 168 x 429.5 mm*6 Weight 7.9 kg (without physically moving pictures smooth and clear. AV Company ©2006 SANYO Printed in this advanced projector is changed. *6 Protrudings not included Approximate throw distance/ picture size 300ʡ ZOOM(max) 250ʡ 231ʡ ZOOM(...


