
User Manual
Page 5
... 33 CONNECTING TO VIDEO EQUIPMENT 14 PICTURE SCREEN ADJUSTMENT 34 PICTURE SCREEN SELECT 34 BEFORE OPERATION 15 PICTURE IMAGE 35 REMOTE CONTROL OPERATION LASER POINTER FUNCTION 15 PICTURE IMAGE ADJUSTMENTS 35 15 REMOTE CONTROL BATTERIES INSTALLATION 16 TOP CONTROLS AND INDICATORS 17 SETTING 38 ON-SCREEN MENU 18 HOW TO OPERATE ON...
... 33 CONNECTING TO VIDEO EQUIPMENT 14 PICTURE SCREEN ADJUSTMENT 34 PICTURE SCREEN SELECT 34 BEFORE OPERATION 15 PICTURE IMAGE 35 REMOTE CONTROL OPERATION LASER POINTER FUNCTION 15 PICTURE IMAGE ADJUSTMENTS 35 15 REMOTE CONTROL BATTERIES INSTALLATION 16 TOP CONTROLS AND INDICATORS 17 SETTING 38 ON-SCREEN MENU 18 HOW TO OPERATE ON...

User Manual
Page 6
... 1920 x 1080 dots. The projector can be controlled and maintained through a web browser. 6 Resolution from a computer. ◆ Laser Pointer Function Remote control supplied with more than XGA (1024 x 768) is compressed into 1024 x 768 dots. There is no button is pressed for a certain period... to approx. 1/4 ~ 49 times of an original image size, allowing you to focus on a projected screen. ◆ Wireless Mouse Remote control supplied with most advanced technology for portability, durability, and ease of your computer is pressed. This function enables you to display the image...
... 1920 x 1080 dots. The projector can be controlled and maintained through a web browser. 6 Resolution from a computer. ◆ Laser Pointer Function Remote control supplied with more than XGA (1024 x 768) is compressed into 1024 x 768 dots. There is no button is pressed for a certain period... to approx. 1/4 ~ 49 times of an original image size, allowing you to focus on a projected screen. ◆ Wireless Mouse Remote control supplied with most advanced technology for portability, durability, and ease of your computer is pressed. This function enables you to display the image...

User Manual
Page 7
High temperature from light beam may block cooling the air. TOP CONTROLS AND INDICATORS AIR INTAKE VENT INFRARED REMOTE RECEIVER BACK OF CABINET EXHAUST VENT POWER CORD CONNECTOR TERMINALS AND CONNECTORS INFRARED REMOTE RECEIVER HOT AIR EXHAUSTED ! BOTTOM OF CABINET LAMP COVER When attaching the PJ-Net Organizer (optional) to the owner's manual...
High temperature from light beam may block cooling the air. TOP CONTROLS AND INDICATORS AIR INTAKE VENT INFRARED REMOTE RECEIVER BACK OF CABINET EXHAUST VENT POWER CORD CONNECTOR TERMINALS AND CONNECTORS INFRARED REMOTE RECEIVER HOT AIR EXHAUSTED ! BOTTOM OF CABINET LAMP COVER When attaching the PJ-Net Organizer (optional) to the owner's manual...
User Manual
Page 12
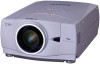
..., Cr or Y, Pb, Pr) from a computer to this jack. (See page 13.) USB CONNECTOR (Series B) When controlling a computer with a remote control cable (optional). CONNECTING PROJECTOR TERMINALS OF PROJECTOR This projector has input and output terminals on pages 12 to this micro processor may malfunction and... is switchable and can be used as either Computer Audio Input 1 or Audio Monitor Output properly before using this jack with the remote control of this projector, connect USB terminal of your personal computer to this terminal. (See page 13.) RESET BUTTON This projector ...
..., Cr or Y, Pb, Pr) from a computer to this jack. (See page 13.) USB CONNECTOR (Series B) When controlling a computer with a remote control cable (optional). CONNECTING PROJECTOR TERMINALS OF PROJECTOR This projector has input and output terminals on pages 12 to this micro processor may malfunction and... is switchable and can be used as either Computer Audio Input 1 or Audio Monitor Output properly before using this jack with the remote control of this projector, connect USB terminal of your personal computer to this terminal. (See page 13.) RESET BUTTON This projector ...

User Manual
Page 15
...is not operated. that you want to select as a Laser Pointer. LASER ON/OFF SW1 SW2 SW3 Code No. LASER POINTER FUNCTION This remote control emits laser beam from the Laser Light Window. LASER POINTER INDICATOR These caution labels are caution labels for more than those specified herein ... Left Side LASER POINTER (DRAG ON) INDICATOR Lights red while the laser beam is emitted from the Laser Light Window when used as the remote control code. (See page 41.) DIP SWITCH SETTING SW4 ........ When the LASER button is being emitted. Do not look into the battery compartment...
...is not operated. that you want to select as a Laser Pointer. LASER ON/OFF SW1 SW2 SW3 Code No. LASER POINTER FUNCTION This remote control emits laser beam from the Laser Light Window. LASER POINTER INDICATOR These caution labels are caution labels for more than those specified herein ... Left Side LASER POINTER (DRAG ON) INDICATOR Lights red while the laser beam is emitted from the Laser Light Window when used as the remote control code. (See page 41.) DIP SWITCH SETTING SW4 ........ When the LASER button is being emitted. Do not look into the battery compartment...
User Manual
Page 16
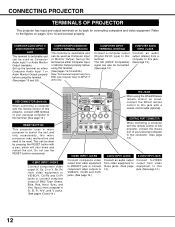
... (optional). They are also used batteries according to freeze the picture. (p.23) Operating Range Point the remote control toward the projector (a Receiver Window) when pressing any button. REMOTE CONTROL BATTERIES INSTALLATION 1 Open the battery compartment lid. Two AA size batteries For correct polarity (+ and....4' VOLUME +/- mode and resize the image. (p.30) SELECT BUTTON Used to select the DIGITAL ZOOM +/- Maximum operating range for the remote control is incorrectly replaced. ● Dispose of the projector. mode. (p.30) The POINT LEFT/ RIGHT buttons are in contact with ...
... (optional). They are also used batteries according to freeze the picture. (p.23) Operating Range Point the remote control toward the projector (a Receiver Window) when pressing any button. REMOTE CONTROL BATTERIES INSTALLATION 1 Open the battery compartment lid. Two AA size batteries For correct polarity (+ and....4' VOLUME +/- mode and resize the image. (p.30) SELECT BUTTON Used to select the DIGITAL ZOOM +/- Maximum operating range for the remote control is incorrectly replaced. ● Dispose of the projector. mode. (p.30) The POINT LEFT/ RIGHT buttons are in contact with ...
User Manual
Page 18
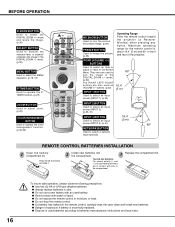
... projector with On-Screen Menu. A red frame is an icon in "FLOW OF ON-SCREEN MENU OPERATION" below ) or adjust a value of respective adjustments. REMOTE CONTROL 1. POINT BUTTONS Used to move the Pointer UP/DOWN/ RIGHT/LEFT. POINTER (red frame) Press the POINT UP/DOWN buttons to move the POINTER... that you want to adjust, and then press the SELECT button to select by pressing the POINT buttons on the top control or on the remote control. ✽ The Pointer is a POINTER. SELECT BUTTON ITEM DATA Press the POINT LEFT/RIGHT buttons to display the On-Screen Menu. 2. MOVING ...
... projector with On-Screen Menu. A red frame is an icon in "FLOW OF ON-SCREEN MENU OPERATION" below ) or adjust a value of respective adjustments. REMOTE CONTROL 1. POINT BUTTONS Used to move the Pointer UP/DOWN/ RIGHT/LEFT. POINTER (red frame) Press the POINT UP/DOWN buttons to move the POINTER... that you want to adjust, and then press the SELECT button to select by pressing the POINT buttons on the top control or on the remote control. ✽ The Pointer is a POINTER. SELECT BUTTON ITEM DATA Press the POINT LEFT/RIGHT buttons to display the On-Screen Menu. 2. MOVING ...

User Manual
Page 20
... starts. 4 After the countdown, the input source that was selected the last time and the Lamp control status icon (see page 41) appear on the remote control. The number changes to "Set" or "Clear" once by pressing the POINT LEFT/RIGHT button and fix the number with a PIN code, a PIN code...
... starts. 4 After the countdown, the input source that was selected the last time and the Lamp control status icon (see page 41) appear on the remote control. The number changes to "Set" or "Clear" once by pressing the POINT LEFT/RIGHT button and fix the number with a PIN code, a PIN code...
User Manual
Page 21
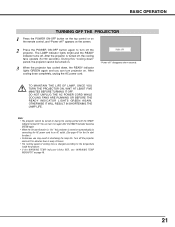
... hour in every 24 hours. • The running speed of cooling fans is "On," this "cooling down" period, the projector cannot be turned on the remote control, and "Power off?" The LAMP indicator lights bright and the READY indicator turns off the projector and rest it on again after 4 seconds. appears...
... hour in every 24 hours. • The running speed of cooling fans is "On," this "cooling down" period, the projector cannot be turned on the remote control, and "Power off?" The LAMP indicator lights bright and the READY indicator turns off the projector and rest it on again after 4 seconds. appears...
User Manual
Page 22
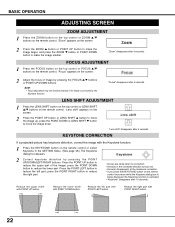
... keystone distortion, correct the image with POINT DOWN button. Reduce the lower width with the Keystone function. 1 Press the KEYSTONE button on the remote control or select Keystone in the corrected direction turn(s) red. • Arrow(s) disappear(s) at the maximum correction. • If you press ... the image larger, and press the ZOOM ▼ button or POINT DOWN button to reduce the lower part. "Zoom" appears on the remote control once more while the Keystone dialog box is being displayed, the Keystone function is corrected by the Keystone function. "Zoom" disappears after ...
... keystone distortion, correct the image with POINT DOWN button. Reduce the lower width with the Keystone function. 1 Press the KEYSTONE button on the remote control or select Keystone in the corrected direction turn(s) red. • Arrow(s) disappear(s) at the maximum correction. • If you press ... the image larger, and press the ZOOM ▼ button or POINT DOWN button to reduce the lower part. "Zoom" appears on the remote control once more while the Keystone dialog box is being displayed, the Keystone function is corrected by the Keystone function. "Zoom" disappears after ...
User Manual
Page 23
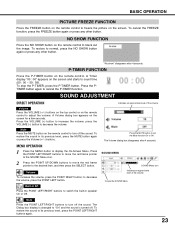
...POINT LEFT/RIGHT buttons again. 23 to decrease the volume. Indicates an approximate level of the volume. A Volume dialog box appears on the remote control to turn off the sound. Volume To increase the volume, press the POINT RIGHT button; SOUND MENU SOUND Menu icon Indicates an approximate ... a few seconds. press the VOLUME (-) button to decrease the volume, press the POINT LEFT button. P-TIMER FUNCTION Press the P-TIMER button on the remote control. To stop the P-TIMER, press the P-TIMER button. Press the VOLUME (+) button to "On" and the sound is turned off the sound....
...POINT LEFT/RIGHT buttons again. 23 to decrease the volume. Indicates an approximate level of the volume. A Volume dialog box appears on the remote control to turn off the sound. Volume To increase the volume, press the POINT RIGHT button; SOUND MENU SOUND Menu icon Indicates an approximate ... a few seconds. press the VOLUME (-) button to decrease the volume, press the POINT LEFT button. P-TIMER FUNCTION Press the P-TIMER button on the remote control. To stop the P-TIMER, press the P-TIMER button. Press the VOLUME (+) button to "On" and the sound is turned off the sound....
User Manual
Page 24
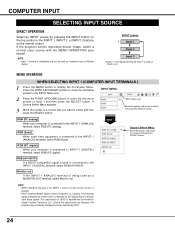
... by DVI (Digital Visual Interface) from being used as Monitor out. NOTE: • INPUT SOURCE changes if the INPUT 1 button on the remote control. MENU OPERATION WHEN SELECTING INPUT 1 (COMPUTER INPUT TERMINALS ) 1 Press the MENU button to a source and press the SELECT button. RGB...OPERATION Select an INPUT source by pressing the INPUT button on the top control or the INPUT 1, INPUT 2, or INPUT 3 buttons on the remote control is pressed. • HDCP (High-bandwidth Digital Content Protection) is a system for protecting digital entertainment content which is connected to INPUT ...
... by DVI (Digital Visual Interface) from being used as Monitor out. NOTE: • INPUT SOURCE changes if the INPUT 1 button on the remote control. MENU OPERATION WHEN SELECTING INPUT 1 (COMPUTER INPUT TERMINALS ) 1 Press the MENU button to a source and press the SELECT button. RGB...OPERATION Select an INPUT source by pressing the INPUT button on the top control or the INPUT 1, INPUT 2, or INPUT 3 buttons on the remote control is pressed. • HDCP (High-bandwidth Digital Content Protection) is a system for protecting digital entertainment content which is connected to INPUT ...
User Manual
Page 25
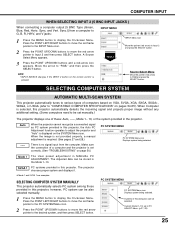
... Adjustment function operates to adjust the projector and "Auto" is set manually.) The projector displays one of a computer and the projector is displayed on the remote control is no signal input from a computer to G, B, R, H/HV, and V jacks: 1 Press the MENU button to Input 2 and then press SELECT button. Systems in this...
... Adjustment function operates to adjust the projector and "Auto" is set manually.) The projector displays one of a computer and the projector is displayed on the remote control is no signal input from a computer to G, B, R, H/HV, and V jacks: 1 Press the MENU button to Input 2 and then press SELECT button. Systems in this...
User Manual
Page 26
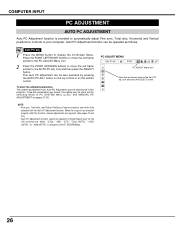
... be memorized in this function, manual adjustments are stored, the setting can be operated in PC SYSTEM Menu (p.25). See MANUAL PC ADJUSTMENT on the remote control. Once the parameters are required. (See pages 27 and 28.) • Auto PC Adjustment function cannot be operated as follows. PC ADJUST MENU PC...
... be memorized in this function, manual adjustments are stored, the setting can be operated in PC SYSTEM Menu (p.25). See MANUAL PC ADJUSTMENT on the remote control. Once the parameters are required. (See pages 27 and 28.) • Auto PC Adjustment function cannot be operated as follows. PC ADJUST MENU PC...

User Manual
Page 29
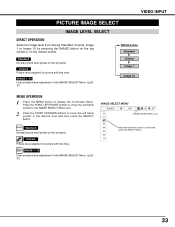
... Menu icon Standard Normal picture level preset on this projector. Real Picture level with improved halftone for graphics. Standard Normal picture level preset on the remote control. Press the POINT LEFT/RIGHT buttons to move the red frame pointer to the IMAGE SELECT Menu icon. 2 Press the POINT UP/DOWN buttons...
... Menu icon Standard Normal picture level preset on this projector. Real Picture level with improved halftone for graphics. Standard Normal picture level preset on the remote control. Press the POINT LEFT/RIGHT buttons to move the red frame pointer to the IMAGE SELECT Menu icon. 2 Press the POINT UP/DOWN buttons...
User Manual
Page 30
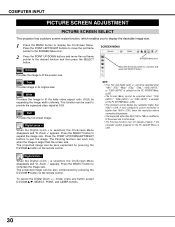
... 1600 x 1200, lower the resolution before connecting the projector. • The image data other than XGA (1024 x 768) is selected on the remote control. is selected, the On-Screen Menu disappears and "D. To cancel the Digital Zoom +/- SCREEN MENU SCREEN Menu icon Move the red frame pointer...SELECT button. True Provides image in initial mode. • The Panning function may not operate properly if the computer system prepared on the remote control. Full Provides the full screen image. The projected image can work only when the image is used to compress the image size. ...
... 1600 x 1200, lower the resolution before connecting the projector. • The image data other than XGA (1024 x 768) is selected on the remote control. is selected, the On-Screen Menu disappears and "D. To cancel the Digital Zoom +/- SCREEN MENU SCREEN Menu icon Move the red frame pointer...SELECT button. True Provides image in initial mode. • The Panning function may not operate properly if the computer system prepared on the remote control. Full Provides the full screen image. The projected image can work only when the image is used to compress the image size. ...

User Manual
Page 31
... move the red arrow pointer to select and then press the SELECT button. NOTE: • INPUT SOURCE changes if the INPUT 3 button on the remote control is pressed. A Source Select Menu appears. 3 Move the pointer to a source that you want to video equipment, select a type of Video.../Cr. INPUT MENU 1 Press the MENU button to display the On-Screen Menu. NOTE: • INPUT SOURCE changes if the INPUT 2 button on the remote control is pressed. WHEN SELECTING INPUT 2 (5 BNC INPUT JACKS ) When connecting to the SVIDEO jack, select S-Video. INPUT MENU 1 Press the MENU button...
... move the red arrow pointer to select and then press the SELECT button. NOTE: • INPUT SOURCE changes if the INPUT 3 button on the remote control is pressed. A Source Select Menu appears. 3 Move the pointer to a source that you want to video equipment, select a type of Video.../Cr. INPUT MENU 1 Press the MENU button to display the On-Screen Menu. NOTE: • INPUT SOURCE changes if the INPUT 2 button on the remote control is pressed. WHEN SELECTING INPUT 2 (5 BNC INPUT JACKS ) When connecting to the SVIDEO jack, select S-Video. INPUT MENU 1 Press the MENU button...
User Manual
Page 33
Standard Normal picture level preset on the remote control. Cinema Picture level adjusted for picture with fine tone. IMAGE 1~10 User preset picture adjustment in the IMAGE ADJUST Menu. (p.3537) IMAGE button Standard ...
Standard Normal picture level preset on the remote control. Cinema Picture level adjusted for picture with fine tone. IMAGE 1~10 User preset picture adjustment in the IMAGE ADJUST Menu. (p.3537) IMAGE button Standard ...

User Manual
Page 35
... has already been made, press the COLOR M. Then use the POINT UP/DOWN buttons to adjust the GAMMA for black, white, and gray) on the remote control to adjust the color and then press the SELECT button. POINTER MODE COLOR MANAGEMENT POINTER NOTE: Press the COLOR M. If you want to display... function can store up to the COLOR MANAGEMENT LIST. button on the screen and replace these colors with other colors if required. button on the remote control once more to accept the setting.
... has already been made, press the COLOR M. Then use the POINT UP/DOWN buttons to adjust the GAMMA for black, white, and gray) on the remote control to adjust the color and then press the SELECT button. POINTER MODE COLOR MANAGEMENT POINTER NOTE: Press the COLOR M. If you want to display... function can store up to the COLOR MANAGEMENT LIST. button on the screen and replace these colors with other colors if required. button on the remote control once more to accept the setting.

User Manual
Page 36
...SELECTION MODE Level and phase adjustment palette. MENU LIST MODE COLOR PALETTE DEL ALL DEL MENU COLOR M. button on the top control or the remote control, it returns to the COLOR MANAGEMENT POINTER and you will not be sure to select "MENU" to return to the projected image (see.... L1 . . . . . Auto picture control LEVEL 1 position. Auto picture control LEVEL 2 position. LIST COLOR M. NOTE: If you press the MENU button on the remote control, the display returns to the IMAGE ADJUST Menu. To store the changed will need to reselect and readjust the color.) MENU Return to the...
...SELECTION MODE Level and phase adjustment palette. MENU LIST MODE COLOR PALETTE DEL ALL DEL MENU COLOR M. button on the top control or the remote control, it returns to the COLOR MANAGEMENT POINTER and you will not be sure to select "MENU" to return to the projected image (see.... L1 . . . . . Auto picture control LEVEL 1 position. Auto picture control LEVEL 2 position. LIST COLOR M. NOTE: If you press the MENU button on the remote control, the display returns to the IMAGE ADJUST Menu. To store the changed will need to reselect and readjust the color.) MENU Return to the...


