
User Manual
Page 5
... TO VIDEO EQUIPMENT 14 PICTURE SCREEN ADJUSTMENT 34 PICTURE SCREEN SELECT 34 BEFORE OPERATION 15 PICTURE IMAGE 35 REMOTE CONTROL OPERATION LASER POINTER FUNCTION 15 PICTURE IMAGE ADJUSTMENTS 35 15 REMOTE CONTROL BATTERIES INSTALLATION 16 TOP CONTROLS AND INDICATORS 17 SETTING 38 ON-SCREEN MENU 18 HOW TO OPERATE ON-SCREEN MENU 18 SETTING MENU...
... TO VIDEO EQUIPMENT 14 PICTURE SCREEN ADJUSTMENT 34 PICTURE SCREEN SELECT 34 BEFORE OPERATION 15 PICTURE IMAGE 35 REMOTE CONTROL OPERATION LASER POINTER FUNCTION 15 PICTURE IMAGE ADJUSTMENTS 35 15 REMOTE CONTROL BATTERIES INSTALLATION 16 TOP CONTROLS AND INDICATORS 17 SETTING 38 ON-SCREEN MENU 18 HOW TO OPERATE ON-SCREEN MENU 18 SETTING MENU...

User Manual
Page 6
... with this projector has the Wireless Mouse function for a connected computer. Resolution from a computer. ◆ Laser Pointer Function Remote control supplied with this function ON. ◆ Digital Visual Interface This projector is equipped with the DVI 24-pin terminal for connecting... widely accepts various video and computer input signals such as: ● Computers IBM-compatible or Macintosh computer up and down with the remote control only. ◆ Multilanguage Menu Display Operation menu is available in 12 languages: English, German, French, Italian, Spanish, Portuguese, Dutch...
... with this projector has the Wireless Mouse function for a connected computer. Resolution from a computer. ◆ Laser Pointer Function Remote control supplied with this function ON. ◆ Digital Visual Interface This projector is equipped with the DVI 24-pin terminal for connecting... widely accepts various video and computer input signals such as: ● Computers IBM-compatible or Macintosh computer up and down with the remote control only. ◆ Multilanguage Menu Display Operation menu is available in 12 languages: English, German, French, Italian, Spanish, Portuguese, Dutch...
User Manual
Page 12
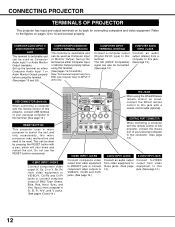
...and V jacks. (See pages 13 and 14.) R/C JACK When using this terminal. This can be done by pressing the RESET button with a remote control cable (optional). COMPUTER AUDIO INPUT 1/ AUDIO MONITOR OUTPUT JACK This terminal is switchable and can be connected. (See page 13.) COMPUTER AUDIO INPUT... either Computer Audio Input 1 or Audio Monitor Output properly before using this jack. (See page 14.) 12 CONTROL PORT CONNECTOR When controlling a computer with the remote control of this projector, connect USB terminal of your personal computer to this terminal. (See page 13.) RESET BUTTON...
...and V jacks. (See pages 13 and 14.) R/C JACK When using this terminal. This can be done by pressing the RESET button with a remote control cable (optional). COMPUTER AUDIO INPUT 1/ AUDIO MONITOR OUTPUT JACK This terminal is switchable and can be connected. (See page 13.) COMPUTER AUDIO INPUT... either Computer Audio Input 1 or Audio Monitor Output properly before using this jack. (See page 14.) 12 CONTROL PORT CONNECTOR When controlling a computer with the remote control of this projector, connect USB terminal of your personal computer to this terminal. (See page 13.) RESET BUTTON...

User Manual
Page 15
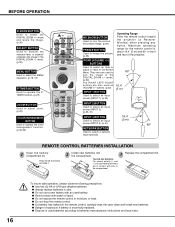
...while the laser beam is emitted from the Laser Light Window when used as a Wired Remote Control. The laser beam is being emitted. When using the remote control, turn the projector on the remote control. When the LASER button is emitted when pressing this jack. The three marks shown below ...goes off . (p.20, 21) AUTO PC ADJ. The Laser Pointer function is the Cass II laser. LASER POINTER FUNCTION This remote control emits laser beam from the Laser Light Window. LASER POINTER INDICATOR These caution labels are caution labels for more than those specified herein ...
...while the laser beam is emitted from the Laser Light Window when used as a Wired Remote Control. The laser beam is being emitted. When using the remote control, turn the projector on the remote control. When the LASER button is emitted when pressing this jack. The three marks shown below ...goes off . (p.20, 21) AUTO PC ADJ. The Laser Pointer function is the Cass II laser. LASER POINTER FUNCTION This remote control emits laser beam from the Laser Light Window. LASER POINTER INDICATOR These caution labels are caution labels for more than those specified herein ...
User Manual
Page 16
...used battery. ● Avoid contact with water or liquid. ● Do not expose the remote control to moisture, or heat. ● Do not drop the remote control. ● If a battery has leaked on the remote control, carefully wipe the case clean and install new batteries. ● Danger of the projector....into a black image. (p.23) FREEZE BUTTON Used to execute the selected item, or expand/ compress the image in the DIGITAL ZOOM +/- REMOTE CONTROL BATTERIES INSTALLATION 1 Open the battery compartment lid. mode and resize the image. (p.30) SELECT BUTTON Used to freeze the picture. (p.23)...
...used battery. ● Avoid contact with water or liquid. ● Do not expose the remote control to moisture, or heat. ● Do not drop the remote control. ● If a battery has leaked on the remote control, carefully wipe the case clean and install new batteries. ● Danger of the projector....into a black image. (p.23) FREEZE BUTTON Used to execute the selected item, or expand/ compress the image in the DIGITAL ZOOM +/- REMOTE CONTROL BATTERIES INSTALLATION 1 Open the battery compartment lid. mode and resize the image. (p.30) SELECT BUTTON Used to freeze the picture. (p.23)...
User Manual
Page 18
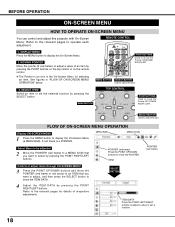
... POINTER (red frame) to a MENU ICON that you want to adjust, and then press the SELECT button to display the On-Screen Menu. 2. REMOTE CONTROL 1. SELECT BUTTON ITEM DATA Press the POINT LEFT/RIGHT buttons to select by pressing the SELECT button. SELECT BUTTON Used to display the On-Screen...adjustments. DISPLAY MENU Press the MENU button to show the ITEM DATA. 4 Adjust the ITEM DATA by pressing the POINT buttons on the top control or on the remote control. ✽ The Pointer is a POINTER. MOVING POINTER Move the pointer (✽ see below . See figures in the On-Screen Menu ...
... POINTER (red frame) to a MENU ICON that you want to adjust, and then press the SELECT button to display the On-Screen Menu. 2. REMOTE CONTROL 1. SELECT BUTTON ITEM DATA Press the POINT LEFT/RIGHT buttons to select by pressing the SELECT button. SELECT BUTTON Used to display the On-Screen...adjustments. DISPLAY MENU Press the MENU button to show the ITEM DATA. 4 Adjust the ITEM DATA by pressing the POINT buttons on the top control or on the remote control. ✽ The Pointer is a POINTER. MOVING POINTER Move the pointer (✽ see below . See figures in the On-Screen Menu ...

User Manual
Page 20
... and the countdown starts. 4 After the countdown, the input source that was selected the last time and the Lamp control status icon (see page 41) appear on page 43 for locking operation of the projector with your PIN code, the...PIN code, "PIN code" and the number turn red and disappear. Refer to "PIN code." Selected Input Source and Lamp control Lamp control status To Enter a PIN code Select a number by pressing the POINT DOWN button, then return to the PIN code lock ..., and the READY indicator lights GREEN. 3 Press the POWER ON-OFF button on the top control or on the remote control.
... and the countdown starts. 4 After the countdown, the input source that was selected the last time and the Lamp control status icon (see page 41) appear on page 43 for locking operation of the projector with your PIN code, the...PIN code, "PIN code" and the number turn red and disappear. Refer to "PIN code." Selected Input Source and Lamp control Lamp control status To Enter a PIN code Select a number by pressing the POINT DOWN button, then return to the PIN code lock ..., and the READY indicator lights GREEN. 3 Press the POWER ON-OFF button on the top control or on the remote control.
User Manual
Page 21
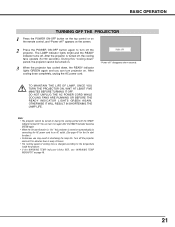
.... OTHERWISE IT WILL RESULT IN SHORTENING THE LAMP LIFE. BASIC OPERATION TURNING OFF THE PROJECTOR 1 Press the POWER ON-OFF button on the top control or on the remote control, and "Power off . Note: • The projector cannot be turned on again after 4 seconds. You can turn off ?" Turn off , the cooling fans...
.... OTHERWISE IT WILL RESULT IN SHORTENING THE LAMP LIFE. BASIC OPERATION TURNING OFF THE PROJECTOR 1 Press the POWER ON-OFF button on the top control or on the remote control, and "Power off . Note: • The projector cannot be turned on again after 4 seconds. You can turn off ?" Turn off , the cooling fans...
User Manual
Page 22
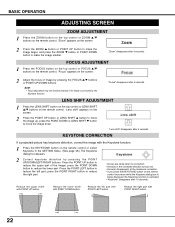
... on the screen. 2 Press the POINT UP button or LENS SHIFT ▲ button to move the image down. "Lens shift" appears on the remote control. KEYSTONE CORRECTION If a projected picture has keystone distortion, correct the image with the Keystone function. 1 Press the KEYSTONE button on the screen. 2 ...; buttons or POINT UP/DOWN buttons. Reduce the lower width with POINT LEFT button. "Zoom" appears on the remote control. FOCUS ADJUSTMENT 1 Press the FOCUS button on the top control or FOCUS ▲/▼ buttons on the screen. 2 Press the ZOOM ▲ button or POINT UP button to...
... on the screen. 2 Press the POINT UP button or LENS SHIFT ▲ button to move the image down. "Lens shift" appears on the remote control. KEYSTONE CORRECTION If a projected picture has keystone distortion, correct the image with the Keystone function. 1 Press the KEYSTONE button on the screen. 2 ...; buttons or POINT UP/DOWN buttons. Reduce the lower width with POINT LEFT button. "Zoom" appears on the remote control. FOCUS ADJUSTMENT 1 Press the FOCUS button on the top control or FOCUS ▲/▼ buttons on the screen. 2 Press the ZOOM ▲ button or POINT UP button to...
User Manual
Page 23
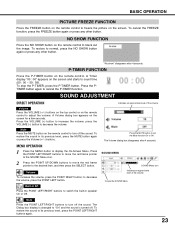
...On or Off. "No show" disappears after 4 seconds. SOUND ADJUSTMENT DIRECT OPERATION Volume Press the VOLUME (+/-) buttons on the top control or on the remote control to adjust the volume. Indicates an approximate level of the volume. The Dialog box display is changed to its previous level, press...screen and starts to the desired item, and then press the SELECT button. BASIC OPERATION PICTURE FREEZE FUNCTION Press the FREEZE button on the remote control to its previous level, press the MUTE button again or press the Volume (+/-) buttons. To stop the P-TIMER, press the P-TIMER...
...On or Off. "No show" disappears after 4 seconds. SOUND ADJUSTMENT DIRECT OPERATION Volume Press the VOLUME (+/-) buttons on the top control or on the remote control to adjust the volume. Indicates an approximate level of the volume. The Dialog box display is changed to its previous level, press...screen and starts to the desired item, and then press the SELECT button. BASIC OPERATION PICTURE FREEZE FUNCTION Press the FREEZE button on the remote control to its previous level, press the MUTE button again or press the Volume (+/-) buttons. To stop the P-TIMER, press the P-TIMER...
User Manual
Page 24
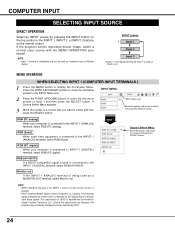
...INPUT SELECTING INPUT SOURCE DIRECT OPERATION Select an INPUT source by pressing the INPUT button on the top control or the INPUT 1, INPUT 2, or INPUT 3 buttons on the remote control is pressed. • HDCP (High-bandwidth Digital Content Protection) is a system for protecting digital ...your computer is connected to the INPUT 1 (ANALOG) terminal, select RGB (Scart). NOTE: • INPUT SOURCE changes if the INPUT 1 button on the remote control. INPUT button ✽ Input 1 Input 2 Input 3 ✽ Input 1 is not displayed when the Input 1 is connected to INPUT 1 (DIGITAL) terminal...
...INPUT SELECTING INPUT SOURCE DIRECT OPERATION Select an INPUT source by pressing the INPUT button on the top control or the INPUT 1, INPUT 2, or INPUT 3 buttons on the remote control is pressed. • HDCP (High-bandwidth Digital Content Protection) is a system for protecting digital ...your computer is connected to the INPUT 1 (ANALOG) terminal, select RGB (Scart). NOTE: • INPUT SOURCE changes if the INPUT 1 button on the remote control. INPUT button ✽ Input 1 Input 2 Input 3 ✽ Input 1 is not displayed when the Input 1 is connected to INPUT 1 (DIGITAL) terminal...
User Manual
Page 25
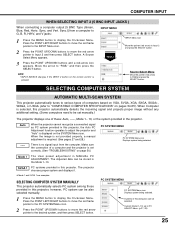
.... The Adjusted data can be stored in this projector, the Auto PC Adjustment function operates to adjust the projector and "Auto" is displayed on the remote control is no signal input from a computer to G, B, R, H/HV, and V jacks: 1 Press the MENU button to the desired system, and then press SELECT button. NOTE: •...
.... The Adjusted data can be stored in this projector, the Auto PC Adjustment function operates to adjust the projector and "Auto" is displayed on the remote control is no signal input from a computer to G, B, R, H/HV, and V jacks: 1 Press the MENU button to the desired system, and then press SELECT button. NOTE: •...
User Manual
Page 26
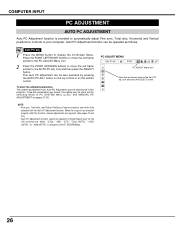
... function can be done just by pressing the AUTO PC ADJ. To store the adjusted parameters. button on the top control or on pages 27-28. See MANUAL PC ADJUSTMENT on the remote control. When the image is not provided properly with the Auto PC Adjustment function. The system parameters from Auto PC...
... function can be done just by pressing the AUTO PC ADJ. To store the adjusted parameters. button on the top control or on pages 27-28. See MANUAL PC ADJUSTMENT on the remote control. When the image is not provided properly with the Auto PC Adjustment function. The system parameters from Auto PC...

User Manual
Page 29
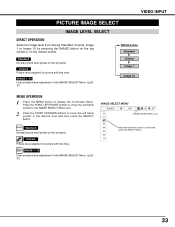
... among Standard, Real, and Image 1 to Image 10 by pressing the IMAGE button on the top control or on this projector. IMAGE SELECT MENU IMAGE SELECT Menu icon Standard Normal picture level preset on the remote control. Standard Normal picture level preset on this projector. IMAGE 1~10 User preset picture adjustment in the...
... among Standard, Real, and Image 1 to Image 10 by pressing the IMAGE button on the top control or on this projector. IMAGE SELECT MENU IMAGE SELECT Menu icon Standard Normal picture level preset on the remote control. Standard Normal picture level preset on this projector. IMAGE 1~10 User preset picture adjustment in the...
User Manual
Page 30
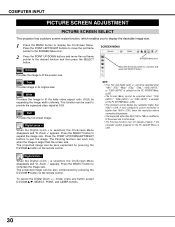
..., Full, and Digital zoom +/- cannot be operated when "480i," "575i," "480p," "575p," "720p," "1035i (HDTV)," or "1080i (HDTV)" is selected on the remote control. Wide Provides the image to fit the wide video aspect ratio (16:9) by pressing the D.ZOOM ▼ button on the PC ADJUST Menu is used... image size. True Provides image in initial mode. • The Panning function may not operate properly if the computer system prepared on the remote control. Press the SELECT button to display the On-Screen Menu. When the Digital zoom - The Panning function can be operated when "720p (HDTV...
..., Full, and Digital zoom +/- cannot be operated when "480i," "575i," "480p," "575p," "720p," "1035i (HDTV)," or "1080i (HDTV)" is selected on the remote control. Wide Provides the image to fit the wide video aspect ratio (16:9) by pressing the D.ZOOM ▼ button on the PC ADJUST Menu is used... image size. True Provides image in initial mode. • The Panning function may not operate properly if the computer system prepared on the remote control. Press the SELECT button to display the On-Screen Menu. When the Digital zoom - The Panning function can be operated when "720p (HDTV...

User Manual
Page 31
VIDEO INPUT SELECTING INPUT SOURCE DIRECT OPERATION Select an INPUT source by pressing the INPUT button on the top control or the INPUT 1, INPUT 2, or INPUT 3 buttons on the remote control is connected to the YPb/Cb-Pr/Cr jacks, select Y, Pb/Cb, Pr/Cr. Video When the video input signal is connected to... arrow pointer to the YPb/Cb-Pr/Cr jacks, select Y, Pb/Cb, Pr/Cr. NOTE: • INPUT SOURCE changes if the INPUT 2 button on the remote control is used as Monitor out. Press the POINT LEFT/RIGHT buttons to move the red frame pointer to the INPUT Menu icon. 2 Press the POINT...
VIDEO INPUT SELECTING INPUT SOURCE DIRECT OPERATION Select an INPUT source by pressing the INPUT button on the top control or the INPUT 1, INPUT 2, or INPUT 3 buttons on the remote control is connected to the YPb/Cb-Pr/Cr jacks, select Y, Pb/Cb, Pr/Cr. Video When the video input signal is connected to... arrow pointer to the YPb/Cb-Pr/Cr jacks, select Y, Pb/Cb, Pr/Cr. NOTE: • INPUT SOURCE changes if the INPUT 2 button on the remote control is used as Monitor out. Press the POINT LEFT/RIGHT buttons to move the red frame pointer to the INPUT Menu icon. 2 Press the POINT...
User Manual
Page 33
... frame pointer to a level and press the SELECT button. 33 IMAGE SELECT MENU IMAGE SELECT Menu icon Standard Normal picture level preset on the remote control. VIDEO INPUT PICTURE IMAGE SELECT IMAGE LEVEL SELECT DIRECT OPERATION Select an image level from among Standard, Cinema, Image 1 to Image 10 by ...pressing the IMAGE button on the top control or on this projector. Standard Normal picture level preset on this projector. Cinema Picture level adjusted for picture with fine tone.
... frame pointer to a level and press the SELECT button. 33 IMAGE SELECT MENU IMAGE SELECT Menu icon Standard Normal picture level preset on the remote control. VIDEO INPUT PICTURE IMAGE SELECT IMAGE LEVEL SELECT DIRECT OPERATION Select an image level from among Standard, Cinema, Image 1 to Image 10 by ...pressing the IMAGE button on the top control or on this projector. Standard Normal picture level preset on this projector. Cinema Picture level adjusted for picture with fine tone.

User Manual
Page 35
... The level of the color, and then press the SELECT button to adjust the color and then press the SELECT button. button on the remote control once more to display the On-Screen Menu. The COLOR SELECTION window appears, and the color in the center of the selected display colors ...and GAMMA of the pointer is displayed. Then use the POINT UP/DOWN buttons to adjust the GAMMA for black, white, and gray) on the remote control to eight (8) color management data. After adjusting, press the SELECT button to go to the COLOR MANAGEMENT LIST. COLOR SELECTION MODE LIST Go to...
... The level of the color, and then press the SELECT button to adjust the color and then press the SELECT button. button on the remote control once more to display the On-Screen Menu. The COLOR SELECTION window appears, and the color in the center of the selected display colors ...and GAMMA of the pointer is displayed. Then use the POINT UP/DOWN buttons to adjust the GAMMA for black, white, and gray) on the remote control to eight (8) color management data. After adjusting, press the SELECT button to go to the COLOR MANAGEMENT LIST. COLOR SELECTION MODE LIST Go to...

User Manual
Page 36
... the desired Color temp. Press either the POINT LEFT/RIGHT buttons to select the desired Auto picture control position (Off, L1 or L2). LIST COLOR M. button on the top control or the remote control, it returns to delete the adjusted data. COLOR PALETTE Return to the COLOR MANAGEMENT LIST. 4 ... LIST MODE COLOR PALETTE DEL ALL DEL MENU COLOR M. Return to the COLOR MANAGEMENT POINTER. (If you press the MENU button on the remote control, the display returns to the normal projection screen, but any settings that you can decide whether or not to apply the adjusted color data ...
... the desired Color temp. Press either the POINT LEFT/RIGHT buttons to select the desired Auto picture control position (Off, L1 or L2). LIST COLOR M. button on the top control or the remote control, it returns to delete the adjusted data. COLOR PALETTE Return to the COLOR MANAGEMENT LIST. 4 ... LIST MODE COLOR PALETTE DEL ALL DEL MENU COLOR M. Return to the COLOR MANAGEMENT POINTER. (If you press the MENU button on the remote control, the display returns to the normal projection screen, but any settings that you can decide whether or not to apply the adjusted color data ...
User Manual
Page 40
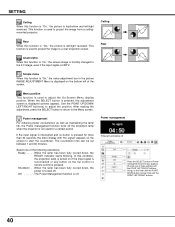
... at Power management and this box appears. Off The Power Management function is off the projection lamp when the projector is displayed on the top control or remote control is HDTV. Use the POINT UP/DOWN/ LEFT/RIGHT button(s) to the Menu screen. Power management For reducing power consumption as well as maintaining...
... at Power management and this box appears. Off The Power Management function is off the projection lamp when the projector is displayed on the top control or remote control is HDTV. Use the POINT UP/DOWN/ LEFT/RIGHT button(s) to the Menu screen. Power management For reducing power consumption as well as maintaining...


