Owners Manual
Page 2
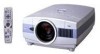
... it in better condition for allowing air circulation and cooling the projector. 20cm Minimum distance should be set in not only shortening the product-life, but also malfunctions, fire hazard, or other people. G Remote Control Unit, supplied to indicate laser emission). Eye damage may result in... the way indicated. Do not stare directly into the beam. G This projector should be used for 1 minute / LASER POINTER INDICATOR lights red ...
... it in better condition for allowing air circulation and cooling the projector. 20cm Minimum distance should be set in not only shortening the product-life, but also malfunctions, fire hazard, or other people. G Remote Control Unit, supplied to indicate laser emission). Eye damage may result in... the way indicated. Do not stare directly into the beam. G This projector should be used for 1 minute / LASER POINTER INDICATOR lights red ...

Owners Manual
Page 5
... REMOTE CONTROL BATTERIES INSTALLATION 15 TOP CONTROLS AND INDICATORS 16 SETTING MENU 36 OPERATING ON-SCREEN MENU 17 HOW TO OPERATE ON-SCREEN MENU 17 FLOW OF ON-SCREEN MENU OPERATION 17 APPENDIX 38 MENU BAR 18 BASIC OPERATION TURNING ON / OFF PROJECTOR... ADJUSTING SCREEN ZOOM ADJUSTMENT FOCUS ADJUSTMENT LENS SHIFT ADJUSTMENT KEYSTONE ADJUSTMENT PICTURE FREEZE FUNCTION NO SHOW FUNCTION P-TIMER FUNCTION SOUND ADJUSTMENT LAMP REPLACEMENT 38 LAMP REPLACE 38 19 LAMP REPLACE COUNTER 39 OPERATING WIRELESS MOUSE 40 19 MAINTENANCE 41 20 WARNING TEMP. G IBM, VGA, XGA...
... REMOTE CONTROL BATTERIES INSTALLATION 15 TOP CONTROLS AND INDICATORS 16 SETTING MENU 36 OPERATING ON-SCREEN MENU 17 HOW TO OPERATE ON-SCREEN MENU 17 FLOW OF ON-SCREEN MENU OPERATION 17 APPENDIX 38 MENU BAR 18 BASIC OPERATION TURNING ON / OFF PROJECTOR... ADJUSTING SCREEN ZOOM ADJUSTMENT FOCUS ADJUSTMENT LENS SHIFT ADJUSTMENT KEYSTONE ADJUSTMENT PICTURE FREEZE FUNCTION NO SHOW FUNCTION P-TIMER FUNCTION SOUND ADJUSTMENT LAMP REPLACEMENT 38 LAMP REPLACE 38 19 LAMP REPLACE COUNTER 39 OPERATING WIRELESS MOUSE 40 19 MAINTENANCE 41 20 WARNING TEMP. G IBM, VGA, XGA...
Owners Manual
Page 6
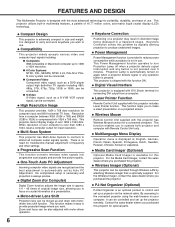
...77 million colors, and matrix liquid crystal display (LCD) technology. N Laser Pointer Function Remote Control Unit supplied with this projector has Wireless Mouse function for optional parts. 6 This function enables you ...wish to operate both projector and computer with motor-driven operation. This projector utilizes built-in ; N High Resolution Image This projector provides 1024 x 768 dots resolution for connecting DVI output from a computer between XGA...
...77 million colors, and matrix liquid crystal display (LCD) technology. N Laser Pointer Function Remote Control Unit supplied with this projector has Wireless Mouse function for optional parts. 6 This function enables you ...wish to operate both projector and computer with motor-driven operation. This projector utilizes built-in ; N High Resolution Image This projector provides 1024 x 768 dots resolution for connecting DVI output from a computer between XGA...
Owners Manual
Page 11
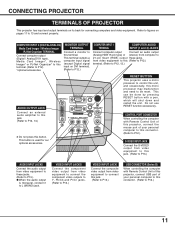
... Connect a monitor to this button. L (MONO) VIDEO S - Do not use RESET function excessively. CONTROL PORT CONNECTOR When controlling the computer with Remote Control Unit of this projector, connect the mouse port of your personal computer to this connector. (Refer to P12.) S-VIDEO INPUT JACK... AUDIO IN - This can be done by pressing RESET button with Remote Control Unit of this projector, connect USB port of your personal computer to this connector. (Refer to P13.) USB CONNECTOR (Series B) When controlling the computer with a pen, which will shut down and restart the ...
... Connect a monitor to this button. L (MONO) VIDEO S - Do not use RESET function excessively. CONTROL PORT CONNECTOR When controlling the computer with Remote Control Unit of this projector, connect the mouse port of your personal computer to this connector. (Refer to P12.) S-VIDEO INPUT JACK... AUDIO IN - This can be done by pressing RESET button with Remote Control Unit of this projector, connect USB port of your personal computer to this connector. (Refer to P13.) USB CONNECTOR (Series B) When controlling the computer with a pen, which will shut down and restart the ...

Owners Manual
Page 14
...INDICATOR lights RED and Laser is emitted with RED light to select LENS SHIFT function. (P20) LASER POINTER FUNCTION This Remote Control Unit emits a laser beam as laser pointer function from Laser Light Window. Laser emitted is not operated. LASER POINTER INDICATOR...button is released, light goes off . (P19) AUTO PC ADJ. When using Remote Control Unit, turn projector on remote control. CAUTION : Use of controls, adjustments or performance of procedures other people. that you want to select remote control code. (Refer to correct keystone distortion. (P20, 36) MOUSE POINTER Used ...
...INDICATOR lights RED and Laser is emitted with RED light to select LENS SHIFT function. (P20) LASER POINTER FUNCTION This Remote Control Unit emits a laser beam as laser pointer function from Laser Light Window. Laser emitted is not operated. LASER POINTER INDICATOR...button is released, light goes off . (P19) AUTO PC ADJ. When using Remote Control Unit, turn projector on remote control. CAUTION : Use of controls, adjustments or performance of procedures other people. that you want to select remote control code. (Refer to correct keystone distortion. (P20, 36) MOUSE POINTER Used ...

Owners Manual
Page 15
... 15 G Replace two batteries at same time. G Do not drop Remote Control Unit. To insure safe operation, please observe following precautions : G Use (2) AA, UM3 or R06 type alkaline batteries. G Dispose of a projector. 60° 16.4' (5 m) COMPUTER 2 BUTTON Used to select ... source (COMPUTER 1). (P22) Operating Range Point Remote Control Unit toward projector (Receiver Window) whenever pressing any button. Maximum operating range for Remote Control Unit is incorrectly replaced. G If a battery has leaked on Remote Control Unit, carefully wipe case clean and install new batteries...
... 15 G Replace two batteries at same time. G Do not drop Remote Control Unit. To insure safe operation, please observe following precautions : G Use (2) AA, UM3 or R06 type alkaline batteries. G Dispose of a projector. 60° 16.4' (5 m) COMPUTER 2 BUTTON Used to select ... source (COMPUTER 1). (P22) Operating Range Point Remote Control Unit toward projector (Receiver Window) whenever pressing any button. Maximum operating range for Remote Control Unit is incorrectly replaced. G If a battery has leaked on Remote Control Unit, carefully wipe case clean and install new batteries...
Owners Manual
Page 17
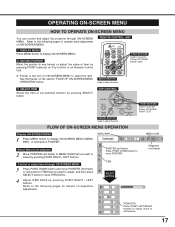
... adjust item through ON-SCREEN MENU. OPERATING ON-SCREEN MENU HOW TO OPERATE ON-SCREEN MENU You can control and adjust this projector through ON-SCREEN MENU 3 Press POINT DOWN button and move POINTER (red frame or red arrow) to ITEM that you want to select by pressing ... select the item. Refer to the following pages for details of item by pressing POINT button(s) on Top Control or on ON-SCREEN MENU. 1 DISPLAY MENU Press MENU button to operate each adjustment on Remote Control Unit. See the figures on the section "FLOW OF ON-SCREEN MENU OPERATION" below ) or adjust the...
... adjust item through ON-SCREEN MENU. OPERATING ON-SCREEN MENU HOW TO OPERATE ON-SCREEN MENU You can control and adjust this projector through ON-SCREEN MENU 3 Press POINT DOWN button and move POINTER (red frame or red arrow) to ITEM that you want to select by pressing ... select the item. Refer to the following pages for details of item by pressing POINT button(s) on Top Control or on ON-SCREEN MENU. 1 DISPLAY MENU Press MENU button to operate each adjustment on Remote Control Unit. See the figures on the section "FLOW OF ON-SCREEN MENU OPERATION" below ) or adjust the...
Owners Manual
Page 19
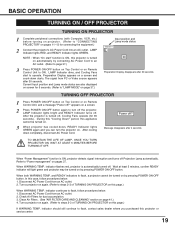
... cooled down, READY Indicator lights GREEN again and you purchased this projector is turned on automatically by connecting AC Power Cord to an AC outlet. (Refer to page 37.) 3 Press POWER ON-OFF button on Top Control or on Remote Control Unit to ON. Check Air Filters for 90 seconds). Current Input position and...
... cooled down, READY Indicator lights GREEN again and you purchased this projector is turned on automatically by connecting AC Power Cord to an AC outlet. (Refer to page 37.) 3 Press POWER ON-OFF button on Top Control or on Remote Control Unit to ON. Check Air Filters for 90 seconds). Current Input position and...

Owners Manual
Page 20
...corrected turn(s) red. • Arrow(s) disappear(s) at the maximum correction. • If you press the KEYSTONE button on Top Control or on Remote Control Unit. Zoom Message disappears after 4 seconds. Message disappears after 4 seconds. Focus adjustment may not function properly if the image ... LENS SHIFT L button to move image down. BASIC OPERATION ADJUSTING SCREEN ZOOM ADJUSTMENT 1 Press ZOOM button on Top Control or ZOOM L/M button on Remote Control Unit once more while the keystone dialog box is being displayed, the keystone adjustment will be canceled. The message "...
...corrected turn(s) red. • Arrow(s) disappear(s) at the maximum correction. • If you press the KEYSTONE button on Top Control or on Remote Control Unit. Zoom Message disappears after 4 seconds. Message disappears after 4 seconds. Focus adjustment may not function properly if the image ... LENS SHIFT L button to move image down. BASIC OPERATION ADJUSTING SCREEN ZOOM ADJUSTMENT 1 Press ZOOM button on Top Control or ZOOM L/M button on Remote Control Unit once more while the keystone dialog box is being displayed, the keystone adjustment will be canceled. The message "...

Owners Manual
Page 21
... Off. Mute Press POINT LEFT/RIGHT button(s) to cut off sound. To restore sound to cut off. Mute Press MUTE button on Remote Control Unit to its previous level, press MUTE button again or press Volume (+/-) button(s). The display disappears after 4 seconds. MENU OPERATION 1... the picture on-screen. No show BASIC OPERATION Message disappears after 4 seconds. P-TIMER FUNCTION Press P-TIMER button on Remote Control Unit. PICTURE FREEZE FUNCTION Press FREEZE button on Remote Control Unit to count time (00 : 00 ~ 59 : 59). Press POINT LEFT/RIGHT buttons to move a red...
... Off. Mute Press POINT LEFT/RIGHT button(s) to cut off sound. To restore sound to cut off. Mute Press MUTE button on Remote Control Unit to its previous level, press MUTE button again or press Volume (+/-) button(s). The display disappears after 4 seconds. MENU OPERATION 1... the picture on-screen. No show BASIC OPERATION Message disappears after 4 seconds. P-TIMER FUNCTION Press P-TIMER button on Remote Control Unit. PICTURE FREEZE FUNCTION Press FREEZE button on Remote Control Unit to count time (00 : 00 ~ 59 : 59). Press POINT LEFT/RIGHT buttons to move a red...

Owners Manual
Page 22
... INPUT Menu icon. 2 Press POINT DOWN button to move a red arrow pointer to Computer 1 (HDB 15-pin) terminal on the projector. 1 Press MENU button and ON-SCREEN MENU will appear. Source Select Menu will appear. 3 Press POINT DOWN button and a red-arrow... on the projector. COMPUTER INPUT SELECTING INPUT SOURCE DIRECT OPERATION Select INPUT source by pressing COMPUTER 1 or COMPUTER 2 button on Top Control. RGB (Scart) When video equipment is connected to Computer 2 and press SELECT button. Select INPUT source by pressing INPUT button on Remote Control Unit. Source...
... INPUT Menu icon. 2 Press POINT DOWN button to move a red arrow pointer to Computer 1 (HDB 15-pin) terminal on the projector. 1 Press MENU button and ON-SCREEN MENU will appear. Source Select Menu will appear. 3 Press POINT DOWN button and a red-arrow... on the projector. COMPUTER INPUT SELECTING INPUT SOURCE DIRECT OPERATION Select INPUT source by pressing COMPUTER 1 or COMPUTER 2 button on Top Control. RGB (Scart) When video equipment is connected to Computer 2 and press SELECT button. Select INPUT source by pressing INPUT button on Remote Control Unit. Source...
Owners Manual
Page 25
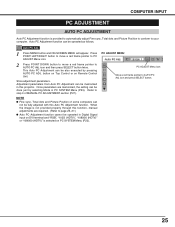
...the setting can be done just by pressing AUTO PC ADJ. COMPUTER INPUT PC ADJUSTMENT AUTO PC ADJUSTMENT Auto PC Adjustment function is selected on Remote Control Unit. Store adjustment parameters. Press POINT LEFT/RIGHT button to move a red frame pointer to PC ADJUST Menu icon. 2 Press POINT DOWN... a red frame pointer to AUTO PC Adj. Refer to page 26, 27.) G Auto PC Adjustment function cannot be fully adjusted with this projector. Auto PC Adjustment function can not be operated in this Auto PC Adjustment function. icon and then press SELECT button twice. NOTE G Fine sync...
...the setting can be done just by pressing AUTO PC ADJ. COMPUTER INPUT PC ADJUSTMENT AUTO PC ADJUSTMENT Auto PC Adjustment function is selected on Remote Control Unit. Store adjustment parameters. Press POINT LEFT/RIGHT button to move a red frame pointer to PC ADJUST Menu icon. 2 Press POINT DOWN... a red frame pointer to AUTO PC Adj. Refer to page 26, 27.) G Auto PC Adjustment function cannot be fully adjusted with this projector. Auto PC Adjustment function can not be operated in this Auto PC Adjustment function. icon and then press SELECT button twice. NOTE G Fine sync...
Owners Manual
Page 28
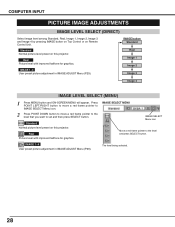
... LEVEL SELECT (DIRECT) Select image level among Standard, Real, Image 1, Image 2, Image 3 and Image 4 by pressing IMAGE button on Top Control or on this projector. Standard Normal picture level preset on this projector. Press POINT LEFT/RIGHT button to move a red frame pointer to IMAGE SELECT Menu icon. 2 Press POINT DOWN button to.... 28 Real Picture level with improved halftone for graphics. IMAGE 1~4 User preset picture adjustment in IMAGE ADJUST Menu (P29). Standard Normal picture level preset on Remote Control Unit.
... LEVEL SELECT (DIRECT) Select image level among Standard, Real, Image 1, Image 2, Image 3 and Image 4 by pressing IMAGE button on Top Control or on this projector. Standard Normal picture level preset on this projector. Press POINT LEFT/RIGHT button to move a red frame pointer to IMAGE SELECT Menu icon. 2 Press POINT DOWN button to.... 28 Real Picture level with improved halftone for graphics. IMAGE 1~4 User preset picture adjustment in IMAGE ADJUST Menu (P29). Standard Normal picture level preset on Remote Control Unit.
Owners Manual
Page 30
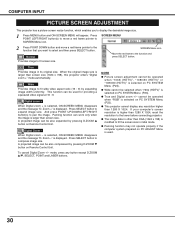
...can work only when the image is selected on Remote Control Unit. Digital Zoom - mode, press any resolution higher than screen size. NOTE G Picture screen adjustment cannot be operated when "RGB" is larger than 1280 X 1024. G This projector cannot display any button except D.ZOOM L/M, SELECT, ...POINT and LASER buttons. If your computer's screen resolution is higher than XGA (1024 x 768) is used for providing a squeezed video signal at 16 : ...
...can work only when the image is selected on Remote Control Unit. Digital Zoom - mode, press any resolution higher than screen size. NOTE G Picture screen adjustment cannot be operated when "RGB" is larger than 1280 X 1024. G This projector cannot display any button except D.ZOOM L/M, SELECT, ...POINT and LASER buttons. If your computer's screen resolution is higher than XGA (1024 x 768) is used for providing a squeezed video signal at 16 : ...

Owners Manual
Page 31
... Move a pointer (red arrow) to S-VIDEO jack, select S-Video. Select INPUT source by pressing INPUT button on Top Control. VIDEO INPUT SELECTING INPUT SOURCE DIRECT OPERATION Select INPUT source by pressing COMPUTER 1 or VIDEO button on Remote Control Unit. If projector cannot reproduce proper image, select correct input source through MENU OPERATION (see below).
... Move a pointer (red arrow) to S-VIDEO jack, select S-Video. Select INPUT source by pressing INPUT button on Top Control. VIDEO INPUT SELECTING INPUT SOURCE DIRECT OPERATION Select INPUT source by pressing COMPUTER 1 or VIDEO button on Remote Control Unit. If projector cannot reproduce proper image, select correct input source through MENU OPERATION (see below).

Owners Manual
Page 33
... button. Move the red frame pointer to set and then press SELECT button. Standard Normal picture level preset on this projector. IMAGE SELECT MENU Standard Normal picture level preset on this projector. IMAGE 1~4 User preset picture adjustment in IMAGE ADJUST Menu (P34, 35). IMAGE 1~4 User preset picture adjustment in IMAGE ADJUST Menu... INPUT PICTURE IMAGE ADJUSTMENTS IMAGE LEVEL SELECT (DIRECT) Select image level among Standard, Cinema, Image 1, Image 2, Image 3 and Image 4 by pressing IMAGE button on Top Control or on Remote Control Unit.
... button. Move the red frame pointer to set and then press SELECT button. Standard Normal picture level preset on this projector. IMAGE SELECT MENU Standard Normal picture level preset on this projector. IMAGE 1~4 User preset picture adjustment in IMAGE ADJUST Menu (P34, 35). IMAGE 1~4 User preset picture adjustment in IMAGE ADJUST Menu... INPUT PICTURE IMAGE ADJUSTMENTS IMAGE LEVEL SELECT (DIRECT) Select image level among Standard, Cinema, Image 1, Image 2, Image 3 and Image 4 by pressing IMAGE button on Top Control or on Remote Control Unit.
Owners Manual
Page 37
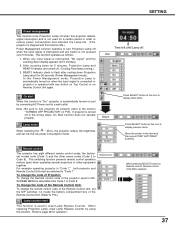
... mode). When any button is not pressed over 5 minutes. To change the code of Projector; To change the Remote control code of the Remote Control Unit. (Refer to P14.) Remote control On On Code 1 Lamp counter reset This function is used to reset Lamp Replace Counter....on when the input signal is connected or projector is operated with this function is "On," projector is interrupted, "No signal" and the counting down Projection Lamp about for operation. Remote control This projector has eight different remote control codes; READY Indicator starts to flash after cooling...
... mode). When any button is not pressed over 5 minutes. To change the code of Projector; To change the Remote control code of the Remote Control Unit. (Refer to P14.) Remote control On On Code 1 Lamp counter reset This function is used to reset Lamp Replace Counter....on when the input signal is connected or projector is operated with this function is "On," projector is interrupted, "No signal" and the counting down Projection Lamp about for operation. Remote control This projector has eight different remote control codes; READY Indicator starts to flash after cooling...

Owners Manual
Page 40
... button in the direction that the mouse port (or USB port) of a Personal Computer is switched on Wireless Remote Control Unit. APPENDIX OPERATING WIRELESS MOUSE Wireless Remote Control Unit is not only able to operate this projector but also usable as Wireless Mouse for a Personal Computer, installation of the mouse driver (not supplied) is in...
... button in the direction that the mouse port (or USB port) of a Personal Computer is switched on Wireless Remote Control Unit. APPENDIX OPERATING WIRELESS MOUSE Wireless Remote Control Unit is not only able to operate this projector but also usable as Wireless Mouse for a Personal Computer, installation of the mouse driver (not supplied) is in...

Owners Manual
Page 43
G Check ALL-OFF switch on Remote Control Unit is set to conform to operate this projector. Maximum operating range is between a projector and your computer. G Turn a projector on before turning on the nameplate means the product is designed and manufactured ... Remote Receiver and Remote Control Unit. This symbol on a computer. APPENDIX Problem: Remote Control Unit does not work . G Make sure the code of Remote Control Unit is a Directive conformity mark of fire, casualty and electrical hazards. WARNING : High voltages are not too far from a projector when using Remote Control...
G Check ALL-OFF switch on Remote Control Unit is set to conform to operate this projector. Maximum operating range is between a projector and your computer. G Turn a projector on before turning on the nameplate means the product is designed and manufactured ... Remote Receiver and Remote Control Unit. This symbol on a computer. APPENDIX Problem: Remote Control Unit does not work . G Make sure the code of Remote Control Unit is a Directive conformity mark of fire, casualty and electrical hazards. WARNING : High voltages are not too far from a projector when using Remote Control...
Owners Manual
Page 44
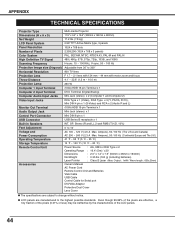
...LCD panels are manufactured to 10˚ AC 100 ~ 120 V (4.6 A Max. Ampere), 50 / 60 Hz (The U.S.A and Canada) AC 200 ~ 240 V (2.3 A Max. Output : 1mW / Wave length : 650±20nm) Owner's Manual AC Power Cord Remote Control Unit and Batteries VGA Cable USB Cable Control... Audio Input Jacks Video Input Jacks Monitor Out Terminal Audio Output Jack Control Port Connector USB Connector Built-in Speakers Feet Adjustment Voltage and Power Consumption Operating Temperature Storage Temperature Remote Control Unit Accessories Multi-media Projector 11.9" x 6.4" x 16.6" (302mm x 162mm x 422mm) ...
...LCD panels are manufactured to 10˚ AC 100 ~ 120 V (4.6 A Max. Ampere), 50 / 60 Hz (The U.S.A and Canada) AC 200 ~ 240 V (2.3 A Max. Output : 1mW / Wave length : 650±20nm) Owner's Manual AC Power Cord Remote Control Unit and Batteries VGA Cable USB Cable Control... Audio Input Jacks Video Input Jacks Monitor Out Terminal Audio Output Jack Control Port Connector USB Connector Built-in Speakers Feet Adjustment Voltage and Power Consumption Operating Temperature Storage Temperature Remote Control Unit Accessories Multi-media Projector 11.9" x 6.4" x 16.6" (302mm x 162mm x 422mm) ...


