
User Manual
Page 2
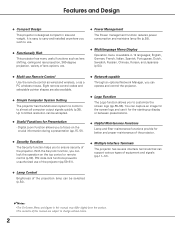
...55-56). You can lock the operation on the crucial information during a presentation (pp.15, 51). ◆ Helpful Maintenance Functions Lamp and filter maintenance functions provide for better and proper maintenance of the projector. ◆ Security Function The Security function helps you to...the product. •The contents of lens options, etc. ◆ Power Management The Power management function reduces power consumption and maintains lamp life (p.58). ◆ Multilanguage Menu Display Operation menu is designed compact in this manual are also available. ◆ Simple Computer ...
...55-56). You can lock the operation on the crucial information during a presentation (pp.15, 51). ◆ Helpful Maintenance Functions Lamp and filter maintenance functions provide for better and proper maintenance of the projector. ◆ Security Function The Security function helps you to...the product. •The contents of lens options, etc. ◆ Power Management The Power management function reduces power consumption and maintains lamp life (p.58). ◆ Multilanguage Menu Display Operation menu is designed compact in this manual are also available. ◆ Simple Computer ...

User Manual
Page 3
... Adjustment (Video, Component Signals) 52 Setting 53 Setting 54 Maintenance and Filter Cleaning . . . . .63 Cleaning the Filter 64 Resetting the Filter Counter 64 Lamp Replacement 65 Resetting the Lamp Counter 66 Warning Indicator 67 Cleaning the Projection Lens 68 Cleaning the Projector Cabinet 68 Appendix 69 Troubleshooting 69 Menu Tree 71 Indicators...
... Adjustment (Video, Component Signals) 52 Setting 53 Setting 54 Maintenance and Filter Cleaning . . . . .63 Cleaning the Filter 64 Resetting the Filter Counter 64 Lamp Replacement 65 Resetting the Lamp Counter 66 Warning Indicator 67 Cleaning the Projection Lens 68 Cleaning the Projector Cabinet 68 Appendix 69 Troubleshooting 69 Menu Tree 71 Indicators...
User Manual
Page 4
... NOT OPEN CAUTION: TO REDUCE THE RISK OF ELECTRIC SHOCK, DO NOT REMOVE COVER (OR BACK). NO USER-SERVICEABLE PARTS INSIDE EXCEPT LAMP REPLACEMENT. THIS SYMBOL INDICATES THAT DANGEROUS VOLTAGE CONSTITUTING A RISK OF ELECTRIC SHOCK IS PRESENT WITHIN THIS UNIT. Please help us to operate improperly... systems for an extended time, unplug the projector from the ceiling, clean air intake vents, filters, or top of this booklet. Your SANYO product is to come. This symbol means that children do not stare directly into a compartment or similarly enclosed, these minimum distances must be...
... NOT OPEN CAUTION: TO REDUCE THE RISK OF ELECTRIC SHOCK, DO NOT REMOVE COVER (OR BACK). NO USER-SERVICEABLE PARTS INSIDE EXCEPT LAMP REPLACEMENT. THIS SYMBOL INDICATES THAT DANGEROUS VOLTAGE CONSTITUTING A RISK OF ELECTRIC SHOCK IS PRESENT WITHIN THIS UNIT. Please help us to operate improperly... systems for an extended time, unplug the projector from the ceiling, clean air intake vents, filters, or top of this booklet. Your SANYO product is to come. This symbol means that children do not stare directly into a compartment or similarly enclosed, these minimum distances must be...
User Manual
Page 6
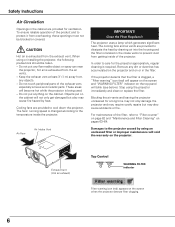
... clean or replace the filter. Objects put anything on pages 63-64. Air flow Air Intake Vent IMPORTANT! Clean the Filter Regularly!! The projector uses a lamp which generates significant heat. Stop using or installing the projector, the following precautions should be blocked or covered. Exhaust Vent (Hot air exhaust) Top Control...
... clean or replace the filter. Objects put anything on pages 63-64. Air flow Air Intake Vent IMPORTANT! Clean the Filter Regularly!! The projector uses a lamp which generates significant heat. Stop using or installing the projector, the following precautions should be blocked or covered. Exhaust Vent (Hot air exhaust) Top Control...

User Manual
Page 7
... tilt the projector over 10 degrees right and left. 7 Set the Fan control function in severe accident or fire hazard. Improper positioning may reduce the lamp life and result in the Setting menu (see page 59). Safety Instructions Installing the Projector in Proper Directions Use the projector properly in the figure...
... tilt the projector over 10 degrees right and left. 7 Set the Fan control function in severe accident or fire hazard. Improper positioning may reduce the lamp life and result in the Setting menu (see page 59). Safety Instructions Installing the Projector in Proper Directions Use the projector properly in the figure...
User Manual
Page 10
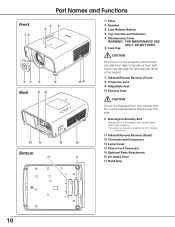
.... ✽ Kensington Security Slot This slot is for a Kensington lock used to deter theft of ACCO Brands Corporation. !1 Infrared Remote Receiver (Back) !2 Terminals and Connectors !3 Lamp Cover !4 Power Cord Connector !5 Optional Parts Attachment !6 Air Intake Vent !7 Hand Grip 10 High temperature from the exhaust vent. Part Names and Functions Front qw...
.... ✽ Kensington Security Slot This slot is for a Kensington lock used to deter theft of ACCO Brands Corporation. !1 Infrared Remote Receiver (Back) !2 Terminals and Connectors !3 Lamp Cover !4 Power Cord Connector !5 Optional Parts Attachment !6 Air Intake Vent !7 Hand Grip 10 High temperature from the exhaust vent. Part Names and Functions Front qw...
User Manual
Page 13
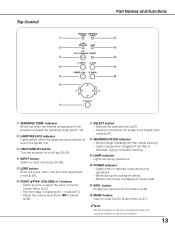
Top Control q w e r t y Part Names and Functions i o !0 !1 !2 u q WARNING TEMP. w LAMP REPLACE indicator Lights yellow when the projection lamp reaches its end of the projector exceeds the operating range (pp.67, 73). r INPUT button Select an input source (pp.34-35). u ... operations. !0 POWER indicator - e ON/STAND-BY button Turn the projector on the top control blinks when the projector detects an abnormal condition. 13 o LAMP indicator Lights red during the cooling-off (pp.25-26). Adjust the volume level (Point 7 8 buttons) (p.30). Expand or compress the image in ...
Top Control q w e r t y Part Names and Functions i o !0 !1 !2 u q WARNING TEMP. w LAMP REPLACE indicator Lights yellow when the projection lamp reaches its end of the projector exceeds the operating range (pp.67, 73). r INPUT button Select an input source (pp.34-35). u ... operations. !0 POWER indicator - e ON/STAND-BY button Turn the projector on the top control blinks when the projector detects an abnormal condition. 13 o LAMP indicator Lights red during the cooling-off (pp.25-26). Adjust the volume level (Point 7 8 buttons) (p.30). Expand or compress the image in ...
User Manual
Page 25
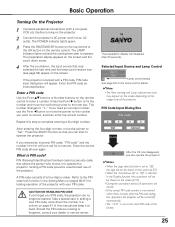
... is not entered within three minutes after 30 seconds. A PIN code consists of the projector. Selected Input Source and Lamp Control Lamp control status See page 54 for a moment. The LAMP indicator lights red and the cooling fans start to "Set." If you can operate the projector. ✔Notes: &#... number you fixed an incorrect number, use of a four-digit number. Press the SELECT button so that was selected the last time and the lamp control status icon (see page 54) appear on the screen (p.57). •During the countdown period, all over again. CAUTION ON HANDLING PIN...
... is not entered within three minutes after 30 seconds. A PIN code consists of the projector. Selected Input Source and Lamp Control Lamp control status See page 54 for a moment. The LAMP indicator lights red and the cooling fans start to "Set." If you can operate the projector. ✔Notes: &#... number you fixed an incorrect number, use of a four-digit number. Press the SELECT button so that was selected the last time and the lamp control status icon (see page 54) appear on the screen (p.57). •During the countdown period, all over again. CAUTION ON HANDLING PIN...
User Manual
Page 26
...;The running speed of cooling fans is changed according to the temperature inside the projector. •Do not put the projector in shortening the lamp life. indicators blinks or all the five indicators on the top panel blink, see "Warning Indicators" on page 67. •While the... turned on the projector. After the projector is set to an AC outlet (p.58). •Do not operate the projector continuously without rest. The LAMP indicator turns off the projector. disappears after 4 seconds. ✔Notes: •When the On start function is turned off ?" appears on the ...
...;The running speed of cooling fans is changed according to the temperature inside the projector. •Do not put the projector in shortening the lamp life. indicators blinks or all the five indicators on the top panel blink, see "Warning Indicators" on page 67. •While the... turned on the projector. After the projector is set to an AC outlet (p.58). •Do not operate the projector continuously without rest. The LAMP indicator turns off the projector. disappears after 4 seconds. ✔Notes: •When the On start function is turned off ?" appears on the ...
User Manual
Page 28
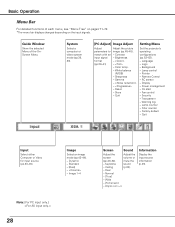
... PC input only.] 28 Screen Sound Adjust the Adjust the screen volume or (pp.49-52). Keystone sound - White balance (R/G/B) - Lamp control - Warning log - Filter counter - Ceiling (p.30). - Contrast - Pointer - Fan control - Lamp counter - Image Select an image mode (pp.43-44). - mute the - Rear - Wide - [Full screen] - [Digital zoom +/-] Information Display...
... PC input only.] 28 Screen Sound Adjust the Adjust the screen volume or (pp.49-52). Keystone sound - White balance (R/G/B) - Lamp control - Warning log - Filter counter - Ceiling (p.30). - Contrast - Pointer - Fan control - Lamp counter - Image Select an image mode (pp.43-44). - mute the - Rear - Wide - [Full screen] - [Digital zoom +/-] Information Display...

User Manual
Page 53
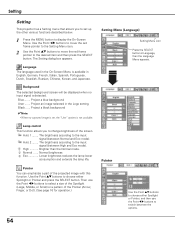
... Security function Power management-------- Background Select the background image for no signal input. RC Sensor selection -------- Select the location of the lamp. Warning log Check the records of the On-Screen Menu. Pointer Select the pointer shape. Remote control Select the remote control code.... Set the Power management function Fan control Set the cooling fans' operation Lamp counter Check the lamp time and reset the lamp counter Filter counter Set the filter cleaning timing On start Turn on the projector automatically when the AC cord...
... Security function Power management-------- Background Select the background image for no signal input. RC Sensor selection -------- Select the location of the lamp. Warning log Check the records of the On-Screen Menu. Pointer Select the pointer shape. Remote control Select the remote control code.... Set the Power management function Fan control Set the cooling fans' operation Lamp counter Check the lamp time and reset the lamp counter Filter counter Set the filter cleaning timing On start Turn on the projector automatically when the AC cord...
User Manual
Page 54
... image selected in the On-Screen Menu is detected. Auto 1 ........ The brightness according to the input signal (between High and Eco mode). Lamp control This function allows you to set , the "User" options is not available. Auto 2 ........ The Setting dialog box appears. Project a........... Project a blue background User ....... High Brighter than the Normal mode. Normal brightness Eco Lower brightness reduces the lamp lower consumption and extends the lamp life. Then use the Point 7 8 buttons to switch between the options. 54 Pointer Use the Point ed buttons...
... image selected in the On-Screen Menu is detected. Auto 1 ........ The brightness according to the input signal (between High and Eco mode). Lamp control This function allows you to set , the "User" options is not available. Auto 2 ........ The Setting dialog box appears. Project a........... Project a blue background User ....... High Brighter than the Normal mode. Normal brightness Eco Lower brightness reduces the lamp lower consumption and extends the lamp life. Then use the Point 7 8 buttons to switch between the options. 54 Pointer Use the Point ed buttons...

User Manual
Page 57
... in the Screen Menu (p.51) ●"Filter warning" icon (red) (p.74) Remote control Display Use the Point 7 8 buttons to project images after the lamp becomes bright enough. Activate only the front receiver. The factory default setting is not bright enough. the factory-set on the remote control for the... all the On-Screen displays. To change the code for more than five seconds to project the image as early as possible even when the lamp is in this function when you want to switch between the codes. (See page 17 for details.) RC sensor Select a location of the...
... in the Screen Menu (p.51) ●"Filter warning" icon (red) (p.74) Remote control Display Use the Point 7 8 buttons to project images after the lamp becomes bright enough. Activate only the front receiver. The factory default setting is not bright enough. the factory-set on the remote control for the... all the On-Screen displays. To change the code for more than five seconds to project the image as early as possible even when the lamp is in this function when you want to switch between the codes. (See page 17 for details.) RC sensor Select a location of the...

User Manual
Page 58
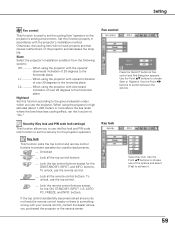
... been fully cooled down, the power will be turned off. Power management Time left before the lamp is pressed for a certain period. Select one of the following options: Ready When the lamp has been fully cooled down .......... Use the Point 7 8 buttons to choose one of the three options. If ... If the projector is turned off. Press the SELECT button at Power management and this function is pressed. It starts the countdown until the lamp is turned off in the incorrect sequence, the On start When this dialog box appears. Shut down , the POWER indicator changes to turn off...
... been fully cooled down, the power will be turned off. Power management Time left before the lamp is pressed for a certain period. Select one of the following options: Ready When the lamp has been fully cooled down .......... Use the Point 7 8 buttons to choose one of the three options. If ... If the projector is turned off. Press the SELECT button at Power management and this function is pressed. It starts the countdown until the lamp is turned off in the incorrect sequence, the On start When this dialog box appears. Shut down , the POWER indicator changes to turn off...
User Manual
Page 59
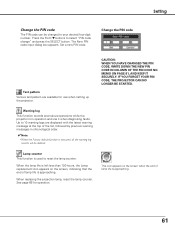
... lock. Slant Select the projector's installation condition from the following options: Off When using the projector with downward inclination of the projector and decreases the lamp life. buttons.
... lock. Slant Select the projector's installation condition from the following options: Off When using the projector with downward inclination of the projector and decreases the lamp life. buttons.
User Manual
Page 61
... NEW PIN CODE IN COLUMN OF THE PIN CODE NO. Up to reset the lamp counter. See page 66 for use it when diagnosing faults. This icon appears on the screen, indicating that the... end of lamp life is used to 10 warning logs are available for operation. Warning log This function records anomalous... THE PROJECTOR CAN NO LONGER BE STARTED. When the lamp life is left less than 100 hours, the Lamp replacement icon appears on the screen when the end of lamp life is executed, all the warning log records will be...
... NEW PIN CODE IN COLUMN OF THE PIN CODE NO. Up to reset the lamp counter. See page 66 for use it when diagnosing faults. This icon appears on the screen, indicating that the... end of lamp life is used to 10 warning logs are available for operation. Warning log This function records anomalous... THE PROJECTOR CAN NO LONGER BE STARTED. When the lamp life is left less than 100 hours, the Lamp replacement icon appears on the screen when the end of lamp life is executed, all the warning log records will be...
User Manual
Page 62
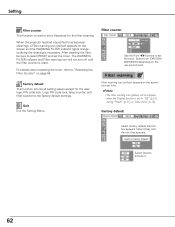
... on the use environment. Setting Filter counter This function is used to set a frequency for the user logo, PIN code lock, Logo PIN code lock, lamp counter, and filter counter to the factory default settings. For details about resetting the timer, refer to set the timer. Select [Yes] to select RESET...
... on the use environment. Setting Filter counter This function is used to set a frequency for the user logo, PIN code lock, Logo PIN code lock, lamp counter, and filter counter to the factory default settings. For details about resetting the timer, refer to set the timer. Select [Yes] to select RESET...
User Manual
Page 63
... into the projector housing. Stop using the Filter counter function in which generates significant heat and thus requires a large amount of costly repairs, and maximize lamp life. The Filter warning icon and WARNING FILTER indicator will not turn off until the filter is clogged, a "Filter warning" icon (red) will appear on... them clean RECOMMENDATION We recommend avoiding dusty/smoky environments when you use the projector in these environments may cause poor image quality. The projector uses a lamp which you use the projector If you operate the projector.
... into the projector housing. Stop using the Filter counter function in which generates significant heat and thus requires a large amount of costly repairs, and maximize lamp life. The Filter warning icon and WARNING FILTER indicator will not turn off until the filter is clogged, a "Filter warning" icon (red) will appear on... them clean RECOMMENDATION We recommend avoiding dusty/smoky environments when you use the projector in these environments may cause poor image quality. The projector uses a lamp which you use the projector If you operate the projector.
User Manual
Page 65
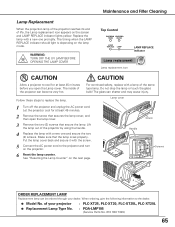
..., PLC-XT20, PLC-XT25L, PLC-XT20L ● Replacement Lamp Type No. : POA-LMP105 (Service Parts No. 610 330 7329) 65 Let the projector cool for at least 45 minutes. 2 Remove the screw that secures the lamp cover, and then open the Lamp cover. WARNING: TURN OFF THE UV LAMP BEFORE OPENING THE LAMP COVER Top Control LAMP REPLACE indicator Lamp...
..., PLC-XT20, PLC-XT25L, PLC-XT20L ● Replacement Lamp Type No. : POA-LMP105 (Service Parts No. 610 330 7329) 65 Let the projector cool for at least 45 minutes. 2 Remove the screw that secures the lamp cover, and then open the Lamp cover. WARNING: TURN OFF THE UV LAMP BEFORE OPENING THE LAMP COVER Top Control LAMP REPLACE indicator Lamp...

User Manual
Page 66
...by pieces of use as a result of hours of the lamp usage and the reset option. Be sure to reset the Lamp counter after the lamp is reset, the LAMP REPLACE indicator stops lighting and the Lamp replacement icon disappears. 1 Press the MENU button to the environment... Cleaning Resetting the Lamp Counter Be sure to reset the Lamp counter only after replacing the lamp. Lamp counter Select Reset and the "Lamp replacement counter Reset?" Improper handling may result in the Lamp Replacement section of this manual.) Continuous use of the lamp. IF A LAMP EXPLODES, THE FOLLOWING...
...by pieces of use as a result of hours of the lamp usage and the reset option. Be sure to reset the Lamp counter after the lamp is reset, the LAMP REPLACE indicator stops lighting and the Lamp replacement icon disappears. 1 Press the MENU button to the environment... Cleaning Resetting the Lamp Counter Be sure to reset the Lamp counter only after replacing the lamp. Lamp counter Select Reset and the "Lamp replacement counter Reset?" Improper handling may result in the Lamp Replacement section of this manual.) Continuous use of the lamp. IF A LAMP EXPLODES, THE FOLLOWING...


