
User Manual
Page 1
Multimedia Projector MODEL PLC-XT25/PLC-XT20 PLC-XT25L*/PLC-XT20L* (*Models without lens.) Owner's Manual
Multimedia Projector MODEL PLC-XT25/PLC-XT20 PLC-XT25L*/PLC-XT20L* (*Models without lens.) Owner's Manual
User Manual
Page 2
... (p.58). ◆ Multilanguage Menu Display Operation menu is available in size and weight. Features and Design ◆ Compact Design This projector is easy to carry and installed anywhere you wish to use it for the starting-up display or between presentations. ◆ Useful ... 51). ◆ Helpful Maintenance Functions Lamp and filter maintenance functions provide for the screen logo and use . ◆ Functionally Rich This projector has many useful functions such as a PC wireless mouse. Digital zoom function allows you can capture an image for better and proper maintenance of...
... (p.58). ◆ Multilanguage Menu Display Operation menu is available in size and weight. Features and Design ◆ Compact Design This projector is easy to carry and installed anywhere you wish to use it for the starting-up display or between presentations. ◆ Useful ... 51). ◆ Helpful Maintenance Functions Lamp and filter maintenance functions provide for the screen logo and use . ◆ Functionally Rich This projector has many useful functions such as a PC wireless mouse. Digital zoom function allows you can capture an image for better and proper maintenance of...

User Manual
Page 3
... Design 2 Table of Contents 3 To the Owner 4 Safety Instructions 5 Air Circulation 6 Installing the Projector in Proper Directions 7 Moving the Projector 8 Cautions in Handling the Projector 8 Compliance 9 Part Names and Functions 10 Front 10 Back 10 Bottom 10 Rear Terminal 11 Top ...Control Battery Installation 18 Remote Control Receivers and Operating Range 18 Adjustable Feet 18 Installation 19 Lens Installation 19 Positioning the Projector 20 Moving the Lens 20 Connecting the AC Power Cord 21 Connecting to a Computer (Digital and Analog RGB) 22 ...
... Design 2 Table of Contents 3 To the Owner 4 Safety Instructions 5 Air Circulation 6 Installing the Projector in Proper Directions 7 Moving the Projector 8 Cautions in Handling the Projector 8 Compliance 9 Part Names and Functions 10 Front 10 Back 10 Bottom 10 Rear Terminal 11 Top ...Control Battery Installation 18 Remote Control Receivers and Operating Range 18 Adjustable Feet 18 Installation 19 Lens Installation 19 Positioning the Projector 20 Moving the Lens 20 Connecting the AC Power Cord 21 Connecting to a Computer (Digital and Analog RGB) 22 ...
User Manual
Page 4
...components which can be maintained. - Do not stare directly into the beam. - Allowing the proper amount of space on the projector. IF THE PROJECTOR COMES IN CONTACT WITH OIL OR CHEMICALS, IT MAY BECOME DETERIORATED. NO USER-SERVICEABLE PARTS INSIDE EXCEPT LAMP REPLACEMENT. Be especially ...projector or the service center. CAUTION RISK OF ELECTRIC SHOCK DO NOT OPEN CAUTION: TO REDUCE THE RISK OF ELECTRIC SHOCK, DO NOT REMOVE COVER (OR BACK). THIS SYMBOL INDICATES THAT THERE ARE IMPORTANT OPERATING AND MAINTENANCE INSTRUCTIONS IN THE OWNER'S MANUAL WITH THIS UNIT. Your SANYO...
...components which can be maintained. - Do not stare directly into the beam. - Allowing the proper amount of space on the projector. IF THE PROJECTOR COMES IN CONTACT WITH OIL OR CHEMICALS, IT MAY BECOME DETERIORATED. NO USER-SERVICEABLE PARTS INSIDE EXCEPT LAMP REPLACEMENT. Be especially ...projector or the service center. CAUTION RISK OF ELECTRIC SHOCK DO NOT OPEN CAUTION: TO REDUCE THE RISK OF ELECTRIC SHOCK, DO NOT REMOVE COVER (OR BACK). THIS SYMBOL INDICATES THAT THERE ARE IMPORTANT OPERATING AND MAINTENANCE INSTRUCTIONS IN THE OWNER'S MANUAL WITH THIS UNIT. Your SANYO...
User Manual
Page 5
... often require extensive work by the manufacturer that are covered by the operating instructions as the original part. Do not place this projector, ask the service technician to perform routine safety checks to determine that could result in fire, electric shock, or injury to ... proper ventilation is left unattended and unused for cleaning. Do not allow anything to qualified service personnel. If the projector has been exposed to the projector. This projector should not be placed in a built-in fire or electric shock. Safety Instructions All the safety and operating instructions...
... often require extensive work by the manufacturer that are covered by the operating instructions as the original part. Do not place this projector, ask the service technician to perform routine safety checks to determine that could result in fire, electric shock, or injury to ... proper ventilation is left unattended and unused for cleaning. Do not allow anything to qualified service personnel. If the projector has been exposed to the projector. This projector should not be placed in a built-in fire or electric shock. Safety Instructions All the safety and operating instructions...
User Manual
Page 6
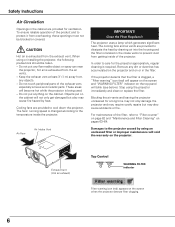
... also cause accidents or fire. Keep the exhaust vent at least 3' (1 m) away from the exhaust vent. Cooling fans are provided for the projector appropriately, regular cleaning is being used. - The fans' running speed is located in the intake vents to protect it from the air vents....from overheating, these openings must not be taken. - Do not touch peripheral parts of the filter, refer to cool down the projector. When using the projector immediately and clean or replace the filter. For maintenance of the exhaust vent, especially screws and metallic parts. Exhaust Vent (Hot ...
... also cause accidents or fire. Keep the exhaust vent at least 3' (1 m) away from the exhaust vent. Cooling fans are provided for the projector appropriately, regular cleaning is being used. - The fans' running speed is located in the intake vents to protect it from the air vents....from overheating, these openings must not be taken. - Do not touch peripheral parts of the filter, refer to cool down the projector. When using the projector immediately and clean or replace the filter. For maintenance of the exhaust vent, especially screws and metallic parts. Exhaust Vent (Hot ...

User Manual
Page 7
... the screen as described below . Bottom Downward (Usual) Front Upward Bottom Upward Front Downward Positioning Precautions Avoid positioning the projector as shown in specified positions. Set the Fan control function in severe accident or fire hazard. Improper positioning may reduce ...and result in the Setting menu (see page 59). This projector can project the picture upward, downward, or backward, perpendicular to the horizontal plane. Safety Instructions Installing the Projector in Proper Directions Use the projector properly in the figure below when installing. 10˚ ...
... the screen as described below . Bottom Downward (Usual) Front Upward Bottom Upward Front Downward Positioning Precautions Avoid positioning the projector as shown in specified positions. Set the Fan control function in severe accident or fire hazard. Improper positioning may reduce ...and result in the Setting menu (see page 59). This projector can project the picture upward, downward, or backward, perpendicular to the horizontal plane. Safety Instructions Installing the Projector in Proper Directions Use the projector properly in the figure below when installing. 10˚ ...
User Manual
Page 8
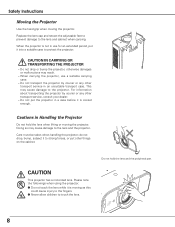
... things on the cabinet. CAUTION IN CARRYING OR TRANSPORTING THE PROJECTOR - do not drop, bump, subject it is cooled enough. When the projector is not in an unsuitable transport case. Do not transport the projector by courier or any other transport service in use a suitable... service, consult your dealer. - CAUTION This projector has a motorized lens. Do not hold the lens when lifting or moving the projector. Safety Instructions Moving the Projector Use the hand grip when moving the projector. When carrying the projector, use for an extended period, put it ...
... things on the cabinet. CAUTION IN CARRYING OR TRANSPORTING THE PROJECTOR - do not drop, bump, subject it is cooled enough. When the projector is not in an unsuitable transport case. Do not transport the projector by courier or any other transport service in use a suitable... service, consult your dealer. - CAUTION This projector has a motorized lens. Do not hold the lens when lifting or moving the projector. Safety Instructions Moving the Projector Use the hand grip when moving the projector. When carrying the projector, use for an extended period, put it ...
User Manual
Page 9
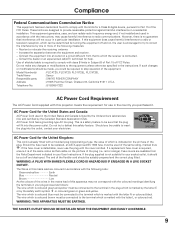
... are designed to provide reasonable protection against harmful interference in the instructions. Model Number(s) Trade Name Responsible party Address : PLC-XT25, PLC-XT20, PLC-XT25L, PLC-XT20L : Sanyo : SANYO FISHER COMPANY : 21605 Plummer Street, Chatsworth, California 91311 U.S.A. THE SOCKET-OUTLET SHOULD BE INSTALLED NEAR THE EQUIPMENT AND ...for the United States and Canada: AC Power Cord used in the United States and Canada is already fitted with this projector meets the requirement for use the plug with the cover omitted. GROUND AC Power Cord for a Class B digital device...
... are designed to provide reasonable protection against harmful interference in the instructions. Model Number(s) Trade Name Responsible party Address : PLC-XT25, PLC-XT20, PLC-XT25L, PLC-XT20L : Sanyo : SANYO FISHER COMPANY : 21605 Plummer Street, Chatsworth, California 91311 U.S.A. THE SOCKET-OUTLET SHOULD BE INSTALLED NEAR THE EQUIPMENT AND ...for the United States and Canada: AC Power Cord used in the United States and Canada is already fitted with this projector meets the requirement for use the plug with the cover omitted. GROUND AC Power Cord for a Class B digital device...
User Manual
Page 10
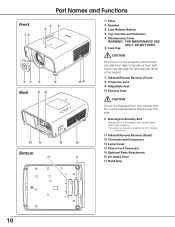
...w Speaker e Lens Release Button r Top Controls and Indicators t Maintenance Cover WARNING: FOR MAINTENANCE USE ONLY. y Lens Cap CAUTION Do not turn on the projector with the lens cap attached. High temperature from the exhaust vent. Do not put heat-sensitive objects near this side. ✽ Kensington Security Slot This... slot is for a Kensington lock used to deter theft of the projector. *Kensington is exhausted from light beam may damage the lens cap and result in fire hazard. DO NOT OPEN. u Infrared Remote...
...w Speaker e Lens Release Button r Top Controls and Indicators t Maintenance Cover WARNING: FOR MAINTENANCE USE ONLY. y Lens Cap CAUTION Do not turn on the projector with the lens cap attached. High temperature from the exhaust vent. Do not put heat-sensitive objects near this side. ✽ Kensington Security Slot This... slot is for a Kensington lock used to deter theft of the projector. *Kensington is exhausted from light beam may damage the lens cap and result in fire hazard. DO NOT OPEN. u Infrared Remote...

User Manual
Page 11
... computer output signal (5 BNC Type [Green, Blue, Red, Horiz. Connect the USB terminal of your computer to this connector with the remote control of the projector. Rear Terminal q w Part Names and Functions e r t o iu y q 5 BNC INPUT JACKS Connect the component or composite video output signal from video equipment to this terminal (pp...
... computer output signal (5 BNC Type [Green, Blue, Red, Horiz. Connect the USB terminal of your computer to this connector with the remote control of the projector. Rear Terminal q w Part Names and Functions e r t o iu y q 5 BNC INPUT JACKS Connect the component or composite video output signal from video equipment to this terminal (pp...

User Manual
Page 12
...). !2 MONITOR OUTPUT TERMINAL (ANALOG) This terminal outputs the video signal from computer to external video equipment (pp.22, 24). !3 CONTROL PORT CONNECTOR When controlling the projector from a computer, connect the computer to this connector with a pen, which controls this unit may occasionally malfunction and need to be done by pressing the...
...). !2 MONITOR OUTPUT TERMINAL (ANALOG) This terminal outputs the video signal from computer to external video equipment (pp.22, 24). !3 CONTROL PORT CONNECTOR When controlling the projector from a computer, connect the computer to this connector with a pen, which controls this unit may occasionally malfunction and need to be done by pressing the...
User Manual
Page 13
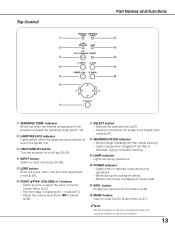
Execute the selected item (p.27). - e ON/STAND-BY button Turn the projector on the top control blinks when the projector detects an abnormal condition. 13 t LENS button Enter the focus, zoom, and lens shift adjustment mode (p.29). r INPUT button Select an ...input source (pp.34-35). i WARNING FILTER indicator - Lights orange when clogging of the projector exceeds the operating range (pp.67, 73). Adjust the volume level (Point 7 8 buttons) (p.30). Blinks orange indicating the filter needs cleaning. - o LAMP...
Execute the selected item (p.27). - e ON/STAND-BY button Turn the projector on the top control blinks when the projector detects an abnormal condition. 13 t LENS button Enter the focus, zoom, and lens shift adjustment mode (p.29). r INPUT button Select an ...input source (pp.34-35). i WARNING FILTER indicator - Lights orange when clogging of the projector exceeds the operating range (pp.67, 73). Adjust the volume level (Point 7 8 buttons) (p.30). Blinks orange indicating the filter needs cleaning. - o LAMP...

User Manual
Page 14
... to moisture or heat. - Part Names and Functions Remote Control r ew q t y !2 u !1 i o !0 q STAND-BY button Turn the projector off (p.26). r LASER LIGHT window A laser beam is being emitted from the laser light window or a signal is emitted from the remote control to this...ensure safe operation, observe the following precautions: - Pan the image in the On-Screen Menu (p.27). - INPUT 3) (pp.34-35). t ON button Turn the projector on the screen (p.31). For cleaning, use a soft dry cloth. i FREEZE button Freeze the picture on (p.25). o POINT ed 7 8 ( VOLUME + ...
... to moisture or heat. - Part Names and Functions Remote Control r ew q t y !2 u !1 i o !0 q STAND-BY button Turn the projector off (p.26). r LASER LIGHT window A laser beam is being emitted from the laser light window or a signal is emitted from the remote control to this...ensure safe operation, observe the following precautions: - Pan the image in the On-Screen Menu (p.27). - INPUT 3) (pp.34-35). t ON button Turn the projector on the screen (p.31). For cleaning, use a soft dry cloth. i FREEZE button Freeze the picture on (p.25). o POINT ed 7 8 ( VOLUME + ...

User Manual
Page 16
...abovementioned procedure until the LASER button lights green. 3 To clear the Spotlight or Pointer out the screen, press the LASER button pointing toward the projector and see if it is pressed for more than 10 seconds to activate the Pointer function. (The Laser pointer has switched to the Pointer,...buttons for the laser beam. If the LASER button does not light green and continues to "ON". Press the LASER button pointing toward the projector. NO SHOW button RESET/ON/ALL OFF Switch LASER button After the Laser pointer has switched to the Pointer function.) 2 Press the LASER ...
...abovementioned procedure until the LASER button lights green. 3 To clear the Spotlight or Pointer out the screen, press the LASER button pointing toward the projector and see if it is pressed for more than 10 seconds to activate the Pointer function. (The Laser pointer has switched to the Pointer,...buttons for the laser beam. If the LASER button does not light green and continues to "ON". Press the LASER button pointing toward the projector. NO SHOW button RESET/ON/ALL OFF Switch LASER button After the Laser pointer has switched to the Pointer function.) 2 Press the LASER ...

User Manual
Page 17
...codes (Code 1-Code 8) are connected with a USB cable. Switching the remote control codes prevents interference from other remote controls when several projectors or video equipment next to each other are connected with a USB cable. The initial code is not available. Change the remote control ...and then to "ON." Before operating the wireless mouse, connect your computer. R-CLICK button Acts as right (click) mouse button while the projector and a computer are operated at the same time. Part Names and Functions Wireless Mouse Operation The remote control can be used as a ...
...codes (Code 1-Code 8) are connected with a USB cable. Switching the remote control codes prevents interference from other remote controls when several projectors or video equipment next to each other are connected with a USB cable. The initial code is not available. Change the remote control ...and then to "ON." Before operating the wireless mouse, connect your computer. R-CLICK button Acts as right (click) mouse button while the projector and a computer are operated at the same time. Part Names and Functions Wireless Mouse Operation The remote control can be used as a ...

User Manual
Page 18
...lid. 2 Install new batteries into the compartment. 3 Replace the compartment lid. Remote Control Receivers and Operating Range Point the remote control toward the projector (to the proper height; Press the lid downward and slide it. Two AAA size batteries For correct polarity (+ and -), be adjusted up ...60° receivers (see pages 15, 32, 50). 18 Adjustable Feet You can be sure battery terminals are provided both of the projector. To correct keystone distortion, press the KEYSTONE button on the remote control, carefully wipe the case clean and install new batteries. ●...
...lid. 2 Install new batteries into the compartment. 3 Replace the compartment lid. Remote Control Receivers and Operating Range Point the remote control toward the projector (to the proper height; Press the lid downward and slide it. Two AAA size batteries For correct polarity (+ and -), be adjusted up ...60° receivers (see pages 15, 32, 50). 18 Adjustable Feet You can be sure battery terminals are provided both of the projector. To correct keystone distortion, press the KEYSTONE button on the remote control, carefully wipe the case clean and install new batteries. ●...

User Manual
Page 19
Make sure that the lens is fully inserted to the projector by following the instructions below. Removing the lens 1 Shift the lens to the center position by using an optional lens, install the lens by aligning ... Lens release button on the lens with the red dot of the projector. 3 Slowly turn the lens counterclockwise until it out slowly from the projector. Attaching the lens to the projector 1 Remove the lens mount cover. 2 Fit the lens to the projector. Lens Release button 19 Red dot CAUTION Do not press the lens...
Make sure that the lens is fully inserted to the projector by following the instructions below. Removing the lens 1 Shift the lens to the center position by using an optional lens, install the lens by aligning ... Lens release button on the lens with the red dot of the projector. 3 Slowly turn the lens counterclockwise until it out slowly from the projector. Attaching the lens to the projector 1 Remove the lens mount cover. 2 Fit the lens to the projector. Lens Release button 19 Red dot CAUTION Do not press the lens...

User Manual
Page 20
... be set perpendicularly to obtain the best image. •All measurements are for PLC-XT25/XT20) For projector positioning, see the figures below are approximate and may vary from the actual sizes. 32.8' (10.0m) 22.0' (6.7m) 16.4' (5.0m) 10.8' (3.3m) 3.9' (1.2m) 150" ... Lens For details about the Lens shift function, refer to limit ambient lighting in the room has a great influence on page 29. Installation Positioning the Projector (for PLC-XT25/XT20. 50% 20 uppermost 15% leftmost 50% downmost 15% rightmost
... be set perpendicularly to obtain the best image. •All measurements are for PLC-XT25/XT20) For projector positioning, see the figures below are approximate and may vary from the actual sizes. 32.8' (10.0m) 22.0' (6.7m) 16.4' (5.0m) 10.8' (3.3m) 3.9' (1.2m) 150" ... Lens For details about the Lens shift function, refer to limit ambient lighting in the room has a great influence on page 29. Installation Positioning the Projector (for PLC-XT25/XT20. 50% 20 uppermost 15% leftmost 50% downmost 15% rightmost

User Manual
Page 21
... proper AC power cord must meet the requirements of the country where you are not sure of the type of power being supplied, consult your projector. NOTE ON THE POWER CORD AC power cord must be easily accessible. and Canada Ground AC outlet side For Continental Europe For the U.K. To reduce... the risk of electrical shock, do not plug into any other type of power system. If you use . Projector side For the U.S.A. To power cord connector on . To the AC outlet. (120 V AC) To the AC outlet. (200-240 V AC) To the AC outlet...
... proper AC power cord must meet the requirements of the country where you are not sure of the type of power being supplied, consult your projector. NOTE ON THE POWER CORD AC power cord must be easily accessible. and Canada Ground AC outlet side For Continental Europe For the U.K. To reduce... the risk of electrical shock, do not plug into any other type of power system. If you use . Projector side For the U.S.A. To power cord connector on . To the AC outlet. (120 V AC) To the AC outlet. (200-240 V AC) To the AC outlet...


