Owners Manual
Page 2
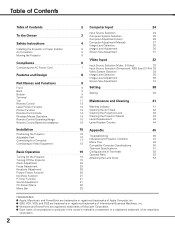
..., Macintosh, and PowerBook are trademarks or registered trademarks of Apple Computer,Inc. Table of Contents Table of Contents To the Owner Safety Instructions Installing the Projector in the owner's manual is a trademark or a registered trademark of its respective corporation. 2 G IBM, VGA, XGA, and PS/2 are registered trademarks of Microsoft Corporation.
..., Macintosh, and PowerBook are trademarks or registered trademarks of Apple Computer,Inc. Table of Contents Table of Contents To the Owner Safety Instructions Installing the Projector in the owner's manual is a trademark or a registered trademark of its respective corporation. 2 G IBM, VGA, XGA, and PS/2 are registered trademarks of Microsoft Corporation.
Owners Manual
Page 3
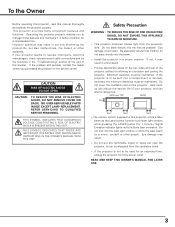
...from the power outlet. READ AND KEEP THIS OWNER'S MANUAL FOR LATER USE. 3 Install the projector in better condition for allowing air circulation and cooling the projector. Provide appropriate space on the top, sides and rear of your projector seems to indicate laser emission). Do not cover the... the service center. NO USER-SERVICEABLE PARTS INSIDE EXCEPT LAMP REPLACEMENT. To the Owner Before operating this projector, read this manual again, check operations and cable connections and try the solutions in a fire hazard. - Safety Precaution WARNING : TO REDUCE THE RISK...
...from the power outlet. READ AND KEEP THIS OWNER'S MANUAL FOR LATER USE. 3 Install the projector in better condition for allowing air circulation and cooling the projector. Provide appropriate space on the top, sides and rear of your projector seems to indicate laser emission). Do not cover the... the service center. NO USER-SERVICEABLE PARTS INSIDE EXCEPT LAMP REPLACEMENT. To the Owner Before operating this projector, read this manual again, check operations and cable connections and try the solutions in a fire hazard. - Safety Precaution WARNING : TO REDUCE THE RISK...

Owners Manual
Page 25
...Computer Adjustment. Adjustment data can be selected manually if some PC systems appear PC System Menu on the On-Screen Menu. 1 Press the MENU button and the On-Screen Menu will appear. Auto When the projector cannot recognize the connected signal as described on...displays the most of the following four displays appears on this projector, the Auto PC Adjustment function operates to adjust the projector. The projector chooses a proper system and displays it manually, perform manual adjustment as PC system provided in the projector. PC system can also be stored in Mode 1 - ...
...Computer Adjustment. Adjustment data can be selected manually if some PC systems appear PC System Menu on the On-Screen Menu. 1 Press the MENU button and the On-Screen Menu will appear. Auto When the projector cannot recognize the connected signal as described on...displays the most of the following four displays appears on this projector, the Auto PC Adjustment function operates to adjust the projector. The projector chooses a proper system and displays it manually, perform manual adjustment as PC system provided in the projector. PC system can also be stored in Mode 1 - ...
Owners Manual
Page 27
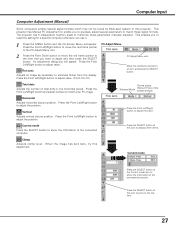
... the information of the connected computer. Press the Point Left/Right button to adjust value. This projector has Manual PC Adjustment to enable you want to match those parameters manually adjusted. Press the Point Left/Right button to adjust the value. Horizontal Adjusts horizontal picture position.... 1 Press the MENU button and the On-Screen Menu will appear. When the image has dark bars, try this projector. Computer Input Computer Adjustment (Manual) Some computers employ special signal formats which may not be tuned by Multi-scan system of this adjustment. Press the ...
... the information of the connected computer. Press the Point Left/Right button to adjust value. This projector has Manual PC Adjustment to enable you want to match those parameters manually adjusted. Press the Point Left/Right button to adjust the value. Horizontal Adjusts horizontal picture position.... 1 Press the MENU button and the On-Screen Menu will appear. When the image has dark bars, try this projector. Computer Input Computer Adjustment (Manual) Some computers employ special signal formats which may not be tuned by Multi-scan system of this adjustment. Press the ...
Owners Manual
Page 30
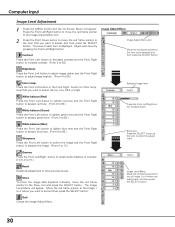
Store To store the image data adjusted manually, move the red frame pointer to the item that you want to set and then press the SELECT button. 30 The Image Level Menu will ...
Store To store the image data adjusted manually, move the red frame pointer to the item that you want to set and then press the SELECT button. 30 The Image Level Menu will ...
Owners Manual
Page 34
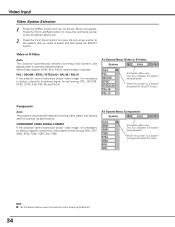
... system that you want to select a specific broadcast signal format among 480i, 575i, 480p, 575p, 720p, 1035i, and 1080i. Video or S-Video Auto The projector automatically detects incoming video system, and adjusts itself to select a specific component video signal format among PAL, SECAM, NTSC, NTSC 4.43, PAL-M, and PAL-N. ...Input Video System Selection 1 Press the MENU button and the On-Screen Menu will appear. When Video System is PAL-M or PAL-N, select system manually. AV System Menu (Video or S-Video) AV System Menu icon This box indicates the system being selected.
... system that you want to select a specific broadcast signal format among 480i, 575i, 480p, 575p, 720p, 1035i, and 1080i. Video or S-Video Auto The projector automatically detects incoming video system, and adjusts itself to select a specific component video signal format among PAL, SECAM, NTSC, NTSC 4.43, PAL-M, and PAL-N. ...Input Video System Selection 1 Press the MENU button and the On-Screen Menu will appear. When Video System is PAL-M or PAL-N, select system manually. AV System Menu (Video or S-Video) AV System Menu icon This box indicates the system being selected.
Owners Manual
Page 44
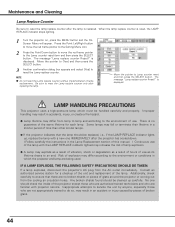
.... ( Follow carefully the instructions in the Lamp Replacement section of this manual. ) Continuous use . The message "Lamp replace counter Reset?" LAMP HANDLING PRECAUTIONS This projector uses a high-pressure lamp which the projector and lamp are not appropriately trained to the environment or conditions in ...and then press the SELECT button. 3 Another confirmation dialog box appears and select [Yes] to the environment of use of the lamp with projector service. The message "Lamp replace counter Reset?" G A Lamp may result in accidents, injury, or create a fire hazard. G Lamp ...
.... ( Follow carefully the instructions in the Lamp Replacement section of this manual. ) Continuous use . The message "Lamp replace counter Reset?" LAMP HANDLING PRECAUTIONS This projector uses a high-pressure lamp which the projector and lamp are not appropriately trained to the environment or conditions in ...and then press the SELECT button. 3 Another confirmation dialog box appears and select [Yes] to the environment of use of the lamp with projector service. The message "Lamp replace counter Reset?" G A Lamp may result in accidents, injury, or create a fire hazard. G Lamp ...
Owners Manual
Page 45
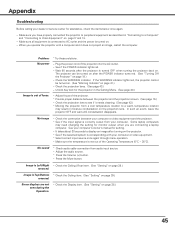
...(See "Warning Indicator" on page 39.) reversed. Check the projection lens to a warm temperature location may need changing the setting for the projector in "Connecting to a Computer" and "Connecting to Video Equipment" on . Make sure the temperature is connected to display an image after ... peripheral equipment as described in the Setting Menu. (See page 40.) Image is turned on the projector. - Provide proper distance between your computer's owner's manual for assistance, check the items below once again. - Check the Ceiling item. (See "Setting" on page 38.) 45...
...(See "Warning Indicator" on page 39.) reversed. Check the projection lens to a warm temperature location may need changing the setting for the projector in "Connecting to a Computer" and "Connecting to Video Equipment" on . Make sure the temperature is connected to display an image after ... peripheral equipment as described in the Setting Menu. (See page 40.) Image is turned on the projector. - Provide proper distance between your computer's owner's manual for assistance, check the items below once again. - Check the Ceiling item. (See "Setting" on page 38.) 45...
Owners Manual
Page 51
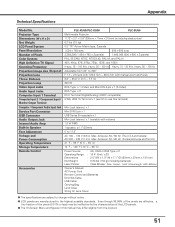
... subject to use this manual may be ineffective by the characteristics of the LCD panels. PLC-XU55/PLC-XU50 PLC-SU50 Projector Type Dimensions (W x H x D) Multi-media Projector 11.73" x 2.8" x 8.58" (298mm x 71mm x 218mm) (not including raised portions) Net Weight LCD Panel System 6.2 lbs (2.8 kg...Connector Mini DIN 8 pin x 1 USB Connector Audio Output Jack Internal Audio Amp USB Series B receptacle x 1 Mini Jack (stereo) x 1 (variable with manual zoom and focus Throw Distance Projection Lamp 3.3' ~ 25.3' (1.0 m ~ 7.7 m) 200 W Video Input Jacks RCA Type x 1 (Video) and Mini ...
... subject to use this manual may be ineffective by the characteristics of the LCD panels. PLC-XU55/PLC-XU50 PLC-SU50 Projector Type Dimensions (W x H x D) Multi-media Projector 11.73" x 2.8" x 8.58" (298mm x 71mm x 218mm) (not including raised portions) Net Weight LCD Panel System 6.2 lbs (2.8 kg...Connector Mini DIN 8 pin x 1 USB Connector Audio Output Jack Internal Audio Amp USB Series B receptacle x 1 Mini Jack (stereo) x 1 (variable with manual zoom and focus Throw Distance Projection Lamp 3.3' ~ 25.3' (1.0 m ~ 7.7 m) 200 W Video Input Jacks RCA Type x 1 (Video) and Mini ...


