Owners Manual
Page 2
... Function Remote Control Code Wireless Mouse Operation Remote Control Operating Range Remote Control Batteries Installation Installation Positioning the Projector Adjustable Feet Connecting to a Computer Connecting to Video Equipment Basic Operation Turning On the Projector Turning Off the Projector Zoom Adjustment Focus Adjustment Keystone Adjustment Picture Freeze Function No Show Function P-Timer Function Sound Adjustment On-Screen Menu Menu Bar 2 Computer Input 24 Input Source Selection 24 3 Computer System Selection 25 Computer Adjustment (Auto) 26 4 Computer Adjustment (Manual...
... Function Remote Control Code Wireless Mouse Operation Remote Control Operating Range Remote Control Batteries Installation Installation Positioning the Projector Adjustable Feet Connecting to a Computer Connecting to Video Equipment Basic Operation Turning On the Projector Turning Off the Projector Zoom Adjustment Focus Adjustment Keystone Adjustment Picture Freeze Function No Show Function P-Timer Function Sound Adjustment On-Screen Menu Menu Bar 2 Computer Input 24 Input Source Selection 24 3 Computer System Selection 25 Computer Adjustment (Auto) 26 4 Computer Adjustment (Manual...
Owners Manual
Page 3
... the Owner Before operating this projector, read this manual again, check operations and cable connections and try the solutions in a fire hazard. - If the problem still persists, contact the dealer where you to indicate laser emission). CAUTION RISK OF ELECTRIC SHOCK DO NOT OPEN CAUTION : TO REDUCE THE RISK OF ELECTRIC SHOCK, DO NOT REMOVE COVER (OR BACK). NO USER-SERVICEABLE PARTS INSIDE EXCEPT LAMP REPLACEMENT. THIS SYMBOL INDICATES...
... the Owner Before operating this projector, read this manual again, check operations and cable connections and try the solutions in a fire hazard. - If the problem still persists, contact the dealer where you to indicate laser emission). CAUTION RISK OF ELECTRIC SHOCK DO NOT OPEN CAUTION : TO REDUCE THE RISK OF ELECTRIC SHOCK, DO NOT REMOVE COVER (OR BACK). NO USER-SERVICEABLE PARTS INSIDE EXCEPT LAMP REPLACEMENT. THIS SYMBOL INDICATES...
Owners Manual
Page 5
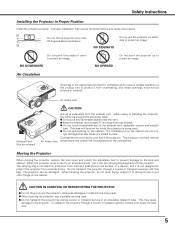
... from overheating, and these openings must not be damaged. Air Intake Vent Exhaust Vent (Hot air exhaust) CAUTION Air Intake Vent Hot air is intended for best way. 5 Safety Instructions Installing the Projector in the cabinet are provided to cool down to project an image. Air Circulation Openings in Proper Position Install the projector properly. Moving the Projector When moving the projector, replace the lens cover and retract the adjustable feet...
... from overheating, and these openings must not be damaged. Air Intake Vent Exhaust Vent (Hot air exhaust) CAUTION Air Intake Vent Hot air is intended for best way. 5 Safety Instructions Installing the Projector in the cabinet are provided to cool down to project an image. Air Circulation Openings in Proper Position Install the projector properly. Moving the Projector When moving the projector, replace the lens cover and retract the adjustable feet...
Owners Manual
Page 6
... the equipment and receiver. - red or orange). If the plug supplied is marked with the cover omitted. The wire which can radiate radio frequency energy and, if not installed and used in this apparatus may cause harmful interference to comply with the following measures : - Model Numbers Trade Name Responsible party Address Telephone No. : PLC-XU55, PLC-XU50, PLC-SU50 : Sanyo : SANYO FISHER COMPANY : 21605 Plummer...
... the equipment and receiver. - red or orange). If the plug supplied is marked with the cover omitted. The wire which can radiate radio frequency energy and, if not installed and used in this apparatus may cause harmful interference to comply with the following measures : - Model Numbers Trade Name Responsible party Address Telephone No. : PLC-XU55, PLC-XU50, PLC-SU50 : Sanyo : SANYO FISHER COMPANY : 21605 Plummer...
Owners Manual
Page 8
... projector can be operated through wired/wireless LAN by setting. This function enables you to use . (See page 20 and 38.) N Power Management The Power management function reduces power consumption and maintain the lamp life. (See page 39.) N Wireless Mouse The remote control supplied with this technology which displays Spotlight or Pointer controlled by the remote control on crucial information at a presentation. (See page 31.) N Interlace Progressive Conversion N User's Logo A projected image...
... projector can be operated through wired/wireless LAN by setting. This function enables you to use . (See page 20 and 38.) N Power Management The Power management function reduces power consumption and maintain the lamp life. (See page 39.) N Wireless Mouse The remote control supplied with this technology which displays Spotlight or Pointer controlled by the remote control on crucial information at a presentation. (See page 31.) N Interlace Progressive Conversion N User's Logo A projected image...
Owners Manual
Page 11
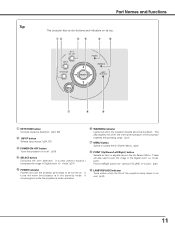
.... (p43) 11 button. (p21) t POWER indicator Flashes red until the projector gets ready to expand / compress the image in the On-Screen Menu. qw er t y ON - o LAMP REPLACE indicator Turns yellow when the life of the projector exceeds the operating range. (p41) u MENU button Opens or closes the On-Screen Menu. (p22) i POINT (Up/Down/Left/Right ) button Selects an item or adjusts value in Digital zoom +/- OFF INPUT POWER WARNING KEYSTONE SELECT LAMP REPLACE VOLUME - It turns red when the projector is under operation. mode. (p31...
.... (p43) 11 button. (p21) t POWER indicator Flashes red until the projector gets ready to expand / compress the image in the On-Screen Menu. qw er t y ON - o LAMP REPLACE indicator Turns yellow when the life of the projector exceeds the operating range. (p41) u MENU button Opens or closes the On-Screen Menu. (p22) i POINT (Up/Down/Left/Right ) button Selects an item or adjusts value in Digital zoom +/- OFF INPUT POWER WARNING KEYSTONE SELECT LAMP REPLACE VOLUME - It turns red when the projector is under operation. mode. (p31...
Owners Manual
Page 12
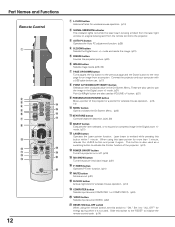
... for wireless mouse operation. (p14) !9 COMPUTER button Selects input source (COMPUTER 1 or COMPUTER 2). (p24) @0 VIDEO button Selects input source (VIDEO). (p32) @1 RESET/ON/ALL-OFF switch When using the remote control, set this switch to "ALL OFF" for an image from the remote control to expand or compress image in the Digital zoom +/mode. (p31) !3 LASER button Operates the Laser pointer function. e AUTO PC button Operates the Auto PC adjustment function. (p26) r D.ZOOM button Selects the Digital zoom +/- mode and resize the image. (p31) t FREEZE button Freezes the projected picture...
... for wireless mouse operation. (p14) !9 COMPUTER button Selects input source (COMPUTER 1 or COMPUTER 2). (p24) @0 VIDEO button Selects input source (VIDEO). (p32) @1 RESET/ON/ALL-OFF switch When using the remote control, set this switch to "ALL OFF" for an image from the remote control to expand or compress image in the Digital zoom +/mode. (p31) !3 LASER button Operates the Laser pointer function. e AUTO PC button Operates the Auto PC adjustment function. (p26) r D.ZOOM button Selects the Digital zoom +/- mode and resize the image. (p31) t FREEZE button Freezes the projected picture...
Owners Manual
Page 14
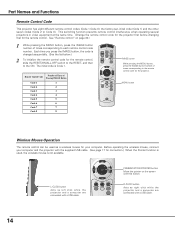
... remote control code number. See "Remote control" on the screen with the supplied USB cable. (See page 17 for the projector. Each time you press the IMAGE button, the code is used as a wireless mouse for your computer and the projector with this button. R-CLICK button Acts as left click while the projector and a computer are connected with a USB cable. This switching function prevents remote control interference when operating several projectors or video equipment at the same time. (Change the remote control code for the projector...
... remote control code number. See "Remote control" on the screen with the supplied USB cable. (See page 17 for the projector. Each time you press the IMAGE button, the code is used as a wireless mouse for your computer and the projector with this button. R-CLICK button Acts as left click while the projector and a computer are connected with a USB cable. This switching function prevents remote control interference when operating several projectors or video equipment at the same time. (Change the remote control code for the projector...
Owners Manual
Page 17
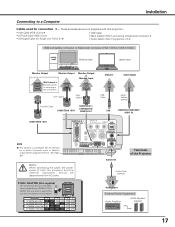
... - Audio Cable (stereo) ✽ N MAC ADAPTER (Not supplied) Set switches as either Computer input or Monitor output before using this projector.) • VGA Cable (HDB 15 pin) ✽ • DVI-VGA Cable (HDB 15 pin) • DVI-Digital Cable (for Single Link T.M.D.S.) ✽ • USB Cable • MAC Adapter (When connecting to Macintosh computer) ✽ • Audio Cables ( Mini Plug (stereo) x 2) ✽ IBM-compatible computer or Macintosh computer (VGA / SVGA / XGA / SXGA) Desktop type Laptop type...
... - Audio Cable (stereo) ✽ N MAC ADAPTER (Not supplied) Set switches as either Computer input or Monitor output before using this projector.) • VGA Cable (HDB 15 pin) ✽ • DVI-VGA Cable (HDB 15 pin) • DVI-Digital Cable (for Single Link T.M.D.S.) ✽ • USB Cable • MAC Adapter (When connecting to Macintosh computer) ✽ • Audio Cables ( Mini Plug (stereo) x 2) ✽ IBM-compatible computer or Macintosh computer (VGA / SVGA / XGA / SXGA) Desktop type Laptop type...

Owners Manual
Page 23
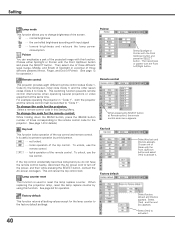
...(p29) Screen Menu Used to adjust size of image. [Normal / True / Wide / Digital zoom +/-] (p31) Setting Menu Used to change settings of the projector or reset lamp replace counter. (p38-40) Input Menu Used to select input source either Computer or Video. (p24) PC Adjust Menu Used to adjust parameters to match with input signal format. (p26-28) Image Adjust Menu Used to adjust computer image. [Contrast / Brightness / Color temp. / White balance (R/G/B) / Sharpness / Gamma] (p30) Sound Menu Used to adjust volume or mute sound. (p21) For video source Input Menu Used to select input source...
...(p29) Screen Menu Used to adjust size of image. [Normal / True / Wide / Digital zoom +/-] (p31) Setting Menu Used to change settings of the projector or reset lamp replace counter. (p38-40) Input Menu Used to select input source either Computer or Video. (p24) PC Adjust Menu Used to adjust parameters to match with input signal format. (p26-28) Image Adjust Menu Used to adjust computer image. [Contrast / Brightness / Color temp. / White balance (R/G/B) / Sharpness / Gamma] (p30) Sound Menu Used to adjust volume or mute sound. (p21) For video source Input Menu Used to select input source...
Owners Manual
Page 31
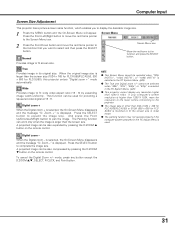
Computer Input Screen Size Adjustment This projector has a picture screen resize function, which enables you want to select and then press the SELECT button. True Provides image in initial mode. Wide Provides image to fit wide video aspect ratio (16 : 9) by pressing the D.ZOOM L button on the remote control. G The image data in other than XGA (1024 x 768 for PLC-XU55/PLC-XU50) or SVGA (800 x 600 for PLCSU50) is selected in the...
Computer Input Screen Size Adjustment This projector has a picture screen resize function, which enables you want to select and then press the SELECT button. True Provides image in initial mode. Wide Provides image to fit wide video aspect ratio (16 : 9) by pressing the D.ZOOM L button on the remote control. G The image data in other than XGA (1024 x 768 for PLC-XU55/PLC-XU50) or SVGA (800 x 600 for PLCSU50) is selected in the...
Owners Manual
Page 39
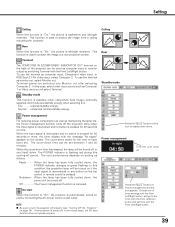
... button is used to project the image to green flashing. Ceiling Rear Standby mode Power management For reducing power consumption as well as Computer 1 or Video, and you will be turned on if the input signal is pressed for 30 seconds or more . The count-down time can be set between 1 and 30 minutes. The count-down starts for the time to project the image from a ceiling mounting the projector. On start function does not operate...
... button is used to project the image to green flashing. Ceiling Rear Standby mode Power management For reducing power consumption as well as Computer 1 or Video, and you will be turned on if the input signal is pressed for 30 seconds or more . The count-down time can be set between 1 and 30 minutes. The count-down starts for the time to project the image from a ceiling mounting the projector. On start function does not operate...
Owners Manual
Page 40
... AC power cord again. See page 44 for the projector; When pressing the SELECT button at the same time. Key lock Select Key lock and this box appears. Select Factory default and this box appears. To change the code for operation.) Remote control This projector provides eight different remote control codes (Code 1Code 8); Setting Lamp mode This function allows you do not have the remote control nearby, disconnect the AC power cord to change brightness of the screen...
... AC power cord again. See page 44 for the projector; When pressing the SELECT button at the same time. Key lock Select Key lock and this box appears. Select Factory default and this box appears. To change the code for operation.) Remote control This projector provides eight different remote control codes (Code 1Code 8); Setting Lamp mode This function allows you do not have the remote control nearby, disconnect the AC power cord to change brightness of the screen...

Owners Manual
Page 43
... Lamp replace counter. When ordering a projection lamp, give the following information to an end. SELECT WARNING LAMP REPLACE VOLUME - G Model No. Do not drop a lamp or touch a glass bulb! The inside of the projector can shatter and may cause injury. Follow these steps to an end, the LAMP REPLACE indicator lights yellow. Lamp Cover Lamp Screw Screw Screw Handle ORDER REPLACEMENT LAMP Replacement lamp can be ordered through your projector : G Replacement Lamp Type No. : PLC-XU55/PLC-XU50/PLC-SU50 POA-LMP55 (for PLC-XU55/PLC-XU50) (Service Parts...
... Lamp replace counter. When ordering a projection lamp, give the following information to an end. SELECT WARNING LAMP REPLACE VOLUME - G Model No. Do not drop a lamp or touch a glass bulb! The inside of the projector can shatter and may cause injury. Follow these steps to an end, the LAMP REPLACE indicator lights yellow. Lamp Cover Lamp Screw Screw Screw Handle ORDER REPLACEMENT LAMP Replacement lamp can be ordered through your projector : G Replacement Lamp Type No. : PLC-XU55/PLC-XU50/PLC-SU50 POA-LMP55 (for PLC-XU55/PLC-XU50) (Service Parts...
Owners Manual
Page 44
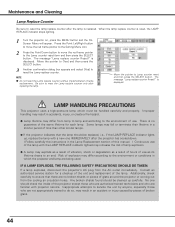
... air circulation holes. Press the Point Left/Right button to move the red frame pointer to the Setting Menu icon. 2 Press the Point Down button to move the red frame pointer to Lamp counter reset and then press the SELECT button. The message "Lamp replace counter Reset?" LAMP HANDLING PRECAUTIONS This projector uses a high-pressure lamp which the projector and lamp are familiar with the LAMP REPLACE indicator lighted may result in which must be cleaned up , replace the lamp...
... air circulation holes. Press the Point Left/Right button to move the red frame pointer to the Setting Menu icon. 2 Press the Point Down button to move the red frame pointer to Lamp counter reset and then press the SELECT button. The message "Lamp replace counter Reset?" LAMP HANDLING PRECAUTIONS This projector uses a high-pressure lamp which the projector and lamp are familiar with the LAMP REPLACE indicator lighted may result in which must be cleaned up , replace the lamp...
Owners Manual
Page 45
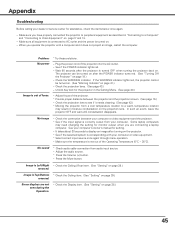
.... Check audio cable connection from a cool temperature location to Video Equipment" on the projection lens. Problem: - Unlock Key lock for monitor output when you operate the projector with your computer or video equipment. - In such an event, leave the projector OFF and wait until condensation disappears. Adjust the audio source. - If the WARNING indicator lights red, the projector cannot be turned on after turning on page 41.) - Check the projection lens to display an image after the POWER indicator turns red. (See "Turning Off the Projector...
.... Check audio cable connection from a cool temperature location to Video Equipment" on the projection lens. Problem: - Unlock Key lock for monitor output when you operate the projector with your computer or video equipment. - In such an event, leave the projector OFF and wait until condensation disappears. Adjust the audio source. - If the WARNING indicator lights red, the projector cannot be turned on after turning on page 41.) - Check the projection lens to display an image after the POWER indicator turns red. (See "Turning Off the Projector...
Owners Manual
Page 46
... following all operating instructions, contact the dealer where you are used to the projector with the INPUT button on the top control, the COMPUTER button or the VIDEO button on your computer. - Give the model number and explain about the problem. Select Computer 2 at the Terminal item in the Setting Menu. (See page 40.) Wireless Mouse function does not work . - Unlock Key lock for the remote control in the Setting Menu. (See...
... following all operating instructions, contact the dealer where you are used to the projector with the INPUT button on the top control, the COMPUTER button or the VIDEO button on your computer. - Give the model number and explain about the problem. Select Computer 2 at the Terminal item in the Setting Menu. (See page 40.) Wireless Mouse function does not work . - Unlock Key lock for the remote control in the Setting Menu. (See...

Owners Manual
Page 47
... turned off ✽ When the life of the lamp. The projector has been cooled down enough and the ✽ temperature returns to an end, the LAMP REPLACE indicator lights yellow. If the ✽ projector is cooled down enough and the temperature returns ✽ to normal. Reset the Lamp replace counter after replacement of the projection lamp draws to normal, the POWER indicator lights red and the pro- Check and clean the air filters. jector on the projector, the WARNING indicator stops flashing...
... turned off ✽ When the life of the lamp. The projector has been cooled down enough and the ✽ temperature returns to an end, the LAMP REPLACE indicator lights yellow. If the ✽ projector is cooled down enough and the temperature returns ✽ to normal. Reset the Lamp replace counter after replacement of the projection lamp draws to normal, the POWER indicator lights red and the pro- Check and clean the air filters. jector on the projector, the WARNING indicator stops flashing...
Owners Manual
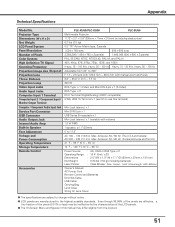
Page 51
PLC-XU55/PLC-XU50 PLC-SU50 Projector Type Dimensions (W x H x D) Multi-media Projector 11.73" x 2.8" x 8.58" (298mm x 71mm x 218mm) (not including raised portions) Net Weight LCD Panel System 6.2 lbs (2.8 kg) 0.8" TFT Active Matrix type, 3 panels Panel Resolution Number of the LCD panels. Output : 1mW / Wave length : 640~660nm) Owner's Manual AC Power Cord Remote Control and Batteries DVI-VGA Cable USB Cable Carrying Bag Lens Cover String for Lens Cover G The specifications are subject to the highest possible standards. Ampere), 50...
PLC-XU55/PLC-XU50 PLC-SU50 Projector Type Dimensions (W x H x D) Multi-media Projector 11.73" x 2.8" x 8.58" (298mm x 71mm x 218mm) (not including raised portions) Net Weight LCD Panel System 6.2 lbs (2.8 kg) 0.8" TFT Active Matrix type, 3 panels Panel Resolution Number of the LCD panels. Output : 1mW / Wave length : 640~660nm) Owner's Manual AC Power Cord Remote Control and Batteries DVI-VGA Cable USB Cable Carrying Bag Lens Cover String for Lens Cover G The specifications are subject to the highest possible standards. Ampere), 50...
Owners Manual
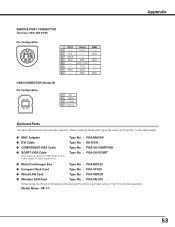
Page 53
.... Model Name : 08-1-1 53 T X D ----- 7 GND GND ----- 8 ----- When ordering those parts, give the name and Type No. Appendix SERVICE PORT CONNECTOR Terminal : Mini DIN 8-PIN Pin Configuration 876 5 43 21 PS/2 Serial ADB 1 ----- GND GND USB CONNECTOR (Series B) Pin Configuration 21 34 1 Vcc 2 - RTS / CTS ----- 6 ----- G MAC Adapter G DVI Cable G COMPONENT-VGA Cable G SCART-VGA Cable (This cable is used for RGB Scart 21-Pin Video output of video...
.... Model Name : 08-1-1 53 T X D ----- 7 GND GND ----- 8 ----- When ordering those parts, give the name and Type No. Appendix SERVICE PORT CONNECTOR Terminal : Mini DIN 8-PIN Pin Configuration 876 5 43 21 PS/2 Serial ADB 1 ----- GND GND USB CONNECTOR (Series B) Pin Configuration 21 34 1 Vcc 2 - RTS / CTS ----- 6 ----- G MAC Adapter G DVI Cable G COMPONENT-VGA Cable G SCART-VGA Cable (This cable is used for RGB Scart 21-Pin Video output of video...


