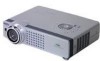
Owners Manual
Page 2
...Bottom Terminal Top Remote Control Laser Pointer Function Pointer Function Remote Control Code Wireless Mouse Operation Remote Control Operating Range Remote Control Batteries Installation Installation Positioning the Projector Adjustable Feet Connecting to a Computer Connecting to Video Equipment Basic Operation Turning On the Projector Turning Off the Projector Zoom Adjustment Focus... corporation. 2 G Windows and PowerPoint are trademarks or registered trademarks of Microsoft Corporation. G IBM, VGA, XGA, and PS/2 are registered trademarks of International Business Machines, Inc.
...Bottom Terminal Top Remote Control Laser Pointer Function Pointer Function Remote Control Code Wireless Mouse Operation Remote Control Operating Range Remote Control Batteries Installation Installation Positioning the Projector Adjustable Feet Connecting to a Computer Connecting to Video Equipment Basic Operation Turning On the Projector Turning Off the Projector Zoom Adjustment Focus... corporation. 2 G Windows and PowerPoint are trademarks or registered trademarks of Microsoft Corporation. G IBM, VGA, XGA, and PS/2 are registered trademarks of International Business Machines, Inc.
Owners Manual
Page 3
... laser light window while pressing the LASER button (for 1 minute / Signal Emission indicator lights red to be maintained. The remote control, supplied to this manual thoroughly and operate the projector properly. If the projector is not to indicate laser emission). Safety Precaution WARNING : TO REDUCE THE RISK OF FIRE OR ELECTRIC SHOCK, DO NOT...
... laser light window while pressing the LASER button (for 1 minute / Signal Emission indicator lights red to be maintained. The remote control, supplied to this manual thoroughly and operate the projector properly. If the projector is not to indicate laser emission). Safety Precaution WARNING : TO REDUCE THE RISK OF FIRE OR ELECTRIC SHOCK, DO NOT...
Owners Manual
Page 8
... built-in size and weight. N Compact Design This projector is extremely compact in multimedia features, a palette of 16.77 million colors, and matrix liquid crystal display (LCD) technology. G 6 Color Systems NTSC, PAL, SECAM, NTSC 4.43, PAL-M or PAL-N color system can be connected. ...operated through wired/wireless LAN by setting. The projector has the function to adjust the brightness according to operate both the projector and the connected computer with the remote control. (See page 14.) N Multi Card Imager (optional) The projector can also display the captured image in ; This...
... built-in size and weight. N Compact Design This projector is extremely compact in multimedia features, a palette of 16.77 million colors, and matrix liquid crystal display (LCD) technology. G 6 Color Systems NTSC, PAL, SECAM, NTSC 4.43, PAL-M or PAL-N color system can be connected. ...operated through wired/wireless LAN by setting. The projector has the function to adjust the brightness according to operate both the projector and the connected computer with the remote control. (See page 14.) N Multi Card Imager (optional) The projector can also display the captured image in ; This...

Owners Manual
Page 10
...2 / COMPONENT IN / MONITOR OUT AUDIO IN AUDIO OUT (VARIABLE) Do not press this connector with a pen, which controls this unit may occasionally malfunction and need to service this projector. I terminal only when using this jack. (p17, 18) u COMPUTER IN 2 /COMPONENT IN / MONITOR OUT This ... Connect the audio output (stereo) from video equipment to VIDEO jack. (p18) t USB (Series B) When operating the connected computer with the remote control, connect USB port of your computer to this button. Set the terminal up as computer input , component input, RGB Scart 21-Pin Video input...
...2 / COMPONENT IN / MONITOR OUT AUDIO IN AUDIO OUT (VARIABLE) Do not press this connector with a pen, which controls this unit may occasionally malfunction and need to service this projector. I terminal only when using this jack. (p17, 18) u COMPUTER IN 2 /COMPONENT IN / MONITOR OUT This ... Connect the audio output (stereo) from video equipment to VIDEO jack. (p18) t USB (Series B) When operating the connected computer with the remote control, connect USB port of your computer to this button. Set the terminal up as computer input , component input, RGB Scart 21-Pin Video input...
Owners Manual
Page 12
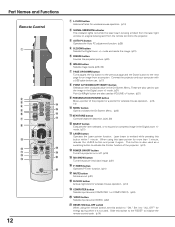
...it again. Part Names and Functions Remote Control q w e r !4 t !5 y !6 u !7 i o !0 !8 !1 !9 !2 @0 !3 @1 12 q L-CLICK button Acts as VOLUME +/- When using the remote control, set this laser pointer for an image from the remote control to pan the image in the ...Digital zoom +/- mode. (p31) Point Left/Right button are also used . mode and resize the image. (p31) t FREEZE button Freezes the projected picture. (p20) y IMAGE button Selects image levels.(p29, 35) u PAGE UP/DOWN button Turns pages; Connect the projector...
...it again. Part Names and Functions Remote Control q w e r !4 t !5 y !6 u !7 i o !0 !8 !1 !9 !2 @0 !3 @1 12 q L-CLICK button Acts as VOLUME +/- When using the remote control, set this laser pointer for an image from the remote control to pan the image in the ...Digital zoom +/- mode. (p31) Point Left/Right button are also used . mode and resize the image. (p31) t FREEZE button Freezes the projected picture. (p20) y IMAGE button Selects image levels.(p29, 35) u PAGE UP/DOWN button Turns pages; Connect the projector...

Owners Manual
Page 13
... radiation exposure. PRESENTATION POINTER button MENU button Spotlight Pointer PRESENTATION POINTER button NOTE G You can move Spotlight or Pointer of the projector with the remote control to the Pointer function.) 2 Press the LASER button on page 40 for changing the patterns and sizes.) 1 While pressing the...be available. (The Laser pointer function has switched to emphasize a part of the projected image. (See "Pointer" on the remote control toward the projector and see if the LASER button lights green, and Spotlight or Pointer is being emitted. Try these steps until the LASER ...
... radiation exposure. PRESENTATION POINTER button MENU button Spotlight Pointer PRESENTATION POINTER button NOTE G You can move Spotlight or Pointer of the projector with the remote control to the Pointer function.) 2 Press the LASER button on page 40 for changing the patterns and sizes.) 1 While pressing the...be available. (The Laser pointer function has switched to emphasize a part of the projected image. (See "Pointer" on the remote control toward the projector and see if the LASER button lights green, and Spotlight or Pointer is being emitted. Try these steps until the LASER ...
Owners Manual
Page 14
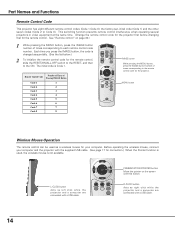
... this button. Each time you press the IMAGE button, the code is used as a wireless mouse for the projector. MENU button Wireless Mouse Operation The remote control can be used , the wireless mouse is Code 1. PRESENTATION POINTER button Move the pointer on page 40.) 1... codes (Code 2 to the ON. This switching function prevents remote control interference when operating several projectors or video equipment at the same time. (Change the remote control code for the projector first before changing that for the remote control, slide the RESET/ON/ALL-OFF switch to the RESET, ...
... this button. Each time you press the IMAGE button, the code is used as a wireless mouse for the projector. MENU button Wireless Mouse Operation The remote control can be used , the wireless mouse is Code 1. PRESENTATION POINTER button Move the pointer on page 40.) 1... codes (Code 2 to the ON. This switching function prevents remote control interference when operating several projectors or video equipment at the same time. (Change the remote control code for the projector first before changing that for the remote control, slide the RESET/ON/ALL-OFF switch to the RESET, ...
Owners Manual
Page 15
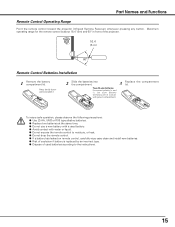
...in contact with pins in front of the projector. 16.4' (5 m) 60° Remote Control Batteries Installation 1 Remove the battery compartment lid. G If a battery has leaked on remote control, carefully wipe case clean and install new ...remote control. Maximum operating range for the remote control is replaced by an incorrect type. G Risk of used battery. G Do not use a new battery with water or liquid. G Do not expose the remote control to the instructions. 15 Part Names and Functions Remote Control Operating Range Point the remote control toward the projector (Infrared Remote...
...in contact with pins in front of the projector. 16.4' (5 m) 60° Remote Control Batteries Installation 1 Remove the battery compartment lid. G If a battery has leaked on remote control, carefully wipe case clean and install new ...remote control. Maximum operating range for the remote control is replaced by an incorrect type. G Risk of used battery. G Do not use a new battery with water or liquid. G Do not expose the remote control to the instructions. 15 Part Names and Functions Remote Control Operating Range Point the remote control toward the projector (Infrared Remote...

Owners Manual
Page 19
...turns on red. 3 Press the POWER ON-OFF button on the top control or on the remote control. DO NOT DISCONNECT AC POWER CORD WHILE COOLING FANS ARE RUNNING OR BEFORE POWER INDICATOR LIGHTS RED. NOTE G The projector cannot be turned on during the cooling period with a computer, VCR, ...cooled down , the input source that was selected last and the Lamp mode status icon appear on the remote control, and a message "Power off?" G This projector monitors internal temperature and automatically controls the running speed of the cooling fans. G If the WARNING indicator flashes or lights red, see "...
...turns on red. 3 Press the POWER ON-OFF button on the top control or on the remote control. DO NOT DISCONNECT AC POWER CORD WHILE COOLING FANS ARE RUNNING OR BEFORE POWER INDICATOR LIGHTS RED. NOTE G The projector cannot be turned on during the cooling period with a computer, VCR, ...cooled down , the input source that was selected last and the Lamp mode status icon appear on the remote control, and a message "Power off?" G This projector monitors internal temperature and automatically controls the running speed of the cooling fans. G If the WARNING indicator flashes or lights red, see "...
Owners Manual
Page 20
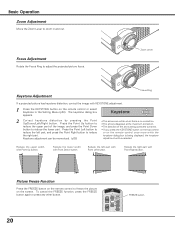
... more while the keystone dialog box is being corrected turns red. • If you press the KEYSTONE button on the top control or on the remote control or select Keystone in and out. Keystone adjustment can be memorized. (p38) • The arrows are white when there is no correction. • ...be canceled. Press the Point Left button to reduce the left part with Point Right button. Picture Freeze Function Press the FREEZE button on the remote control to freeze the picture on the screen. Basic Operation Zoom Adjustment Move the Zoom Lever to zoom in the Setting Menu (p38). The keystone...
... more while the keystone dialog box is being corrected turns red. • If you press the KEYSTONE button on the top control or on the remote control or select Keystone in and out. Keystone adjustment can be memorized. (p38) • The arrows are white when there is no correction. • ...be canceled. Press the Point Left button to reduce the left part with Point Right button. Picture Freeze Function Press the FREEZE button on the remote control to freeze the picture on the screen. Basic Operation Zoom Adjustment Move the Zoom Lever to zoom in the Setting Menu (p38). The keystone...
Owners Manual
Page 21
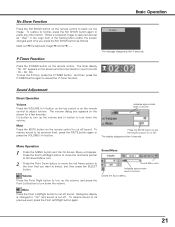
... item in the Setting Menu (p38), the screen changes each time you want to cut off sound. Mute Press the MUTE button on the remote control to select, and then press the SELECT button. To restore sound to its previous level, press the MUTE button again or press the VOLUME ...appears on the screen and the timer starts to adjust volume. Sound Adjustment Direct Operation Volume Press the VOLUME (+/-) button on the top control or on the remote control. indicates approximate level of volume. To restore to set as follows. Press the MUTE button to normal, press the NO SHOW button ...
... item in the Setting Menu (p38), the screen changes each time you want to cut off sound. Mute Press the MUTE button on the remote control to select, and then press the SELECT button. To restore sound to its previous level, press the MUTE button again or press the VOLUME ...appears on the screen and the timer starts to adjust volume. Sound Adjustment Direct Operation Volume Press the VOLUME (+/-) button on the top control or on the remote control. indicates approximate level of volume. To restore to set as follows. Press the MUTE button to normal, press the NO SHOW button ...

Owners Manual
Page 22
... the pointer (red frame) to the Menu icon that you want to adjust, and then press the SELECT button to operate each adjustment on the remote control. Refer to the following pages to show the item data. 4 Adjust the item data by pressing the Point Left/Right button. 3 Press the Point...item that you want to the following pages for details of respective adjustments. 5 To close this projector through the On-Screen Menu. To clear the On-Screen Menu, press the MENU button on the top control or on the On-Screen Menu. OFF INPUT POWER WARNING KEYSTONE SELECT LAMP REPLACE VOLUME - ...
... the pointer (red frame) to the Menu icon that you want to adjust, and then press the SELECT button to operate each adjustment on the remote control. Refer to the following pages to show the item data. 4 Adjust the item data by pressing the Point Left/Right button. 3 Press the Point...item that you want to the following pages for details of respective adjustments. 5 To close this projector through the On-Screen Menu. To clear the On-Screen Menu, press the MENU button on the top control or on the On-Screen Menu. OFF INPUT POWER WARNING KEYSTONE SELECT LAMP REPLACE VOLUME - ...
Owners Manual
Page 24
...Before using these buttons, correct input source should be changed, this projector may not display the digital content protected by pressing the INPUT button on the top control or press the COMPUTER button on the remote control. Press the Point Left/Right button to move the red frame ... the specification be selected through the DVI terminal, select RGB (Analog). NOTE G HDCP (High-bandwidth Digital Content Protection) is decided and controlled by DVI (Digital Visual Interface) from a computer through menu operation as Monitor out. The specification of HDCP is a system for protecting ...
...Before using these buttons, correct input source should be changed, this projector may not display the digital content protected by pressing the INPUT button on the top control or press the COMPUTER button on the remote control. Press the Point Left/Right button to move the red frame ... the specification be selected through the DVI terminal, select RGB (Analog). NOTE G HDCP (High-bandwidth Digital Content Protection) is decided and controlled by DVI (Digital Visual Interface) from a computer through menu operation as Monitor out. The specification of HDCP is a system for protecting ...
Owners Manual
Page 26
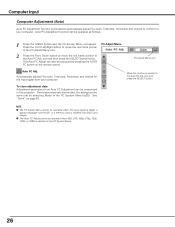
Auto PC Adjustment function can be operated when 480i, 575i, 480p, 575p, 720p, 1035i, or 1080i is selected in this projector. See "Store" on the remote control. PC Adjust Menu Auto PC Adj. To store adjustment data Adjustment parameters from your computer. G The Auto PC Adjust cannot be done just by pressing ...
Auto PC Adjustment function can be operated when 480i, 575i, 480p, 575p, 720p, 1035i, or 1080i is selected in this projector. See "Store" on the remote control. PC Adjust Menu Auto PC Adj. To store adjustment data Adjustment parameters from your computer. G The Auto PC Adjust cannot be done just by pressing ...
Owners Manual
Page 29
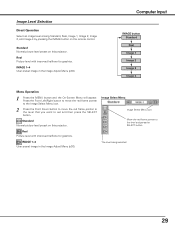
... image level among Standard, Real, Image 1, Image 2, Image 3, and Image 4 by pressing the IMAGE button on this projector. Real Picture level with improved halftone for graphics. Standard Normal picture level preset on the remote control. IMAGE 1~4 User preset image in the Image Adjust Menu (p30). Image Select Menu Image Select Menu icon Move... the red frame pointer to the level that you want to the level and press the SELECT button. Standard Normal picture level preset on this projector. Real Picture level with improved halftone for graphics.
... image level among Standard, Real, Image 1, Image 2, Image 3, and Image 4 by pressing the IMAGE button on this projector. Real Picture level with improved halftone for graphics. Standard Normal picture level preset on the remote control. IMAGE 1~4 User preset image in the Image Adjust Menu (p30). Image Select Menu Image Select Menu icon Move... the red frame pointer to the level that you want to the level and press the SELECT button. Standard Normal picture level preset on this projector. Real Picture level with improved halftone for graphics.
Owners Manual
Page 31
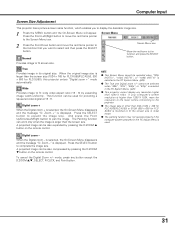
... the remote control. A projected image can work only when the image is modified to fit the screen size in other than XGA (1024 x 768 for PLC-XU55/PLC-XU50) or SVGA (800 x 600 for PLCSU50) is larger than 1280 X 1024, reset the resolution to the lower before connecting to the projector. mode..., press any resolution higher than the screen size (1024 x 768 for PLC-XU55/PLC-XU50, 800 x 600...
... the remote control. A projected image can work only when the image is modified to fit the screen size in other than XGA (1024 x 768 for PLC-XU55/PLC-XU50) or SVGA (800 x 600 for PLCSU50) is larger than 1280 X 1024, reset the resolution to the lower before connecting to the projector. mode..., press any resolution higher than the screen size (1024 x 768 for PLC-XU55/PLC-XU50, 800 x 600...
Owners Manual
Page 32
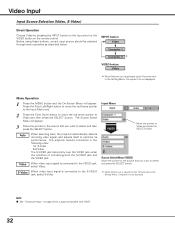
... select Video. S-Video When video input signal is connected to the S-VIDEO jack, select S-Video. NOTE G See "Computer Input" on the remote control. Menu Operation 1 Press the MENU button and the On-Screen Menu will appear. 3 Move the pointer to the source that you want to ...button. Before using these buttons, correct input source should be selected through menu operation as described below. Auto When selecting Auto, the projector automatically detects incoming video signal, and adjusts itself to Video and press the SELECT button. Input Menu VIDEO Move the pointer to ...
... select Video. S-Video When video input signal is connected to the S-VIDEO jack, select S-Video. NOTE G See "Computer Input" on the remote control. Menu Operation 1 Press the MENU button and the On-Screen Menu will appear. 3 Move the pointer to the source that you want to ...button. Before using these buttons, correct input source should be selected through menu operation as described below. Auto When selecting Auto, the projector automatically detects incoming video signal, and adjusts itself to Video and press the SELECT button. Input Menu VIDEO Move the pointer to ...
Owners Manual
Page 33
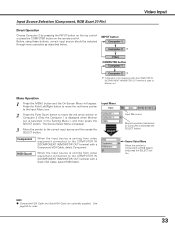
... Input Input Source Selection (Component, RGB Scart 21-Pin) Direct Operation Choose Computer 2 by pressing the INPUT button on the top control or press the COMPUTER button on the remote control. Before using these buttons, correct input source should be selected through menu operation as Monitor out. Menu Operation 1 Press the MENU button...
... Input Input Source Selection (Component, RGB Scart 21-Pin) Direct Operation Choose Computer 2 by pressing the INPUT button on the top control or press the COMPUTER button on the remote control. Before using these buttons, correct input source should be selected through menu operation as Monitor out. Menu Operation 1 Press the MENU button...
Owners Manual
Page 35
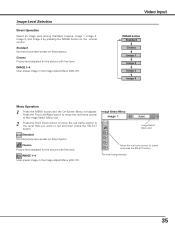
...preset image in the Image Adjust Menu (p36, 37). The level being selected. 35 Standard Normal picture level preset on this projector. Cinema Picture level adjusted for the picture with fine tone. Image Select Menu Image Select Menu icon Move the red frame pointer ...Image 2 Image 3 Image 4 Menu Operation 1 Press the MENU button and the On-Screen Menu will appear. Standard Normal picture level preset on the remote control. IMAGE 1~4 User preset image in the Image Adjust Menu (p36, 37). Image Level Selection Direct Operation Select an image level among Standard, Cinema, ...
...preset image in the Image Adjust Menu (p36, 37). The level being selected. 35 Standard Normal picture level preset on this projector. Cinema Picture level adjusted for the picture with fine tone. Image Select Menu Image Select Menu icon Move the red frame pointer ...Image 2 Image 3 Image 4 Menu Operation 1 Press the MENU button and the On-Screen Menu will appear. Standard Normal picture level preset on the remote control. IMAGE 1~4 User preset image in the Image Adjust Menu (p36, 37). Image Level Selection Direct Operation Select an image level among Standard, Cinema, ...
Owners Manual
Page 39
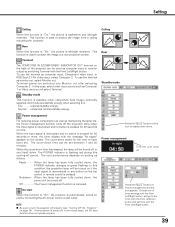
...lamp has been fully cooled down starts for 30 seconds or more , the timer display with the message "No signal" appears on the top control or remote control is pressed for 30 seconds or more . NOTE G Be sure to cool itself down. Eco ···· reduces standby energy...reduces standby energy when selecting Eco. Rear When this case, select other items. Power management Time left until Lamp off to turn the projector off period. This function is flashing red during this condition, the projection lamp will select Terminal. The POWER indicator is used to display ...
...lamp has been fully cooled down starts for 30 seconds or more , the timer display with the message "No signal" appears on the top control or remote control is pressed for 30 seconds or more . NOTE G Be sure to cool itself down. Eco ···· reduces standby energy...reduces standby energy when selecting Eco. Rear When this case, select other items. Power management Time left until Lamp off to turn the projector off period. This function is flashing red during this condition, the projection lamp will select Terminal. The POWER indicator is used to display ...


