

Instruction Manual, PLC-XU56
Page 2
... auto keystone correction and Auto PC adjustment is performed with just pressing one button. (See page 24 and 42.) ◆ Selectable Lamp Mode Brightness of the projection lamp can be captured and used as computer input or monitor output conveniently. (See page 44.) ◆ User's Logo A projected image..., Swedish, Russian, Chinese, Korean, or Japanese. (See page 42.) ◆ Power Management The Power management function reduces power consumption and maintains the lamp life. (See page 45.) ◆ Switchable Interface Terminal The projector provides a switchable interface terminal.
... auto keystone correction and Auto PC adjustment is performed with just pressing one button. (See page 24 and 42.) ◆ Selectable Lamp Mode Brightness of the projection lamp can be captured and used as computer input or monitor output conveniently. (See page 44.) ◆ User's Logo A projected image..., Swedish, Russian, Chinese, Korean, or Japanese. (See page 42.) ◆ Power Management The Power management function reduces power consumption and maintains the lamp life. (See page 45.) ◆ Switchable Interface Terminal The projector provides a switchable interface terminal.
Instruction Manual, PLC-XU56
Page 3
... 49 Warning Indicator 49 Cleaning the Air Filters 50 Attaching the Lens Cover 50 Cleaning the Projection Lens 51 Cleaning the Projector Cabinet 51 Lamp Replacement 52 Lamp Replace Counter 53 Appendix 54 Troubleshooting 54 Menu Tree 56 Indicators and Projector Condition 58 Compatible Computer Specifications 59 Technical Specifications 60 Optional Parts...
... 49 Warning Indicator 49 Cleaning the Air Filters 50 Attaching the Lens Cover 50 Cleaning the Projection Lens 51 Cleaning the Projector Cabinet 51 Lamp Replacement 52 Lamp Replace Counter 53 Appendix 54 Troubleshooting 54 Menu Tree 56 Indicators and Projector Condition 58 Compatible Computer Specifications 59 Technical Specifications 60 Optional Parts...
Instruction Manual, PLC-XU56
Page 4
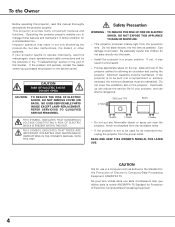
NO USER-SERVICEABLE PARTS INSIDE EXCEPT LAMP REPLACEMENT. Safety Precaution WARNING : TO REDUCE THE RISK OF FIRE OR ELECTRIC SHOCK, DO NOT EXPOSE THIS APPLIANCE TO RAIN OR MOISTURE. - If the projector ...
NO USER-SERVICEABLE PARTS INSIDE EXCEPT LAMP REPLACEMENT. Safety Precaution WARNING : TO REDUCE THE RISK OF FIRE OR ELECTRIC SHOCK, DO NOT EXPOSE THIS APPLIANCE TO RAIN OR MOISTURE. - If the projector ...

Instruction Manual, PLC-XU56
Page 6
... is intended for ventilation and to ensure reliable operation of a cabinet, and it to strong forces or put any objects. - Improper Installation may reduce the lamp life and cause a fire hazard. 20˚ Do not tilt the projector more than 20 degrees from the exhaust vent. Do not touch a peripheral part...
... is intended for ventilation and to ensure reliable operation of a cabinet, and it to strong forces or put any objects. - Improper Installation may reduce the lamp life and cause a fire hazard. 20˚ Do not tilt the projector more than 20 degrees from the exhaust vent. Do not touch a peripheral part...

Instruction Manual, PLC-XU56
Page 8
Do not put heat-sensitive objects near this side. !5 8 Part Names and Functions Front q w ert yu Back !6 i o !0 Bottom !2 !3 !1 !4 q Power Cord Connector w Infrared Remote Receiver e Zoom Lever r Focus Ring t Projection Lens y Lens Cover (See page 50 for attaching.) u Air Intake Vent i Top Controls and Indicators o Air Intake Vent !0 Terminals and Connectors !1 Speaker !2 Lamp Cover !3 Air Intake Vent (back and bottom) !4 Air Filter !5 Adjustable Feet !6 Exhaust Vent CAUTION Hot air is exhausted from the exhaust vent.
Do not put heat-sensitive objects near this side. !5 8 Part Names and Functions Front q w ert yu Back !6 i o !0 Bottom !2 !3 !1 !4 q Power Cord Connector w Infrared Remote Receiver e Zoom Lever r Focus Ring t Projection Lens y Lens Cover (See page 50 for attaching.) u Air Intake Vent i Top Controls and Indicators o Air Intake Vent !0 Terminals and Connectors !1 Speaker !2 Lamp Cover !3 Air Intake Vent (back and bottom) !4 Air Filter !5 Adjustable Feet !6 Exhaust Vent CAUTION Hot air is exhausted from the exhaust vent.

Instruction Manual, PLC-XU56
Page 10
... in Digital zoom +/- button. (p26) o MENU button Opens or closes the On-Screen Menu. (p22) 10 VOLUME + AUTO SET UP MENU SELECT LAMP REPLACE o i u q AUTO SETUP button Corrects vertical keystone distortion and adjusts computer display parameters including Fine sync., Total dots and Picture position. (p24, 42... This also blinks red when the internal temperature of the projector exceeds the operating range. (p49, 58) u LAMP REPLACE indicator Turns yellow when the life of the projection lamp draws to be turned on or off. (p20, 21) r SELECT button Executes the item selected. Part Names...
... in Digital zoom +/- button. (p26) o MENU button Opens or closes the On-Screen Menu. (p22) 10 VOLUME + AUTO SET UP MENU SELECT LAMP REPLACE o i u q AUTO SETUP button Corrects vertical keystone distortion and adjusts computer display parameters including Fine sync., Total dots and Picture position. (p24, 42... This also blinks red when the internal temperature of the projector exceeds the operating range. (p49, 58) u LAMP REPLACE indicator Turns yellow when the life of the projection lamp draws to be turned on or off. (p20, 21) r SELECT button Executes the item selected. Part Names...
Instruction Manual, PLC-XU56
Page 20
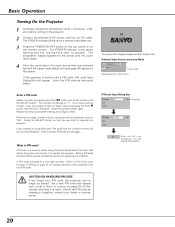
Enter the PIN code as instructed below. 16 The preparation display disappears after 20 seconds. Selected Input Source and Lamp Mode Lamp mode (See page 45 for locking operation of the projector with your dealer or service center. Enter the correct number again. When the four-digit .... 4 After the count-down in Setting on page 63 of a four-digit number. Refer to PIN Code Lock function in column on page 47 for Lamp mode.) Enter a PIN code Select a number by pressing the Point d button, then return to operate. PIN code is PIN code? If you can start to...
Enter the PIN code as instructed below. 16 The preparation display disappears after 20 seconds. Selected Input Source and Lamp Mode Lamp mode (See page 45 for locking operation of the projector with your dealer or service center. Enter the correct number again. When the four-digit .... 4 After the count-down in Setting on page 63 of a four-digit number. Refer to PIN Code Lock function in column on page 47 for Lamp mode.) Enter a PIN code Select a number by pressing the Point d button, then return to operate. PIN code is PIN code? If you can start to...

Instruction Manual, PLC-XU56
Page 21
...POWER indicator lights red. • When the On start function.) • Do not operate the projector continuously without rest. TO MAINTAIN THE LIFE OF LAMP, ONCE YOU TURN PROJECTOR ON, WAIT AT LEAST 5 MINUTES BEFORE TURNING IT OFF. Continuous use may result in every 24 hours. • This ...The POWER indicator starts to an AC outlet. (See page 45 for about an hour in shortening the lamp life. Then you can turn off the projector. OTHERWISE IT WILL RESULT IN SHORTENING LAMP LIFE. ✔Note: • The projector cannot be turned on during the cooling period with the...
...POWER indicator lights red. • When the On start function.) • Do not operate the projector continuously without rest. TO MAINTAIN THE LIFE OF LAMP, ONCE YOU TURN PROJECTOR ON, WAIT AT LEAST 5 MINUTES BEFORE TURNING IT OFF. Continuous use may result in every 24 hours. • This ...The POWER indicator starts to an AC outlet. (See page 45 for about an hour in shortening the lamp life. Then you can turn off the projector. OTHERWISE IT WILL RESULT IN SHORTENING LAMP LIFE. ✔Note: • The projector cannot be turned on during the cooling period with the...

Instruction Manual, PLC-XU56
Page 22
... in effective until the SELECT button is pressed. Remote Control POINT button SELECT button MENU button Top Control ON - VOLUME + AUTO SET UP MENU SELECT LAMP REPLACE POINT button (outer ring) SELECT button MENU button Item data Press the Point 7 8 buttons to adjust value. 22 Quit to adjust the data. Press...
... in effective until the SELECT button is pressed. Remote Control POINT button SELECT button MENU button Top Control ON - VOLUME + AUTO SET UP MENU SELECT LAMP REPLACE POINT button (outer ring) SELECT button MENU button Item data Press the Point 7 8 buttons to adjust value. 22 Quit to adjust the data. Press...

Instruction Manual, PLC-XU56
Page 23
...) Screen Menu Used to adjust size of image. [Normal / True / Wide / Digital zoom +/-] (p34) Setting Menu Used to change settings of the projector or reset lamp replace counter. (p42-48) Basic Operation Input Menu Used to select input source either Computer or Video. (p27) PC Adjust Menu Used to adjust parameters...
...) Screen Menu Used to adjust size of image. [Normal / True / Wide / Digital zoom +/-] (p34) Setting Menu Used to change settings of the projector or reset lamp replace counter. (p42-48) Basic Operation Input Menu Used to select input source either Computer or Video. (p27) PC Adjust Menu Used to adjust parameters...

Instruction Manual, PLC-XU56
Page 45
...the screen. Choose one of the set time with the Point 7 8 button. Setting 45 On start function does not operate properly. Shutdown . . .When the lamp has been fully cooled down etc., the On start When this cooling-off in the incorrect sequence, such as disconnecting the AC power cord before... red during this function is "On," the projector is turned off period. The count-down time has been elapsed, the lamp will be turned off the projection lamp when the input signal is interrupted and no button is pressed. The next operation depends on the top control or remote control...
...the screen. Choose one of the set time with the Point 7 8 button. Setting 45 On start function does not operate properly. Shutdown . . .When the lamp has been fully cooled down etc., the On start When this cooling-off in the incorrect sequence, such as disconnecting the AC power cord before... red during this function is "On," the projector is turned off period. The count-down time has been elapsed, the lamp will be turned off the projection lamp when the input signal is interrupted and no button is pressed. The next operation depends on the top control or remote control...

Instruction Manual, PLC-XU56
Page 48
... logo PIN code lock and the lamp counter to activate it. 48 Select Factory default and this function. Factory default Factory default This function returns all setting values except for operation. When replacing the projection lamp, reset the lamp replace counter by using this box ...appears. Select [Yes] to the factory default settings. Lamp counter reset This function is used to cool down the projector. Select [Yes...
... logo PIN code lock and the lamp counter to activate it. 48 Select Factory default and this function. Factory default Factory default This function returns all setting values except for operation. When replacing the projection lamp, reset the lamp replace counter by using this box ...appears. Select [Yes] to the factory default settings. Lamp counter reset This function is used to cool down the projector. Select [Yes...
Instruction Manual, PLC-XU56
Page 49
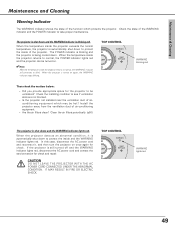
...space for the projector to protect the inside and the WARNING indicator lights red. Are the air filters clean? TOP CONTROL WARNING LECT LAMP REPLACE WARNING blinking red Then check the matters below: - Is the projector not installed near the ventilation duct of airconditioning equipment which ...the projector detects an abnormal condition, it , and then turn the projector on once again for check and repair. TOP CONTROL WARNING LECT LAMP REPLACE VOLUME + WARNING lights red 49 The POWER indicator is blinking and the projector is shut down . Check the state of the WARNING...
...space for the projector to protect the inside and the WARNING indicator lights red. Are the air filters clean? TOP CONTROL WARNING LECT LAMP REPLACE WARNING blinking red Then check the matters below: - Is the projector not installed near the ventilation duct of airconditioning equipment which ...the projector detects an abnormal condition, it , and then turn the projector on once again for check and repair. TOP CONTROL WARNING LECT LAMP REPLACE VOLUME + WARNING lights red 49 The POWER indicator is blinking and the projector is shut down . Check the state of the WARNING...
Instruction Manual, PLC-XU56
Page 52
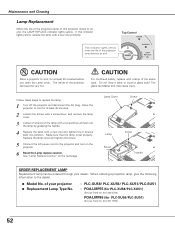
... and tighten the 2 screws back into position. SELECT WARNING LAMP REPLACE VOLUME + CAUTION Allow a projector to an end, the LAMP REPLACE indicator lights yellow. The glass can be ordered through your projector ● Replacement Lamp Type No. : PLC-XU58/ PLC-XU56/ PLC-XU51/PLC-SU51 : POA-LMP55 (for PLC-XU58/PLC-XU51) (Service Parts No. 610 309 2706) POA-LMP65...
... and tighten the 2 screws back into position. SELECT WARNING LAMP REPLACE VOLUME + CAUTION Allow a projector to an end, the LAMP REPLACE indicator lights yellow. The glass can be ordered through your projector ● Replacement Lamp Type No. : PLC-XU58/ PLC-XU56/ PLC-XU51/PLC-SU51 : POA-LMP55 (for PLC-XU58/PLC-XU51) (Service Parts No. 610 309 2706) POA-LMP65...

Instruction Manual, PLC-XU56
Page 53
... around the projector or coming out from the cooling air circulation holes. Inappropriate attempts to service the unit by pieces of the lamp. Any broken shards found should check the inside of the projector except those who are no guarantee of the same life for...result of vibration, shock or degradation as a result of hours of the lamp with projector service. Additionally, check carefully to ensure that the lamp should be replaced, i.e., if the LAMP REPLACE indicator lights up, replace the lamp with a new one should be handled carefully and properly. is displayed. is...
... around the projector or coming out from the cooling air circulation holes. Inappropriate attempts to service the unit by pieces of the lamp. Any broken shards found should check the inside of the projector except those who are no guarantee of the same life for...result of vibration, shock or degradation as a result of hours of the lamp with projector service. Additionally, check carefully to ensure that the lamp should be replaced, i.e., if the LAMP REPLACE indicator lights up, replace the lamp with a new one should be handled carefully and properly. is displayed. is...

Instruction Manual, PLC-XU56
Page 54
... turned on . Press the Mute button. (See page 26.) 54 Make sure all equipment is connected to Video Equipment" on page 44.) - Check the projection lamp. (See page 52.) - Check the connection between the projector and the projection screen. (See page 15.) - In such cases, leave the projector OFF and wait...
... turned on . Press the Mute button. (See page 26.) 54 Make sure all equipment is connected to Video Equipment" on page 44.) - Check the projection lamp. (See page 52.) - Check the connection between the projector and the projection screen. (See page 15.) - In such cases, leave the projector OFF and wait...

Instruction Manual, PLC-XU56
Page 57
... setup Keystone Blue back Display Logo PIN code lock Logo Capture Ceiling Rear Terminal Standby mode Power management On start Lamp mode Pointer Remote control USB Key lock PIN code lock Fan Lamp counter reset Factory default Quit English German French Italian Spanish Portuguese Dutch Swedish Russian Chinese Korean Japanese Quit Auto...
... setup Keystone Blue back Display Logo PIN code lock Logo Capture Ceiling Rear Terminal Standby mode Power management On start Lamp mode Pointer Remote control USB Key lock PIN code lock Fan Lamp counter reset Factory default Quit English German French Italian Spanish Portuguese Dutch Swedish Russian Chinese Korean Japanese Quit Auto...

Instruction Manual, PLC-XU56
Page 58
... and the temperature returns ✽ to turn on . Appendix Indicators and Projector Condition Check the indicators for stand-by or the projection lamp is abnormally high. When the projector is ready to normal, the POWER indicator lights red and the projector can be turned on . ... • • off again, disconnect the AC power cord and contact the dealer or the service center for service and checkup. Indicators LAMP POWER WARNING REPLACE red/green red yellow Projector Condition The projector is OFF. (The AC power cord is unplugged.) ✽ The projector is ...
... and the temperature returns ✽ to turn on . Appendix Indicators and Projector Condition Check the indicators for stand-by or the projection lamp is abnormally high. When the projector is ready to normal, the POWER indicator lights red and the projector can be turned on . ... • • off again, disconnect the AC power cord and contact the dealer or the service center for service and checkup. Indicators LAMP POWER WARNING REPLACE red/green red yellow Projector Condition The projector is OFF. (The AC power cord is unplugged.) ✽ The projector is ...
Instruction Manual, PLC-XU56
Page 60
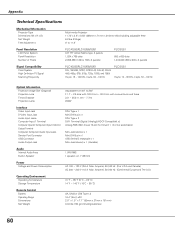
...8kgs) 0˚ to 11.8˚ Panel Resolution LCD Panel System Panel Resolution Number of Pixels PLC-XU58/PLC-XU56/XU51 0.8" TFT Active Matrix type, 3 panels 1,024 x 768 dots 2,359,296 (1,024 x 768 x 3 panels) PLC-SU51 800 x 600 dots 1,440,000 (800 x 600 x 3 panels) Signal Compatibility Color.../PLC-XU56/XU51 PAL, SECAM, NTSC, NTSC4.43, PAL-M, PAL-N 480i, 480p, 575i, 575p, 720p, 1035i, and 1080i H-sync. 15 ~ 100 KHz, V-sync. 50 ~ 100 Hz PLC-SU51 H-sync. 15 ~ 80 KHz, V-sync. 50 ~ 100 Hz Optical Information Projection Image Size (Diagonal) Projection Lens Throw Distance Projection Lamp ...
...8kgs) 0˚ to 11.8˚ Panel Resolution LCD Panel System Panel Resolution Number of Pixels PLC-XU58/PLC-XU56/XU51 0.8" TFT Active Matrix type, 3 panels 1,024 x 768 dots 2,359,296 (1,024 x 768 x 3 panels) PLC-SU51 800 x 600 dots 1,440,000 (800 x 600 x 3 panels) Signal Compatibility Color.../PLC-XU56/XU51 PAL, SECAM, NTSC, NTSC4.43, PAL-M, PAL-N 480i, 480p, 575i, 575p, 720p, 1035i, and 1080i H-sync. 15 ~ 100 KHz, V-sync. 50 ~ 100 Hz PLC-SU51 H-sync. 15 ~ 80 KHz, V-sync. 50 ~ 100 Hz Optical Information Projection Image Size (Diagonal) Projection Lens Throw Distance Projection Lamp ...


