Owners Manual
Page 2
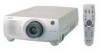
..., DO NOT REMOVE COVER (OR BACK). NO USERSERVICEABLE PARTS INSIDE EXCEPT LAMP REPLACEMENT. This projector provides many convenient features and functions. Improper operation may result in not only shortening the product-life, but also malfunctions, fire hazard, or other accidents. If your projector, and can near the projector, hot air is not to operate improperly, read this manual again, check operations and cable connections and try the...
..., DO NOT REMOVE COVER (OR BACK). NO USERSERVICEABLE PARTS INSIDE EXCEPT LAMP REPLACEMENT. This projector provides many convenient features and functions. Improper operation may result in not only shortening the product-life, but also malfunctions, fire hazard, or other accidents. If your projector, and can near the projector, hot air is not to operate improperly, read this manual again, check operations and cable connections and try the...

Owners Manual
Page 3
... to rain or use liquid or aerosol cleaners. Do not expose this projector yourself as improper adjustment of other controls may expose you are provided for long periods of time, unplug it from overheating. Refer all warnings and instructions marked on the marking label. e. f. This will often require extensive work by persons walking on the power cord. This projector should be placed...
... to rain or use liquid or aerosol cleaners. Do not expose this projector yourself as improper adjustment of other controls may expose you are provided for long periods of time, unplug it from overheating. Refer all warnings and instructions marked on the marking label. e. f. This will often require extensive work by persons walking on the power cord. This projector should be placed...
Owners Manual
Page 5
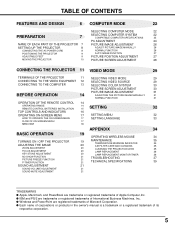
... OPERATION OF THE REMOTE CONTROL 14 OPERATING RANGE REMOTE CONTROL BATTERIES INSTALLATION 14 15 SETTING 32 TOP CONTROLS AND INDICATORS 16 OPERATING ON-SCREEN MENU 17 SETTING MENU 32 HOW TO OPERATE THE ON-SCREEN MENU 17 SETTING LANGUAGE 33 FLOW OF ON-SCREEN MENU 17 MENU BAR 18 APPENDIX 34 BASIC OPERATION 19 OPERATING WIRELESS MOUSE 34 TURNING ON / OFF THE PROJECTOR 19 MAINTENANCE TEMPERATURE WARNING INDICATOR 35 35 ADJUSTING THE IMAGE 20 AIR FILTER CARE AND CLEANING 35 ZOOM ADJUSTMENT 20 CLEANING THE PROJECTION LENS 35 FOCUS ADJUSTMENT 20 LAMP REPLACEMENT...
... OPERATION OF THE REMOTE CONTROL 14 OPERATING RANGE REMOTE CONTROL BATTERIES INSTALLATION 14 15 SETTING 32 TOP CONTROLS AND INDICATORS 16 OPERATING ON-SCREEN MENU 17 SETTING MENU 32 HOW TO OPERATE THE ON-SCREEN MENU 17 SETTING LANGUAGE 33 FLOW OF ON-SCREEN MENU 17 MENU BAR 18 APPENDIX 34 BASIC OPERATION 19 OPERATING WIRELESS MOUSE 34 TURNING ON / OFF THE PROJECTOR 19 MAINTENANCE TEMPERATURE WARNING INDICATOR 35 35 ADJUSTING THE IMAGE 20 AIR FILTER CARE AND CLEANING 35 ZOOM ADJUSTMENT 20 CLEANING THE PROJECTION LENS 35 FOCUS ADJUSTMENT 20 LAMP REPLACEMENT...
Owners Manual
Page 6
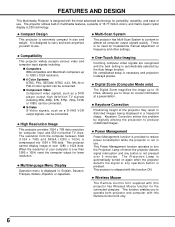
... troublesome manual adjustment of frequency and other settings. It is designed to carry and work anywhere you wish to use . When the resolution of your computer is pressed. This Power Management function operates to produce undistorted images. q 6 Color Systems NTSC, PAL, SECAM, NTSC 4.43, PAL-M or PAL-N color system can be connected. x High Resolution Image This projector provides 1024 x 768 dots resolution for lower resolution. x One-Touch Auto Imaging Incoming computer video signals...
... troublesome manual adjustment of frequency and other settings. It is designed to carry and work anywhere you wish to use . When the resolution of your computer is pressed. This Power Management function operates to produce undistorted images. q 6 Color Systems NTSC, PAL, SECAM, NTSC 4.43, PAL-M or PAL-N color system can be connected. x High Resolution Image This projector provides 1024 x 768 dots resolution for lower resolution. x One-Touch Auto Imaging Incoming computer video signals...

Owners Manual
Page 7
... the internal temperature and automatically controls the operating power of any object, especially heat-sensitive object. PREPARATION NAME OF EACH PART OF THE PROJECTOR FRONT OF THE CABINET PROJECTION LENS ZOOM RING FOCUS RING SPEAKER (Monaural) LENS COVER INFRARED REMOTE RECEIVER BACK OF THE CABINET TERMINALS AND CONNECTORS AIR INTAKE VENTS (Both sides and Rear) This projector is used. q Do not touch this vent. q Keep sides and...
... the internal temperature and automatically controls the operating power of any object, especially heat-sensitive object. PREPARATION NAME OF EACH PART OF THE PROJECTOR FRONT OF THE CABINET PROJECTION LENS ZOOM RING FOCUS RING SPEAKER (Monaural) LENS COVER INFRARED REMOTE RECEIVER BACK OF THE CABINET TERMINALS AND CONNECTORS AIR INTAKE VENTS (Both sides and Rear) This projector is used. q Do not touch this vent. q Keep sides and...
Owners Manual
Page 8
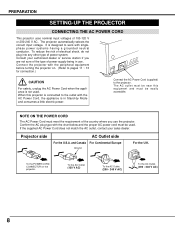
...) To the AC Outlet. (200 - 240 V AC) 8 PREPARATION SETTING-UP THE PROJECTOR CONNECTING THE AC POWER CORD This projector uses nominal input voltages of power system. The projector automatically selects the correct input voltage. Projector side AC Outlet side For the U.S.A. The AC outlet must be near this projector is not used . It is in use the projector. To reduce the risk of electrical shock, do...
...) To the AC Outlet. (200 - 240 V AC) 8 PREPARATION SETTING-UP THE PROJECTOR CONNECTING THE AC POWER CORD This projector uses nominal input voltages of power system. The projector automatically selects the correct input voltage. Projector side AC Outlet side For the U.S.A. The AC outlet must be near this projector is not used . It is in use the projector. To reduce the risk of electrical shock, do...

Owners Manual
Page 11
... CONTROL PORT CONNECTOR Terminal : DIN 8-PIN Connect control port (PS/2, Serial or ADB port) on your personal computer to this terminal. (Refer to be done by pressing the RESET button with the VGA Cable (supplied). sync. 7 Ground (Green) 15 Reserved 8 Ground (Blue) PS/2 Serial 1 ----- T X D 7 GND GND 8 ----- Occasionally, the micro processor may malfunction and need to P12, 13.) VIDEO S - Pin Configuration 876 5 43 21 1 Red Input 9 No Connect 2 Green Input 10 Ground (Vert.sync.) 3 Blue Input...
... CONTROL PORT CONNECTOR Terminal : DIN 8-PIN Connect control port (PS/2, Serial or ADB port) on your personal computer to this terminal. (Refer to be done by pressing the RESET button with the VGA Cable (supplied). sync. 7 Ground (Green) 15 Reserved 8 Ground (Blue) PS/2 Serial 1 ----- T X D 7 GND GND 8 ----- Occasionally, the micro processor may malfunction and need to P12, 13.) VIDEO S - Pin Configuration 876 5 43 21 1 Red Input 9 No Connect 2 Green Input 10 Ground (Vert.sync.) 3 Blue Input...

Owners Manual
Page 14
... SELECT button. Operating Range Point the remote control toward the projector (the Remote Receiver) whenever pressing the buttons. And turn the projector on or off. (P19) COMPUTER BUTTON Used to select COMPUTER input source. (P22) VIDEO BUTTON Used to select VIDEO source. (P29) RIGHT CLICK BUTTON Used to compress the image in DIGITAL ZOOM mode. (P28) It is also used as a PC mouse in Wireless Mouse Operation. (P34) POINT BUTTON Used to move the pointer on the MENU, to adjust the...
... SELECT button. Operating Range Point the remote control toward the projector (the Remote Receiver) whenever pressing the buttons. And turn the projector on or off. (P19) COMPUTER BUTTON Used to select COMPUTER input source. (P22) VIDEO BUTTON Used to select VIDEO source. (P29) RIGHT CLICK BUTTON Used to compress the image in DIGITAL ZOOM mode. (P28) It is also used as a PC mouse in Wireless Mouse Operation. (P34) POINT BUTTON Used to move the pointer on the MENU, to adjust the...

Owners Manual
Page 16
... turned on . BEFORE OPERATION TOP CONTROLS AND INDICATORS MENU BUTTON Used to open or close the MENU operation. (P17, 18) POWER ON-OFF BUTTON Used to turn the projector on or off. (P19) POINT BUTTONS Used to select an item or adjust the value in Power Management mode. (P33) WIDE TELE ON - OFF MENU NORMAL MODE LAMP WARNING REPLACE TEMP. And it flashes green in the MENU. READY LAMP NORMAL BUTTON Used to reset to normal picture adjustment preset by mode. 16 It is in DIGITAL ZOOM mode. (P28) WARNING TEMP...
... turned on . BEFORE OPERATION TOP CONTROLS AND INDICATORS MENU BUTTON Used to open or close the MENU operation. (P17, 18) POWER ON-OFF BUTTON Used to turn the projector on or off. (P19) POINT BUTTONS Used to select an item or adjust the value in Power Management mode. (P33) WIDE TELE ON - OFF MENU NORMAL MODE LAMP WARNING REPLACE TEMP. And it flashes green in the MENU. READY LAMP NORMAL BUTTON Used to reset to normal picture adjustment preset by mode. 16 It is in DIGITAL ZOOM mode. (P28) WARNING TEMP...

Owners Manual
Page 18
... VIDEO MODE Press MENU BUTTON while in Video mode. MODE MENU Used to select the Video input. (Refer to P29) IMAGE MENU Used to adjust the picture image. [Color / Tint / White Balance / Contrast / Brightness/ Sharpness / Gamma] (Refer to P31) Same function as the Computer Mode. 18 SYSTEM MENU Used to select a color system of the selected video source. (Refer to P30) VIDEO SOURCE MENU Used to select a video source among [Video, S-Video, and Y, Pb/Cb, Pr/Cr]. (Refer to P29) SCREEN MENU Used to set the Display Menu and reset Lamp Replacement...
... VIDEO MODE Press MENU BUTTON while in Video mode. MODE MENU Used to select the Video input. (Refer to P29) IMAGE MENU Used to adjust the picture image. [Color / Tint / White Balance / Contrast / Brightness/ Sharpness / Gamma] (Refer to P31) Same function as the Computer Mode. 18 SYSTEM MENU Used to select a color system of the selected video source. (Refer to P30) VIDEO SOURCE MENU Used to select a video source among [Video, S-Video, and Y, Pb/Cb, Pr/Cr]. (Refer to P29) SCREEN MENU Used to set the Display Menu and reset Lamp Replacement...
Owners Manual
Page 19
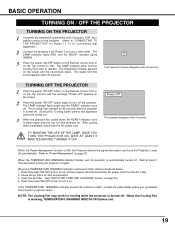
... Control to flash, follow procedures below: 1. The LAMP indicator lights bright and the READY indicator turns off ? The Cooling Fans operate for cooling while the projector is ON, the Projector detects the signal interruption and turns the Projection Lamp off the projector and disconnect the AC power cord from the source appears after 30 seconds. 30 The Preparation Display disappears after 4 seconds. After cooling down starts. Power off . When the TEMPERATURE WARNING indicator flashes red, the projector is working, TEMPERATURE WARNING INDICATOR flashes red...
... Control to flash, follow procedures below: 1. The LAMP indicator lights bright and the READY indicator turns off ? The Cooling Fans operate for cooling while the projector is ON, the Projector detects the signal interruption and turns the Projection Lamp off the projector and disconnect the AC power cord from the source appears after 30 seconds. 30 The Preparation Display disappears after 4 seconds. After cooling down starts. Power off . When the TEMPERATURE WARNING indicator flashes red, the projector is working, TEMPERATURE WARNING INDICATOR flashes red...
Owners Manual
Page 22
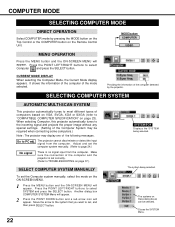
... Remote Control Unit. When selecting Computer, this projector automatically tunes to the incoming signal and projects the proper image without any special settings. (Setting of the Computer System may display one of the mode selected. Another dialog box COMPUTER SYSTEM Menu will appear. 2 Press the POINT DOWN button and a red-arrow icon will appear. Closes the SYSTEM Menu. MODE button COMPUTER VIDEO MENU OPERATION Press the MENU button and the ON-SCREEN MENU...
... Remote Control Unit. When selecting Computer, this projector automatically tunes to the incoming signal and projects the proper image without any special settings. (Setting of the Computer System may display one of the mode selected. Another dialog box COMPUTER SYSTEM Menu will appear. 2 Press the POINT DOWN button and a red-arrow icon will appear. Closes the SYSTEM Menu. MODE button COMPUTER VIDEO MENU OPERATION Press the MENU button and the ON-SCREEN MENU...

Owners Manual
Page 28
.../RIGHT buttons. q The image data in other than 1280 X 1024, reset the resolution to the lower before connecting the projector. Correct the Keystone distortion by degrees. Digital Zoom To adjust the image size or pan the image, select Digital zoom in the dialog box. Move the arrow to the function that you to display the desirable image size. 1 Press the MENU button and the ON-SCREEN MENU will appear. Another dialog box PICTURE SCREEN Menu will...
.../RIGHT buttons. q The image data in other than 1280 X 1024, reset the resolution to the lower before connecting the projector. Correct the Keystone distortion by degrees. Digital Zoom To adjust the image size or pan the image, select Digital zoom in the dialog box. Move the arrow to the function that you to display the desirable image size. 1 Press the MENU button and the ON-SCREEN MENU will appear. Another dialog box PICTURE SCREEN Menu will...

Owners Manual
Page 32
... the left / right reversed picture is provided to project the image to show all the On-Screen Displays. To restore the sound, set by pressing the VOLUME (+/-) button on the screen when the input source is provided to 63.) The sound volume can be also adjusted by pressing the MUTE button on the remote control unit. SETTING SETTING MENU 1 Press the MENU button and the ON-SCREEN MENU will appear. Volume Press POINT...
... the left / right reversed picture is provided to project the image to show all the On-Screen Displays. To restore the sound, set by pressing the VOLUME (+/-) button on the screen when the input source is provided to 63.) The sound volume can be also adjusted by pressing the MUTE button on the remote control unit. SETTING SETTING MENU 1 Press the MENU button and the ON-SCREEN MENU will appear. Volume Press POINT...

Owners Manual
Page 33
... any button on again (Power Management mode). When replacing the lamp, reset the lamp replacement monitor timer by using this function ON.) Power Management function operates to set , and then press the SELECT button. When the Projection Lamp turned off, the READY indicator turns off . Move the Pointer to the language that you want to set , and then press the SELECT button. 33 The Cooling Fans operate for a certain period in the ON-SCREEN MENU...
... any button on again (Power Management mode). When replacing the lamp, reset the lamp replacement monitor timer by using this function ON.) Power Management function operates to set , and then press the SELECT button. When the Projection Lamp turned off, the READY indicator turns off . Move the Pointer to the language that you want to set , and then press the SELECT button. 33 The Cooling Fans operate for a certain period in the ON-SCREEN MENU...

Owners Manual
Page 34
... projector but also usable as a wireless mouse for the wireless mouse operation. SELECT button (left button in your computer to the Control Port of your computer. The POINT buttons and the two CLICK buttons are pressing. When the computer is switched on the screen. POINT button (Move the pointer) SELECT (LEFT CLICK) button This button has the same function as the right button in Menu mode. INSTALLATION To use the Wireless Remote Control...
... projector but also usable as a wireless mouse for the wireless mouse operation. SELECT button (left button in your computer to the Control Port of your computer. The POINT buttons and the two CLICK buttons are pressing. When the computer is switched on the screen. POINT button (Move the pointer) SELECT (LEFT CLICK) button This button has the same function as the right button in Menu mode. INSTALLATION To use the Wireless Remote Control...
Owners Manual
Page 35
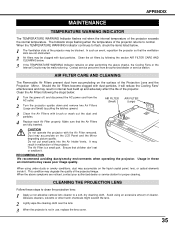
...particles. 4 Replace each Air Filter properly. APPENDIX MAINTENANCE TEMPERATURE WARNING INDICATOR The TEMPERATURE WARNING Indicator flashes red when the internal temperature of cleaner. Contact service personnel from the AC outlet. 2 Turn the projector upside down and remove two Air Filters (Large and Small) by following the steps below . 3 If the TEMPERATURE WARNING Indicator remains on the liquid crystal panel, lens, or optical elements inside it . AIR FILTER (Small) AIR FILTER (Large) 3 Clean the Air Filters with the Air Filter removed. Should the Air Filters become clogged...
...particles. 4 Replace each Air Filter properly. APPENDIX MAINTENANCE TEMPERATURE WARNING INDICATOR The TEMPERATURE WARNING Indicator flashes red when the internal temperature of cleaner. Contact service personnel from the AC outlet. 2 Turn the projector upside down and remove two Air Filters (Large and Small) by following the steps below . 3 If the TEMPERATURE WARNING Indicator remains on the liquid crystal panel, lens, or optical elements inside it . AIR FILTER (Small) AIR FILTER (Large) 3 Clean the Air Filters with the Air Filter removed. Should the Air Filters become clogged...
Owners Manual
Page 36
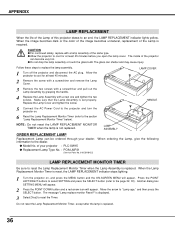
... reset the Lamp Replacement Monitor Timer, except after the lamp is set properly. Make sure that the Lamp Assembly is replaced. 36 LAMP COVER HANDLE 5 Connect the AC Power Cord to cool for at least 45 minutes before you open the lamp cover. information to an end, the LAMP REPLACEMENT indicator lights yellow. q Allow the projector to the projector and turn the projector on , and press the MENU button and the ON-SCREEN MENU will appear. APPENDIX LAMP REPLACEMENT When the life...
... reset the Lamp Replacement Monitor Timer, except after the lamp is set properly. Make sure that the Lamp Assembly is replaced. 36 LAMP COVER HANDLE 5 Connect the AC Power Cord to cool for at least 45 minutes before you open the lamp cover. information to an end, the LAMP REPLACEMENT indicator lights yellow. q Allow the projector to the projector and turn the projector on , and press the MENU button and the ON-SCREEN MENU will appear. APPENDIX LAMP REPLACEMENT When the life...

Owners Manual
Page 37
... of focus. Image is On. Some displays are properly connected. 3. Check cable connection. If the image sill does not appear, unplug the projector from audio input source. Problem: No power. q Check the TEMPERATURE WARNING indicator. In such an event, leave the projector OFF and wait until condensation disappears. q Press MUTE button. 37 Verify that all computer, video and power cords are not seen during the Operation. If the projector still does not produce an image, re-start...
... of focus. Image is On. Some displays are properly connected. 3. Check cable connection. If the image sill does not appear, unplug the projector from audio input source. Problem: No power. q Check the TEMPERATURE WARNING indicator. In such an event, leave the projector OFF and wait until condensation disappears. q Press MUTE button. 37 Verify that all computer, video and power cords are not seen during the Operation. If the projector still does not produce an image, re-start...
Owners Manual
Page 38
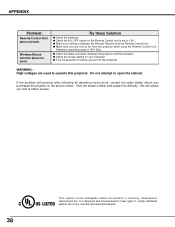
... electrical hazards. q Check the ALL-OFF switch on before you how to open the cabinet. Wireless Mouse function does not work . WARNING : High voltages are not too far from the projector when using the Remote Control Unit. q Make sure nothing is set to "ON.". Maximum operating range is designed and manufactured to operate this projector. If the problem still persists after following all operating instructions, contact the sales...
... electrical hazards. q Check the ALL-OFF switch on before you how to open the cabinet. Wireless Mouse function does not work . WARNING : High voltages are not too far from the projector when using the Remote Control Unit. q Make sure nothing is set to "ON.". Maximum operating range is designed and manufactured to operate this projector. If the problem still persists after following all operating instructions, contact the sales...


