Owners Manual
Page 2
... check operations and cable connections and try the solutions in the "Trouble-shooting" section of the end of the projector cabinet for a considerable time. This projector provides many convenient features and functions. READ AND KEEP THIS OWNER'S MANUAL FOR LATER USE. THIS SYMBOL INDICATES THAT... AND MAINTENANCE INSTRUCTIONS IN THE OWNER'S MANUAL WITH THIS UNIT. 2 Do not stare directly into the beam. If your projector, and can near the projector, hot air is exhausted from the projection lens. SAFETY PRECAUTIONS WARNING : TO REDUCE THE RISK OF FIRE OR ELECTRIC SHOCK...
... check operations and cable connections and try the solutions in the "Trouble-shooting" section of the end of the projector cabinet for a considerable time. This projector provides many convenient features and functions. READ AND KEEP THIS OWNER'S MANUAL FOR LATER USE. THIS SYMBOL INDICATES THAT... AND MAINTENANCE INSTRUCTIONS IN THE OWNER'S MANUAL WITH THIS UNIT. 2 Do not stare directly into the beam. If your projector, and can near the projector, hot air is exhausted from the projection lens. SAFETY PRECAUTIONS WARNING : TO REDUCE THE RISK OF FIRE OR ELECTRIC SHOCK...

Owners Manual
Page 3
...sure the service technician has used replacement parts specified by the operating instructions as improper adjustment of any service or repairs to this projector through cabinet slots as they may result in fire or electric shock. When the power cord or plug is in Nederland Bij dit... may cause hazards. Do not overload wall outlets and extension cords as opening should be covered with care. Do not locate this projector yourself as this projector on a bed, sofa, rug, or other hazards. Do not attempt to dangerous voltage or other similar surface. Refer all warnings...
...sure the service technician has used replacement parts specified by the operating instructions as improper adjustment of any service or repairs to this projector through cabinet slots as they may result in fire or electric shock. When the power cord or plug is in Nederland Bij dit... may cause hazards. Do not overload wall outlets and extension cords as opening should be covered with care. Do not locate this projector yourself as this projector on a bed, sofa, rug, or other hazards. Do not attempt to dangerous voltage or other similar surface. Refer all warnings...

Owners Manual
Page 4
... . THE SOCKET-OUTLET SHOULD BE INSTALLED NEAR THE EQUIPMENT AND EASILY ACCESSIBLE. 4 AC Power Cord for a Class A digital device, pursuant to Part 15 of this projector meets the requirement for your plug proceed as that the plug will be required to correct the interference at his own expense. Should the fuse...
... . THE SOCKET-OUTLET SHOULD BE INSTALLED NEAR THE EQUIPMENT AND EASILY ACCESSIBLE. 4 AC Power Cord for a Class A digital device, pursuant to Part 15 of this projector meets the requirement for your plug proceed as that the plug will be required to correct the interference at his own expense. Should the fuse...
Owners Manual
Page 5
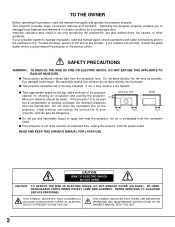
... POWER CORD 8 NORMAL FUNCTION 26 POSITIONING THE PROJECTOR 9 AUTO IMAGE FUNCTION 27 ADJUSTABLE FEET 9 PICTURE POSITION ADJUSTMENT 27 MOVING THE PROJECTOR 10 PICTURE SCREEN ADJUSTMENT 28 CONNECTING THE PROJECTOR 11 VIDEO MODE 29 TERMINALS OF THE PROJECTOR 11 SELECTING VIDEO MODE 29 CONNECTING TO THE ...OF ON-SCREEN MENU 17 MENU BAR 18 APPENDIX 34 BASIC OPERATION 19 OPERATING WIRELESS MOUSE 34 TURNING ON / OFF THE PROJECTOR 19 MAINTENANCE TEMPERATURE WARNING INDICATOR 35 35 ADJUSTING THE IMAGE 20 AIR FILTER CARE AND CLEANING 35 ZOOM ADJUSTMENT 20 CLEANING ...
... POWER CORD 8 NORMAL FUNCTION 26 POSITIONING THE PROJECTOR 9 AUTO IMAGE FUNCTION 27 ADJUSTABLE FEET 9 PICTURE POSITION ADJUSTMENT 27 MOVING THE PROJECTOR 10 PICTURE SCREEN ADJUSTMENT 28 CONNECTING THE PROJECTOR 11 VIDEO MODE 29 TERMINALS OF THE PROJECTOR 11 SELECTING VIDEO MODE 29 CONNECTING TO THE ...OF ON-SCREEN MENU 17 MENU BAR 18 APPENDIX 34 BASIC OPERATION 19 OPERATING WIRELESS MOUSE 34 TURNING ON / OFF THE PROJECTOR 19 MAINTENANCE TEMPERATURE WARNING INDICATOR 35 35 ADJUSTING THE IMAGE 20 AIR FILTER CARE AND CLEANING 35 ZOOM ADJUSTMENT 20 CLEANING ...
Owners Manual
Page 6
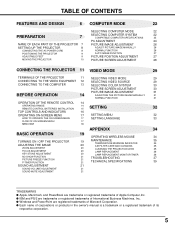
... you to focus on again when the projector detects the signal or any button is designed to carry and work anywhere you to operate both projector and computer with this function ON. The resolution from the computer between XGA (1024 x 768) and SXGA (1280... manual adjustment of 16.77 million colors, and matrix liquid crystal display (LCD) technology. x Multilanguage Menu Display Operation menu is always precise. Keystone Correction solves this Remote Control Unit only. 6 The projector utilizes built-in ; q Component Video Component video signals, such as a...
... you to focus on again when the projector detects the signal or any button is designed to carry and work anywhere you to operate both projector and computer with this function ON. The resolution from the computer between XGA (1024 x 768) and SXGA (1280... manual adjustment of 16.77 million colors, and matrix liquid crystal display (LCD) technology. x Multilanguage Menu Display Operation menu is always precise. Keystone Correction solves this Remote Control Unit only. 6 The projector utilizes built-in ; q Component Video Component video signals, such as a...

Owners Manual
Page 7
...and metallic parts. Pay attention to ensure proper ventilation and avoid a possible risk of fire and malfunction. This area will become hot while the projector is equipped with cooling fans for protection from overheating. ADJUSTABLE FEET AND FEET LOCK LATCHES 7 q Keep sides and rear clear of the Cooling ...Fans. q Do not touch this vent. q Do not cover the vent slot. PREPARATION NAME OF EACH PART OF THE PROJECTOR FRONT OF THE CABINET PROJECTION LENS ZOOM RING FOCUS RING SPEAKER (Monaural) LENS COVER INFRARED REMOTE RECEIVER BACK OF THE CABINET TERMINALS AND CONNECTORS...
...and metallic parts. Pay attention to ensure proper ventilation and avoid a possible risk of fire and malfunction. This area will become hot while the projector is equipped with cooling fans for protection from overheating. ADJUSTABLE FEET AND FEET LOCK LATCHES 7 q Keep sides and rear clear of the Cooling ...Fans. q Do not touch this vent. q Do not cover the vent slot. PREPARATION NAME OF EACH PART OF THE PROJECTOR FRONT OF THE CABINET PROJECTION LENS ZOOM RING FOCUS RING SPEAKER (Monaural) LENS COVER INFRARED REMOTE RECEIVER BACK OF THE CABINET TERMINALS AND CONNECTORS...
Owners Manual
Page 8
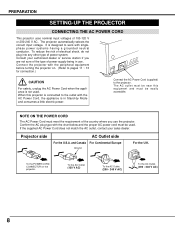
... the chart below and the proper AC power cord must be used . Confirm the AC plug type with the peripheral equipment before turning the projector on the projector. To the AC Outlet. (120 V AC) To the AC Outlet. (200 - 240 V AC) To the AC Outlet. (200 - 240 V AC) 8 ...outlet, contact your authorized dealer or service station if you use . NOTE ON THE POWER CORD The AC Power Cord must be near this projector is connected to the outlet with singlephase power systems having a grounded neutral conductor. and Canada For Continental Europe Ground For the U.K. PREPARATION ...
... the chart below and the proper AC power cord must be used . Confirm the AC plug type with the peripheral equipment before turning the projector on the projector. To the AC Outlet. (120 V AC) To the AC Outlet. (200 - 240 V AC) To the AC Outlet. (200 - 240 V AC) 8 ...outlet, contact your authorized dealer or service station if you use . NOTE ON THE POWER CORD The AC Power Cord must be near this projector is connected to the outlet with singlephase power systems having a grounded neutral conductor. and Canada For Continental Europe Ground For the U.K. PREPARATION ...

Owners Manual
Page 9
...and rotate the ADJUSTABLE FEET to fine tune the position and the tilt. 3 To shorten the ADJUSTABLE FEET, lift the front of the projector and pull and undo the FEET LOCK LATCHES. The position and the keystone distortion of the image can be adjusted using the Menu Operation.... (Refer to P 20, 28 and 30.) ADJUSTABLE FEET FEET LOCK LATCHES 9 PREPARATION POSITIONING THE PROJECTOR q This projector is recommended to limit ambient lighting in the room has a great influence on a flat projection surface. It is designed to project on the ...
...and rotate the ADJUSTABLE FEET to fine tune the position and the tilt. 3 To shorten the ADJUSTABLE FEET, lift the front of the projector and pull and undo the FEET LOCK LATCHES. The position and the keystone distortion of the image can be adjusted using the Menu Operation.... (Refer to P 20, 28 and 30.) ADJUSTABLE FEET FEET LOCK LATCHES 9 PREPARATION POSITIONING THE PROJECTOR q This projector is recommended to limit ambient lighting in the room has a great influence on a flat projection surface. It is designed to project on the ...

Owners Manual
Page 10
... This may result. When this projector is not designed to strong forces or put it into the case (carrying bag) supplied with this projector. When handling the projector, do not drop or bump the projector, subject it to protect the LCD projector from dust and scratches on the... cabinet. To transport the projector through a courier or transport services with this bag. q...
... This may result. When this projector is not designed to strong forces or put it into the case (carrying bag) supplied with this projector. When handling the projector, do not drop or bump the projector, subject it to protect the LCD projector from dust and scratches on the... cabinet. To transport the projector through a courier or transport services with this bag. q...

Owners Manual
Page 11
... the VIDEO/Y jack or connect the component video outputs to the Y/VIDEO, Pb/Cb and Pr/Cr jacks. (Refer to P12.) RESET BUTTON This projector uses a micro processor to control the unit. Pin Configuration 876 5 43 21 1 Red Input 9 No Connect 2 Green Input 10 Ground (Vert.sync... (Green) 15 Reserved 8 Ground (Blue) PS/2 Serial 1 ----- This can be reset. Do not use the RESET function excessively. CONNECTING THE PROJECTOR TERMINALS OF THE PROJECTOR VIDEO INPUT JACKS (VIDEO/Y, Pb/Cb, Pr/Cr) Connect the composite video output from the computer to this terminal. (Refer to P13.) COMPUTER ...
... the VIDEO/Y jack or connect the component video outputs to the Y/VIDEO, Pb/Cb and Pr/Cr jacks. (Refer to P12.) RESET BUTTON This projector uses a micro processor to control the unit. Pin Configuration 876 5 43 21 1 Red Input 9 No Connect 2 Green Input 10 Ground (Vert.sync... (Green) 15 Reserved 8 Ground (Blue) PS/2 Serial 1 ----- This can be reset. Do not use the RESET function excessively. CONNECTING THE PROJECTOR TERMINALS OF THE PROJECTOR VIDEO INPUT JACKS (VIDEO/Y, Pb/Cb, Pr/Cr) Connect the composite video output from the computer to this terminal. (Refer to P13.) COMPUTER ...

Owners Manual
Page 12
... Component Video Output Y Pb/Cb Pr/Cr S-VIDEO Output Audio Output RL Use any of both the projector and the external equipment should be disconnected from AC outlet. VIDEO jack are not supplied with this projector.) • Video Cable (RCA x 1 or RCA x 3) ✽ • S-VIDEO Cable ✽ ... Pr/Cr RESET AUDIO OUT AV COMPUTER IN COMPUTER AUDIO IN CONTROL PORT AV AUDIO IN Audio Cable (Stereo) ✽ Terminals of the Projector 12 Audio Input External Audio Equipment Audio Speaker (stereo) Audio Amplifier NOTE : When connecting the cable, the power cords of VIDEO jack ...
... Component Video Output Y Pb/Cb Pr/Cr S-VIDEO Output Audio Output RL Use any of both the projector and the external equipment should be disconnected from AC outlet. VIDEO jack are not supplied with this projector.) • Video Cable (RCA x 1 or RCA x 3) ✽ • S-VIDEO Cable ✽ ... Pr/Cr RESET AUDIO OUT AV COMPUTER IN COMPUTER AUDIO IN CONTROL PORT AV AUDIO IN Audio Cable (Stereo) ✽ Terminals of the Projector 12 Audio Input External Audio Equipment Audio Speaker (stereo) Audio Amplifier NOTE : When connecting the cable, the power cords of VIDEO jack ...

Owners Manual
Page 13
...Input Audio Amplifier Audio Speaker (stereo) x MAC ADAPTER (Not supplied) Set the switches as shown in the table below . CONNECTING THE PROJECTOR CONNECTING TO THE COMPUTER Cables used for ADB Port ✽ Terminal Terminal Terminal Audio Cable (stereo) ✽ VGA Cable Use one ...)) ✽ NOTE : When connecting the cable, the power cords of both the projector and the external equipment should be disconnected from AC outlet. IBM-compatible computers or Macintosh computers (VGA / SVGA / XGA / SXGA) Desktop type Laptop type Monitor Output MAC Adapter ✽ Set the slide...
...Input Audio Amplifier Audio Speaker (stereo) x MAC ADAPTER (Not supplied) Set the switches as shown in the table below . CONNECTING THE PROJECTOR CONNECTING TO THE COMPUTER Cables used for ADB Port ✽ Terminal Terminal Terminal Audio Cable (stereo) ✽ VGA Cable Use one ...)) ✽ NOTE : When connecting the cable, the power cords of both the projector and the external equipment should be disconnected from AC outlet. IBM-compatible computers or Macintosh computers (VGA / SVGA / XGA / SXGA) Desktop type Laptop type Monitor Output MAC Adapter ✽ Set the slide...

Owners Manual
Page 14
... the remote control is about 16.4' (5m) and 60° in front of this switch to "ON." Operating Range Point the remote control toward the projector (the Remote Receiver) whenever pressing the buttons. And turn it to "ALL OFF" when it works as a PC mouse in Wireless Mouse Operation. (P34) ... ON MENU BUTTON Used to select MENU operation. (P17, 18) MUTE MENU COMPUTER VIDEO ALL-OFF SWITCH When using the Remote Control Unit, turn the projector on or off. (P19) COMPUTER BUTTON Used to select COMPUTER input source. (P22) VIDEO BUTTON Used to select VIDEO source. (P29) RIGHT CLICK BUTTON Used...
... the remote control is about 16.4' (5m) and 60° in front of this switch to "ON." Operating Range Point the remote control toward the projector (the Remote Receiver) whenever pressing the buttons. And turn it to "ALL OFF" when it works as a PC mouse in Wireless Mouse Operation. (P34) ... ON MENU BUTTON Used to select MENU operation. (P17, 18) MUTE MENU COMPUTER VIDEO ALL-OFF SWITCH When using the Remote Control Unit, turn the projector on or off. (P19) COMPUTER BUTTON Used to select COMPUTER input source. (P22) VIDEO BUTTON Used to select VIDEO source. (P29) RIGHT CLICK BUTTON Used...

Owners Manual
Page 16
... to select input source either Computer or Video. (P22, 29) SELECT BUTTON Used to an end. (P36) LAMP INDICATOR This indicator is dim when the projector is turned on. OFF MENU NORMAL MODE LAMP WARNING REPLACE TEMP. It is in DIGITAL ZOOM mode. (P28) LAMP REPLACE INDICATOR This indicator turns to... OPERATION TOP CONTROLS AND INDICATORS MENU BUTTON Used to open or close the MENU operation. (P17, 18) POWER ON-OFF BUTTON Used to turn the projector on or off. (P19) POINT BUTTONS Used to select an item or adjust the value in Power Management mode. (P33) WIDE TELE ON -
... to select input source either Computer or Video. (P22, 29) SELECT BUTTON Used to an end. (P36) LAMP INDICATOR This indicator is dim when the projector is turned on. OFF MENU NORMAL MODE LAMP WARNING REPLACE TEMP. It is in DIGITAL ZOOM mode. (P28) LAMP REPLACE INDICATOR This indicator turns to... OPERATION TOP CONTROLS AND INDICATORS MENU BUTTON Used to open or close the MENU operation. (P17, 18) POWER ON-OFF BUTTON Used to turn the projector on or off. (P19) POINT BUTTONS Used to select an item or adjust the value in Power Management mode. (P33) WIDE TELE ON -

Owners Manual
Page 17
... Move the pointer (see the NOTE below . BEFORE OPERATION OPERATING ON-SCREEN MENU HOW TO OPERATE ON-SCREEN MENU You can control and adjust this projector through ON-SCREEN MENU 4 Move the POINTER downward by pressing POINT DOWN button. (The shape of the ITEM appears. SELECT BUTTON Used to select the...
... Move the pointer (see the NOTE below . BEFORE OPERATION OPERATING ON-SCREEN MENU HOW TO OPERATE ON-SCREEN MENU You can control and adjust this projector through ON-SCREEN MENU 4 Move the POINTER downward by pressing POINT DOWN button. (The shape of the ITEM appears. SELECT BUTTON Used to select the...
Owners Manual
Page 19
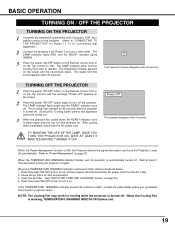
... FILTER CARE AND CLEANING" section on the Top Control, and the message "Power off?" The Cooling Fans operate for cooling while the projector is turned off the projector and disconnect the AC power cord from the source appears after 30 seconds. 30 The Preparation Display disappears after 4 seconds. The message ... indicator turns off ? appears on the Top Control to operate. The LAMP indicator dims, and the Cooling Fans start to ON. TURNING OFF THE PROJECTOR 1 Press the power ON-OFF button on the Remote Control Unit or on page 35.) 4. When the Cooling Fan is turned off . The ...
... FILTER CARE AND CLEANING" section on the Top Control, and the message "Power off?" The Cooling Fans operate for cooling while the projector is turned off the projector and disconnect the AC power cord from the source appears after 30 seconds. 30 The Preparation Display disappears after 4 seconds. The message ... indicator turns off ? appears on the Top Control to operate. The LAMP indicator dims, and the Cooling Fans start to ON. TURNING OFF THE PROJECTOR 1 Press the power ON-OFF button on the Remote Control Unit or on page 35.) 4. When the Cooling Fan is turned off . The ...
Owners Manual
Page 22
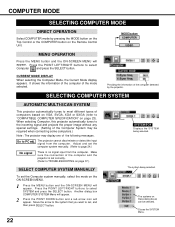
...22 SYSTEM BOX Displays the SYSTEM being selected. Providing the information of the Computer System may display one of the following messages. The projector cannot discriminate or detect the input signal from the computer. MODE button COMPUTER VIDEO MENU OPERATION Press the MENU button and the ON-SCREEN...special settings. (Setting of the computer detected by pressing the MODE button on the Top Control or the COMPUTER button on VGA, SVGA, XGA or SXGA (refer to select SYSTEM and press the SELECT button. Press the POINT LEFT/RIGHT buttons to PC adj. The system being selected...
...22 SYSTEM BOX Displays the SYSTEM being selected. Providing the information of the Computer System may display one of the following messages. The projector cannot discriminate or detect the input signal from the computer. MODE button COMPUTER VIDEO MENU OPERATION Press the MENU button and the ON-SCREEN...special settings. (Setting of the computer detected by pressing the MODE button on the Top Control or the COMPUTER button on VGA, SVGA, XGA or SXGA (refer to select SYSTEM and press the SELECT button. Press the POINT LEFT/RIGHT buttons to PC adj. The system being selected...

Owners Manual
Page 23
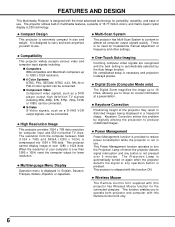
.... (Hz) 77.07 VGA 2 VGA 3 VGA 4 720 x 400 640 x 400 640 x 480 31.47 31.47 37.86 70.09 70.09 74.38 XGA 11 XGA 12 XGA 13 1024 x 768 1024 x 768 1024 x 768 61.00 35.522 46.90 75.70 86.96 (Interlace) 58.20 VGA 5 640 x 480 37... 54.58 HDTV720p XGA 8 XGA 9 1024 x 768 1024 x 768 63.48 36.00 79.35 87.17 (Interlace) HDTV1035i HDTV1080i NOTE : Specifications are subject to change without notice. 45.00 33.75 33.75 60.00 60.00 (Interlace) 60.00 (Interlace) 23 COMPUTER MODE COMPATIBLE COMPUTER SPECIFICATIONS Basically this projector can accept...
.... (Hz) 77.07 VGA 2 VGA 3 VGA 4 720 x 400 640 x 400 640 x 480 31.47 31.47 37.86 70.09 70.09 74.38 XGA 11 XGA 12 XGA 13 1024 x 768 1024 x 768 1024 x 768 61.00 35.522 46.90 75.70 86.96 (Interlace) 58.20 VGA 5 640 x 480 37... 54.58 HDTV720p XGA 8 XGA 9 1024 x 768 1024 x 768 63.48 36.00 79.35 87.17 (Interlace) HDTV1035i HDTV1080i NOTE : Specifications are subject to change without notice. 45.00 33.75 33.75 60.00 60.00 (Interlace) 60.00 (Interlace) 23 COMPUTER MODE COMPATIBLE COMPUTER SPECIFICATIONS Basically this projector can accept...
Owners Manual
Page 24
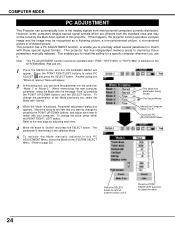
... function cannot be recognized as a flickering picture, a non-synchronized picture, a non-centered picture or a skewed picture. If this projector. Press the POINT RIGHT/LEFT buttons to recall the setting for adjusting each item to the next page for a specific computer whenever you...HDTV1035i" or "HDTV1080i" is selected, Parameter adjustment dialog box appears. Closes the PC ADJUSTMENT Menu. 4 Move the arrow to 5). This projector has a PC ADJUSTMENT function, to enable you can automatically tune to set Computer Mode (1 to "Stored" and press the SELECT button. ...
... function cannot be recognized as a flickering picture, a non-synchronized picture, a non-centered picture or a skewed picture. If this projector. Press the POINT RIGHT/LEFT buttons to recall the setting for adjusting each item to the next page for a specific computer whenever you...HDTV1035i" or "HDTV1080i" is selected, Parameter adjustment dialog box appears. Closes the PC ADJUSTMENT Menu. 4 Move the arrow to 5). This projector has a PC ADJUSTMENT function, to enable you can automatically tune to set Computer Mode (1 to "Stored" and press the SELECT button. ...

Owners Manual
Page 25
... data previously set. Adjust the number to match the resolution of the horizontal or vertical picture position. When the image has a dark bar(s), try this projector. Display area Adjustment of the total dots in the memory. Select the resolution at the Display area dialog box, or adjust the number at the...
... data previously set. Adjust the number to match the resolution of the horizontal or vertical picture position. When the image has a dark bar(s), try this projector. Display area Adjustment of the total dots in the memory. Select the resolution at the Display area dialog box, or adjust the number at the...


