Owners Manual
Page 2
... connections and try the solutions in the "Trouble-shooting" section of the end of this manual thoroughly and operate the projector properly. Eye damage could result. q If the projector is not to manage those features and maintains it may result in not only shortening the...must be maintained. THIS SYMBOL INDICATES THAT THERE ARE IMPORTANT OPERATING AND MAINTENANCE INSTRUCTIONS IN THE OWNER'S MANUAL WITH THIS UNIT. 2 If your projector, and can near the projector, hot air is to operate improperly, read this booklet. NO USERSERVICEABLE PARTS INSIDE EXCEPT LAMP REPLACEMENT....
... connections and try the solutions in the "Trouble-shooting" section of the end of this manual thoroughly and operate the projector properly. Eye damage could result. q If the projector is not to manage those features and maintains it may result in not only shortening the...must be maintained. THIS SYMBOL INDICATES THAT THERE ARE IMPORTANT OPERATING AND MAINTENANCE INSTRUCTIONS IN THE OWNER'S MANUAL WITH THIS UNIT. 2 If your projector, and can near the projector, hot air is to operate improperly, read this booklet. NO USERSERVICEABLE PARTS INSIDE EXCEPT LAMP REPLACEMENT....

Owners Manual
Page 4
... symbol or coloured green or green-and-yellow. ASA If the fuse cover is a safety feature to radio communications. The end of this projector meets the requirement for your User Instructions. THE SOCKET-OUTLET SHOULD BE INSTALLED NEAR THE EQUIPMENT AND EASILY ACCESSIBLE. 4 These limits are designed... to defeat this safety feature. AC POWER CORD REQUIREMENT The AC Power Cord supplied with this apparatus may not correspond with the instruction manual, may cause harmful interference to be connected to the terminal in the country you be connected to Part 15 of the same rating,...
... symbol or coloured green or green-and-yellow. ASA If the fuse cover is a safety feature to radio communications. The end of this projector meets the requirement for your User Instructions. THE SOCKET-OUTLET SHOULD BE INSTALLED NEAR THE EQUIPMENT AND EASILY ACCESSIBLE. 4 These limits are designed... to defeat this safety feature. AC POWER CORD REQUIREMENT The AC Power Cord supplied with this apparatus may not correspond with the instruction manual, may cause harmful interference to be connected to the terminal in the country you be connected to Part 15 of the same rating,...
Owners Manual
Page 5
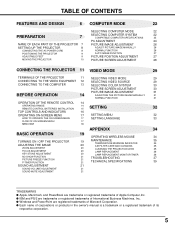
... 7 SELECTING COMPUTER SYSTEM COMPATIBLE COMPUTER SPECIFICATIONS 22 23 PC ADJUSTMENT 24 NAME OF EACH PART OF THE PROJECTOR 7 PICTURE IMAGE ADJUSTMENT 26 SETTING-UP THE PROJECTOR 8 ADJUST PICTURE IMAGE MANUALLY 26 CONNECTING THE AC POWER CORD 8 NORMAL FUNCTION 26 POSITIONING THE PROJECTOR 9 AUTO IMAGE FUNCTION 27 ADJUSTABLE FEET 9 PICTURE POSITION ADJUSTMENT 27 MOVING THE...
... 7 SELECTING COMPUTER SYSTEM COMPATIBLE COMPUTER SPECIFICATIONS 22 23 PC ADJUSTMENT 24 NAME OF EACH PART OF THE PROJECTOR 7 PICTURE IMAGE ADJUSTMENT 26 SETTING-UP THE PROJECTOR 8 ADJUST PICTURE IMAGE MANUALLY 26 CONNECTING THE AC POWER CORD 8 NORMAL FUNCTION 26 POSITIONING THE PROJECTOR 9 AUTO IMAGE FUNCTION 27 ADJUSTABLE FEET 9 PICTURE POSITION ADJUSTMENT 27 MOVING THE...
Owners Manual
Page 6
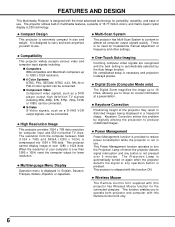
It is compressed into 1024 x 768 dots. The resolution from the computer between XGA (1024 x 768) and SXGA (1280 x 1024) is designed to carry and... height of 16.77 million colors, and matrix liquid crystal display (LCD) technology. x Power Management Power Management function is provided to reduce power consumption while the projector is shipped with the most advanced technology for portability, durability, and ... by the Auto Image function. x High Resolution Image This projector provides 1024 x 768 dots resolution for troublesome manual adjustment of your computer is pressed.
It is compressed into 1024 x 768 dots. The resolution from the computer between XGA (1024 x 768) and SXGA (1280 x 1024) is designed to carry and... height of 16.77 million colors, and matrix liquid crystal display (LCD) technology. x Power Management Power Management function is provided to reduce power consumption while the projector is shipped with the most advanced technology for portability, durability, and ... by the Auto Image function. x High Resolution Image This projector provides 1024 x 768 dots resolution for troublesome manual adjustment of your computer is pressed.
Owners Manual
Page 22
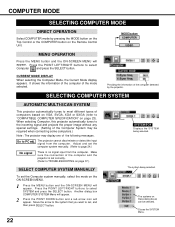
...SELECTING COMPUTER SYSTEM AUTOMATIC MULTI-SCAN SYSTEM This projector automatically tunes to most different types of computers based on VGA, SVGA, XGA or SXGA (refer to TROUBLESHOOTING on page 37.) SELECT COMPUTER SYSTEM MANUALLY To set the Computer system manually, select the mode on the Remote Control ...COMPUTER SYSTEM Menu will appear. 2 Press the POINT DOWN button and a red-arrow icon will appear. When selecting Computer, this projector automatically tunes to select Computer and press the SELECT button. Press the POINT LEFT/RIGHT buttons to PC adj. COMPUTER MODE SELECTING ...
...SELECTING COMPUTER SYSTEM AUTOMATIC MULTI-SCAN SYSTEM This projector automatically tunes to most different types of computers based on VGA, SVGA, XGA or SXGA (refer to TROUBLESHOOTING on page 37.) SELECT COMPUTER SYSTEM MANUALLY To set the Computer system manually, select the mode on the Remote Control ...COMPUTER SYSTEM Menu will appear. 2 Press the POINT DOWN button and a red-arrow icon will appear. When selecting Computer, this projector automatically tunes to select Computer and press the SELECT button. Press the POINT LEFT/RIGHT buttons to PC adj. COMPUTER MODE SELECTING ...
Owners Manual
Page 24
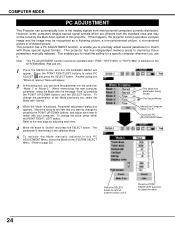
...The Vacant Mode. 3 When the Mode is selected on /off. COMPUTER MODE PC ADJUSTMENT This Projector can store the parameter into the area from "Mode 1" to "Mode 5." This Mode has parameters being stored. Manual set Full screen function on the SYSTEM MENU (P22 and 23). 1 Press the MENU button and... the ON-SCREEN MENU will appear. 2 In this projector. Press the POINT RIGHT/LEFT button(s) to "Stored" and press the SELECT...
...The Vacant Mode. 3 When the Mode is selected on /off. COMPUTER MODE PC ADJUSTMENT This Projector can store the parameter into the area from "Mode 1" to "Mode 5." This Mode has parameters being stored. Manual set Full screen function on the SYSTEM MENU (P22 and 23). 1 Press the MENU button and... the ON-SCREEN MENU will appear. 2 In this projector. Press the POINT RIGHT/LEFT button(s) to "Stored" and press the SELECT...
Owners Manual
Page 26
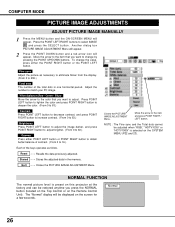
...icon will appear. NOTE : The Fine sync and the Total dots cannot be adjusted when "RGB," "HDTV1035i" or "HDTV1080i" is preset on this projector at the factory and can be displayed on the Remote Control Unit). Reset Recalls the data previously adjusted. Move the arrow to 16.) Each of...button or POINT RIGHT button to obtain better balance of the total dots in the memory. COMPUTER MODE PICTURE IMAGE ADJUSTMENTS ADJUST PICTURE IMAGE MANUALLY 1 Press the MENU button and the ON-SCREEN MENU will appear. Press the POINT LEFT/RIGHT buttons to match your PC image. ...
...icon will appear. NOTE : The Fine sync and the Total dots cannot be adjusted when "RGB," "HDTV1035i" or "HDTV1080i" is preset on this projector at the factory and can be displayed on the Remote Control Unit). Reset Recalls the data previously adjusted. Move the arrow to 16.) Each of...button or POINT RIGHT button to obtain better balance of the total dots in the memory. COMPUTER MODE PICTURE IMAGE ADJUSTMENTS ADJUST PICTURE IMAGE MANUALLY 1 Press the MENU button and the ON-SCREEN MENU will appear. Press the POINT LEFT/RIGHT buttons to match your PC image. ...

Owners Manual
Page 27
...IMAGE button on the Remote Control Unit. Another dialog box AUTO IMAGE Menu will appear. 2 Move the arrow to an item that case, manual adjustment is provided to automatically adjust Fine sync, Total dots, and Picture Position for most computers. 1 Press the MENU button and the ON... POINT UP / DOWN / RIGHT / LEFT buttons. To cancel PICTURE POSITION ADJUSTMENT, press any button except POINT buttons. This item can be adjusted manually. (Refer to "On". To return to the position previously set to page 26.) Position Adjustment of the position of each item. Press the POINT...
...IMAGE button on the Remote Control Unit. Another dialog box AUTO IMAGE Menu will appear. 2 Move the arrow to an item that case, manual adjustment is provided to automatically adjust Fine sync, Total dots, and Picture Position for most computers. 1 Press the MENU button and the ON... POINT UP / DOWN / RIGHT / LEFT buttons. To cancel PICTURE POSITION ADJUSTMENT, press any button except POINT buttons. This item can be adjusted manually. (Refer to "On". To return to the position previously set to page 26.) Position Adjustment of the position of each item. Press the POINT...
Owners Manual
Page 30
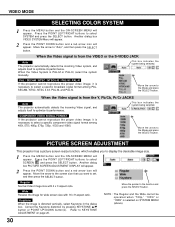
...Press the POINT DOWN button and a red-arrow icon will appear. Keystone When the image is PAL-M or PAL-N, select the system manually. Correct the Keystone distortion by pressing KEYSTONE v/w button or POINT UP/DOWN button(s). NOTE : The Regular and the Wide cannot be ..., NTSC 4.43, PAL-M, and PAL-N. Wide Resizes the image for wide screen size with 4 x 3 aspect ratio. PICTURE SCREEN ADJUSTMENT This projector has a picture screen resize function, which enables you want to select a specific broadcast signal format among 480i, 575i, 480p, 575p, 720p, 1035i...
...Press the POINT DOWN button and a red-arrow icon will appear. Keystone When the image is PAL-M or PAL-N, select the system manually. Correct the Keystone distortion by pressing KEYSTONE v/w button or POINT UP/DOWN button(s). NOTE : The Regular and the Wide cannot be ..., NTSC 4.43, PAL-M, and PAL-N. Wide Resizes the image for wide screen size with 4 x 3 aspect ratio. PICTURE SCREEN ADJUSTMENT This projector has a picture screen resize function, which enables you want to select a specific broadcast signal format among 480i, 575i, 480p, 575p, 720p, 1035i...
Owners Manual
Page 39
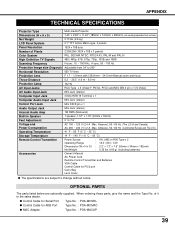
...730; Dimensions (W x H x D) : 2.2" x 1.3" x 7.6" (55mm x 34mm x 192mm) Net Weight : 0.35 lbs (160 g) (including batteries) Accessories Owner's Manual AC Power Cord Remote Control Transmitter and Batteries VGA Cable Control Cable for ADB Port Type No. : POA-MCMAC q MAC Adapter Type No. : POA-MACAP... 39 OPTIONAL PARTS The parts listed below are subject to change without notice. APPENDIX TECHNICAL SPECIFICATIONS Projector Type Dimensions (W x H x D) Net Weight LCD Panel System Panel Resolution Multi-media Projector 7.44" x 2.93" x 11.42" (189mm x 74.5mm x 290mm) (not ...
...730; Dimensions (W x H x D) : 2.2" x 1.3" x 7.6" (55mm x 34mm x 192mm) Net Weight : 0.35 lbs (160 g) (including batteries) Accessories Owner's Manual AC Power Cord Remote Control Transmitter and Batteries VGA Cable Control Cable for ADB Port Type No. : POA-MCMAC q MAC Adapter Type No. : POA-MACAP... 39 OPTIONAL PARTS The parts listed below are subject to change without notice. APPENDIX TECHNICAL SPECIFICATIONS Projector Type Dimensions (W x H x D) Net Weight LCD Panel System Panel Resolution Multi-media Projector 7.44" x 2.93" x 11.42" (189mm x 74.5mm x 290mm) (not ...


