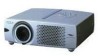
Owners Manual
Page 2
... OPERATING AND MAINTENANCE INSTRUCTIONS IN THE OWNER'S MANUAL WITH THIS UNIT. 2 READ AND KEEP THIS OWNER'S MANUAL FOR LATER USE. NO USERSERVICEABLE PARTS INSIDE EXCEPT LAMP REPLACEMENT. Operating the projector properly enables you purchased the projector or the service center. Be especially careful that children do not stare directly into the lens as possible. If your projector, and can near the projector, hot air is to be maintained. q This projector...
... OPERATING AND MAINTENANCE INSTRUCTIONS IN THE OWNER'S MANUAL WITH THIS UNIT. 2 READ AND KEEP THIS OWNER'S MANUAL FOR LATER USE. NO USERSERVICEABLE PARTS INSIDE EXCEPT LAMP REPLACEMENT. Operating the projector properly enables you purchased the projector or the service center. Be especially careful that children do not stare directly into the lens as possible. If your projector, and can near the projector, hot air is to be maintained. q This projector...
Owners Manual
Page 3
... overturn. Do not attempt to qualified service personnel. Adjust only those controls that the projector is left unattended and unused for service. Unauthorized substitutions may cause hazards. Follow all warnings and instructions marked on the projector. Do not overload wall outlets and extension cords as they may expose you are covered by the operating instructions as opening should not be blocked by the...
... overturn. Do not attempt to qualified service personnel. Adjust only those controls that the projector is left unattended and unused for service. Unauthorized substitutions may cause hazards. Follow all warnings and instructions marked on the projector. Do not overload wall outlets and extension cords as they may expose you are covered by the operating instructions as opening should not be blocked by the...
Owners Manual
Page 4
.... Model Number Trade Name Responsible party Address Telephone No. : PLC-XW20U, PLC-XW20E, PLC-XW20B : Sanyo : SANYO FISHER COMPANY : 21605 Plummer Street, Chatsworth, California 91311 : (818)998-7322 AC POWER CORD REQUIREMENT The AC Power Cord supplied with the cover omitted. AC Power Cord for your plug proceed as that interference will fit into the power outlet. ASA If the fuse cover is coloured green-and-yellow must be used in...
.... Model Number Trade Name Responsible party Address Telephone No. : PLC-XW20U, PLC-XW20E, PLC-XW20B : Sanyo : SANYO FISHER COMPANY : 21605 Plummer Street, Chatsworth, California 91311 : (818)998-7322 AC POWER CORD REQUIREMENT The AC Power Cord supplied with the cover omitted. AC Power Cord for your plug proceed as that interference will fit into the power outlet. ASA If the fuse cover is coloured green-and-yellow must be used in...
Owners Manual
Page 5
... 11 SELECTING INPUT SOURCE 30 CONNECTING TO COMPUTER 12 SELECTING VIDEO SYSTEM 31 CONNECTING TO VIDEO EQUIPMENT 13 PICTURE IMAGE ADJUSTMENT 32 IMAGE LEVEL SELECT 32 IMAGE LEVEL ADJUSTMENT 33 BEFORE OPERATION 14 PICTURE SCREEN ADJUSTMENT 34 OPERATION OF REMOTE CONTROL 14 SETTING 35 OPERATING RANGE 15 REMOTE CONTROL BATTERY INSTALLATION 15 TOP CONTROLS AND INDICATORS 16 SETTING MENU 35 OPERATING ON-SCREEN MENU 17 HOW TO OPERATE ON-SCREEN MENU 17 FLOW OF ON-SCREEN MENU OPERATION 17 APPENDIX 37 MENU BAR 18 MAINTENANCE 37 BASIC OPERATION WARNING TEMP.
... 11 SELECTING INPUT SOURCE 30 CONNECTING TO COMPUTER 12 SELECTING VIDEO SYSTEM 31 CONNECTING TO VIDEO EQUIPMENT 13 PICTURE IMAGE ADJUSTMENT 32 IMAGE LEVEL SELECT 32 IMAGE LEVEL ADJUSTMENT 33 BEFORE OPERATION 14 PICTURE SCREEN ADJUSTMENT 34 OPERATION OF REMOTE CONTROL 14 SETTING 35 OPERATING RANGE 15 REMOTE CONTROL BATTERY INSTALLATION 15 TOP CONTROLS AND INDICATORS 16 SETTING MENU 35 OPERATING ON-SCREEN MENU 17 HOW TO OPERATE ON-SCREEN MENU 17 FLOW OF ON-SCREEN MENU OPERATION 17 APPENDIX 37 MENU BAR 18 MAINTENANCE 37 BASIC OPERATION WARNING TEMP.
Owners Manual
Page 6
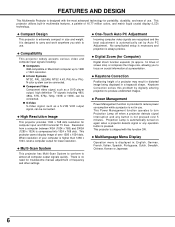
... dots. x One-Touch Auto PC Adjustment Incoming computer video signals are recognized and the best adjustment is displayed in; x Keystone Correction Positioning height of a projector may result in distorted image being displayed in multimedia features, a palette of use. Projection Lamp is automatically turned on crucial information at a presentation. This projector is shipped with the most advanced technology for lower resolution. x Multilanguage Menu Display Operation menu is automatically set by digitally altering projection to produce undistorted images...
... dots. x One-Touch Auto PC Adjustment Incoming computer video signals are recognized and the best adjustment is displayed in; x Keystone Correction Positioning height of a projector may result in distorted image being displayed in multimedia features, a palette of use. Projection Lamp is automatically turned on crucial information at a presentation. This projector is shipped with the most advanced technology for lower resolution. x Multilanguage Menu Display Operation menu is automatically set by digitally altering projection to produce undistorted images...

Owners Manual
Page 7
... this area, especially screw and metallic part. q Do not put any object. q Do not cover vent slots. ADJUSTABLE FEET AND FEET LOCK LATCHES 7 PREPARATION NAME OF EACH PART OF PROJECTOR FRONT INFRARED REMOTE RECEIVER PROJECTION LENS FOCUS RING POWER CORD CONNECTOR ZOOM LEVER LENS COVER BACK TOP CONTROLS AND INDICATORS EXHAUST VENTS HOT AIR EXHAUSTED ! This area will become hot while a projector is used. q Keep front grills at least 3'(1m) away from overheating.
... this area, especially screw and metallic part. q Do not put any object. q Do not cover vent slots. ADJUSTABLE FEET AND FEET LOCK LATCHES 7 PREPARATION NAME OF EACH PART OF PROJECTOR FRONT INFRARED REMOTE RECEIVER PROJECTION LENS FOCUS RING POWER CORD CONNECTOR ZOOM LEVER LENS COVER BACK TOP CONTROLS AND INDICATORS EXHAUST VENTS HOT AIR EXHAUSTED ! This area will become hot while a projector is used. q Keep front grills at least 3'(1m) away from overheating.
Owners Manual
Page 12
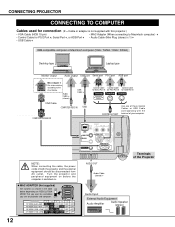
... AC outlet. Pb / Cb - Pr / Cr USB COMPUTER AUDIO IN AV AUDIO OUT CONTROL PORT S-VIDEO COMPUTER IN Terminals of the Projector NOTE : When connecting the cable, the power cords of these Control Cables or USB Cable corresponding with this projector.) • VGA Cable (HDB 15 pin) • MAC Adapter (When connecting to Macintosh computer) ✽ • Control Cable for connection (✽ = Cable or adapter is switched on RESOLUTION MODE that you turn on projector and computer. OFF ON DIP 123456...
... AC outlet. Pb / Cb - Pr / Cr USB COMPUTER AUDIO IN AV AUDIO OUT CONTROL PORT S-VIDEO COMPUTER IN Terminals of the Projector NOTE : When connecting the cable, the power cords of these Control Cables or USB Cable corresponding with this projector.) • VGA Cable (HDB 15 pin) • MAC Adapter (When connecting to Macintosh computer) ✽ • Control Cable for connection (✽ = Cable or adapter is switched on RESOLUTION MODE that you turn on projector and computer. OFF ON DIP 123456...

Owners Manual
Page 14
...) MENU BUTTON Used to select MENU operation. (P17, 18) FREEZE BUTTON Used to freeze the picture. (P20) NO SHOW BUTTON Used to operate P-TIMER function. (P21) INPUT ON-OFF KEYSTONE D.ZOOM VOLUME + - P-TIMER IMAGE To insure safe operation, please observe the following precautions : q Do not bend, drop Remote Control Unit, or expose Remote Control Unit to select image level. (P27, 32) Battery is installed in DIGITAL ZOOM mode. (P29) MUTE BUTTON Used to mute sound.(P21) IMAGE BUTTON Used to moisture or heat. POWER...
...) MENU BUTTON Used to select MENU operation. (P17, 18) FREEZE BUTTON Used to freeze the picture. (P20) NO SHOW BUTTON Used to operate P-TIMER function. (P21) INPUT ON-OFF KEYSTONE D.ZOOM VOLUME + - P-TIMER IMAGE To insure safe operation, please observe the following precautions : q Do not bend, drop Remote Control Unit, or expose Remote Control Unit to select image level. (P27, 32) Battery is installed in DIGITAL ZOOM mode. (P29) MUTE BUTTON Used to mute sound.(P21) IMAGE BUTTON Used to moisture or heat. POWER...
Owners Manual
Page 16
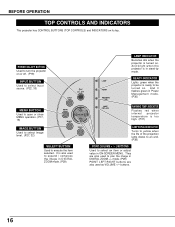
... or adjust value in DIGITAL ZOOM mode. (P29) LAMP REPLACE WARNING TEMP. mode. (P29) POINT LEFT/RIGHT buttons are also used to select input source. (P22, 30) INPUT ON - OFF LAMP READY WARNING TEMP . They are also used to execute the item selected. READY INDICATOR Lights green when the projector is turned on its top. And it flashes green in Power Management mode. (P36) MENU BUTTON Used to open or close MENU operation. (P17, 18) IMAGE BUTTON Used to select image level. (P27, 32) MENU IMAGE -VOLUMESELECT SELECT BUTTON Used to...
... or adjust value in DIGITAL ZOOM mode. (P29) LAMP REPLACE WARNING TEMP. mode. (P29) POINT LEFT/RIGHT buttons are also used to select input source. (P22, 30) INPUT ON - OFF LAMP READY WARNING TEMP . They are also used to execute the item selected. READY INDICATOR Lights green when the projector is turned on its top. And it flashes green in Power Management mode. (P36) MENU BUTTON Used to open or close MENU operation. (P17, 18) IMAGE BUTTON Used to select image level. (P27, 32) MENU IMAGE -VOLUMESELECT SELECT BUTTON Used to...
Owners Manual
Page 18
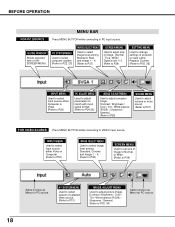
... Image 1 ~ 4. (Refer to P32) SCREEN MENU Used to set size of projector or reset Lamp Replace Counter. (Refer to P35, 36) INPUT MENU Used to select input source either Computer or Video. (Refer to P22) PC ADJUST MENU Used to adjust parameters to match with input signal format. (Refer to P24-26) IMAGE ADJUST MENU Used to adjust computer image. [Contrast / Brightness / Color / Tint / White balance (R/G/B) / Sharpness / Gamma] (Refer to P28) SOUND MENU Used to adjust volume or mute sound. (Refer to P21) FOR VIDEO SOURCE Press MENU BUTTON while connecting...
... Image 1 ~ 4. (Refer to P32) SCREEN MENU Used to set size of projector or reset Lamp Replace Counter. (Refer to P35, 36) INPUT MENU Used to select input source either Computer or Video. (Refer to P22) PC ADJUST MENU Used to adjust parameters to match with input signal format. (Refer to P24-26) IMAGE ADJUST MENU Used to adjust computer image. [Contrast / Brightness / Color / Tint / White balance (R/G/B) / Sharpness / Gamma] (Refer to P28) SOUND MENU Used to adjust volume or mute sound. (Refer to P21) FOR VIDEO SOURCE Press MENU BUTTON while connecting...
Owners Manual
Page 19
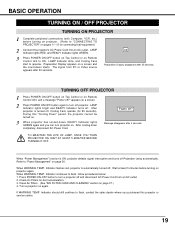
...Cord. Preparation Display appears on again. Power off , Cooling Fans operate (for dust accumulation. 3. When WARNING TEMP. If WARNING TEMP. LAMP Indicator dims, and Cooling Fans start to flash, follow procedures below: 1. During this projector or service center. 19 When WARNING TEMP. BASIC OPERATION TURNING ON / OFF PROJECTOR TURNING ON PROJECTOR 1 Complete peripheral connections (with Computer, VCR, etc.) before turning on page 36. Clean Air Filters. (See "AIR FILTER CARE AND CLEANING" section on Remote Control Unit to turn off ?" LAMP Indicator lights RED...
...Cord. Preparation Display appears on again. Power off , Cooling Fans operate (for dust accumulation. 3. When WARNING TEMP. If WARNING TEMP. LAMP Indicator dims, and Cooling Fans start to flash, follow procedures below: 1. During this projector or service center. 19 When WARNING TEMP. BASIC OPERATION TURNING ON / OFF PROJECTOR TURNING ON PROJECTOR 1 Complete peripheral connections (with Computer, VCR, etc.) before turning on page 36. Clean Air Filters. (See "AIR FILTER CARE AND CLEANING" section on Remote Control Unit to turn off ?" LAMP Indicator lights RED...
Owners Manual
Page 20
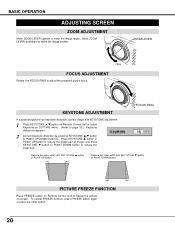
... SETTING menu. (Refer to page 35.) Keystone dialog box appears. 2 Correct keystone distortion by pressing KEYSTONE v/w button or POINT UP/DOWN button(s). FOCUS RING KEYSTONE ADJUSTMENT If a projected picture has keystone distortion, correct image with KEYSTONE adjustment. 1 Press KEYSTONE v/w button on Remote Control Unit or select Keystone on -screen. Reduce the upper width with KEY STONE w button or POINT DOWN button. To cancel FREEZE function, press FREEZE button again or press any other button. 20 WIDE ZOOM...
... SETTING menu. (Refer to page 35.) Keystone dialog box appears. 2 Correct keystone distortion by pressing KEYSTONE v/w button or POINT UP/DOWN button(s). FOCUS RING KEYSTONE ADJUSTMENT If a projected picture has keystone distortion, correct image with KEYSTONE adjustment. 1 Press KEYSTONE v/w button on Remote Control Unit or select Keystone on -screen. Reduce the upper width with KEY STONE w button or POINT DOWN button. To cancel FREEZE function, press FREEZE button again or press any other button. 20 WIDE ZOOM...
Owners Manual
Page 21
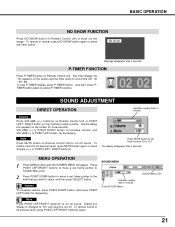
... Press NO SHOW button on Remote Control unit. To restore to cancel P-TIMER function. SOUND ADJUSTMENT DIRECT OPERATION Indicates roughly level of volume. Mute Press MUTE button on the screen for a few seconds. To restore sound to its previous level, press POINT LEFT/RIGHT button(s) again. The display disappears after 4 seconds. MENU OPERATION 1 Press MENU button and ON-SCREEN MENU will appear. Close SOUND Menu. Dialog box display is changed to its previous...
... Press NO SHOW button on Remote Control unit. To restore to cancel P-TIMER function. SOUND ADJUSTMENT DIRECT OPERATION Indicates roughly level of volume. Mute Press MUTE button on the screen for a few seconds. To restore sound to its previous level, press POINT LEFT/RIGHT button(s) again. The display disappears after 4 seconds. MENU OPERATION 1 Press MENU button and ON-SCREEN MENU will appear. Close SOUND Menu. Dialog box display is changed to its previous...
Owners Manual
Page 22
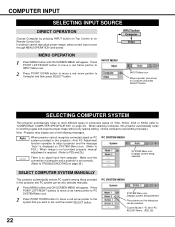
... button. Custom Mode (1~5) set correctly. (Refer to TROUBLESHOOTING on SYSTEM Menu icon. (Refer to P24.) When image is not provided properly, manual adjustment is required. (Refer to "COMPATIBLE COMPUTER SPECIFICATION" on page 23). SELECTING COMPUTER SYSTEM This projector automatically tunes to most different types of computer and a projector is set in this projector, Auto PC Adjustment function operates to adjust projector and the message "Auto" is no signal input from computer. If projector...
... button. Custom Mode (1~5) set correctly. (Refer to TROUBLESHOOTING on SYSTEM Menu icon. (Refer to P24.) When image is not provided properly, manual adjustment is required. (Refer to "COMPATIBLE COMPUTER SPECIFICATION" on page 23). SELECTING COMPUTER SYSTEM This projector automatically tunes to most different types of computer and a projector is set in this projector, Auto PC Adjustment function operates to adjust projector and the message "Auto" is no signal input from computer. If projector...
Owners Manual
Page 29
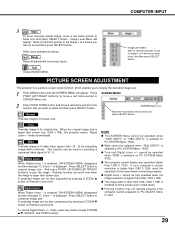
..., reset the resolution to Store icon and press SELECT button. Zoom +" is displayed. Press SELECT button to SCREEN Menu icon. A projected image can be fully operated when the image resolution is modified to display the desirable image size. 1 Press MENU button and ON-SCREEN MENU will appear. NOTE q This SCREEN Menu cannot be selected when "720p (HDTV)" is selected on Remote Control Unit. q This projector cannot display any button except D.ZOOM v/w, SELECT, and POINT buttons. q Digital zoom - Other icons operates as follows. PICTURE SCREEN ADJUSTMENT...
..., reset the resolution to Store icon and press SELECT button. Zoom +" is displayed. Press SELECT button to SCREEN Menu icon. A projected image can be fully operated when the image resolution is modified to display the desirable image size. 1 Press MENU button and ON-SCREEN MENU will appear. NOTE q This SCREEN Menu cannot be selected when "720p (HDTV)" is selected on Remote Control Unit. q This projector cannot display any button except D.ZOOM v/w, SELECT, and POINT buttons. q Digital zoom - Other icons operates as follows. PICTURE SCREEN ADJUSTMENT...
Owners Manual
Page 36
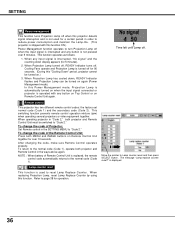
...) when operating several projectors or video equipment together. Set Remote control in "Code 2," both projector and Remote Control Unit must be switched to "Code 2." After changing the code, make sure Remote Control operates properly. Refer to Lamp counter reset and then press SELECT button. When any input signal is interrupted, "No signal" and the counting down , READY Indicator flashes and Projection Lamp can be turned on Remote Control Unit again. In this Power Management mode, Projection Lamp is automatically turned on when the input signal connected or projector is operated with...
...) when operating several projectors or video equipment together. Set Remote control in "Code 2," both projector and Remote Control Unit must be switched to "Code 2." After changing the code, make sure Remote Control operates properly. Refer to Lamp counter reset and then press SELECT button. When any input signal is interrupted, "No signal" and the counting down , READY Indicator flashes and Projection Lamp can be turned on Remote Control Unit again. In this Power Management mode, Projection Lamp is automatically turned on when the input signal connected or projector is operated with...
Owners Manual
Page 37
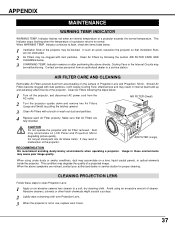
... WARNING TEMP. Clean Air Filters following the section AIR FILTER CARE AND CLEANING below . 1 Ventilation Slots of a projector exceeds the normal temperature. Dust may accumulate on LCD Panel and Projection Mirror degrading picture quality. Make sure that Ventilation Slots are noticed, contact your authorized dealer or service station for proper cleaning. Do not put small parts into Air Intake Vents. Indicator flashes red when an internal temperature of the projector may result in use, replace Lens Cover...
... WARNING TEMP. Clean Air Filters following the section AIR FILTER CARE AND CLEANING below . 1 Ventilation Slots of a projector exceeds the normal temperature. Dust may accumulate on LCD Panel and Projection Mirror degrading picture quality. Make sure that Ventilation Slots are noticed, contact your authorized dealer or service station for proper cleaning. Do not put small parts into Air Intake Vents. Indicator flashes red when an internal temperature of the projector may result in use, replace Lens Cover...
Owners Manual
Page 38
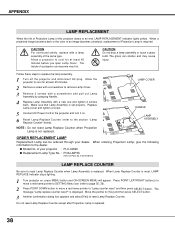
... indicator lights yellow. LAMP COVER HANDLE LAMP ASSEMBLY ORDER REPLACEMENT LAMP Replacement Lamp can be ordered through your projector : PLC-XW20 q Replacement Lamp Type No. : POA-LMP36 (Service Parts No. 610 293 8210) LAMP REPLACE COUNTER Be sure to cool for at least 45 minutes before you open Lamp Cover. Do not reset Lamp Replace Counter except after Projection Lamp is replaced. 38 APPENDIX LAMP REPLACEMENT When the life of Projection Lamp of this projector draws to reset Lamp Replace Counter. CAUTION For continued safety, replace with a new one and tighten 2 screws...
... indicator lights yellow. LAMP COVER HANDLE LAMP ASSEMBLY ORDER REPLACEMENT LAMP Replacement Lamp can be ordered through your projector : PLC-XW20 q Replacement Lamp Type No. : POA-LMP36 (Service Parts No. 610 293 8210) LAMP REPLACE COUNTER Be sure to cool for at least 45 minutes before you open Lamp Cover. Do not reset Lamp Replace Counter except after Projection Lamp is replaced. 38 APPENDIX LAMP REPLACEMENT When the life of Projection Lamp of this projector draws to reset Lamp Replace Counter. CAUTION For continued safety, replace with a new one and tighten 2 screws...
Owners Manual
Page 39
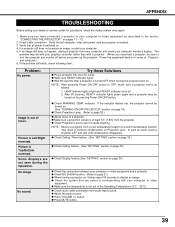
... or video equipment and a projector. LAMP indicator lights bright and READY indicator turns off before you have connected a projector to your computer or video equipment as follows: 1. q Make sure a projection screen is not out of focus. No sound. q Check audio cable connection from a cool temperature location to OFF, make sure a projector works as described in moisture condensation on , it takes about 30 seconds to see if it needs cleaning. Problem: No power. q Check Projection Lens to display an image. q Check NO...
... or video equipment and a projector. LAMP indicator lights bright and READY indicator turns off before you have connected a projector to your computer or video equipment as follows: 1. q Make sure a projection screen is not out of focus. No sound. q Check audio cable connection from a cool temperature location to OFF, make sure a projector works as described in moisture condensation on , it takes about 30 seconds to see if it needs cleaning. Problem: No power. q Check Projection Lens to display an image. q Check NO...
Owners Manual
Page 41
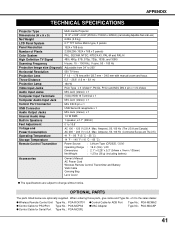
... q Control Cable for Serial Port Type No.: POA-MCSRL q Control Cable for ADB Port q MAC Adapter Type No.: POA-MCMAC Type No.: POA-MACAP 41 of Pixels Color System High Definition TV Signal Scanning Frequency Projection Image size (Diagonal) Horizontal Resolution Projection Lens Throw Distance Projection Lamp Video Input Jacks Audio Input Jacks Computer Input Terminals Computer Audio Input Jack Control Port Connector USB Connector Audio Output Jacks Internal Audio Amp Built-in Speakers Feet Adjustment Voltage and Power Consumption Operating Temperature Storage Temperature Remote Control...
... q Control Cable for Serial Port Type No.: POA-MCSRL q Control Cable for ADB Port q MAC Adapter Type No.: POA-MCMAC Type No.: POA-MACAP 41 of Pixels Color System High Definition TV Signal Scanning Frequency Projection Image size (Diagonal) Horizontal Resolution Projection Lens Throw Distance Projection Lamp Video Input Jacks Audio Input Jacks Computer Input Terminals Computer Audio Input Jack Control Port Connector USB Connector Audio Output Jacks Internal Audio Amp Built-in Speakers Feet Adjustment Voltage and Power Consumption Operating Temperature Storage Temperature Remote Control...


