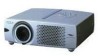
Owners Manual
Page 2
...result in a fire hazard. If the problem still persists, contact the sales dealer where you to operate improperly, read this booklet. q This projector produces intense light from the power outlet. If not, it in better condition for a considerable time. SIDE and TOP 50cm 50cm REAR 50cm ...SHOCK DO NOT OPEN CAUTION : TO REDUCE THE RISK OF ELECTRIC SHOCK, DO NOT REMOVE COVER (OR BACK). NO USERSERVICEABLE PARTS INSIDE EXCEPT LAMP REPLACEMENT. q This projector should be maintained. Be especially careful that children do not stare directly into the lens as possible. This...
...result in a fire hazard. If the problem still persists, contact the sales dealer where you to operate improperly, read this booklet. q This projector produces intense light from the power outlet. If not, it in better condition for a considerable time. SIDE and TOP 50cm 50cm REAR 50cm ...SHOCK DO NOT OPEN CAUTION : TO REDUCE THE RISK OF ELECTRIC SHOCK, DO NOT REMOVE COVER (OR BACK). NO USERSERVICEABLE PARTS INSIDE EXCEPT LAMP REPLACEMENT. q This projector should be maintained. Be especially careful that children do not stare directly into the lens as possible. This...
Owners Manual
Page 3
... outlet and refer servicing to rain or use a mounting kit approved by following conditions: a. The projector may result in the back and bottom of the cabinet are required, be sure the service technician has used replacement parts specified by the manufacturer, or sold with care. Quick stops, excessive force, and uneven surfaces...
... outlet and refer servicing to rain or use a mounting kit approved by following conditions: a. The projector may result in the back and bottom of the cabinet are required, be sure the service technician has used replacement parts specified by the manufacturer, or sold with care. Quick stops, excessive force, and uneven surfaces...
Owners Manual
Page 4
...and certified by turning the equipment off and destroyed. The wire which is no guarantee that visible on a circuit different from the Parts Department indicated in this safety feature. However, there is marked by the letter E or by one or more of the following ... the mains lead of this projector meets the requirement for use the plug with the cover omitted. The Wires in your electrician. WARNING : THIS APPARATUS MUST BE EARTHED. Model Number Trade Name Responsible party Address Telephone No. : PLC-XW20U, PLC-XW20E, PLC-XW20B : Sanyo : SANYO FISHER COMPANY : 21605 Plummer...
...and certified by turning the equipment off and destroyed. The wire which is no guarantee that visible on a circuit different from the Parts Department indicated in this safety feature. However, there is marked by the letter E or by one or more of the following ... the mains lead of this projector meets the requirement for use the plug with the cover omitted. The Wires in your electrician. WARNING : THIS APPARATUS MUST BE EARTHED. Model Number Trade Name Responsible party Address Telephone No. : PLC-XW20U, PLC-XW20E, PLC-XW20B : Sanyo : SANYO FISHER COMPANY : 21605 Plummer...
Owners Manual
Page 5
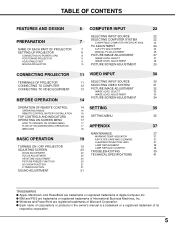
...COMPATIBLE COMPUTER SPECIFICATIONS 22 23 PC ADJUSTMENT 24 NAME OF EACH PART OF PROJECTOR 7 AUTO PC ADJUSTMENT 24 SETTING-UP PROJECTOR 8 MANUAL PC ADJUSTMENT 25 CONNECTING AC POWER CORD 8 PICTURE IMAGE ADJUSTMENT 27 POSITIONING PROJECTOR 9 IMAGE LEVEL SELECT 27 ADJUSTABLE FEET 9 IMAGE LEVEL ...respective corporation. 5 INDICATOR 37 19 AIR FILTER CARE AND CLEANING 37 CLEANING PROJECTION LENS 37 TURNING ON / OFF PROJECTOR 19 LAMP REPLACEMENT LAMP REPLACE COUNTER 38 38 ADJUSTING SCREEN 20 TROUBLESHOOTING 39 ZOOM ADJUSTMENT FOCUS ADJUSTMENT 20 20 TECHNICAL ...
...COMPATIBLE COMPUTER SPECIFICATIONS 22 23 PC ADJUSTMENT 24 NAME OF EACH PART OF PROJECTOR 7 AUTO PC ADJUSTMENT 24 SETTING-UP PROJECTOR 8 MANUAL PC ADJUSTMENT 25 CONNECTING AC POWER CORD 8 PICTURE IMAGE ADJUSTMENT 27 POSITIONING PROJECTOR 9 IMAGE LEVEL SELECT 27 ADJUSTABLE FEET 9 IMAGE LEVEL ...respective corporation. 5 INDICATOR 37 19 AIR FILTER CARE AND CLEANING 37 CLEANING PROJECTION LENS 37 TURNING ON / OFF PROJECTOR 19 LAMP REPLACEMENT LAMP REPLACE COUNTER 38 38 ADJUSTING SCREEN 20 TROUBLESHOOTING 39 ZOOM ADJUSTMENT FOCUS ADJUSTMENT 20 20 TECHNICAL ...

Owners Manual
Page 7
...area will become hot while a projector is equipped with Cooling Fans for protection from overheating. ADJUSTABLE FEET AND FEET LOCK LATCHES 7 q Do not put any object, especially heat-sensitive object. q Do not touch this area, especially screw and metallic part. q Do not cover vent ...slots. Obstructions may block cooling air. PREPARATION NAME OF EACH PART OF PROJECTOR FRONT INFRARED REMOTE RECEIVER PROJECTION LENS FOCUS RING POWER CORD CONNECTOR ZOOM LEVER LENS ...
...area will become hot while a projector is equipped with Cooling Fans for protection from overheating. ADJUSTABLE FEET AND FEET LOCK LATCHES 7 q Do not put any object, especially heat-sensitive object. q Do not touch this area, especially screw and metallic part. q Do not cover vent ...slots. Obstructions may block cooling air. PREPARATION NAME OF EACH PART OF PROJECTOR FRONT INFRARED REMOTE RECEIVER PROJECTION LENS FOCUS RING POWER CORD CONNECTOR ZOOM LEVER LENS ...
Owners Manual
Page 20
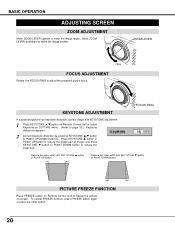
WIDE ZOOM LEVER TELE FOCUS ADJUSTMENT Rotate the FOCUS RING to reduce the lower part. To cancel FREEZE function, press FREEZE button again or press any other button. 20 Reduce the lower width with KEY STONE v button or POINT UP ... box appears. 2 Correct keystone distortion by pressing KEYSTONE v/w button or POINT UP/DOWN button(s). Press KEYSTONE v button or POINT UP button to reduce the upper part of image, and press KEYSTONE w button or POINT DOWN button to adjust the projected picture focus. FOCUS RING KEYSTONE ADJUSTMENT If a projected picture has keystone...
WIDE ZOOM LEVER TELE FOCUS ADJUSTMENT Rotate the FOCUS RING to reduce the lower part. To cancel FREEZE function, press FREEZE button again or press any other button. 20 Reduce the lower width with KEY STONE v button or POINT UP ... box appears. 2 Correct keystone distortion by pressing KEYSTONE v/w button or POINT UP/DOWN button(s). Press KEYSTONE v button or POINT UP button to reduce the upper part of image, and press KEYSTONE w button or POINT DOWN button to adjust the projected picture focus. FOCUS RING KEYSTONE ADJUSTMENT If a projected picture has keystone...
Owners Manual
Page 37
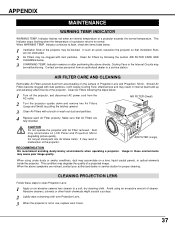
...Dust may be malfunctioning. Do not put small parts into Air Intake Vents. When the above checks, Cooling Fans or the Internal Circuits may accumulate on a lens, liquid crystal panels, or optical elements inside the projector. Avoid using under dusty or smoky conditions, dust... the latches upward. 3 Clean Air Filters with Air Filter removed. This condition may accumulate on LCD Panel and Projection Mirror degrading picture quality. When using an excessive amount of a projector returns to normal. Abrasive cleaners, solvents or other harsh chemicals might scratch a surface. 2 Lightly...
...Dust may be malfunctioning. Do not put small parts into Air Intake Vents. When the above checks, Cooling Fans or the Internal Circuits may accumulate on a lens, liquid crystal panels, or optical elements inside the projector. Avoid using under dusty or smoky conditions, dust... the latches upward. 3 Clean Air Filters with Air Filter removed. This condition may accumulate on LCD Panel and Projection Mirror degrading picture quality. When using an excessive amount of a projector returns to normal. Abrasive cleaners, solvents or other harsh chemicals might scratch a surface. 2 Lightly...
Owners Manual
Page 38
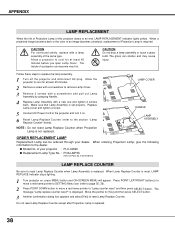
...Lamp is required. CAUTION Do not drop a lamp assembly or touch a glass bulb! The glass can be ordered through your projector : PLC-XW20 q Replacement Lamp Type No. : POA-LMP36 (Service Parts No. 610 293 8210) LAMP REPLACE COUNTER Be sure to cool for at least 45 minutes before you open Lamp Cover. ...Allow the projector to cool for at least 45 minutes. 2 Remove a screw with a screwdriver to the projector and turn it on , press MENU ...
...Lamp is required. CAUTION Do not drop a lamp assembly or touch a glass bulb! The glass can be ordered through your projector : PLC-XW20 q Replacement Lamp Type No. : POA-LMP36 (Service Parts No. 610 293 8210) LAMP REPLACE COUNTER Be sure to cool for at least 45 minutes before you open Lamp Cover. ...Allow the projector to cool for at least 45 minutes. 2 Remove a screw with a screwdriver to the projector and turn it on , press MENU ...
Owners Manual
Page 41
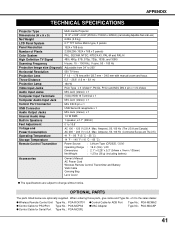
...below are subject to the sales dealer. When ordering those parts, give name and Type No. of Pixels Color System ... Output Jacks Internal Audio Amp Built-in Speakers Feet Adjustment Voltage and Power Consumption Operating Temperature Storage Temperature Remote Control Transmitter Multi-media Projector 10.12" x 2.98" x 9.02" (257mm x 75.8mm x 229mm) (not including Adjustble Feet and Lens) 6.....: POA-MCMAC Type No.: POA-MACAP 41 APPENDIX TECHNICAL SPECIFICATIONS Projector Type Dimensions (W x H x D) Net Weight LCD Panel System Panel Resolution Number of it to change without notice.
...below are subject to the sales dealer. When ordering those parts, give name and Type No. of Pixels Color System ... Output Jacks Internal Audio Amp Built-in Speakers Feet Adjustment Voltage and Power Consumption Operating Temperature Storage Temperature Remote Control Transmitter Multi-media Projector 10.12" x 2.98" x 9.02" (257mm x 75.8mm x 229mm) (not including Adjustble Feet and Lens) 6.....: POA-MCMAC Type No.: POA-MACAP 41 APPENDIX TECHNICAL SPECIFICATIONS Projector Type Dimensions (W x H x D) Net Weight LCD Panel System Panel Resolution Number of it to change without notice.

Owners Manual
Page 44
Printed in Japan Part No. 610 294 2811 (1AA6P1P2903-- MW6A) SANYO Electric Co., Ltd
Printed in Japan Part No. 610 294 2811 (1AA6P1P2903-- MW6A) SANYO Electric Co., Ltd
