User Manual
Page 2
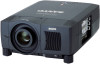
... functions. CAUTION RISK OF ELECTRIC SHOCK DO NOT OPEN CAUTION : TO REDUCE THE RISK OF ELECTRIC SHOCK, DO NOT REMOVE COVER (OR BACK). NO USERSERVICEABLE PARTS INSIDE EXCEPT LAMP REPLACEMENT. READ AND KEEP THIS OWNER'S MANUAL FOR LATER USE. TO THE OWNER Before operating this projector, read this manual again, check...
... functions. CAUTION RISK OF ELECTRIC SHOCK DO NOT OPEN CAUTION : TO REDUCE THE RISK OF ELECTRIC SHOCK, DO NOT REMOVE COVER (OR BACK). NO USERSERVICEABLE PARTS INSIDE EXCEPT LAMP REPLACEMENT. READ AND KEEP THIS OWNER'S MANUAL FOR LATER USE. TO THE OWNER Before operating this projector, read this manual again, check...

User Manual
Page 3
.... Use only with cloth or other hazards. Quick stops, excessive force, and uneven surfaces may touch dangerous voltage points or short out parts that have the same characteristics as this projector yourself as they may expose you are required, be covered with a cart or stand recommended... not place this projector through cabinet slots as opening should use . The openings should never be sure the service technician has used replacement parts specified by placing the projector on an unstable cart, stand, or table. Do not allow anything to rain or water. Refer all ...
.... Use only with cloth or other hazards. Quick stops, excessive force, and uneven surfaces may touch dangerous voltage points or short out parts that have the same characteristics as this projector yourself as they may expose you are required, be covered with a cart or stand recommended... not place this projector through cabinet slots as opening should use . The openings should never be sure the service technician has used replacement parts specified by placing the projector on an unstable cart, stand, or table. Do not allow anything to rain or water. Refer all ...
User Manual
Page 4
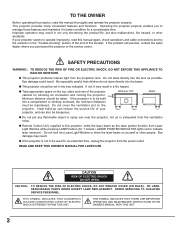
...APPARATUS MUST BE EARTHED. THE SOCKET-OUTLET SHOULD BE INSTALLED NEAR THE EQUIPMENT AND EASILY ACCESSIBLE. 4 These limits are available from the Parts Department indicated in your socket outlet, it is indicated on the pin face of this apparatus may cause harmful interference to insert the ... Communication Commission Notice This equipment has been tested and found to comply with the limits for a Class A digital device, pursuant to Part 15 of the equipment. This equipment can be connected to take adequate countermeasures. The wire which is coloured blue must be connected to...
...APPARATUS MUST BE EARTHED. THE SOCKET-OUTLET SHOULD BE INSTALLED NEAR THE EQUIPMENT AND EASILY ACCESSIBLE. 4 These limits are available from the Parts Department indicated in your socket outlet, it is indicated on the pin face of this apparatus may cause harmful interference to insert the ... Communication Commission Notice This equipment has been tested and found to comply with the limits for a Class A digital device, pursuant to Part 15 of the equipment. This equipment can be connected to take adequate countermeasures. The wire which is coloured blue must be connected to...
User Manual
Page 5
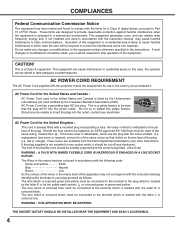
... FEATURES AND DESIGN 6 COMPUTER MODE 25 SELECTING INPUT SOURCE 25 PREPARATION 7 SELECTING COMPUTER SYSTEM COMPATIBLE COMPUTER SPECIFICATIONS 25 27 PC ADJUSTMENT 28 NAME OF EACH PART OF PROJECTOR 7 AUTO PC ADJUSTMENT 28 SETTING-UP PROJECTOR 8 MANUAL PC ADJUSTMENT 29 CONNECTING AC POWER CORD 8 PICTURE IMAGE ADJUSTMENT 31 LENS INSTALLATION 9 IMAGE LEVEL...
... FEATURES AND DESIGN 6 COMPUTER MODE 25 SELECTING INPUT SOURCE 25 PREPARATION 7 SELECTING COMPUTER SYSTEM COMPATIBLE COMPUTER SPECIFICATIONS 25 27 PC ADJUSTMENT 28 NAME OF EACH PART OF PROJECTOR 7 AUTO PC ADJUSTMENT 28 SETTING-UP PROJECTOR 8 MANUAL PC ADJUSTMENT 29 CONNECTING AC POWER CORD 8 PICTURE IMAGE ADJUSTMENT 31 LENS INSTALLATION 9 IMAGE LEVEL...

User Manual
Page 6
... being displayed in Terminal Slots enable you to turn Projection Lamp off when a projector detects signal interruption and any button is no need for optional parts. 6 N Compatibility This projector widely accepts various video and computer input signals including; G Computers IBM-compatible or Macintosh computer up a projector via the network cable. G Component...
... being displayed in Terminal Slots enable you to turn Projection Lamp off when a projector detects signal interruption and any button is no need for optional parts. 6 N Compatibility This projector widely accepts various video and computer input signals including; G Computers IBM-compatible or Macintosh computer up a projector via the network cable. G Component...

User Manual
Page 7
... using or installing a projector, following to following precautions should be taken. G Do not put a flammable object near this area, especially screws and metallic parts. PREPARATION NAME OF EACH PART OF PROJECTOR FRONT SPEAKERS INFRARED REMOTE RECEIVER PROJECTION LENS LENS COVER CAUTION Do not turn on a projector with cooling fans for protection from...
... using or installing a projector, following to following precautions should be taken. G Do not put a flammable object near this area, especially screws and metallic parts. PREPARATION NAME OF EACH PART OF PROJECTOR FRONT SPEAKERS INFRARED REMOTE RECEIVER PROJECTION LENS LENS COVER CAUTION Do not turn on a projector with cooling fans for protection from...
User Manual
Page 9
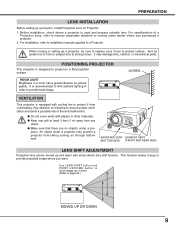
... on picture quality. Pay attention to following to strong forces. G Make sure that there are no objects under a projector may damage lens, cabinet, or mechanical parts. AIR INTAKE VENT EXHAUST VENT (BOTTOM SIDE) (FRONT AND REAR SIDE) LENS SHIFT ADJUSTMENT Projection lens can be careful not to hold or subject lens...
... on picture quality. Pay attention to following to strong forces. G Make sure that there are no objects under a projector may damage lens, cabinet, or mechanical parts. AIR INTAKE VENT EXHAUST VENT (BOTTOM SIDE) (FRONT AND REAR SIDE) LENS SHIFT ADJUSTMENT Projection lens can be careful not to hold or subject lens...
User Manual
Page 11
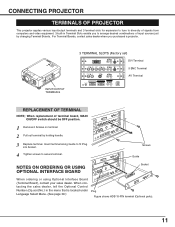
... and video equipment. 3-built-in the menu that is located under Language Select Menu. (See page 39.) Plug Figure shows HDB 15-PIN terminal (Optional parts). 11
... and video equipment. 3-built-in the menu that is located under Language Select Menu. (See page 39.) Plug Figure shows HDB 15-PIN terminal (Optional parts). 11
User Manual
Page 22
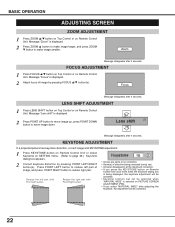
... Unit. Lens shift Message disappears after 4 seconds. Message "Focus" is selected on Remote Control Unit. Press POINT LEFT button to reduce left part with Point Left button. Message "Lens shift" is displayed. 2 Press ZOOM L button to make image larger, and press ZOOM M button to reduce ... OPERATION ADJUSTING SCREEN ZOOM ADJUSTMENT 1 Press ZOOM L/M button on Top Control or on Remote Control Unit. Reduce the left part of image by pressing POINT LEFT/RIGHT button(s). Focus Message disappears after adjusting the keystone, the adjustment will be canceled. • ...
... Unit. Lens shift Message disappears after 4 seconds. Message "Focus" is selected on Remote Control Unit. Press POINT LEFT button to reduce left part with Point Left button. Message "Lens shift" is displayed. 2 Press ZOOM L button to make image larger, and press ZOOM M button to reduce ... OPERATION ADJUSTING SCREEN ZOOM ADJUSTMENT 1 Press ZOOM L/M button on Top Control or on Remote Control Unit. Reduce the left part of image by pressing POINT LEFT/RIGHT button(s). Focus Message disappears after adjusting the keystone, the adjustment will be canceled. • ...
User Manual
Page 32
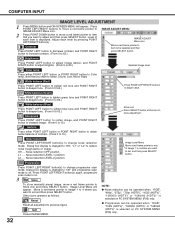
...(s) again, progressive scan mode to on. 3 Store To store manually preset image, move a red frame pointer to item that you want to reduce noise (rough parts) of each level by pressing POINT LEFT/RIGHT button(s). Reset Reset all adjustment to 63.) Selected Image level Color temp. L1 NOTE : G Noise reduction can...
...(s) again, progressive scan mode to on. 3 Store To store manually preset image, move a red frame pointer to item that you want to reduce noise (rough parts) of each level by pressing POINT LEFT/RIGHT button(s). Reset Reset all adjustment to 63.) Selected Image level Color temp. L1 NOTE : G Noise reduction can...

User Manual
Page 37
.... Progressive can not be adjusted when video system is PAL, SECAM, PAL-M or PAL-N. Progressive scan Press POINT LEFT/RIGHT button(s) to reduce noise (rough parts) of image. Dialog box display is selected on . Level of contrast. (From 0 to 15.) Noise reduction Press POINT LEFT/RIGHT button(s) to be operated when...
.... Progressive can not be adjusted when video system is PAL, SECAM, PAL-M or PAL-N. Progressive scan Press POINT LEFT/RIGHT button(s) to reduce noise (rough parts) of image. Dialog box display is selected on . Level of contrast. (From 0 to 15.) Noise reduction Press POINT LEFT/RIGHT button(s) to be operated when...
User Manual
Page 44
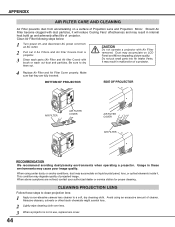
Should Air Filter become clogged with dust particles, it . Be sure to a soft, dry cleaning cloth. Do not put small parts into Air Intake Vents. When above symptoms are fully inserted. CLEANING PROJECTION LENS Follow these environments may result in malfunction of a projector.... projector. When using an excessive amount of projector. APPENDIX AIR FILTER CARE AND CLEANING Air Filter prevents dust from a projector. 3 Clean each parts (Air Filter and Air filter Cover) with Air Filter removed. This condition may result in internal heat build up and adversely affect life of ...
Should Air Filter become clogged with dust particles, it . Be sure to a soft, dry cleaning cloth. Do not put small parts into Air Intake Vents. When above symptoms are fully inserted. CLEANING PROJECTION LENS Follow these environments may result in malfunction of a projector.... projector. When using an excessive amount of projector. APPENDIX AIR FILTER CARE AND CLEANING Air Filter prevents dust from a projector. 3 Clean each parts (Air Filter and Air filter Cover) with Air Filter removed. This condition may result in internal heat build up and adversely affect life of ...
User Manual
Page 47
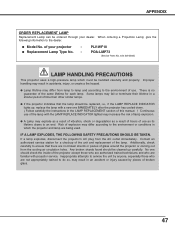
... the lamp. of lamp explosion. Additionally, check carefully to ensure that the lamp should be ordered through your projector : G Replacement Lamp Type No. : PLV-WF10 POA-LMP73 (Service Parts No. 610 309 3802) LAMP HANDLING PRECAUTIONS This projector uses a high-pressure lamp which the projector and lamp are not appropriately trained to service...
... the lamp. of lamp explosion. Additionally, check carefully to ensure that the lamp should be ordered through your projector : G Replacement Lamp Type No. : PLV-WF10 POA-LMP73 (Service Parts No. 610 309 3802) LAMP HANDLING PRECAUTIONS This projector uses a high-pressure lamp which the projector and lamp are not appropriately trained to service...
